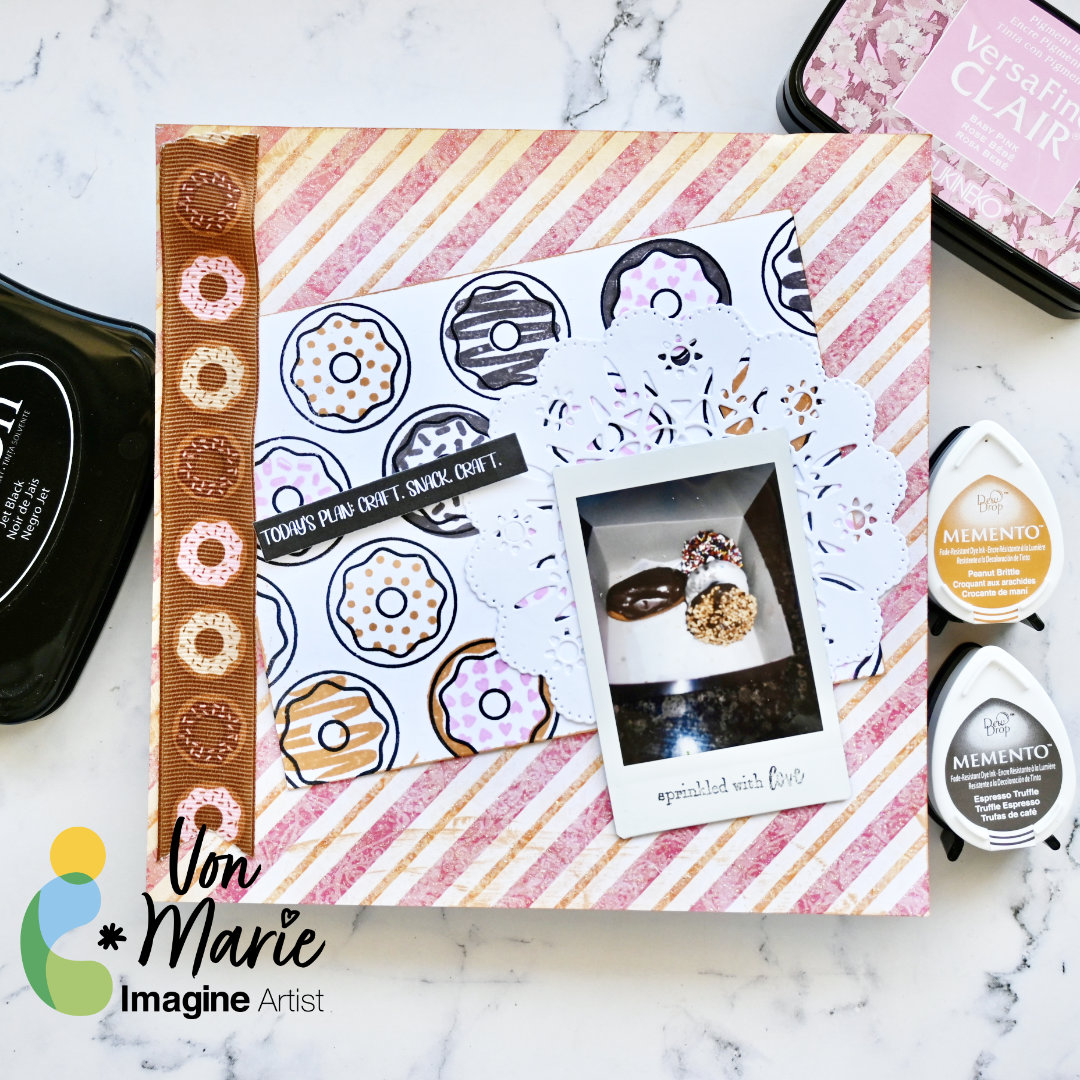
Hello everyone. Von Marie here and I have my newest video sharing an easy and fun Donuts Mini Layout Page perfect for hanging in your craft room. I love donuts and this page is so much fun to create using Memento inks. You can make any kind of page perfect to hang in your craft room. The video will have more details.
Skill: Beginner Beginner Time: 30 Minutes
Craft Supplies
• 100lb white Hammermill Paper • A2 Card Base Glue • Photo • Pattern Paper • Ribbon • Clips • Doily Die-cut • Stamping Block
• Taylored Expressions Donut Days Cling & Clear Combo • Stamps Of Life Doily 1 Die Set • LV Handcrafted Gnome Love Sentiment Printable • Donut Ribbon from my stash • Instax Mini SE
ALTERNATIVE PRODUCTS THAT CAN BE USED TO RECREATE SOMETHING SIMILAR Any stamps, inks, and or pattern paper
You can watch how to create this Donuts Mini Layout Click Here
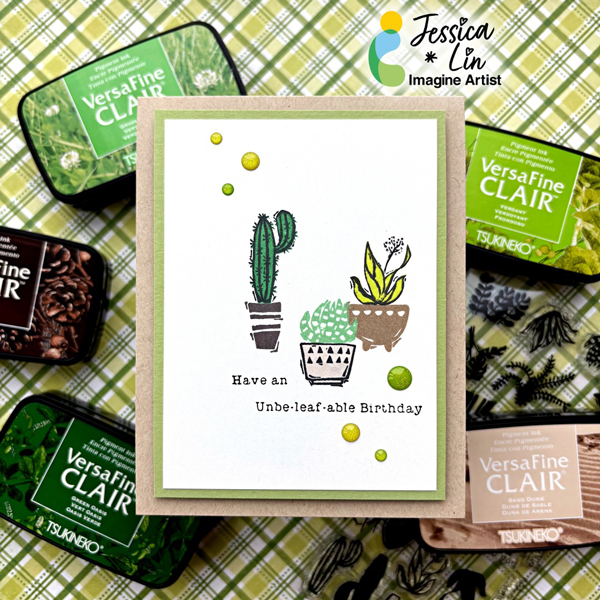
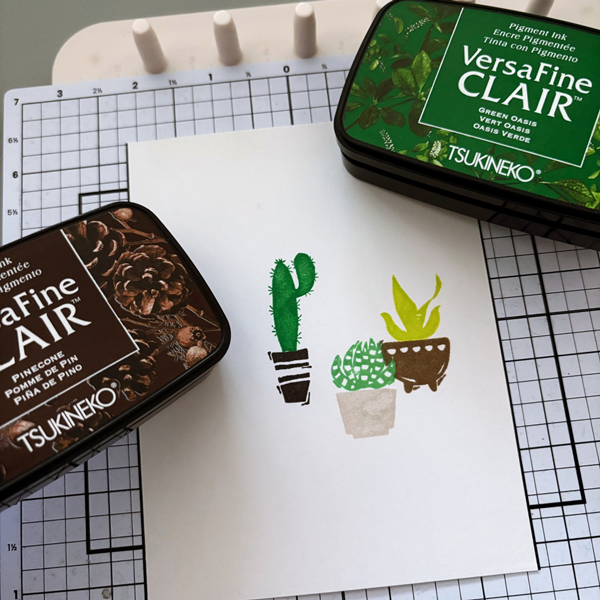
Hi everyone! It’s Jessica here. I am always looking for ways to create gender-neutral birthday cards, and I am so excited to share a beginner-friendly version today. This plant stamp set has some punny sentiments for Valentine’s Day, too. Some of the phrases are perfect for all-occasions, which makes this set so versatile to pair up with the potted plants images.
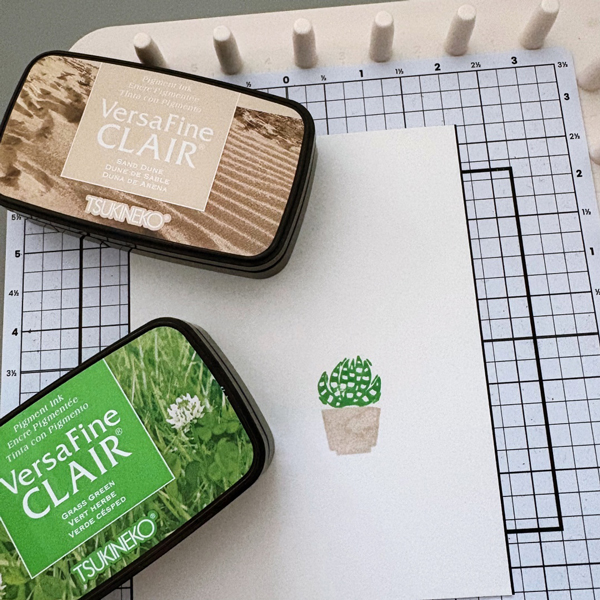
Step 1: Stamp the succulent plant with VersaFine Clair Grass Green ink pad. For the pot, use VersaFine Clair Sand Dune. Stamp another succulent image on a post-it note and fussy cut the image for masking in step 2. Tip: Stamp on the sticky edge of the post-it note so that the fussy cut image will turn into a temporary sticker
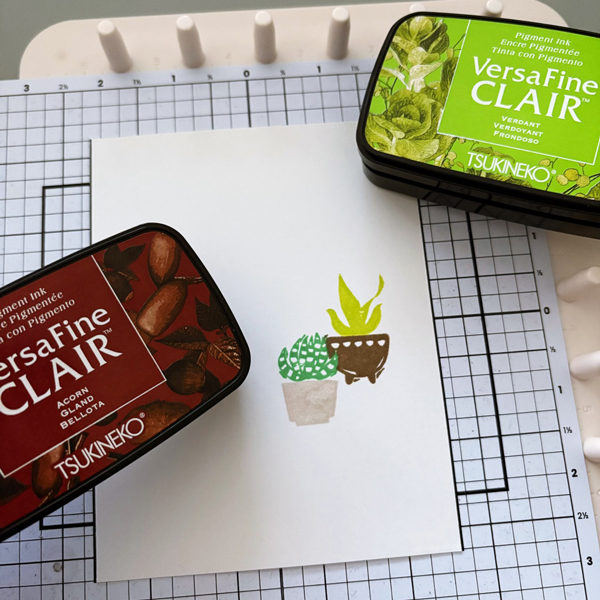
Step 2: Mask the stamped succulent image with the fussy cut sticky note. Then stamp the second plant pot with VersaFine Clair Verdant and Acorn. Masking the succulent plant creates the illusion that it sits in front of the second plant pot. I did not overlap the two plants very much, but you could stamp the two closer together to emphasize the spatial arrangement.
Step 3: For the third cactus plant, stamp with VersaFine Clair Green Oasis and Pinecone. I love the different shades of greens and browns in the VersaFine Clair line; they complement each other so well.
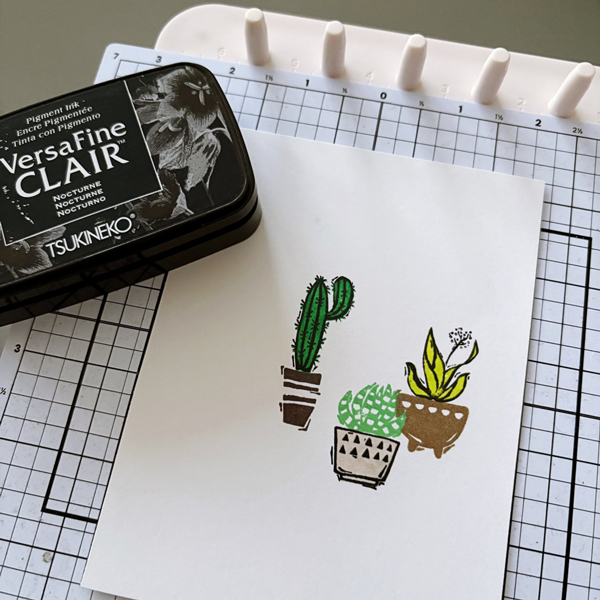
Step 4: Lastly, stamp the outline images with VersaFine Clair Nocturne ink pad. The super cute pun sentiment was also stamped with the same ink.
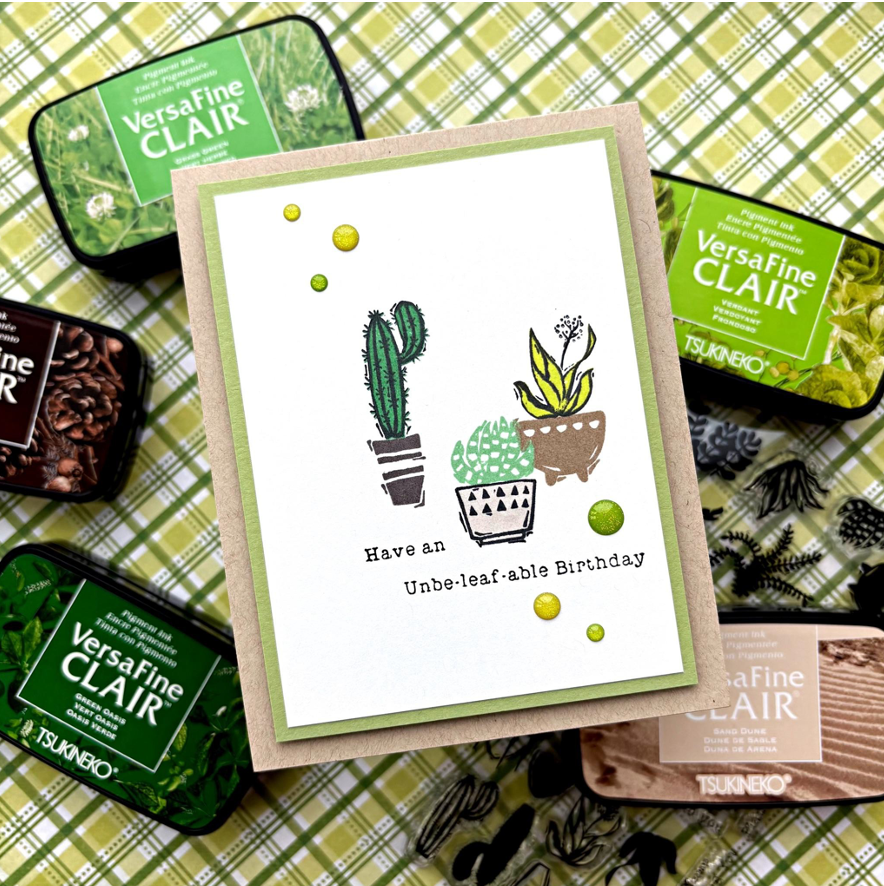
Step 5: Trim the stamped card panel to 3 ½’’ x 4 ¾’’. Adhere it to a 3 ¾’’ x 5’’ piece of green cardstock, then adhere both layers to a cardbase with foam tape.
Step 6: For the final finishing touch, add a few enamel drops from Doodlebug Sprinkles Limeade.
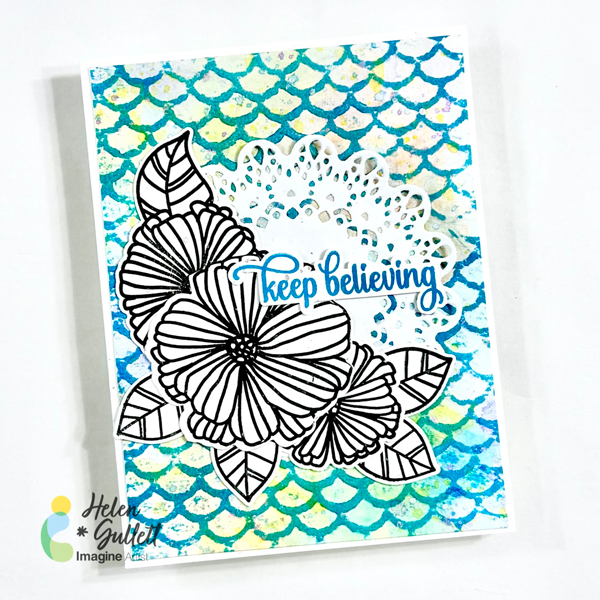
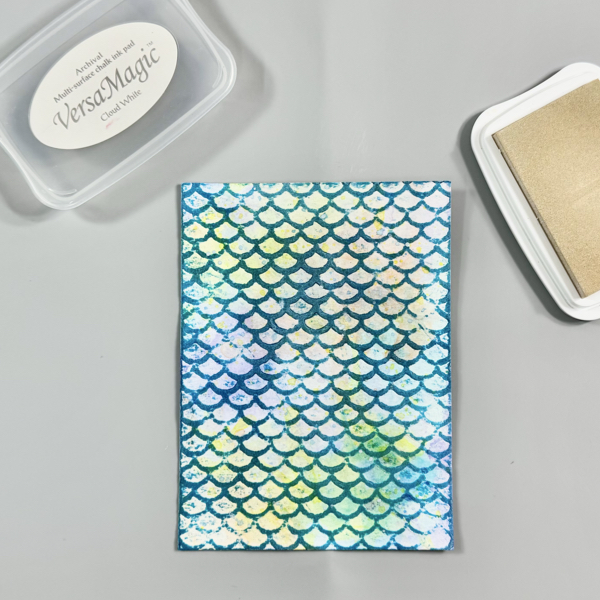
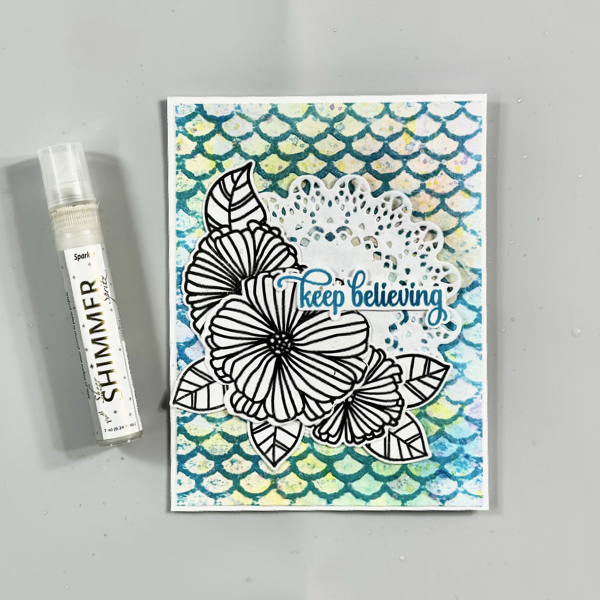
Hello crafty friends! Today we are going to make this floral mixed media card with some ink-smooshing, ink-swiping, ink-splattering, and embossing techniques.
Let’s get crafting!
Skill: Intermediate Time: 15-30 minutes
Direction:
Step 1
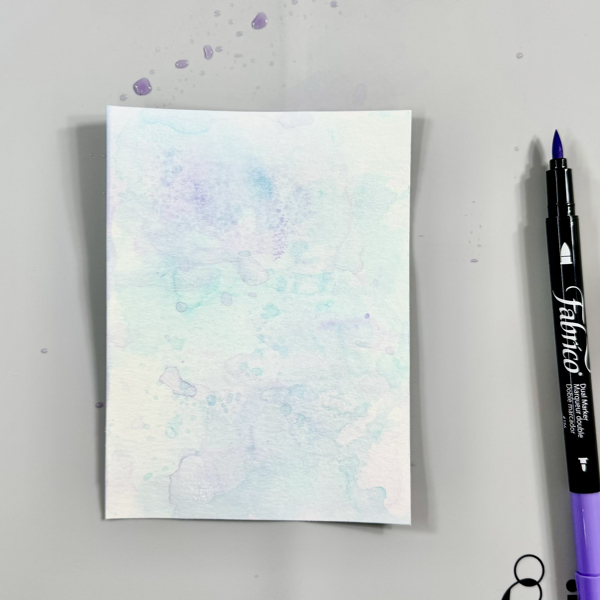
Starting with creating the watercolored background panel by cutting a piece of 140 lb watercolor cardstock into 4 ¼ inch x 5 ½ inch. To pick out the color combo, make sure you pick the colors that won’t turn into a muddy color when they are mixed together.
Scribble some of the Tropical Lagoon Fabrico Marker on the craft mat and then spray it lightly with some water. Then, smoosh the watercolor cardstock to the watercolor ink on the mat. Pick it up and dry the watercolor ink on the panel with a craft heat gun. Repeat it until you like the result.
Clean the craft mat with the Staz-On All Purpose Stamp Cleaner and paper towel.
Step 2
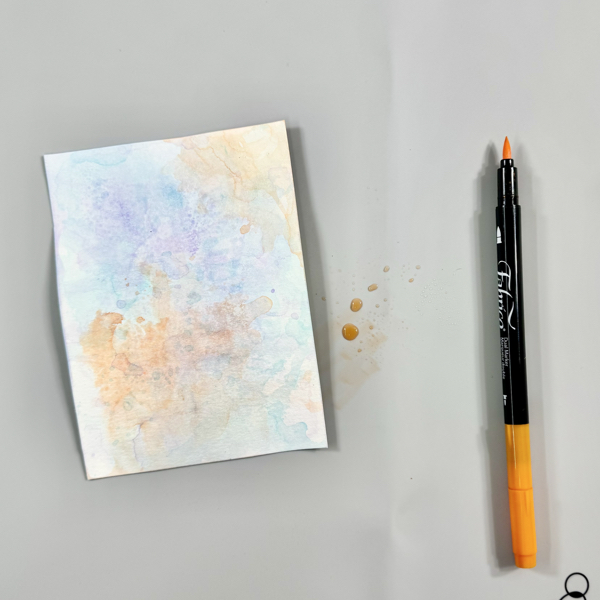
Scribble some of the Peony Purple Fabrico Marker on the craft mat and then spray it lightly with some water.
Then, smoosh the watercolor cardstock to the watercolor ink on the mat. Pick it up and dry the watercolor ink on the panel with a craft heat gun. Repeat it until you like the result.
Clean the craft mat with the Staz-On All Purpose Stamp Cleaner and paper towel.
Step 3
Scribble some of the Tangerine Fabrico Marker on the craft mat and then spray it lightly with some water.
Then, smoosh the watercolor cardstock to the watercolor ink on the mat. Pick it up and dry the watercolor ink on the panel with a craft heat gun. Repeat it until you like the result.
Clean the craft mat with the Staz-On All Purpose Stamp Cleaner and paper towel.
Step 4
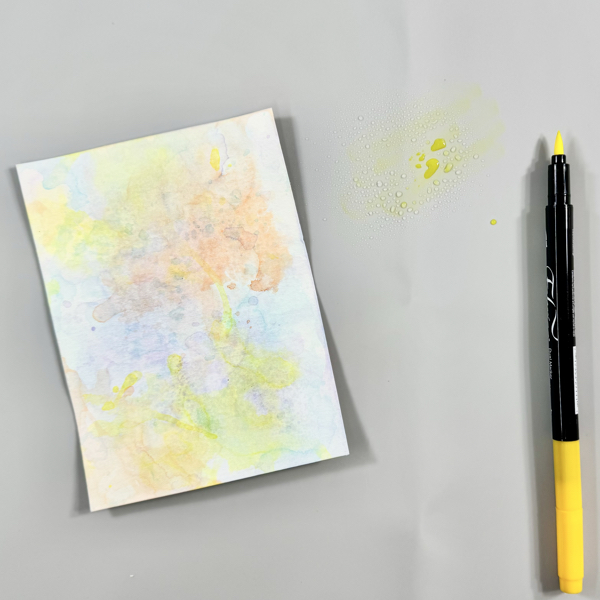
Scribble some of the Lemon Yellow Fabrico Marker on the craft mat and then spray it lightly with some water.
Then, smoosh the watercolor cardstock to the watercolor ink on the mat. Pick it up and dry the watercolor ink on the panel with a craft heat gun. Repeat it until you like the result.
Clean the craft mat with the Staz-On All Purpose Stamp Cleaner and paper towel.
Step 5
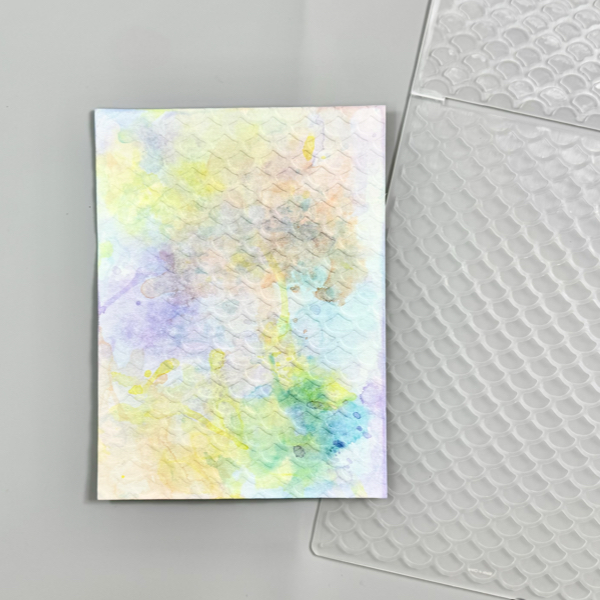
Once the watercolored panel dried well, put it inside the embossing folder, and then run it through the machine.
Step 6
Swipe the VersaFine Clair Warm Breeze ink directly on the embossed part of the panel.
Make sure you swipe the ink lightly and smoothly, do not press down the ink pad to the paper. The juicer (good amount of ink) ink pad, the better.
Dry the ink on the panel with a craft heat gun.
Step 7
To tone down the bright color, swipe some of the VersMagic Cloud White ink on the panel.
This is an optional step, if you prefer a more subtle color background instead of bright color.
Dry the ink on the panel with a craft heat gun.
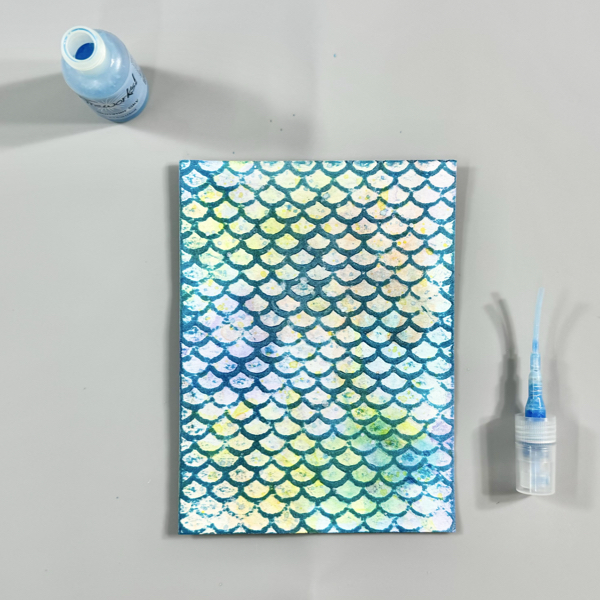
Step 8
Shake the Fireworks! Shimmery Craft Sprays bottles before you use it to make sure the ink inside mixes well.
Open the top of the spray and use it (or small round brush) to add some splatters of the Summer Sky Fireworks! Shimmery Craft Spray on the panel.
Dry the splatters of ink on the panel with a craft heat gun.
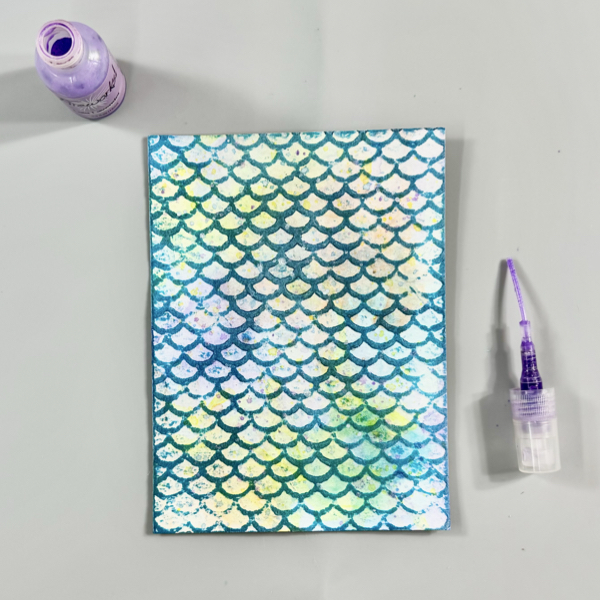
Step 9
Next, open the top of the spray and use it (or small round brush) to add some splatters of the Lulu Lavender Fireworks! Shimmery Craft Spray on the panel.
Dry the splatters of ink on the panel with a craft heat gun.
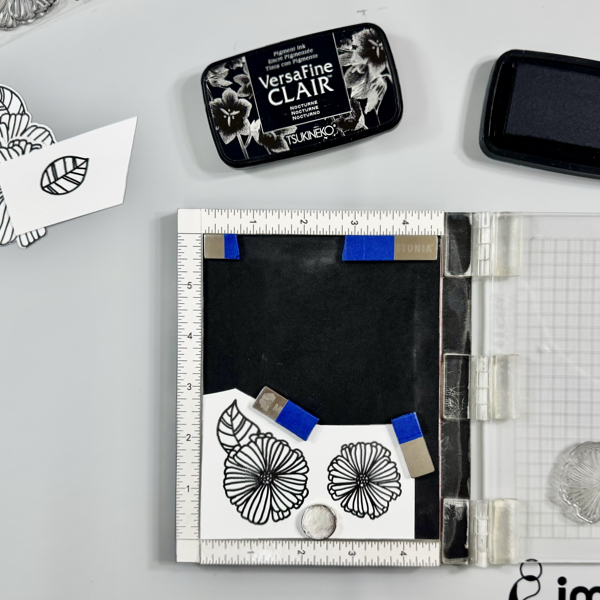
Step 10
Stamp the flower and leaf images on a white cardstock using the VersaFine Clair Nocturne ink pad with a stamping tool (or acrylic stamping blocks).
Dry the stamped images with a craft heat gun.
Step 11
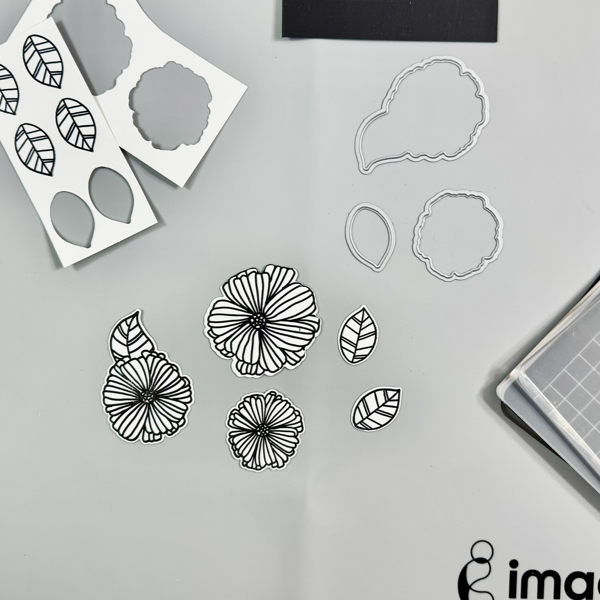
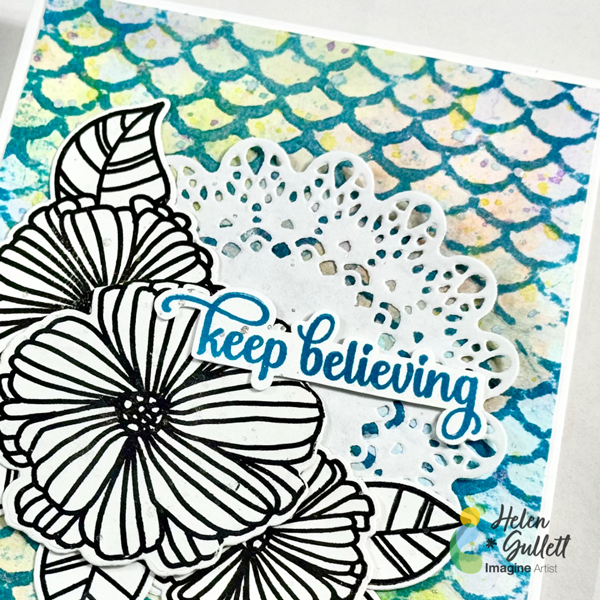
Cut all the stamped flowers and leaves with their matching die set, or you can fussy cut them using micro-tip scissors.
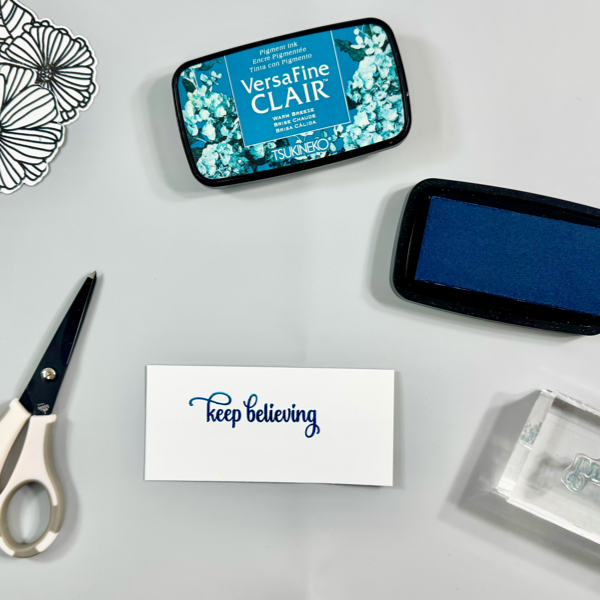
Step 12
Stamp the sentiment on a white card stock using the VersaFine Clair Warm Breeze ink pad with a stamping block.
Dry the stamped sentiment word with a craft heat gun and then fussy cut it with a micro-tip scissors.
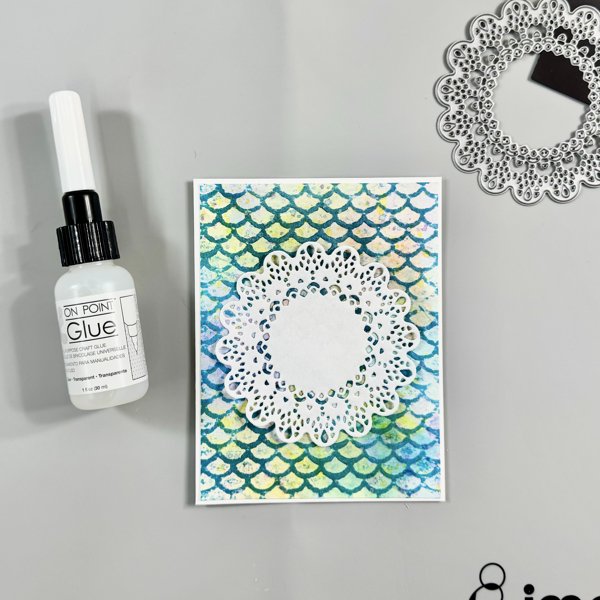
Step 13
Trim the background panel into 4 inch x 5 ¼ inch using a paper trimmer.
Add the background panel to an A2 card base with the On Point Glue.
Step 14
Cut a piece of white paper (copy paper works great) with the Delicate Doily die to create your own doily paper mat.
Add the doily paper to the card with the On Point Glue.
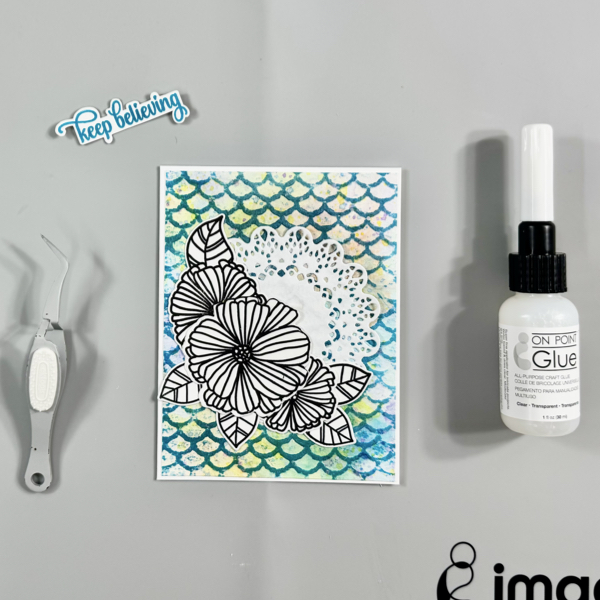
Step 15
Add the flowers and leaves to the card with On Point Glue.
Then, add some of a thin foam to the sentiment with On Point Glue and add it to the card with the same glue.
Step 16
Add more shimmer to the card by spraying and splatting some of the Sheer Shimmer Spark Spray.
The ink-smooshing, embossing, ink-swiping, and ink-splattering techniques give an amazing texture look to the background of this card.
And those layers of doily, flowers, leaves, and sentiment add more dimension to this mixed media card.
I hope you will give this tutorial a try and play around with different colors to see the surprise you will get for your cards. Thanks so much for stopping by our blog today.
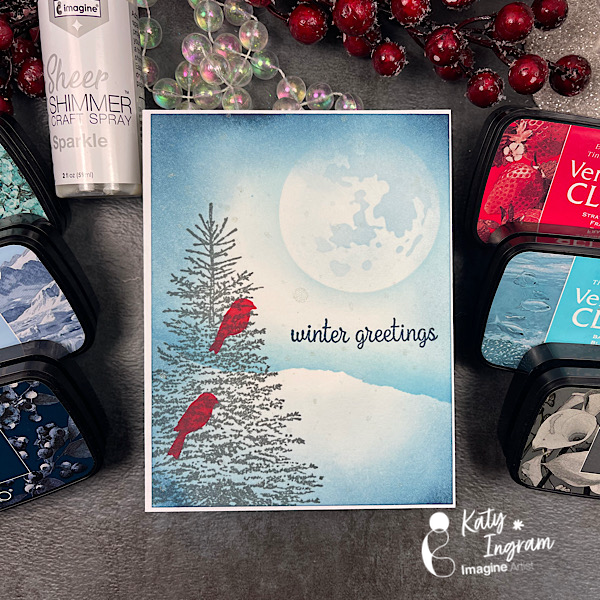
Hello Friends! Katy here with my latest video using a color palette of blue and gray VersaFine Clair inks to create a simple winter scene. This design is great for winter birthday cards or simple greetings. Video has all the details. Thanks for watching.
Strathmore 500 Series Hot Pressed Watercolor Paper 100 lb Cardstock Penny Black Winter Tree Stamp Penny Black Seasons Marvel Stamp Set Hero Arts CM308 Stacking Snowflakes Blending Brushes Tim Holtz Moon Mask
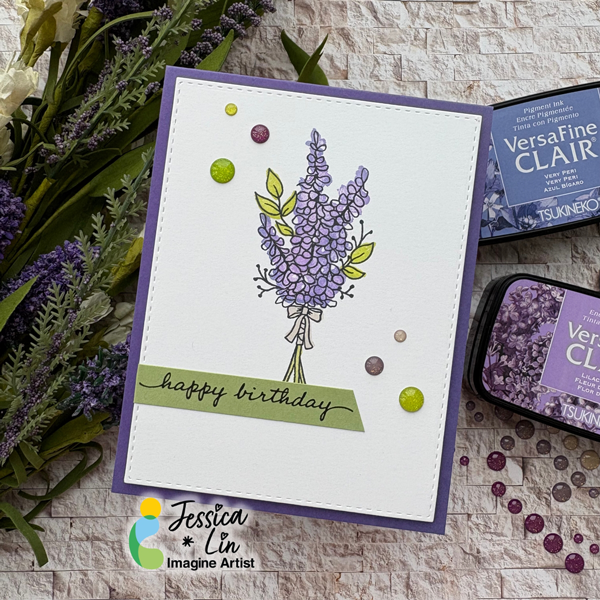
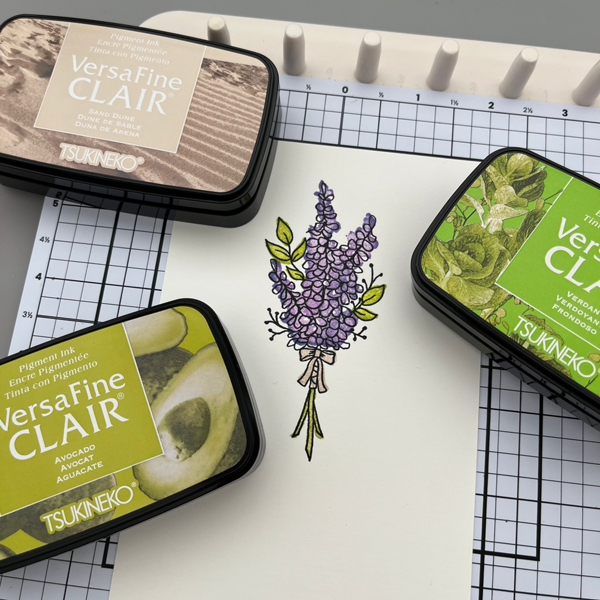
Hi everyone! It’s Jessica here. Today I have a beginner friendly birthday card to share with you. Most of my creations involve die cutting or dry embossing using a die cutting machine. So today, I decided to go back to the basics and create a card that focuses on stamping.
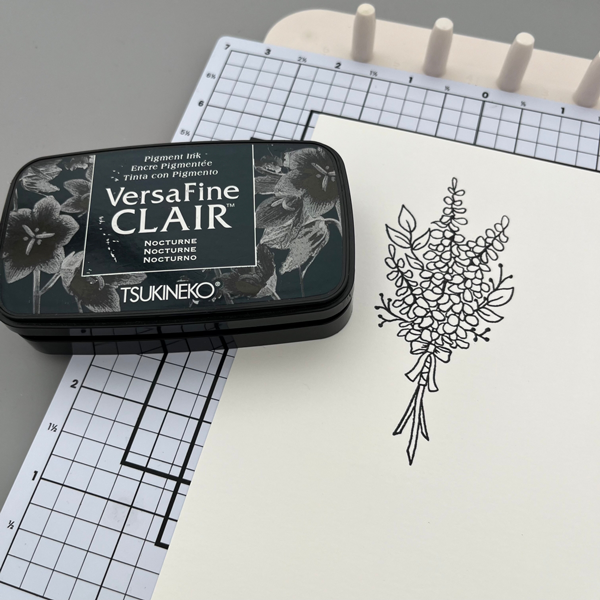
Step 1: I will be using VersaFine Clair ink pads to stamp all of the images today. For the outline, I used Nocturne. This is my favorite black ink pad because the stamped images are always crisp and dark.
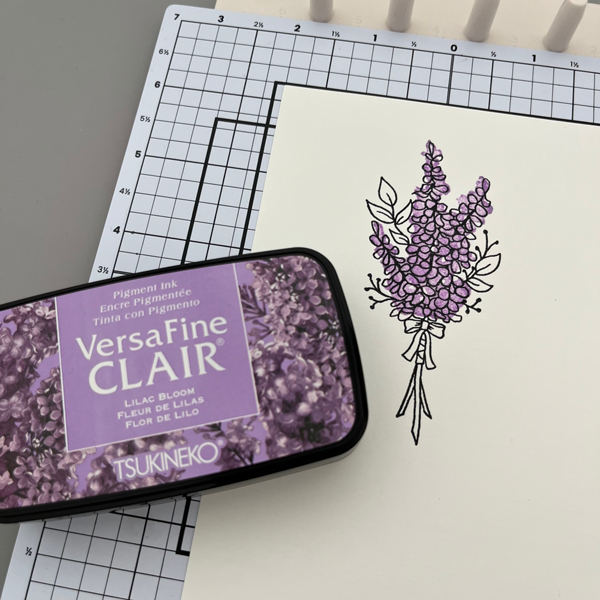
Step 2: Then I stamped the lavender overlay image with VersaFine Clair Lilac Bloom. The stamp set I am using today is called Lots of Lavender from Stampin’ Up. It’s a simple layering stamp set that is very forgiving for beginners; the overlay stamps have loose, watercolor-like shapes so you don’t have to line up to the outline image exactly.
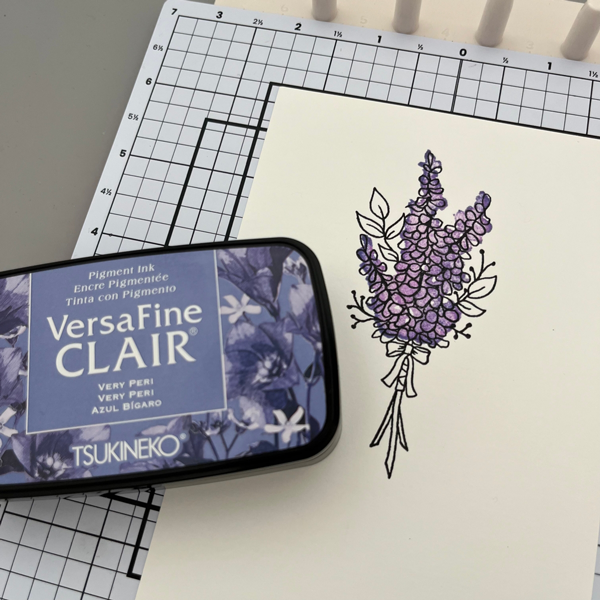
Step 3: I decided to add a different purple tone to the lavender layer. I inked up the same stamp using VersaFine Clair Very Peri, only this time, I inked up only the edges of the stamp. This way, you can create an image that has duo-tone effects. I think these two purple shades complement each other so perfectly.
Step 4: I used the same duo-tone technique and stamped the leaves and stems with VersaFine Clair Verdant first, then with VersaFine Clair Avocado. For the bow, I stamped with VersaFine Clair Sand Dune.
Step 5: Finally, I stamped the “happy birthday” sentiment with VersaFine Clair Nocturne, added a few enamel dots, and the card is complete!