Learn How To Make An Intricate Wedding Congratulations Card

by Arjita Sepaha Singh

Learn How To Make An Intricate Wedding Congratulations Card using Mboss embossing powder and a metal diecut

For today’s card, I used a very intricate die that has a bit of a mandala look and the gorgeous Mboss embossing powder in Sparkle. This “To the Perfect Couple” Wedding card is super simple to create and the sparkle you get is amazing. I stacked 3 die cuts on top of each other to create a chipboard effect and added a red paper to make it look brighter and festive. I finished it with a sentiment. This design is perfect for wedding invites & envelopes.

Skill: Intermediate to Advanced
Time: 45 minutes

Directions

Supplies

Imagine
Other
  • Cardstock – White, Red
  • Heat gun
  • Acrylic block
  • Intricate metal diecut
  • Diecut Machine
  • Sentiment Stamp
  • Paintbrush

DIY Wedding Favor Gift Boxes

by Nadine Carlier

DIY Wedding Favor Gift Boxes with silver embossing

Sometimes you want to leave your guests a little something as a thank you for attending your wedding. These DIY wedding favor gift boxes are super easy to make. They can be made in many different sizes and colors to fit your style and needs. They would also be great for party favors for a baby shower too.
Watch my video below for details on how to make these cute little boxes.

Skill: Intermediate
Time: 10 minutes

Supplies

Imagine
Other

Visit our YouTube Channel for more inspirational videos and subscribe. Make sure to click the bell to get updates when we post new videos.

Learn How to Make a Cute Cat Themed Wedding Book Cover

by Kyriakos Pachadiroglou

Make a book cover that can be used in projects such a wedding wishes book, a handmade photo album cover or any other wedding related project. Add extra sparkle and shine with the Sheer Shimmer on the paper cover and on the flowers that decorate the front.

Skill: Intermediate
Time: 2 hours

Directions


Step 1

Color the wooden shapes with the All-Purpose Ink in White.


Step 2

Use a paintbrush to add tuxedo detail to one of the cats (the groom) with the All-Purpose Ink in Real Black. Use a thin wire to add whiskers.


Step 3

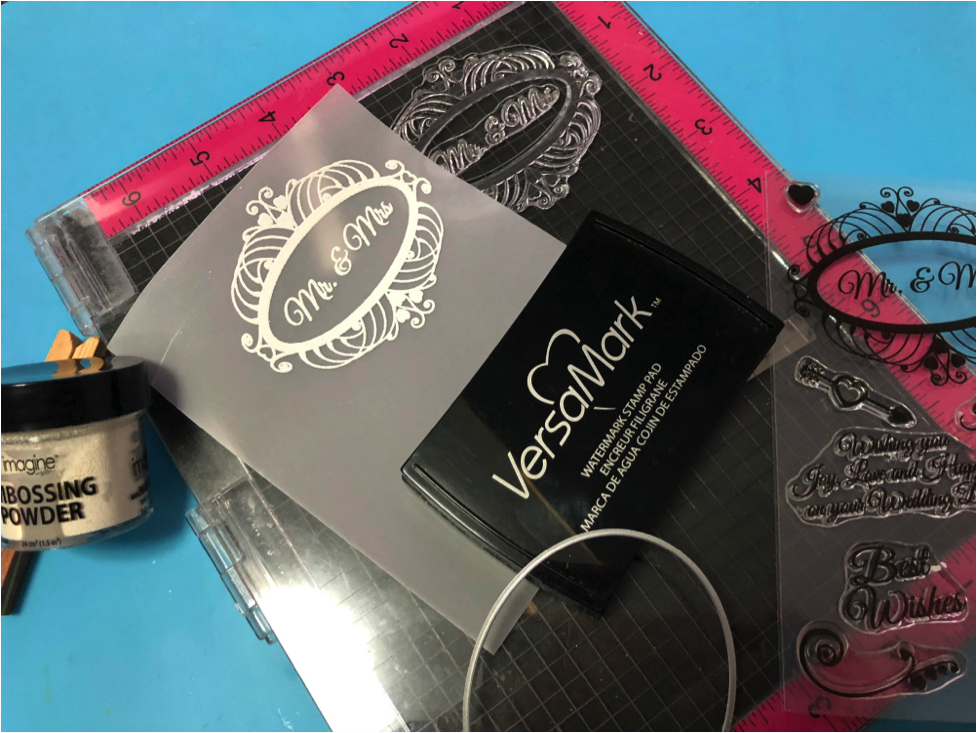
Stamp the background stamp on the other cat body (the bride) with the VersaMark watermark pad, cover with Imagine’s Embossing Powder in Iridescent and heat set.


Step 4

Add details on the faces of the cats using the Memento markers.


Step 5

Cut the hat and bow tie shapes from the Vertigo sheet and color with the StazOn Jet Black.


Step 6

Add drops forming a pearl-like necklace on the bride cat with the irRESISTible Pico Embellisher Wedding dress and adhere the Vertigo shapes with the On Point Glue.


Step 7

Cut two 8 x 10 inches pieces of book board.


Step 8

Cover with the embossed table runner using the Tear It! Tape.


Step 9

Spray with the Sheer Shimmer Spritz in Sparkle.


Step 10

Cover the inside of the book covers with the scrapbooking paper, again using the Tear It! Tape.


Step 11

Embellish the front of the cover with cutting of the lace paper used in the inner sides, and/or real cotton lace.


Step 12

Spray paper flower and leaves with the Sheer Shimmer Spritz in Sparkle.


Step 13

Glue the cats, the flowers and the rest of embellishments on the front.

The covers can be glued to a book cover, or using a hole punch and book rings, you can make one. Meow!

Supplies

Imagine
Other
  • Wooden cat shapes
  • Paper flowers and leaves
  • Rhinestones
  • Cotton lace
  • Embossed table runner
  • Book board
  • 12 x 12 lace scrapbook paper
  • Viva Decor – Peacock feathers stamp
  • Heat tool

Learn How To Create A DIY White Wedding Invitation With Texture

by Martha Lucia Gomez

Hello everyone, today I have a quick and elegant card. This technique would be perfect for a wedding invitation. I create the shimmer and texture using the new Sheer Shimmer Stix in Frost and an embossing folder. The base of my card is Whisper White cardstock and I cut a second layer using the same color of cardstock, but apply the shimmer-texture technique for a very cool tone on tone look.

Skill: Beginner
Time: 30 minutes

Directions


Step 1

Determine the area that you want to paint and add texture. I used post it tape to obtain a straight line.


Step 2

Evenly apply the Sheer Shimmer Frost with the Stix Dauber. Let the paper dry naturally, it takes a few seconds only.


Step 3

Without removing the post it tape, take an embossing folder of your preference and align the borders to only emboss the painted area. Pass the sandwich through your cutting machine.


Step 4

Remove the post it tape and stamp your message on the upper area. I used VersaMark and embossing powder in Gold to stamp my message. It is an image included on the stamp set Happily Ever After from The Rabbit Hole Designs.


Step 5

Resize your layer and paste it directly over the card base. If you want to add more decorations or details you can do it before to paste the decorated layer on to the card base.

Supplies

Imagine
Other
  • Card Stock – Whisper White
  • Embossing Folder
  • Die Cutting Machine
  • Post it Tape
  • The Rabbit Hole Designs – Happily Ever After Stamp Set

Learn How to Make a Clear Wedding Invitation

by Lindsay Adreon

2019_April_LA_ClearInvitation_72PPI

Wedding invitation styles are constantly changing and updating and recently on Pinterest I have seen some beautiful CLEAR invitations using acrylic sheets. I wanted to find a DIY to make clear invitations and still have them be very elegant. I used StazOn Pigment Ink and a Marble stamp layering stamp set to get the look I was going for, and it was easier than I thought to create these see-through translucent invitations!

Skill: Advanced
Time: 15 minutes for each

Directions

Supplies

Imagine
Other

Create a Beautiful “Mr & Mrs” Congratulations Card

by Martha Lucia Gomez

Create a Beautiful "Mr & Mrs" Congratulations Card

Stenciling with color and texture always makes for a stunning project. This concept is perfect for wedding cards as it keeps the look elegant and still unique. Make something special for the happy couple with just one design element and two different products: Memento and Creative Medium. Take a look at how to do it!

Skill: Intermediate
Time: 1 hour + dry time

Directions


Step 1

Secure the stencil over cardstock and using a jumbo dauber apply the Memento ink in circular motions. Try to create an ombre effect or gradient of color. Leave the stencil and paper where it is for step 2.


Step 2

Now apply Creative Medium Clear over the inked area. Not only will it add texture, but you will notice how it will intensify the color when it is dry. When you finish this step, remove the stencil immediately and wash with warm water. Let this dry completely before finalizing the card.


Step 3

On a piece of vellum stamp the wedding sentiment or image using VersaMark and White Embossing Powder. I used two images included in the stamp set Wedding Wishes by Joy Clair. Then I cut the stamped image with one Nesting Oval Infinity Die from Hero Arts and colored some details of it using colored pencils that match the Tangelo Memento ink.


Step 4

To finalize the card, paste the stamped oval using double-sided foam tape. To avoid seeing it through the vellum I put the foam under the embossed area. I also complimented the design with a Congratulations die cut word that I adhered using On Point Glue.

Supplies

Imagine
Other
  • Cardstock
  • Vellum
  • Kite – Moroccan Lattice Stencil
  • My Sweet Petunia – MISTI
  • Heat tool
  • Hero Arts – Nesting Oval Infinity Die
  • Joy Clair – Wedding Wishes Stamp Set
  • Congratulations Die Cut
  • Double sided foam tape or Dimensionals
  • Prismacolor – Colored pencils