Learn How to Make an Embossed Background with Mboss

by Arjita Sepaha Singh

Learn How to Make an Embossed Background with Mboss

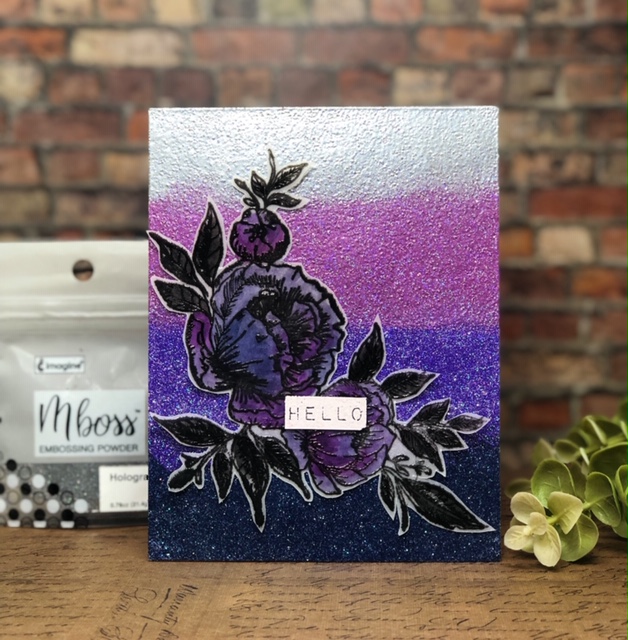
Today’s I used a beautiful Floral stamp set by Waffle Flower and few Mboss Embossing Powders in purple and magenta hues. I stamped the Floral image on a vellum piece with VersaFine black onyx ink and added Clear Mboss Powder. This gives a beautiful glossy effect on the image. For the background, I dabbed the VersaMark pad directly onto the card stock and created an ombre effect with the Mboss Embossing Powders. I repeated this process twice to get a rich shimmery effect. To finish the card I adhered the floral image and a “hello” sentiment.

Skill: Advanced
Time: 30 minutes

Directions

Supplies

Imagine
Other
  • Cardstock – White, Vellum
  • Misti Stamping Tool
  • Heatgun
  • Waffle Flower Stamps
  • Coffee Filters
  • Double-side Tape


See How to Make a Cute Japanese Mountain Scene Greeting Card

by Arjita Sepaha Singh

See How to Make a Cute Japanese Mountain Scene Greeting Card

For today’s card, I used an adorable Konnichiwa Stamp Set by Waffle Flower Stamps and Memento markers to create a mountain scene. I stamped the images on watercolor paper with VersaFine in Onyx Black and then cut out each one individually. VersaFine is a great ink for watercoloring because it does not react with water-based inks. For the sentiment “how are you,” which is in English and Japanese, I used VersaMark ink and white embossing powder. To add some finishing touches, I added Pico Embellisher at few areas which creates a nice dimensional effect. The card is super cute easy to make.

Skill: Intermediate
Time: 45 minutes

Directions

Supplies

Imagine

VersaFine Inkpad – Onyx Black
• Memento Markers – Grape Jelly, Pear Tart, Angel Pink, Rose Bud, Summer Sky, Rich Cocoa, Espresso Truffle, Lady Bug, Desert Sand
• VersaMark Inkpad
• Mboss Embossing Powder – White

Other

• Waffle Flower – Konnichiwa Stamp Set – http://bit.ly/2kakJ8m
• Cardstock – Arches Cold Press, Violet cardstock
• Misti Stamping Tool
• Paint Brush
• Heat Tool
• Paint Brush
• Scissors

Learn How to Stamp Layered Tropical Themes with Memento Ink

by Arjita Sepaha Singh

Learn How to Stamp Layered Tropical Themes with Memento Ink

For today’s card, I used a few Memento Inks to stamp the different shades of foliage and the flamingos from a Hampton Art Tropical stamp set. For the sentiment “With Love, and Prayers”, I used Versafine Clair ink. I took a stamp set which had few layers and created the perfect Tropical theme using first and second generation stamping.

Skill: Intermediate
Time: 30 – 45 minutes

Directions

Supplies

Imagine
Other
  • Cardstock – Neenah Solar white
  • Misti Stamping Tool
  • Paint Brush
  • Scissors
  • Acrylic Block
  • Hampton Art – Tropical (SC0753) Layering Clear Stamps

Learn How to use Creative Medium to make a Mixed Media Tag

by Arjita Sepaha Singh

For today’s mixed media tag, I used Imagine mixed media products. I took the chipboard tag and added Black gesso to get a nice dark base. Then I took a stencil and Creative Medium to add a beautiful flourish. I also added decorative chipboard cutouts, resin pieces (heart with wings) and paper flowers to my layout. Creative medium is a great adhesive for adhering all my unique pieces onto the tag. Once everything was dry, I added the beautiful Fireworks Shimmery Craft Spray and Golden Delicata ink to give this creative gift tag extra sparkle and shine. The shimmer products are especially bright on dark backgrounds and take on a new life!

Skill: Intermediate/Advanced
Time: 30 minutes + dry time

Directions

Supplies

Imagine
Other
  • Chipboard
  • Stencil
  • Chipboard design
  • Resin Pieces
  • Paper Flowers
  • Black gesso
  • Paint Brush

Create a Chic Background Pattern on a Card with GooseBumps

by Arjita Sepaha Singh

Create Chic Background Pattern on a Card with Goosebumps

For today’s card, I used a few VersaMagic DewDrop Inkpads to watercolor and the VersaFine Onyx Black Inkpad for stamping the floral image and sentiment. I created a circle pattern background using GooseBumps and a paintbrush. Once the GooseBumps was dry I added the VersaMagic inks on top and the GooseBumps created a resist. I wiped the excess ink with a dry tissue and the white circles looked even prettier. Then I stamped a flower and leaf using VersaFine Onyx Black and colored them using the same VersaMagic Inks. I dabbed the inkpads on the Imagine Craft Mat and then picked up the pigment with a wet brush to color the images. I finished the card by adding a sentiment.

Skill: Intermediate
Time: 30 minutes

Directions

Supplies

Imagine

• VersaFine Inkpad – Onyx Black
VersaMagic DewDrops – Malted Mauve, Pink Grapefruit, Pixie Dust, Key Lime, Tea Leaves, Spanish Olive
• GooseBumps Texture

Other

• Card Stock – Neenah Solar white
• MISTI Stamping Tool
• Paint Brush
• Floral Stamp set

Learn How to Create a Cute Woodland Creatures Card with Masking and Watercoloring

by Arjita Singh

See how I use a simple masking technique and water coloring to create a cute and simple woodland creatures card. This stamping and coloring tutorial is a perfect activity for a Sunday afternoon of paper crafting and art-making. Enjoy!

Skill: Intermediate/Advanced
Time: 30-45 minutes

Directions

Supplies

Imagine
Other
  • Cardstock – brown
  • Watercolor paper
  • Watercolor brush
  • MISTI Stamping tool (or acrylic block)
  • White Gel Pen
  • Post-It Note
  • Waffle Flower – Be Her Stamp Set