See How To Make 3D Flowers For A Scrapbook Layout

by Elina Stromberg

See How To Make 3d Flowers For A Scrapbook Layout

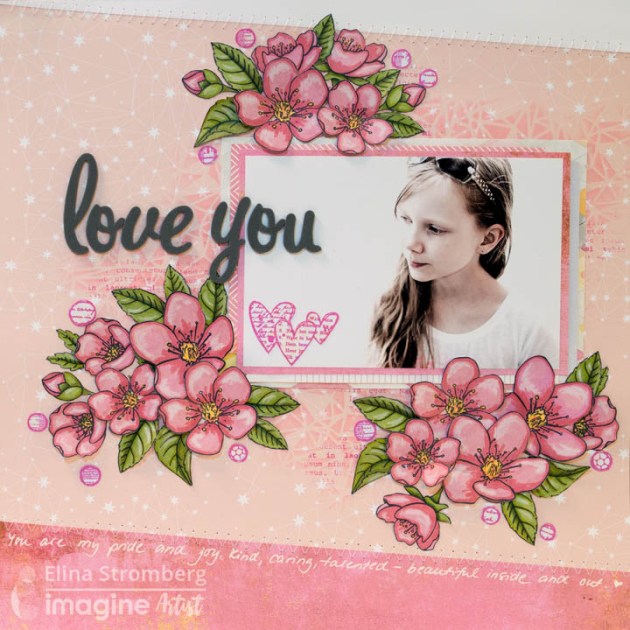
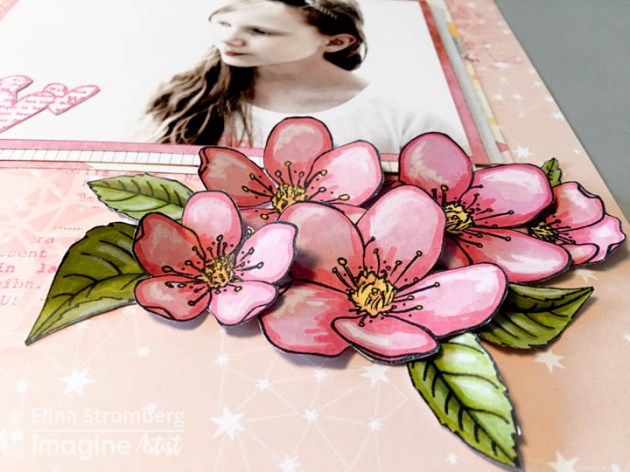
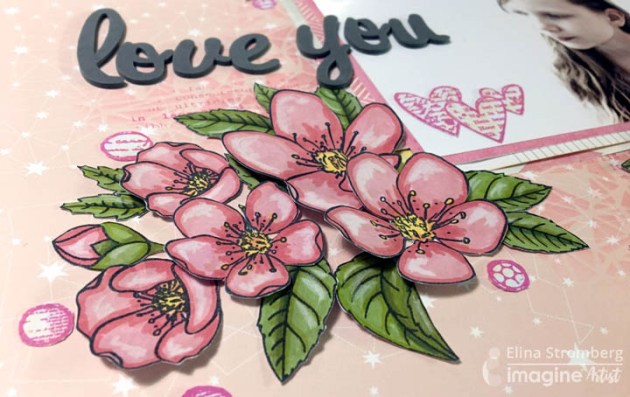
Lots and lots of flowers make a girly scrapbook layout bloom! There are many ready-made flower embellishments in the market, but I prefer making the embellishments myself. That way I can easily make sure that the flowers have just the right shape, size, and color to match my project. In addition to punched and die-cut flowers, I like to use my flower stamps to embellish my card creations and scrapbook pages. Coloring and fuzzy-cutting flowers are pure crafting mindfulness!

Stamped flowers don’t have to be dull flat decorations. Once the flowers are cut out, I press them gently on the palm of my hand. This lifts up the petals, and when glued on is applied only to the center of the flower the finished look is lovely dimensional.

Skill: Advanced
Time: 2 hours

Directions


Step 1

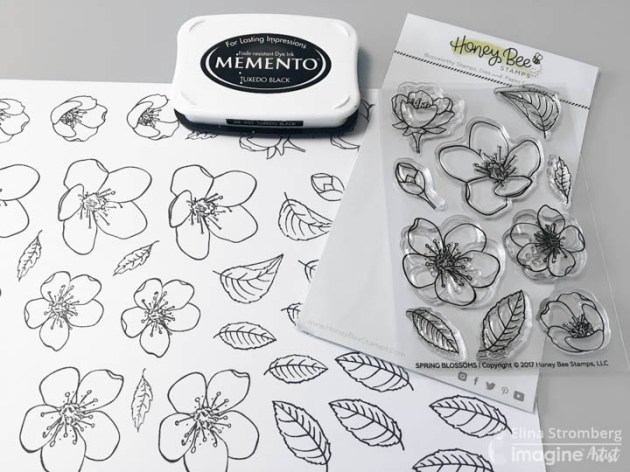
Stamp flowers and leaves on heavy white cardstock. When coloring with alcohol markers, use (black) Memento ink for stamping. When coloring with watercolors or watercolor pencils, use (black) VersaFine Clair or VersaFine ink.


Step 2

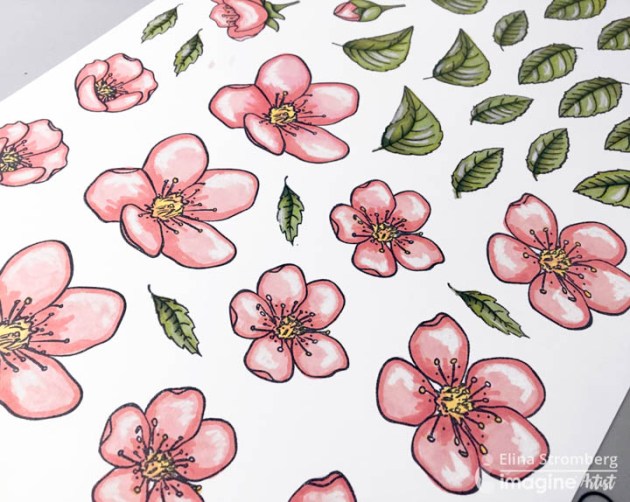
Color the flowers and leaves with alcohol markers, watercolors or color pencils. Use both lighter and darker tones of the colors of your choice. Add white highlights with a white pastel pen/charcoal pencil. Cut out.


Step 3

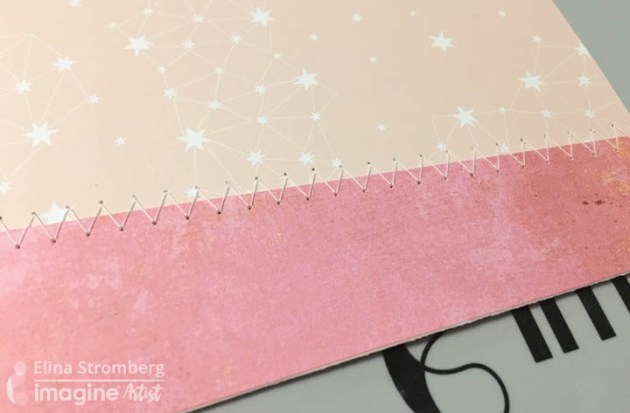
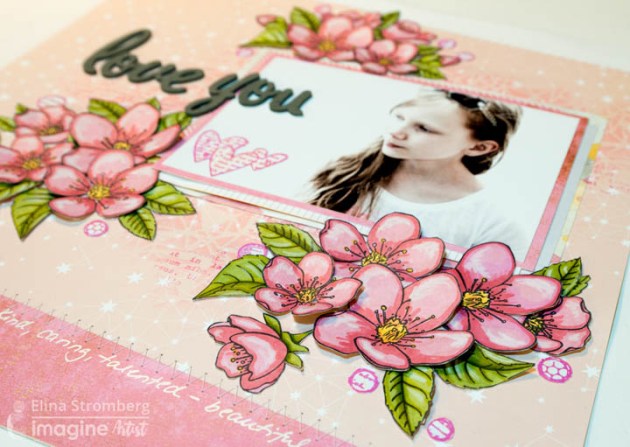
Trim two strips of patterned/colored papers, either horizontal or slightly slanted. Place a narrow strip on top of the page and a bit wider strip on the bottom. Adhere with double-sided tape and secure by sewing a wide zig zag over the edge. Using small pieces of tape fasten off the ends of the sewing yarn on the back of the page.


Step 4

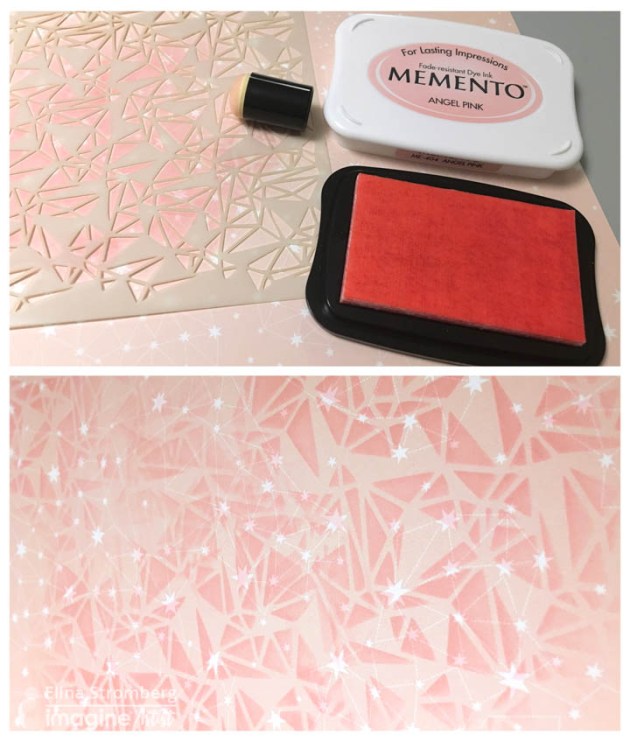
Stencil light pink patterns on the background paper. Dab the ink through the stencil with a sponge dauber. 


Step 5

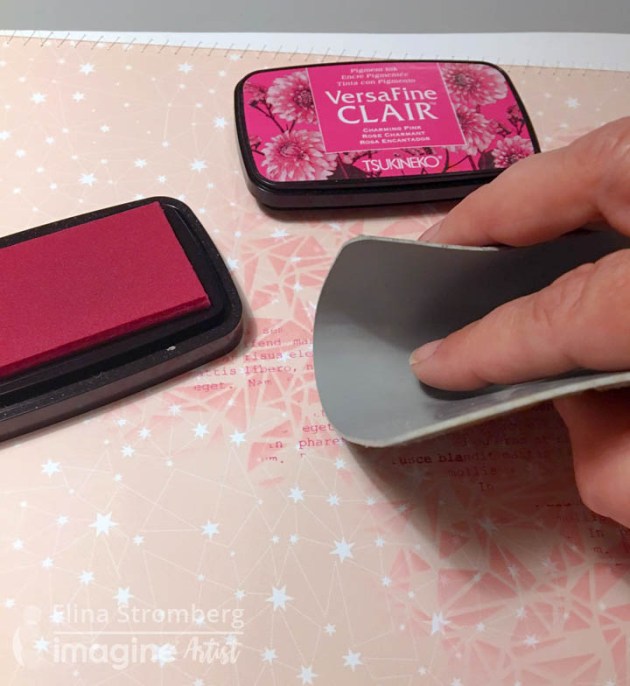
Stamp hints of texture on the stenciled pattern: Keep the stamp in your hand and bend it when inking and stamping. This way you can create small partial stamped patterns on the paper; you don’t want the stamped pattern to stand out too much!


Step 6

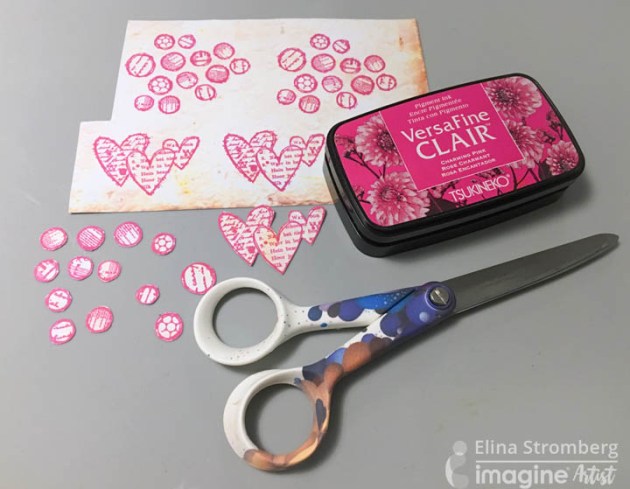
Stamp small embellishments on white or light patterned paper using the same VersaFine Clair color as was used on decorating the background. Cut out.


Step 7

Layer photo on pieces of patterned papers. Decorate photo with stamped and fuzzy cut images.


Step 8

Use a long ruler to align the title text letters. Grid lines of the craft mat will help in aligning. Plan the sticker placement carefully, as you will not be able to reposition them; they stick firmly on the photo! Press flowers on the palm of your hand to gently bend the petals. Glue on the page building clusters of flowers. Fold the leaves in half, put a drop of glue on the back and tuck under the flowers. Add small stamped and fuzzy-cut embellishments around the flowers.


Step 9

Write journaling on the page with a white gel pen.

Supplies

Imagine
Other
  • Patterned paper in size 12” x 12” for layout background (Studio Calico May ’13)
  • Strips of solid color and patterned paper
  • Pieces of patterned papers to mat the photo
  • Stencil – 13 Arts ‘Stained Glass’
  • Stamps – Honey Bee: ‘Spring Blossom,’ Wycinanka: ‘Lorem ipsum,’ Carabelle Studio: ‘Mini Textures’
  • Letter stickers: American Crafts
  • White gel pen
  • Sewing machine
  • White sewing yarn
  • Glue
  • Double-sided tape
  • Scissors

Learn How to Upcycle an Old Jar into a Mystical Fairy Lantern

by Roni Johnson

I don’t know any little girl that didn’t want to be a fairy when they were little…some of us have never forgotten that dream and love fairy’s to this very day. Here’s a way to sprinkle a little fairy dust in your home with this upcycled DIY Fairy Lantern craft!

Skill: Intermediate
Time: 1 Hour

Directions


Step 1

Wash and dry a glass jar that you will use to create the lantern. Cut a fairy silhouette or cut out from black cardstock. Apply a layer of On Point Glue to the paper die-cut. Apply a layer of On Point Glue to the die-cut.


Step 2

Press the fairy to the inside of the jar front. Note: If you have a fairy stamp you can exchange that for the fairy die cut and stamp it on the outside of the jar with StazOn Pigment Ink.


Step 3

Glue a bit of moss to the bottom of the jar so that when the lantern is lit it will look like she is standing in a bit of foliage or plant life.


Step 4

Stamp flowers images on the other 3 sides of the jar using StazOn Pigment Ink. Silhouette flowers work best but use what you have.


Step 5

Sponge Blue Hawaii StazOn Studio Glaze to the corners, top and bottom areas of each side with an Ink Blusher sponge and let dry.


Step 6

Sponge on a coat of Wedding Dress (white – dries frosty) StazOn Studio Glaze over the entire jar and let it dry.


Step 7

Sponge on a second coat of the Wedding Dress Studio Glaze on one side of the jar and immediately sprinkle with Mboss Sparkle embossing powder. Shake off the excess and reserve for the next side.


Step 8

Set the jar on the craft mat and heat the embossing powder to melt. Let it cool! Note: the jar will become very hot during this process. Do not try to pick it up as you will burn your fingers.


Step 9

Repeat steps 9 and 10 on the rest of the jar. When the jar is fully covered it is now time to move on to the lid. Sponge Piano Black StazOn Pigment Ink over the writing on the lid.


Step 10

Add desired embellishments to the lid and top of the jar. Wrap wire around an LED flicker light so you can insert it into the jar with ease.


You now have an amazing little fairy lantern to light your way! Use this tutorial to create decorations for a summer party, birthday or any fun outdoor event!

Supplies

Imagine
Other
  • Mason Jar
  • Posh Paper Supplies – Fairy die cut
  • Hobby Lobby – Pearl Trim, Garland
  • Prima – Flowers
  • Heat Tool
  • Battery Operated Candle

See How to Upcycle a Thrift Store Vase

by Kassy Tousignant

See How to Upcycle a Thrift Store Vase

Here is another upcycled project from me! I really love giving old, tired objects new life. I can always count on my All-Purpose Ink to help freshen things up!

Skill: Advanced
Time: 1 hour + dry time

Directions

Supplies

Imagine

•  On Point Glue
•  All-Purpose Ink – Sky Mist, Blue Bayou, Lemon Yellow
•  Creative Medium – Clear

Other

• Gesso – White
• Glass Vase
• Paintbrush
• Resin flowers
• Prima ephemera
• Paper napkin
• String

Create a Sunflower Mixed Media Art Panel

by Lori Warren

Create a 3D piece of Mixed Media Art with a metal flower and a variety of inks. To add a nice 3D effect to your project, just use metal!  Metal is a great way to add dimension and can even be colored to match with StazOn Pigment ink.  The results can really be spectacular!

Skill: Intermediate
Time: 30 minutes

Directions


Step 1

Add color to a metal flower with StazOn Pigment Inkpad.


Step 2

On an art panel, create a watercolor background with Memento DewDrops.


Step 3

Spray panel with Sheer Shimmer Spray in Sparkle.


Step 4

Stamp script stamp onto the panel with StazOn Pigment.


Step 5

Apply Memento ink in Teal Zeal and Pistachio onto the Craft Mat, add water, then use to stamp dots onto the panel.


Step 6

Stamp stem image with StazOn Pigment in Piano Black.


Step 7

Add water to a smear of Memento Ink in Tuxedo Black and splatter onto the background with a brush.


Step 8

Stamp saying with VersaFine CLAIR in Nocturne.


Step 9

Adhere metal flower onto the panel at top of the stem.


Step 10

Tie ribbon around the bottom portion of the panel.

Supplies

Imagine
Other
  • Art Minds Metal Embellishment
  • Lori’s Cards & Creations Stamps
  • Art Panel
  • Celebrate 360 Sheer Ribbon

Stamping on Acetate with StazOn Pigment to Create Sunshine Stained Glass

by Jessica Lin

Stamping on Acetate with StazOn Pigment to Create Sunshine Stained Glass

Hi everyone! I have a special project to share with you: stained glass piece using acetate and aluminum foil. I’ve been wanting to try this technique and I know that now is the perfect time to do this with the new StazOn Pigment inkpads! Check out how well the StazOn Pigment inks stamp on acetate and paper in this tutorial.

Skill: Advanced
Time: 30 minutes

Directions

Supplies

Imagine
Other
  • STAMPlorations New Beginning
  • Acetate Sheet
  • Aluminum Foil
  • Adhesive Sheet
  • Neenah Black Cardstock
  • Copic Markers

Learn How to Color Metal for a Jewelry Making Project

by Kyriakos Pachadiroglou

Learn How to Color Metal for a Jewelry Making Project

The sun turned into a square! Capture the colors of the sun on faux enamel jewelry piece with a marbled pattern. Decorate the Imagine’s Sheet Metal in the squares shapes with a mix of irRESISTible colors and create a marble design that is covered with clear Mboss embossing powder to protect and give the impression of enamel.

Skill: Beginner
Time: 1 hour

Directions


Step 1

Cover the square Sheet Metal shapes with the irRESISTible in Gold, mixing the gel with a bamboo skewer or toothpick.


Step 2

Add drops of the irRESISTible in Tangelo and mix in circular motions with a bamboo skewer. Let the paint dry well.


Step 3

Press the square shapes on the VersaMark inkpad, cover with Mboss embossing powder and heat set.


Step 4

Turn over to the other side of the Sheet Metal shapes, cover with StazOn Sunflower Yellow.


Step 5

Cover with GlazOn Vintage to secure the color. This is very important to use GlazOn in between uses because StazOn solvent qualities react with other layers of StazOn. In other words, you will erase or lift the color you just laid down.


Step 6

Cut 20-inch long cord pieces, pass it through a jump ring and inside the Sheet Metal shape hole. Add a gold colored bead.


Step 7

Continue with the rest of the pieces and secure all the cords together with a jump ring creating a stop.


Step 8

Cut 20-inch long cord pieces, pass them between the shapes and the previous stop jump ring. Braid the cords and secure all the edges with jewelry caps and clasps.

Supplies

Imagine
Other
  • Bamboo skewers
  • Heat tool
  • Black waxed cord
  • Jewelry clasps, jump rings, lobster locks