Learn How To Make A Gingerbread Theme Gift Tag

by Jowilna Nolte

Learn How To Make A Gingerbread Theme Gift Tag

Make some cute gingerbread theme tags for your gift giving this holiday season. Inspired by the numerous light brown inks and products that fall into this color scheme, I created these holiday tags to inspire you. Enjoy!

Skill: Advanced
Time: 30 minutes per tag

Directions


Step 1

On your Craft Mat mix a small amount of glossy texture paste and Delicata Golden Glitz inker.


Step 2

With a palette knife, apply the colored paste to some white cardstock and leave to dry. A nice thin layer is all you need – add as much texture and dimension as you want.


Step 3

Once the texture paste is dry, use VersaMagic Gingerbread and color the entire piece of cardstock. Blend the ink over the texture paste, then cut a strip about 3cm wide and the length of you tag.


Step 4

Stamps some Christmas baubles (or ornaments) in VersaFine Clair Nocturne.


Step 5

Use a small paintbrush and VersaMagic Gingerbread to add color to your stamped baubles (ornaments). Add ink to your Craft Mat, mist with water and pick up the color to paint your images.


Step 6

Use the direct to paper technique to color half of the length of your manilla tag using the VersaMagic ink pad.


Step 7

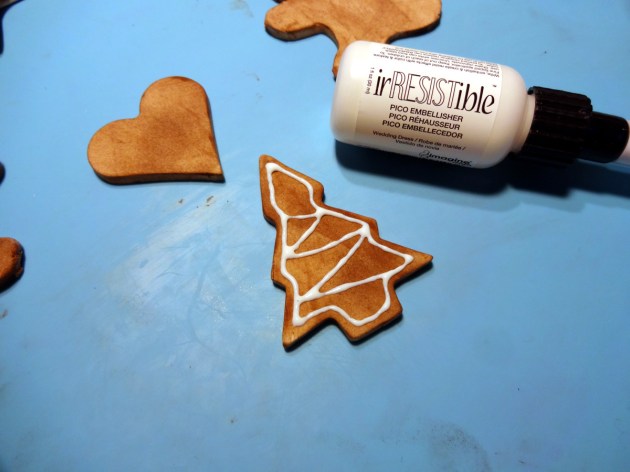
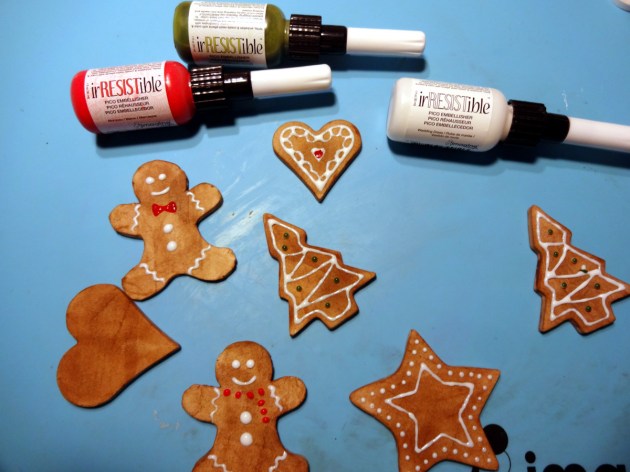
Add irRESISTible Pico embellisher in Shimmer and Desert Sand to your baubles (ornaments) and leave to dry.


Step 8

Use VersaFine Clair and a sentiment stamp, and stamp repeatedly down the colored side of the tag.


Step 9

Adhere the paper strip down the left side of the tag and add decorative sewing. Adhere the colored baubles (ornaments) using foam tape for dimension. Adhere one bauble (ornament) flat and cut off overlapping side. Add diamanté and other flourishes to finish it up.

Supplies

Imagine
Other
  • Tags
  • Cardstock – White
  • Stamps – PSX, Kaisercraft
  • Sewing machine
  • Diamante
  • Celebr8 flowers

See How to Create a Beautiful Autumn Nature ATC Card Set

by Elina Stromberg

See How to Create a Beautiful Autumn Nature ATC Card Set

Artist Trading Cards aka ATC’s are wonderful little pieces of art. Their small 3.5” x 2.5” size doesn’t require too many materials nor too much time. Using just one single sheet of mixed media or watercolor paper you can create a pile of cards on one go. This set of ATC’s was inspired by the beautiful autumn nature. Bright, bold colors, and wilted garden flowers getting ready for winter. Simple but elegant, and so fun to create!

Skill: Beginner
Time: 1 hour

Directions


Step 1

Apply purple, pink, and orange Memento DewDrops on a white mixed media paper with Jumbo Daubers. Sprinkle water on the inked paper, letting the colors to mix. Let dry or dry with a heat gun.


Step 2

Decorate paper by stamping random text patterns on the paper. Use only one pattern stamp, but two ink colors (orange Memento Tangelo and dark purple VersaFine Clair Fantasia). Cut several cards from the inked and stamped sheet. The standard size of ATC is 2.3” x 3.5”. If you want to mat the cards on a solid color cardstock, trim these foreground cards slightly smaller than ATC. Mix white acrylic paint with water, and sprinkle paint drops on the cards. Let dry.


Step 3

Cut ATC backgrounds from dark red cardstock. Attach card fronts on the backgrounds with two-sided tape. Stamp flower shapes on the cards using black VersaFine Clair. Decorate ATC’s with word stickers that express sentiments such as “friends,” “treasure,” and “inspiration.”

Supplies

Imagine
Other
  • White mixed media paper
  • Cardstock – Dark Red
  • Acrylic paint
  • Stamps – Text stamp (‘Tekst’ by Wycinanka); Flower stem stamps (Artemio)
  • Word stickers
  • Double-sided tape

Learn How to Make Shiny 3D flowers using Rinea Foils

by Arjita Sepaha Singh

Learn How to Make Shiny 3D flowers using Rinea Foils

For today’s Wedding Day card, I used the Rinea Foil Papers which can be embossed, die cut and shaped. I used a floral die set to cut the flower petals and with the help of a metal brad fixed them together. Once the flowers were punched, I shaped the flowers and leaves with my hands which was so much fun. I added the 3D elements on a silver Foil paper and finished the card with a sentiment in black. I love the way these gorgeous flowers pop forward and create this beautiful effect.

Skill: Advanced
Time: 30 minutes

Directions

Supplies

Imagine

• StazOn – Jet Black
• Tear It! Tape

Other

• Rinea Foil – Mocha, Blue
• Metal brad
• Flower Die
• Glue Dots
• Acrylic Blocks
• Scoring tool

Make Gingerbread Ornaments with Clay and Memento Ink

by Kyriakos Pachadiroglou

 See How to Make Gingerbread Ornaments with Polymer Clay and Memento Ink

This holiday season, the best recipe for gingerbread cookies can be found right here! It takes only a few ingredients/materials and no baking, with a long-lasting fresh cookie look! The first ingredient is clay! I used an air dry one to avoid any “baking” at all. A nice match of Walnut Ink Crystals with Memento Rich Cocoa ink pad gives a beautiful gingerbread color that will make people think these cookies are baked to perfection. Decorate the cookies with easy glazing and fine detail provided by the thin nozzle of irRESISTible Pico Embellisher colors. See if you can trick someone into tasting them! (Ok, maybe don’t go that far…)

Skill: Beginner
Time: 1 hour + clay drying time

Directions


Step 1

Use the rolling pin to flatten the clay in a thick layer. Cut shapes with the cookie cutters. Lay them on the parchment paper and set aside to dry.


Step 2

Dilute a few Walnut Ink Crystals in water and paint the clay shapes.


Step 3

Use a jumbo sponge dauber to darken and add a bit of texture on the clay shapes with Memento Rich Cocoa ink.


Step 4

Use the irRESISTible Pico Embellisher in Wedding Dress as ‘sugar glaze’ to decorate the clay cookies.


Step 5

Add color and details on the clay cookies with the irRESISTible Pico Embellisher in Morocco and Pear Tart colors.

Supplies

Imagine
Walnut Ink Crystals
Walnut Ink Crystals
Memento Inkpad in Rich Cocoa
Memento Inkpad Rich Cocoa
irRESISTible Pico Embellisher Wedding Dress
irRESISTible Pico Embellisher Pear TartirRESISTible Pico Embellisher Pear Tart irRESISTible Pico Embellisher MoroccoirRESISTible Pico Embellisher Morocco Sponge DauberSponge Dauber
Other
  • Air dry clay
  • Cookie cutters
  • Rolling pin
  • Parchment paper
  • Paintbrush

Making the Most of Your Imagine Sprays and Inks

by Melissa Andrew

Making the Most of Your Imagine Sprays and Inks

Do you feel limited by the sprays and inks you have or want? If you feel like you get one look consistently and want something new with products you know and love, try switching up your paper. In today’s video, I show you how a simple change can make a large difference in the appearance of your creations.

Skill: Advanced
Time: 1 hour

Directions

Supplies

Imagine
Other
  • Whimsy Stamps – Shine Bright Stamp Set, Wavy Edger Die Set
  • Mini-Stencil Set – Tim Holtz set 31
  • Paper – Watercolor, Bristol Smooth, Hammermill
  • Paper Trimmer
  • Water bottle

Create a Grey Plaid Poinsettia Handmade Christmas Card

by Martha Lucia Gomez

In this world, we want to buy everything we like and see, but sometimes experimenting and recreating is part of the fun. Today, I am sharing with you a card that I made using beautiful single pieces that I combined with “necessity” because I don’t have a plaid stamp! I am crazy with the fabulous plaid designer papers that I saw during this season but I decided to create my own pattern just using two colors of VersaFine Clair Ink and without embossing to make it more rustic.

Skill: Advanced
Time: 1 hour

Directions


Step 1

I took a stamp set from Peek-a-Boo Designs that includes a lot of different stripes and selected just two or three to be used on my card. I positioned the stripes in my Stamparatus and stamped stripe by stripe using for the wide strip VersaFine Clair Morning Mist and for the thin VersaFine Clair Nocturne.


Step 2

When I was satisfied with the vertical pattern I decided to add a horizontal different design to make the plaid more interesting. To stamp these lines I only used VersaFine Clair Nocturne. Since the top of the Stamparatus has grids, was very easy to follow the pattern just moving the paper and not the stamps. I left this stamped piece side for a few minutes.


Step 3

In a separate piece of whisper white cardstock, I stamped with VersaMark Ink one festive poinsettia included on the stamp set Poinsettia Tangle from Dare2B Artzy and covered it with Silver Embossing Powder that I melted with the heat tool. I fussy cut poinsettia with my scissors.


Step 4

With the leftover cardstock, I used three colors of Fireworks to create a soft green tone that at the same time show me a little shimmer. I used Fireworks Shimmery Craft Spray in Cottage Ivy, New Sprout, and Bamboo Leaves. After the piece of cardstock was totally dried and cut some leaves using a die cuts from Prima.


Step 5

To finalize my card, I resized the background and arranged all the pieces over Real Red cardstock and as a final touch, I die cut the word believe in Real Red cardstock and black foam. I pasted both die cuts using On Point Glue and sprayed with Sheer Shimmer Frost. With a Memento Marker, I colored the center of the poinsettia. Sometimes, by exploring and practicing, you can discover amazing things that you can do using only your inks and this card is a perfect example.

Supplies

Imagine
Other
  • Cardstock – Whisper White, Real Red
  • Peek a Boo Designs – It’s Plaid Time Stamp set
  • Dare2B Artzy – Poinsettia Tangle
  • Simon Says Stamps – Believe Die Cut
  • Foam Black