Learn How to Create a Layered Valentine’s Card with Cute Frame

by Kassy Tousignant

I just love using Imagine products with different finishes and textures together in a mixed media card.  The background of this Valentine card has shimmer from the Fireworks spray, dimension from the irRESISTible Pico Embellisher, and shine like no other from the Goosebumps spray!  Also, All Purpose Ink is fantastic for use on resin or clay shapes.  You can paint or spray it on for really great coverage.  The sparkle and shine from the embossing powder really makes the paper frame stand out!

Skill: Intermediate

Time: 1 hour

Directions

Supplies

Imagine
Other
  • Gesso
  • Foam tape
  • Heavy body gel
  • Cardstock – kraft, pre-printed sentiments or white
  • Prima Marketing – flowers, paper, embellishments
  • Resin heart shape

See How to Make Layers of Hearts for Valentines

by Kyriakos Pachadiroglou

See How to Make a Layers of Hearts for Valentines

Make a layered dimensional love frame using a 5 x 7 deep picture frame and a bold red colored heart painted with All-Purpose Ink Poppy Red. This project centers around a simple concept—create layers of hearts and floating like sense with a background that allows light to pass through too. The Vertigo sheets create a blur effect without dominating the picture. The bold red heart stands out from all decorations used, enhancing the purpose of the frame.

Skill: Intermediate
Time: 1 hour

Directions


Step 1

Make the hearts with a heart shaped mold and paper clay. After you cast the heart and let dry fully, color with the All-Purpose in Ink Poppy Red color. All-Purpose Ink works beautifully on all types of surfaces such as fabric and wood, so it is a natural fit for the paper clay.


Step 2

Cut a 2 ½ x 7-inch long piece of the white cardstock and fold in a border about ½ inches on the short edges. Adjust the folding to the inner dimension of your frame if different.


Step 3

Stamp the Valentine theme words from the stamp set with the VersaFine Clair Nocturne.


Step 4

Die cut Vertigo sheets in heart shapes (or cut with scissors).


Step 5

Place Tear It! Tape on the folded edges of the cardstock piece at the non-stamped side.


Step 6

Set the cardstock piece in the frame with the Tear It! Tape previously placed on the top and bottom sides of the frame.


Step 7

Glue the red heart in place as shown in the photo above.


Step 8

Twist pieces of wire (as springs) to use holders for the Vertigo hearts.


Step 9

Glue on the side to the inner bottom of the frame and place the Vertigo heart.


Step 10

Stamp the cupid design with the VersaFine Clair Nocturne on a piece of Vertigo sheet and set it on a heart inside the frame.


Supplies

Imagine
Other
  • Lightweight clay
  • Heart shaped mold
  • Heavy white cardstock
  • Penny Black – All about love stamp set
  • 5 x 7 deep white frame
  • Craft wire
  • Hot glue gun
  • Heart shape dies (optional)
  • Die cutting machine (optional)

Create A Snowflake Theme Card To Say Thank You

by Jowilna Nolte

Create A Snowflake Theme Card To Say Thank You

Create a beautifully layered snowflake element for a “So Grateful” greeting card using a variety of Tsukineko products that compliment each other in the Frosted Blue color scheme. This card theme makes a perfect thank you card to send to friends and family for Christmas gift-giving.

Skill: Beginner
Time: 30 minutes

Directions

Stamp a background image onto white cardstock using VersaFine Clair in Paradise
Step 1

Stamp a background image onto white cardstock using VersaFine Clair in Paradise. Sprinkle with clear embossing powder and heat set until fully melted and shiny.

Add a few drops of StazOn Studio Glaze Cloudy Sky onto the embossed background
Step 2

Add a few drops of StazOn Studio Glaze Cloudy Sky onto the embossed background and smooth it out using your finger. The glaze just makes the white not as white and adds a nice finishing touch to it.

Ink the edges of the embossed disk using VersaMagic Night Sky
Step 3

Ink the edges of the embossed disk using VersaMagic Night Sky. Use a finger dauber to blend the edges should you have to. I used the ink pad directly.

Use a small paintbrush and All-Purpose Ink in Sky Mist
Step 4

Adhere the embossed disk onto a folded card. Use a small paintbrush and All-Purpose Ink in Sky Mist to add some splatters to the background.


Step 5

Stamp a large snowflake image onto white cardstock using VersaFine Clair in Twilight. Cut out the snowflake and add a diamanté to the center.


Step 6

Adhere the snowflake to the circle, add stamped sentiment in VersaFine Clair along the outside edge of the circle. Finish off your card with diamanté.

Supplies

Imagine

Other

  • Cardstock
  • Cardbase
  • Patterned paper
  • Heat Gun
  • Stamps – gratitude sentiment (your choice), snowflake image, floral images
  • Paintbrush
  • Diamante

Learn How to Make Wood Slice Holiday Ornaments

by Kyriakos Pachadiroglou

Learn How to Make Wood Slice Holiday Ornaments

Make Christmas tree ornaments using bark slices painted with All-Purpose Ink in White and stamped with Christmas theme stamps. The surface of the wood slices are covered with Creative Medium for an iridescent result and then stamped with Memento Luxe Bahama Blue ink and sealed with clear embossing powder from Imagine. For once more the Radiant Neon Amplify in White makes the perfect snow result and works as a glue medium to add the ice crystals.

Skill: Beginner
Time: 45 minutes

Directions


Step 1

Dilute some All-Purpose Ink with water and paint the wooden slices.


Step 2

When the paint dries use a palette knife to cover with Creative Medium Iridescent Blue.


Step 3

Stamp with Memento Luxe Bahama Blue ink pad.


Step 4

Cover with Imagine’s clear embossing powder and heat set.


Step 5

Add Radiant Neon Amplify! White paint on the top side of the wooden slices.


Step 6

Press the still wet paint in the ice crystals and heat with a heat gun to make the paint puffy.


Step 7

Use the On Point Glue to add rhinestones and tie a bow with the satin ribbon.

Supplies

Imagine
Other
  • Wooden bark slices
  • Crackerbox and Suzy Stamps – Blowing snowflakes tree, Snowflake Trio
  • CraftSmart – Toy soldier stamp
  • Heat tool
  • Viva Decor – Eiskristall
  • Rhinestones
  • Satin ribbon

How to Make a Realistic Snowy Background on a Holiday Card

by Kassy Tousignant 

How to Make a Realistic Snowy Background on a Holiday Card

Doodlestix, embossing powder, and Fireworks spray team up to make the most wonderful wintery background for the cute snowman!  I really love making impressions with stamps in embossing powder. You can get some very exciting and sometimes unexpected results.  The Doodlestix worked perfectly to help create a swirling winter snow scene for this mixed media card.

Skill: Advanced
Time: 45 minutes

Directions

Supplies

Imagine
Other
  • Simon Says Stamp – stencil
  • Unity Stamp Co – Snowman stamp set
  • Elizabeth Craft Designs – crystal clear glitter
  • Cardstock – white, black, silver glitter
  • Vellum
  • Paintbrush
  • Heat gun
  • Foam tape
  • Water bottle
  • Glue Dots

Learn How To Create Cards With Versatile Vellum

by Elina Stromberg

Learn How To Create Cards With Versatile Vellum

As a paper crafter, I’m sure you’ve come across a material called vellum. Hundreds of years ago ‘vellum’ was used to describe a thin, yet durable paper made from calf’s skin, but today this translucent, parchment resembling specialty paper is made from cotton and pulp. Vellum is usually white, but it is available in various other colors, too. Vellum’s unique characteristics have made it a popular material among paper crafters. However, some crafters consider vellum to be a bit tricky material to work with and knowing a few tips and tricks may help in the process. The best way to get familiar with the versatility of vellum is just to start playing and experimenting. Let me share with you a couple of ideas of how I like to use this great material.

Layering vellum on patterned paper

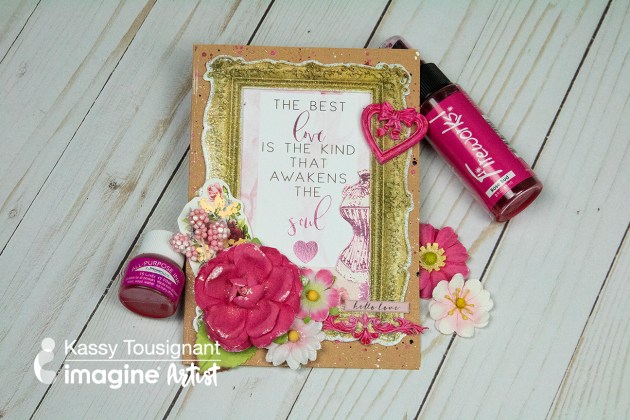
Vellum is translucent so it can be placed over a patterned background without completely hiding the underlying pattern. This characteristic is a great way to calm down a busy background, and if you place other elements on the vellum layer they will not blend into the background pattern.

Layering vellum on patterned paper

Transparency of vellum has its pros and cons. The background pattern will show through, but so will most of the adhesives that you need to use for attaching vellum on the background. However, lightweight vellum does not require too much adhesive to stay in place, and the trick is to use glue only on spots that you can cover later with other elements like frames, cut-out images or sentimetns, flowers, sequins, enamel dots, buttons etc. For some projects, a stapler is a good option for fastening, and on other projects, a metal brad will do the trick.

In my card sample, I die-cut a paper frame that I used for hiding the glue marks.

In my card sample, I die-cut a paper frame that I used not only as a fun layout element, but also for hiding the glue marks where the vellum is attached to the background.


Heat embossing

Vellum is a great material for heat embossing. Same supplies (VersaMark and Embossing Powders) can be used for vellum and for paper, and the melted powder will stick as it does on paper.

Simply heat emboss the text on a piece of vellum and attach the strip on the card.

Translucent vellum takes heat embossing to a new level, providing new possibilities to layer stamped elements. This is especially the case with stamped sentiment texts that in some cases are tricky to position on a card. Simply heat emboss the text on a piece of vellum and attach the strip on the card. While the vellum will highlight the raised text, its translucent background will let the underlying pattern to show through too.

Coloring with inks or watercolors

Vellum can be colored with markers, pencils, paints, inks, and watercolors. Vellum does not absorb wet media too well and a watercolor painted vellum surface may start to curl. However, this vellum characteristics can be utilized for creating beautiful vellum flowers where you can use the curling as an advantage:

I started with stamping and heat embossing simple flower images on a piece of vellum.

I started with stamping and heat embossing simple flower images on a piece of vellum.


I colored the flowers with All-Purpose Ink in Cherry Pink, adding with a water brush quite a rich amount of water on the petals

I colored the flowers with All-Purpose Ink in Cherry Pink, adding with a water brush quite a rich amount of water on the petals. While vellum was still a bit moist, I cut out the flowers and dried the color with a heat gun.

On this card the background is heat-embossed also, using clear embossing powder.

Using the heat gun to dry the wet inks curled up the flower petals, and by layering two stamped flowers I created a beautiful 3-dimensional flower to be used on a card.

If you are not big on heat embossing, Delicata and Brilliance inks will dry on vellum without heat embossing. Remember though that it will take longer to dry on vellum than on standard cardstock.

Dry embossing

Vellum has a smooth finish that can easily be dry-embossed. The result looks amazing, as the embossed lines turn from frosty white to bright white. If you’re using embossing folders and a die-cutting machine, make sure that you’re applying as little pressure as possible on the folder. A detailed image and heavy pressure will easily break the vellum. I prefer using a stylus for dry embossing vellum. In this technique, I place the piece of vellum on a surface that is a bit soft, like the Imagine Craft Mat or a mouse pad, and trace the lines with a stylus. It’s important to apply just enough pressure to change the vellum from translucent to white, as a stylus can also tear or punch the vellum if too much pressure is used.

With a stylus, you can write texts, doodle swirls or draw

With a stylus, you can write texts, doodle swirls or draw. Instead of free-hand drawing, you can also use a stencil as your guidance. Just place a stencil on the vellum and trace the pattern with a stylus:

Instead of free-hand drawing, you can also use a stencil as your guidance.

I attached the vellum panel on the card with a few stitches on each edge as I did not want to frame it for this layout. Instead of hand-stitching, I could have used a sewing machine for attaching; it works just as well!

I used this dry-embossed vellum background for a simple card project. The dry embossed pattern adds a whimsical element that does not compete with the bold sentiment.

Hope these ideas inspire you to use vellum on your craft projects. I’m sure you will love the versatility of it!

Supplies

Imagine
Other
  • American Crafts – Vellum
  • Stamps: Carabelle Studio – ‘Little girl with ball’, Visible Image – ‘Somewhere In Time’, Honey Bee – ‘Congrats’, Stampin’Up! – ‘Diagonal Stripe’, Jasmine Jones+Studio Calico – ‘Happy Birthday’, Altenew – ‘Freeform Greenery’.
  • Other stamps: “Thanks” sentiment, Flowers
  • Sizzix – Nesting dies
  • Fiskars – Stylus
  • Dot stencil
  • Water brush
  • Cardstock
  • Card bases
  • Embroidery yarn & needle