Using Reinkers To Create Easy Colorful Backgrounds On Cards

by Nadine Carlier

Watch my video tutorial below to see how I used Radiant Neon Reinkers to create colorful and easy background on my cards. Enjoy!

Skill: Beginner
Time: 30 minutes

Supplies

Imagine

Radiant Neon Reinker – Electric Pink, Electric Orange, Electric Yellow, Electric Green, Electric Blue, Electric Purple

Other

Poppystamps Dies

Visit our YouTube Channel for more inspirational videos and subscribe. Make sure to click the bell to get updates when we post new videos.

Learn How to Make a Pastel Floral “Hello” Card

By Annie Collins

Hello Crafty Friends – Annie here with a lovely Pastel Spring Floral Card.
Today, I am using Memento Inks to watercolor an embossed image.


Art Supplies

Imagine

• Memento Inks: Lulu Lavender, Lilac Posies, Pear Tart, & New Sprout

• VersaMark Ink

• Irresistible Craft Spray – Gold

• Mboss Embossing Powder: Gold

• Tear It! Tape

• On Point Glue


Other Supplies

• Altenew Stamps: Rosie Posy

• Recollections Brand 110# Cardstock: White

• Recollections Brand 80# Cardstock: Cream, White and Lavender

• EK Success Powder Tool

• Heat Tool

• Watercolor Brush 0

• Water


Create a Beautiful Spring Card Using VersaMagic Ink

By Alison Heikkila

Hello! Today I am sharing how to create a beautiful card with layering stamps and VersaMagic Inks. I love this line of inks because of their soft, chalky finish. They blend beautifully, and the color range is just lovely. My card today uses the Birthday Blooms stamp set from The Greetery, which is a pretty layering stamp set that is easy to work with.

Skill Level: Beginner-Intermediate
Time: 30-45 Minutes

Directions:

Step 1:

On a piece of 4″ x 5 1/4″ white cardstock, begin stamping the D1 and C1 images with Key Lime VersaMagic Ink. Work from one side to the other, or from top to bottom.

Step 2:

As you add foliage, also stamp D2, which is one of the blooms, in Pink Grapefruit VersaMagic ink, so that you ensure room for the blossoms.


Step 3:

Continue working across the entire panel with those three stamps until it is filled.


Step 4:

Apply stamps D4 and C2 to the foliage to create the veins and shadows with Tea Leaves VersaMagic ink.

Step 5:

Apply the D3 stamp to the blooms with Eggplant VersaMagic Ink.


Step 6:

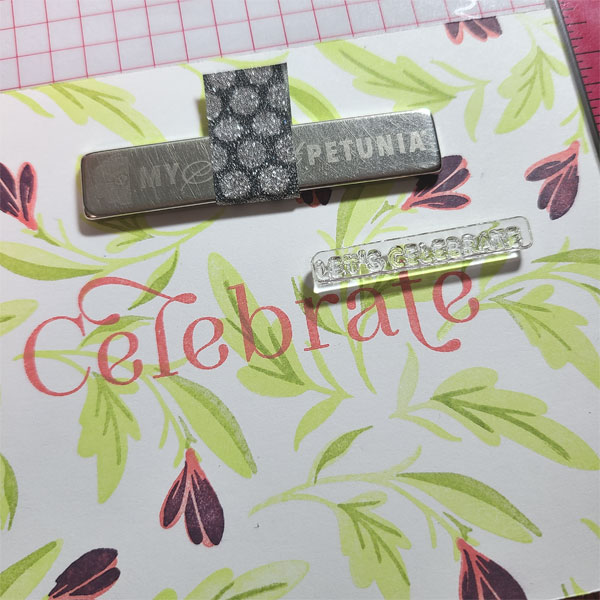
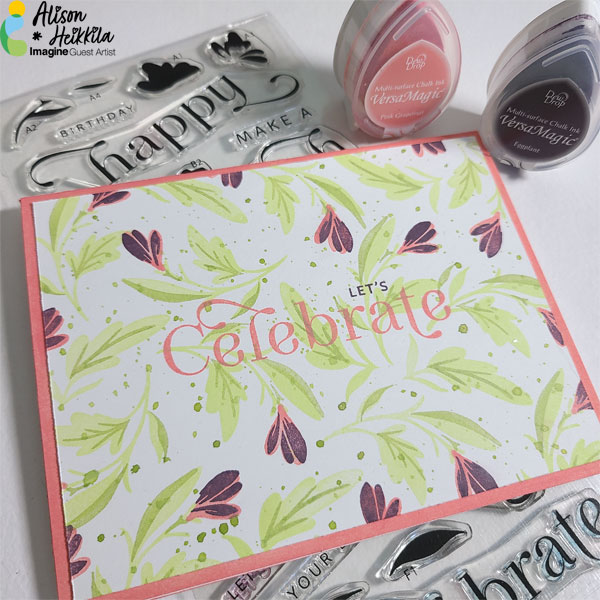
Stamp the Celebrate sentiment in the middle of the panel with Pink Grapefruit VersaMagic Ink.

Step 7:

Place the smaller “Let’s Celebrate” sentiment on top of the larger sentiment. We do not need the small “Celebrate,” so only apply Eggplant VersaMagic ink to the “Let’s.” Stamp the small sentiment on to the panel.


Step 8:

Shake up Bamboo Leaves Fireworks! Spray, and unscrew the sprayer. Tap the straw over the panel to get larger droplets on the card. Let dry.


Step 9:

On your card base, ink the edges with Pink Grapefruit VersaMagic Ink.

Step 10:

Adhere the stamped panel to the card base.


I love the soft tones of the VersaMagic Inks. They look so beautiful when layered on top of each other or blended. I hope you’ll give this technique a try! Thanks for stopping by. Have an inspiring day!


Art Supplies:

Imagine:

Key Lime VersaMagic Ink

Tea Leaves VersaMagic Ink

Pink Grapefruit VersaMagic Ink

Eggplant VersaMagic Ink

Bamboo Leaves Fireworks! Spray

Other:

The Greetery: Birthday Blooms Stamp Set

White Cardstock

Acrylic Blocks

Adhesive

How To Watercolor With VersaColor Ink

by Nadine Carlier

Watch my video tutorial below to see how I used VersaColor to watercolor in the stamped image to create a pretty flower hello card. Enjoy!

Skill: Intermediate
Time: 30 minutes

Supplies

Imagine

Other

Visit our YouTube Channel for more inspirational videos and subscribe. Make sure to click the bell to get updates when we post new videos.

Learn How to Make a Spring “Thinking of You” Card with Ink Blending

By Katy Ingram

Hello my crafty friends! Katy here and in today’s crafting video tutorial, I show you how to make a floral “Thinking of You” card with 3 tips for easy ink blending using our Memento inks. This is a great project for the Spring season and by changing the sentiment this card can suit any spring-time occasion.

Skill: Beginner, Intermediate

Time: 30 minutes


Directions:


Art Supplies:

Imagine

• Memento Ink Pad – Rose Bud

• Memento ink Pad – Lilac Posies

• Memento Ink Pad – Lulu Lavender

• VersaFine Clair Ink Pad – Medieval Blue

Other

• Pinkfresh Studio – Blooming Bouquet Stamp Set

• Pinkfresh Studio – Leafy Branch die

• Simon Says Stamp – Thinking of You die

• Pink & Main – Mini Blending Brushes

• Gina K Designs – In The Navy Card stock

• Neenah – Classic Crest Solar White 110 lb Card stock

• Gmund – 100% Cotton Shiny Cream Card stock

Learn How to Make a Cupid Valentine’s Card with Brilliance Shimmery Inks

By Jessica Lin

Hi everyone, it’s Jessica here. Did you know that you could watercolor with your shimmery ink pads? I tried watercolor with some Brilliance Dew Drop ink pads today and I was so amazed at the result! The shimmer and sparkle definitely add that extra detail to a simple card. Let me know if you have tried this before!

Skill Level: Intermediate

Time: 35 Minutes


Art Supplies

Imagine

VersaMagic Ink Pad- Thatched Straw, Wheat

• Brilliance Ink Pad –  Rocket Red, Rocket Red Gold, Pearlescent Chocolate, Galaxy Gold, Moonlight White

VersaFine Clair – Nocturne


Other Products

• Water brush

• Tim Holtz Watercolor Cardstock

• Stampin’ Up Flight of Fancy stamp set

• Stampin’ Up Well Said bundle

• Spellbinders Die Set – Shoot

• Red cardstock