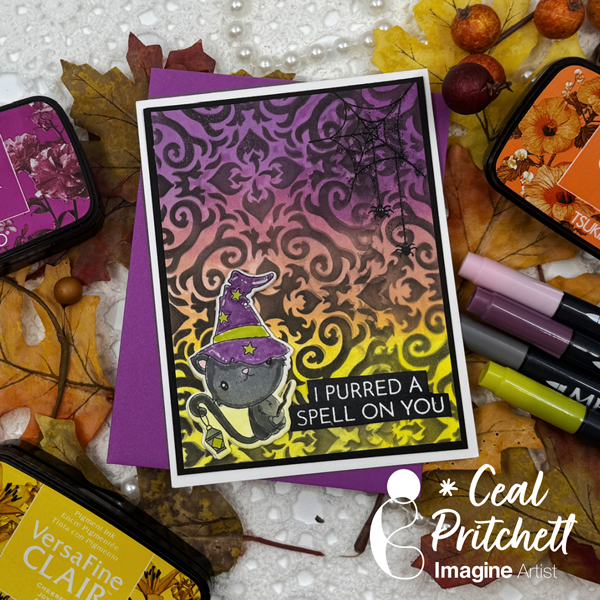
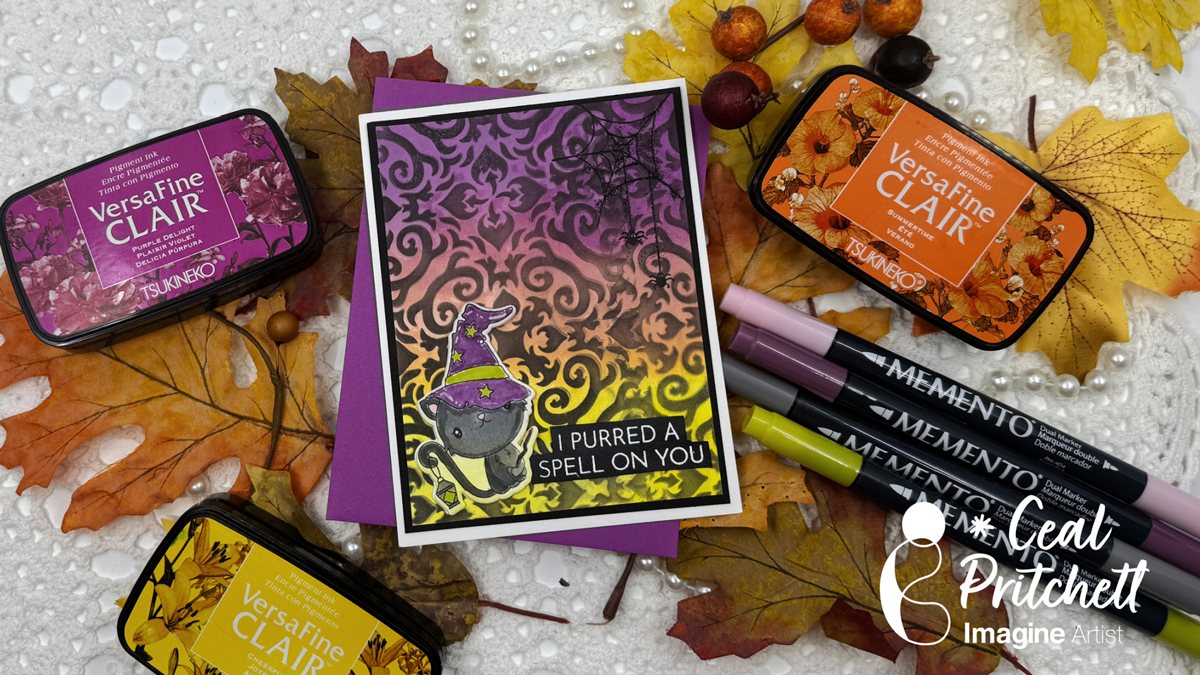
Hey there crafty friends! It’s Ceal, here. Today I am sharing a Halloween card with you.
Skill Level: Intermediate Time: 30 Minutes
Directions:
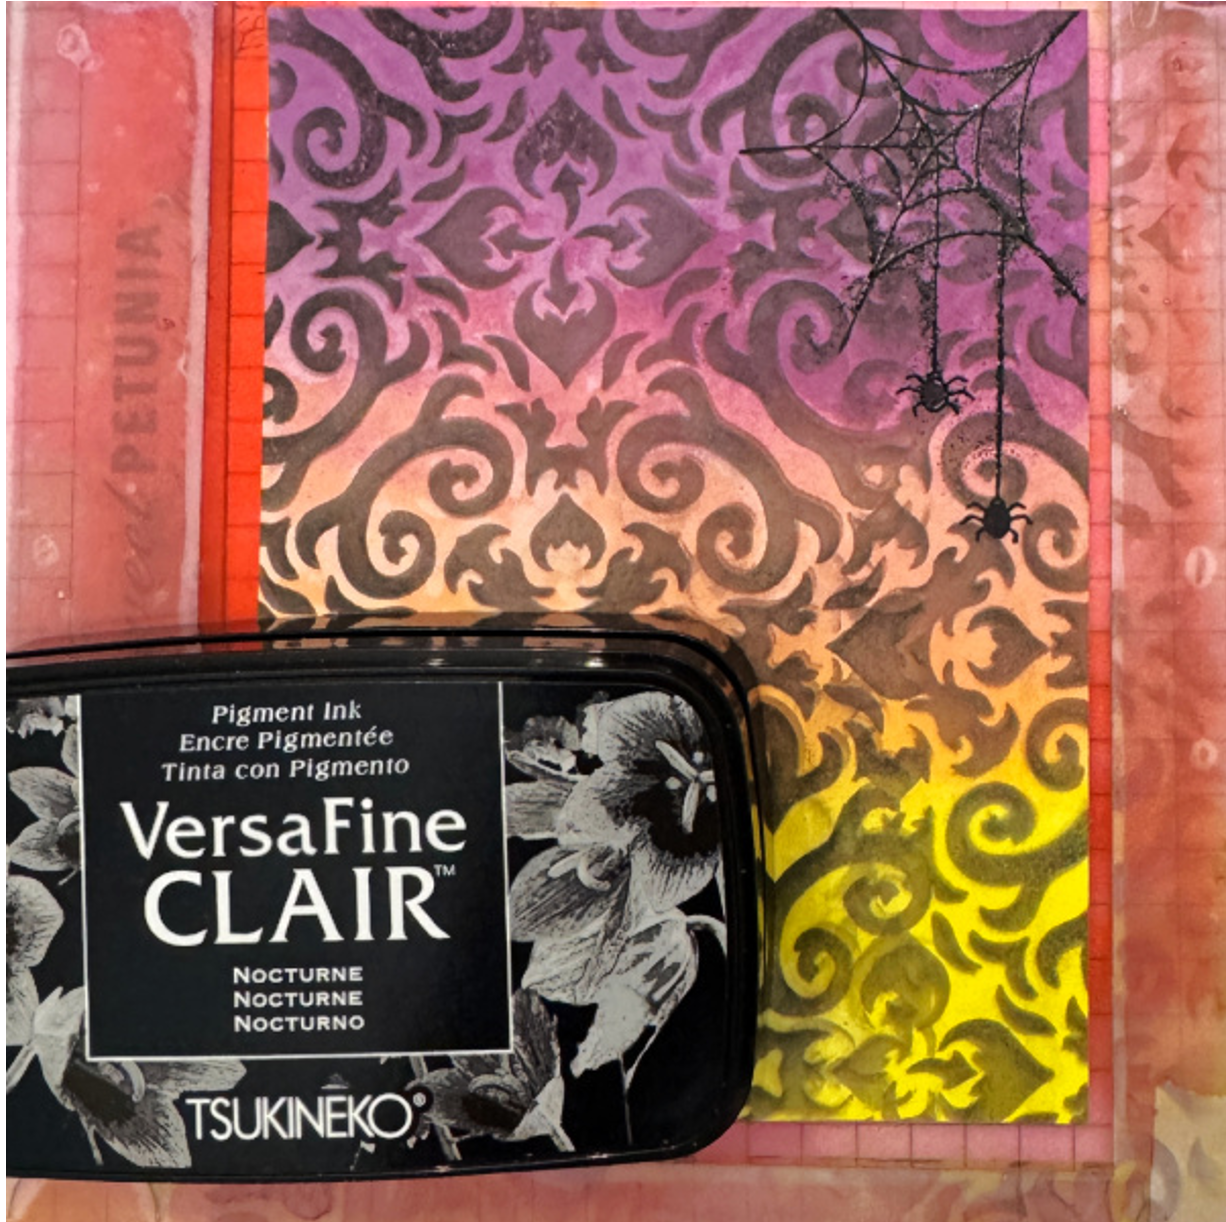
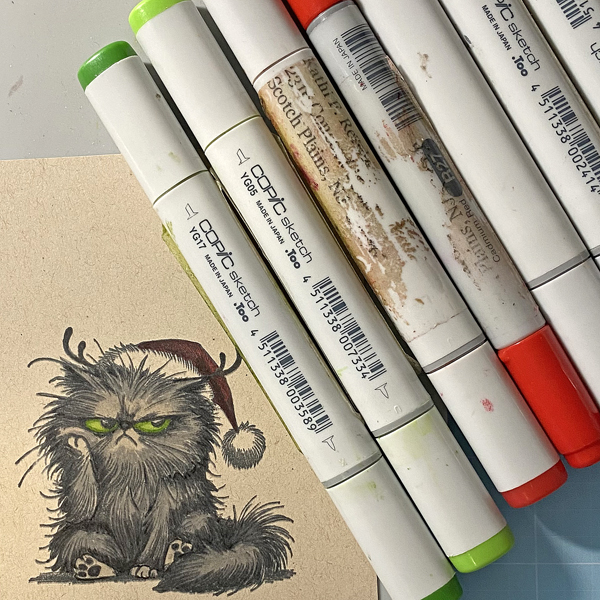
Gather your supplies. You will need a Halloween themed stamp set, a stencil, white and black embossing powder, some markers if you have a line art image and three Halloween colors of ink.
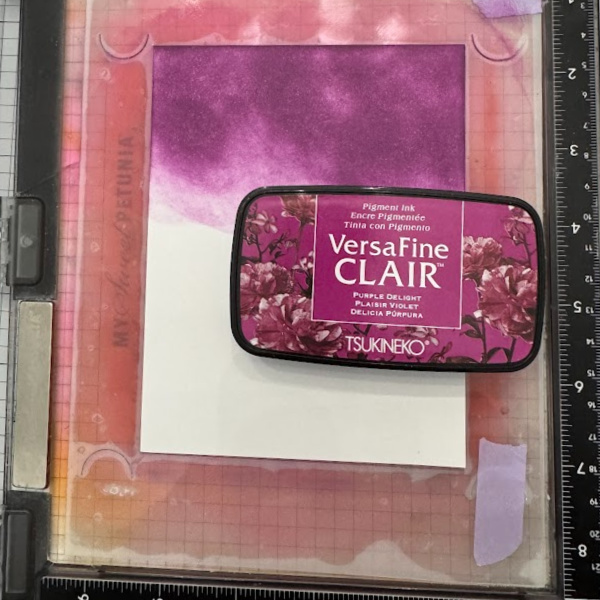
Step 1: Ink Blend a purple ink (VersaFine Clair Purple Delight used) on a third of the panel.
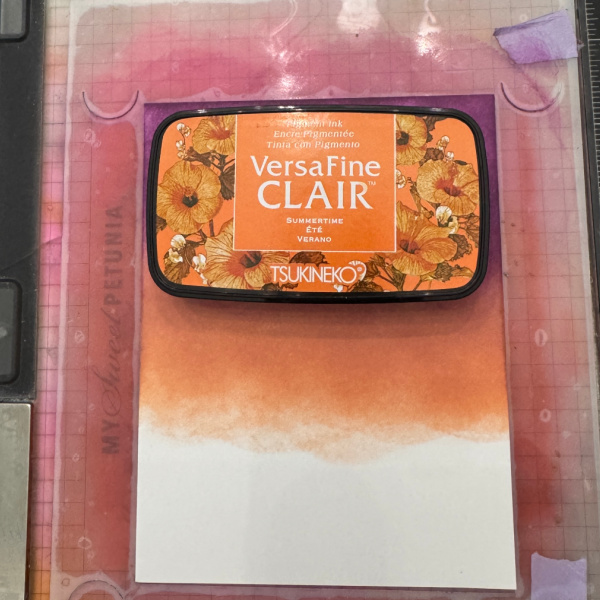
Step 2: Ink Blend an orange (VersaFine Clair Summertime used) ink over the second third of the panel.
Step 3: Ink Blend a yellow (VersaFine Clair Cheerful used) ink over the bottom third of the panel.
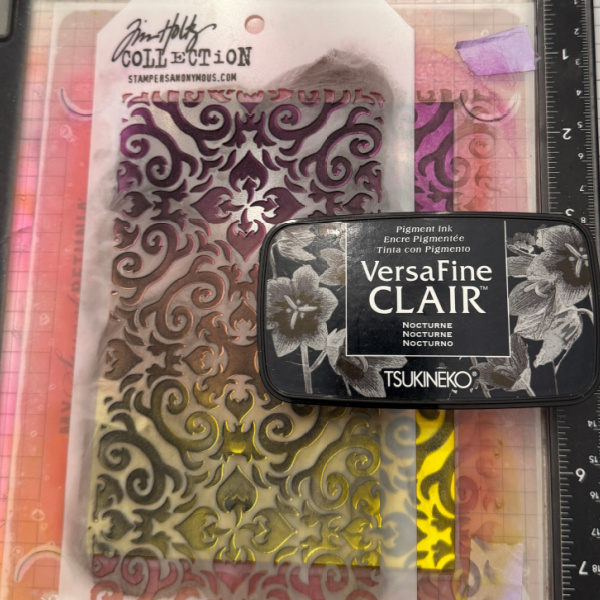
Step 4: Place a stencil over the blended panel and add black (VersaFine Clair Nocturne used) ink over the stencil.
Step 5: Stamp a spider web in the corner using black ink and then emboss with black powder.
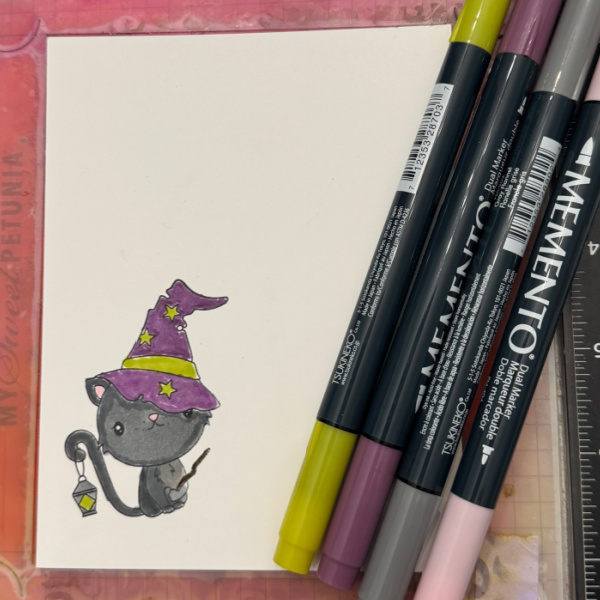
Step 6: Stamp, color and cut out the image and add to the front of the card.
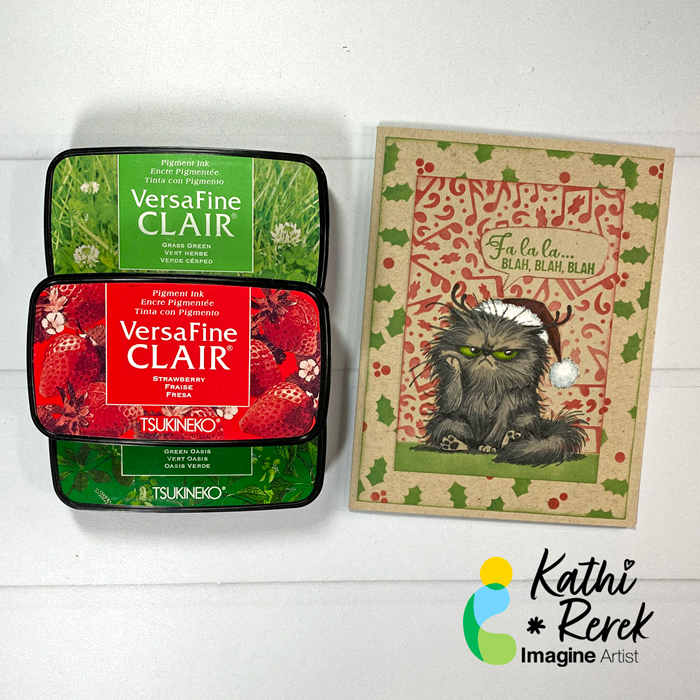
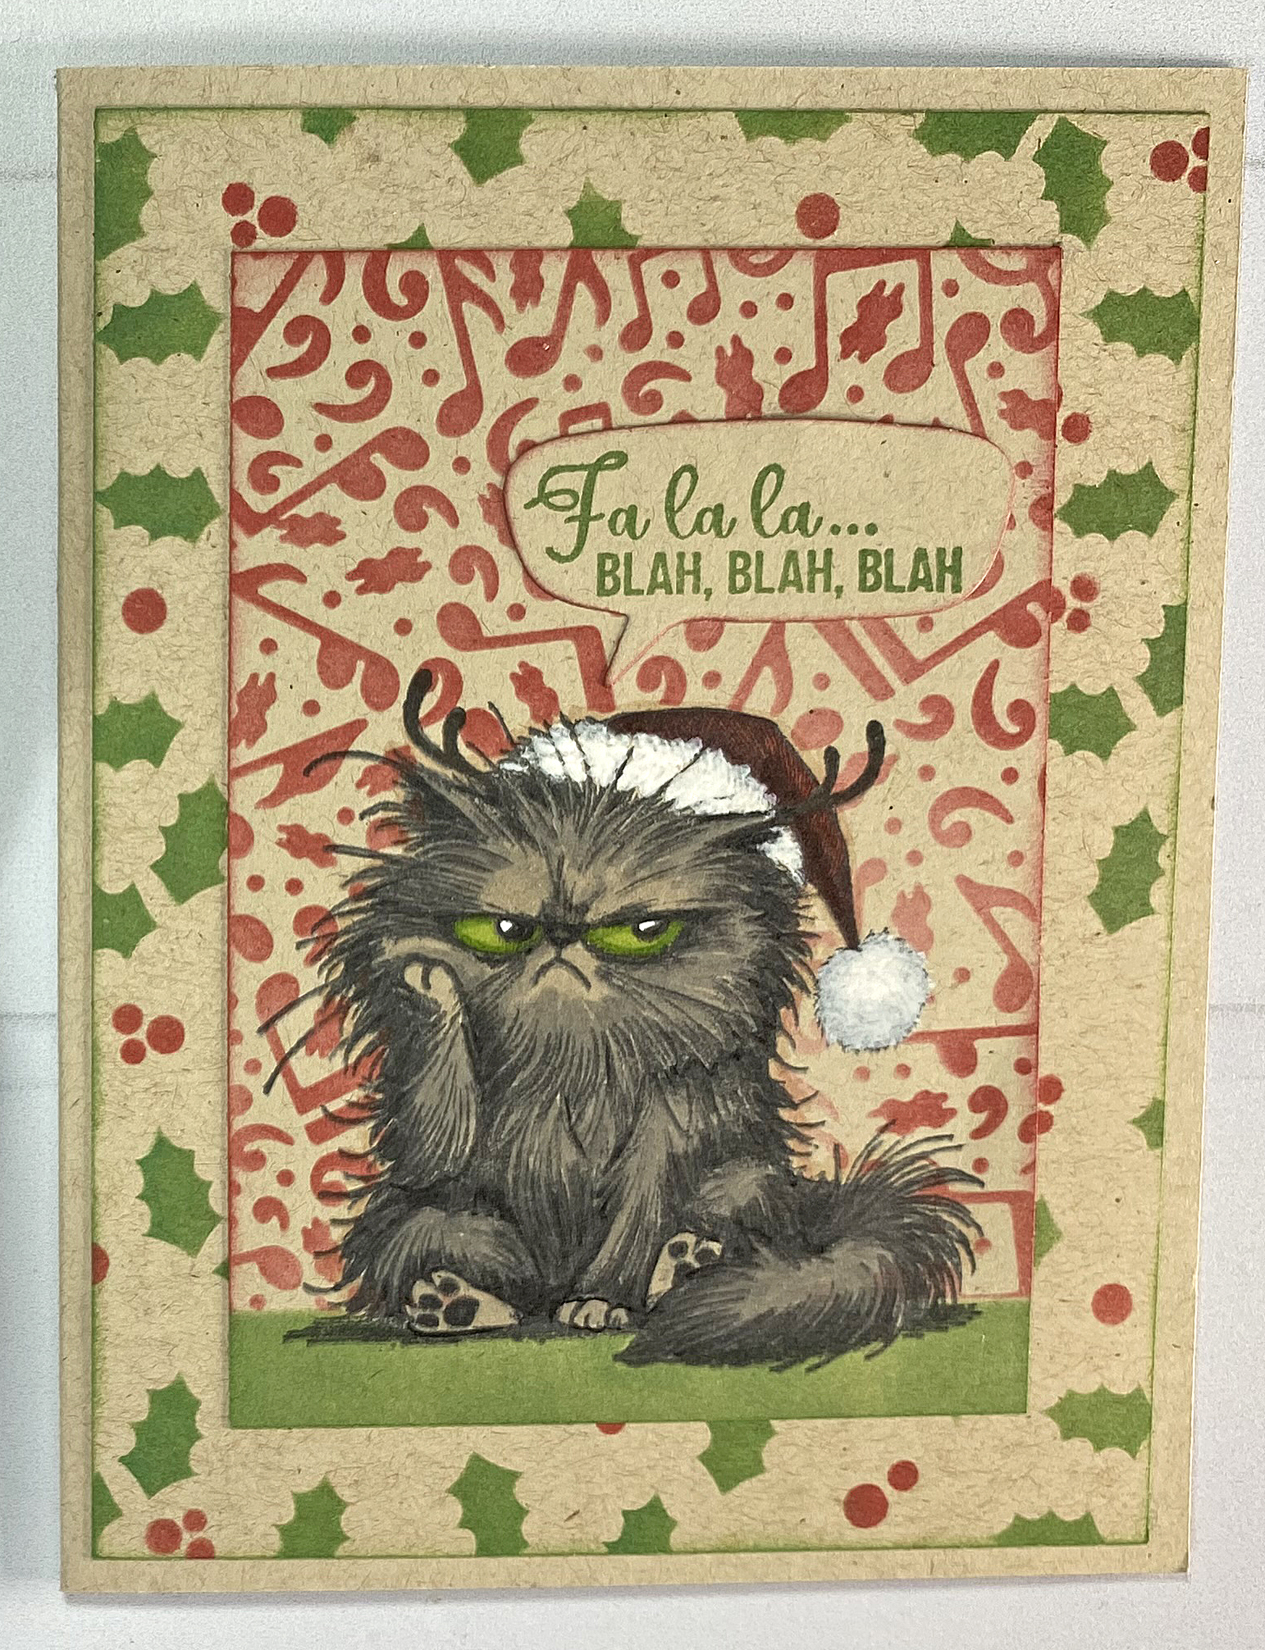
Here’s a snarky and fun Christmas card that shows how well VersaFine Clair Inks work on Kraft Cardstock!
Skill Level: Beginner Time: 45 minutes
Instructions:
Step 1: Use Tuxedo Black Memento Ink to stamp the Pissy Kitty twice — once onto Kraft cardstock and once onto repositionable sticker paper.
Step 2: Use Copic markers to color the kitty. Use white gel pen to add highlights to his eyes.
Step 3: Fussy-cut the sticker paper version of the kitty and place it over its counterpart as a mask.
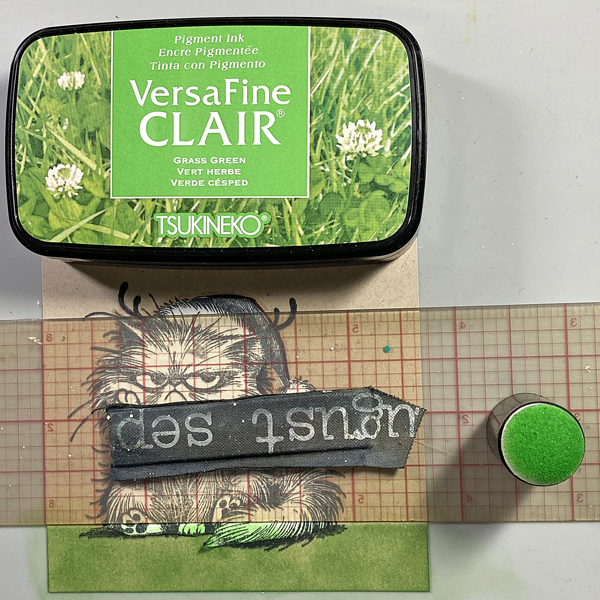
Step 4: Place a ruler horizontally across the image panel, right below the masked cat. Use a Sponge Dauber to apply Grass Green VersaFine Clair Ink over the ruler onto the bottom of the image panel.
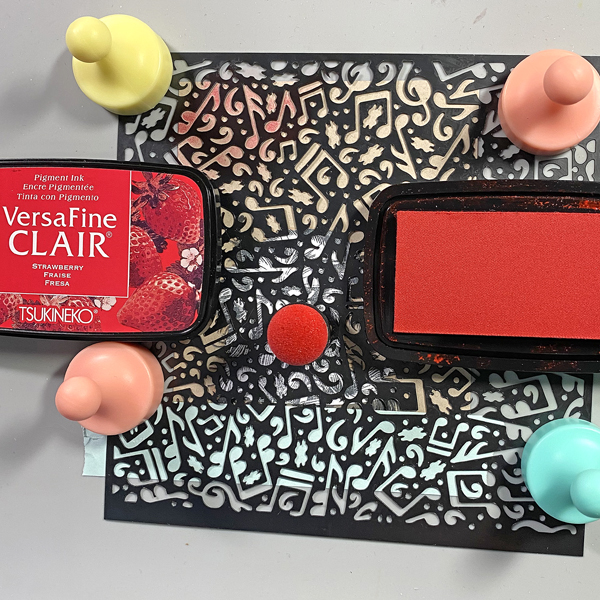
Step 5: Use low tack tape to secure the image panel to the back of the Grunge Notes Stencil. Secure the stencil to the craft mat with magnets. Use a Sponge Dauber to apply Strawberry VersaFine Clair Ink over the stencil onto the image panel. Remove the stencil and the masks, edge the panel using both Strawberry and VersaFine Clair Inks, then heat set the image panel.
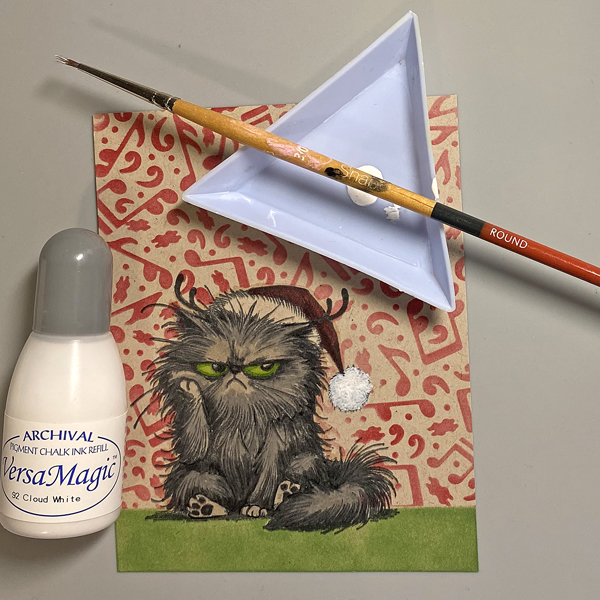
Step 6: Squeeze a few dollops of Cloud White VersaMagic Ink into a little dish. Use a paint brush to apply white paint to the pom-pom and brim of the Santa hat. Use both Strawberry and VersaFine Clair Inks to edge the image panel.
Steps 7: Cut a 4” x 5.25” panel from Desert Storm Cardstock to create your own patterned background. Use low tack tape to secure the image panel to the back of the Holly Background Stencil. Secure the stencil to the craft mat with magnets.
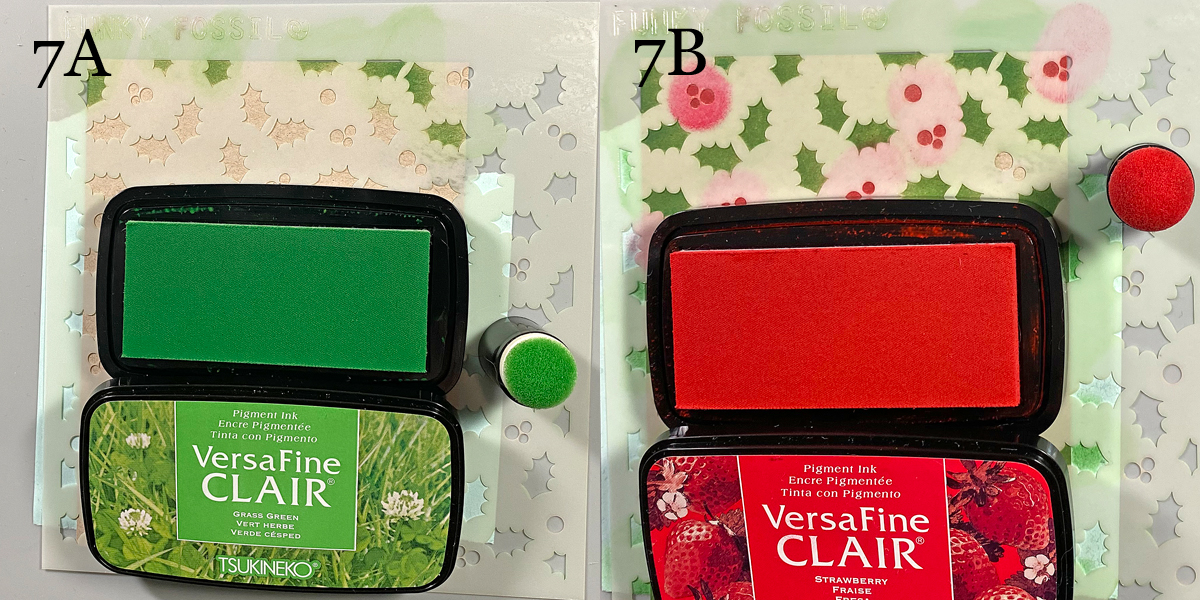
Use a Sponge Dauber to apply Grass Green VersaFine Clair Ink over the holly leaves of the stencil onto the background panel (7A). Use a small brush to apply Green Oasis VersaFine Ink, which is a slightly darker green, to the outside of the holly leaves on the stencil to add a touch of shading (Sorry. No photo).
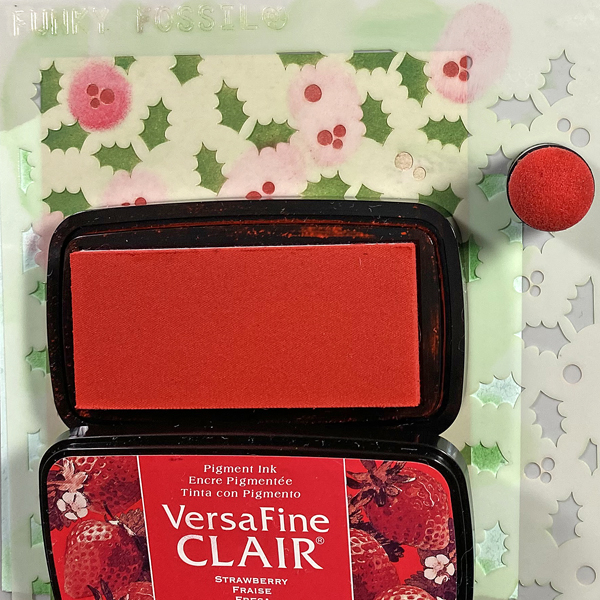
Use a Sponge Dauber to apply Strawberry VersaFine Clair Ink over the stencil’s holly berries onto the background panel (7B). Remove the stencil, edge with Grass Green VersaFine Ink, and heat set.
Step 8: Use Grass Green VersaFine Clair Ink to stamp the “Fa La La” sentiment onto a scrap of Kraft cardstock. Remove the stamped scrap from the stamping platform. Heat set.
Use a speech bubble die to cut the sentiment. Edge the die-cut with Strawberry VersaFine Clair Ink.
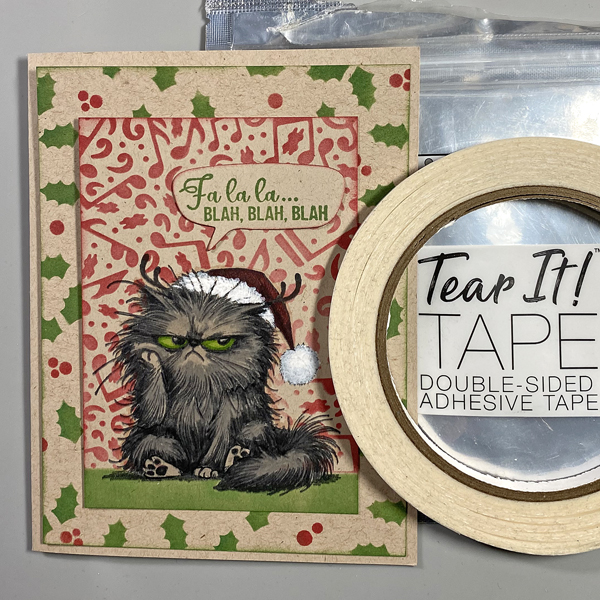
Step 9: Use Tear It! Tape to adhere the sentiment, image panel, and background panel to an A2 Kraft card.
Hello crafty friends! It’s Ceal, here. Today I’m sharing a fun card using this humorous stamp and water coloring it with Memento Inks.
Skill Level: Beginner Time: 30 minutes
Directions: Gather your supplies. You will need a outline stamp, I used one by Unity Stamp Co. You will need several colors of dye inks. The inks must be a dye ink like Memento to react with water. You will also need a pigment ink VersaFine Clair to stamp the image so it will not react with the water. The last thig you will need is a water brush or paintbrush.
Step 1: Stamp the image using VersaFine Clair Nocturne ink
Step 2: Using a Water brush, color in your image. I used Peanut Brittle and Cantaloupe Memento ink for the kitty
Step 3: Using a water brush finish coloring your image. I used Teal Zeal to color the coffee cup.
Step 4: Using a stitched die, cut out the panel and stamp the sentiment under the image. To finish the card, I used a piece of patterned paper as a mat and adhered the panel to it and then t the base.
Other Supplies: Neenah Classic Crest Solar White 120Lb Neenah Classic Crest Solar White 80lb Patterned Paper from Lawn Fawn MISTI Stamp Platform – My Sweet Petunia Pissy Kitty Stamp Set – Unity Stamp Co Stitched Rectangle Die – My Favorite Things
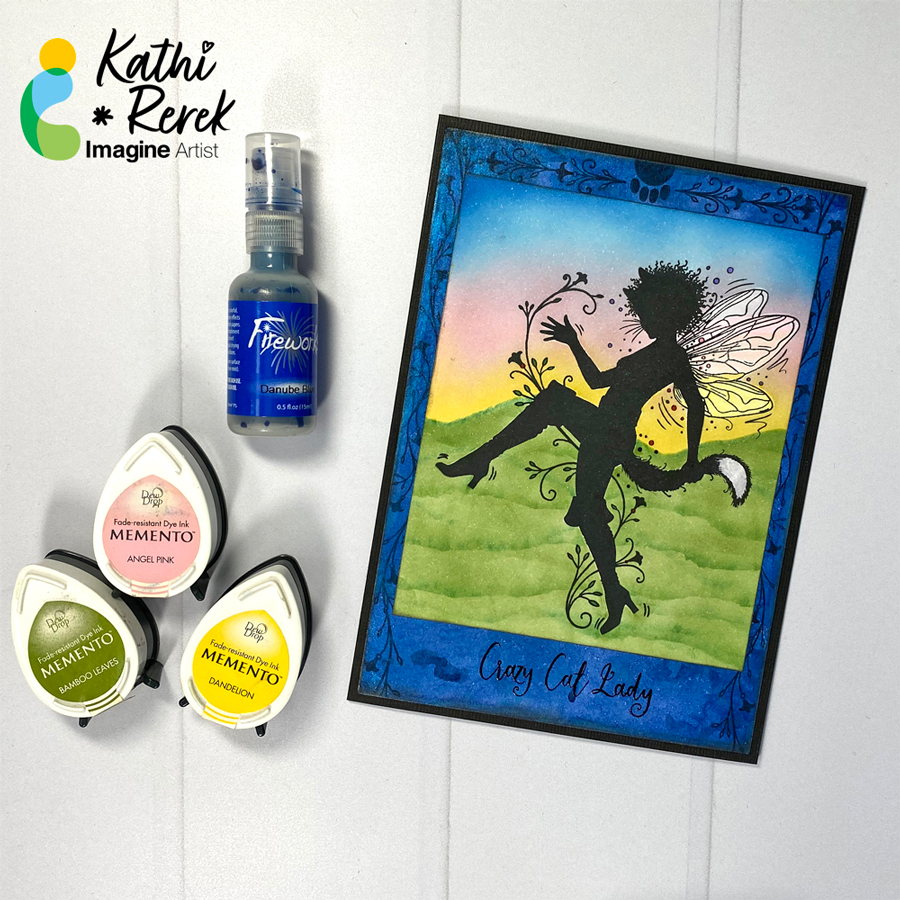
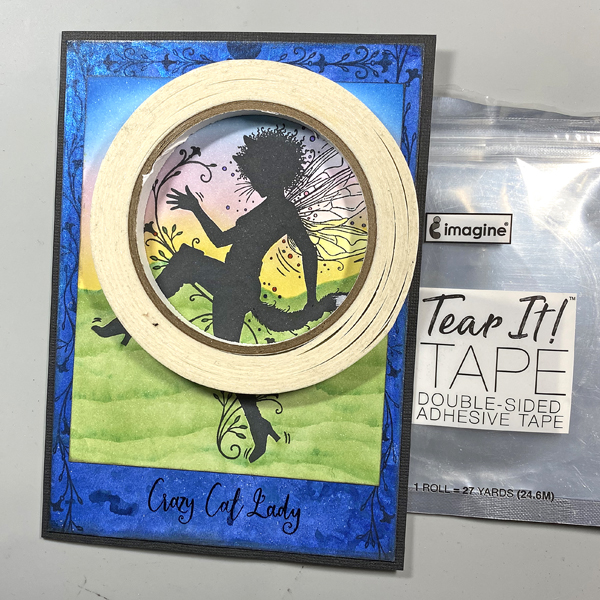
I’m delighted to be returning to the Imagine Crafts AIR program again this year. Our first assignment was to create a project that reflected ourselves. I love creating scenic cards, magical creatures, and cats!
Skill Level: Intermediate Time: 1.5 hour
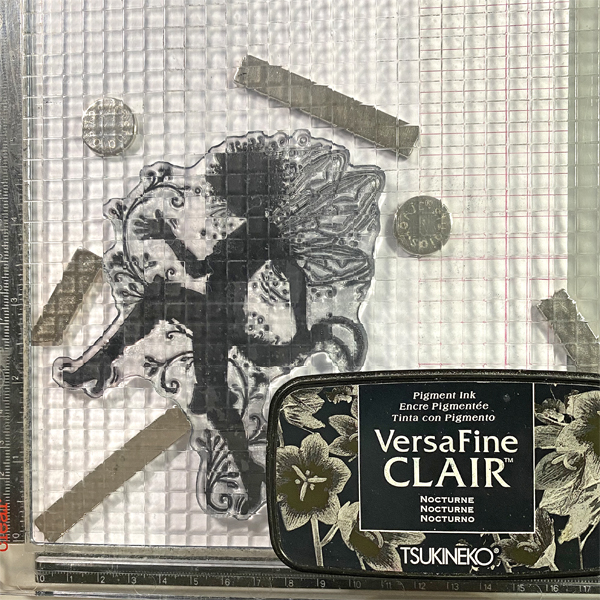
Step 1: Use magnets to secure a 4” x 5.25” piece of white cardstock onto the base of a stamping platform. Use Nocturne VersaFine Clair ink to stamp the Puss in Boots image twice — once onto the image panel and once onto repositionable sticker paper.
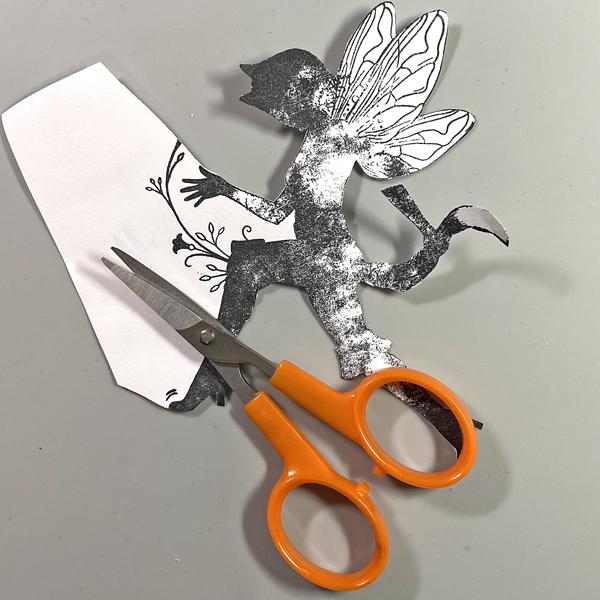
Step 2: Fussy-cut the sticker paper version and place it onto the image panel as a mask.
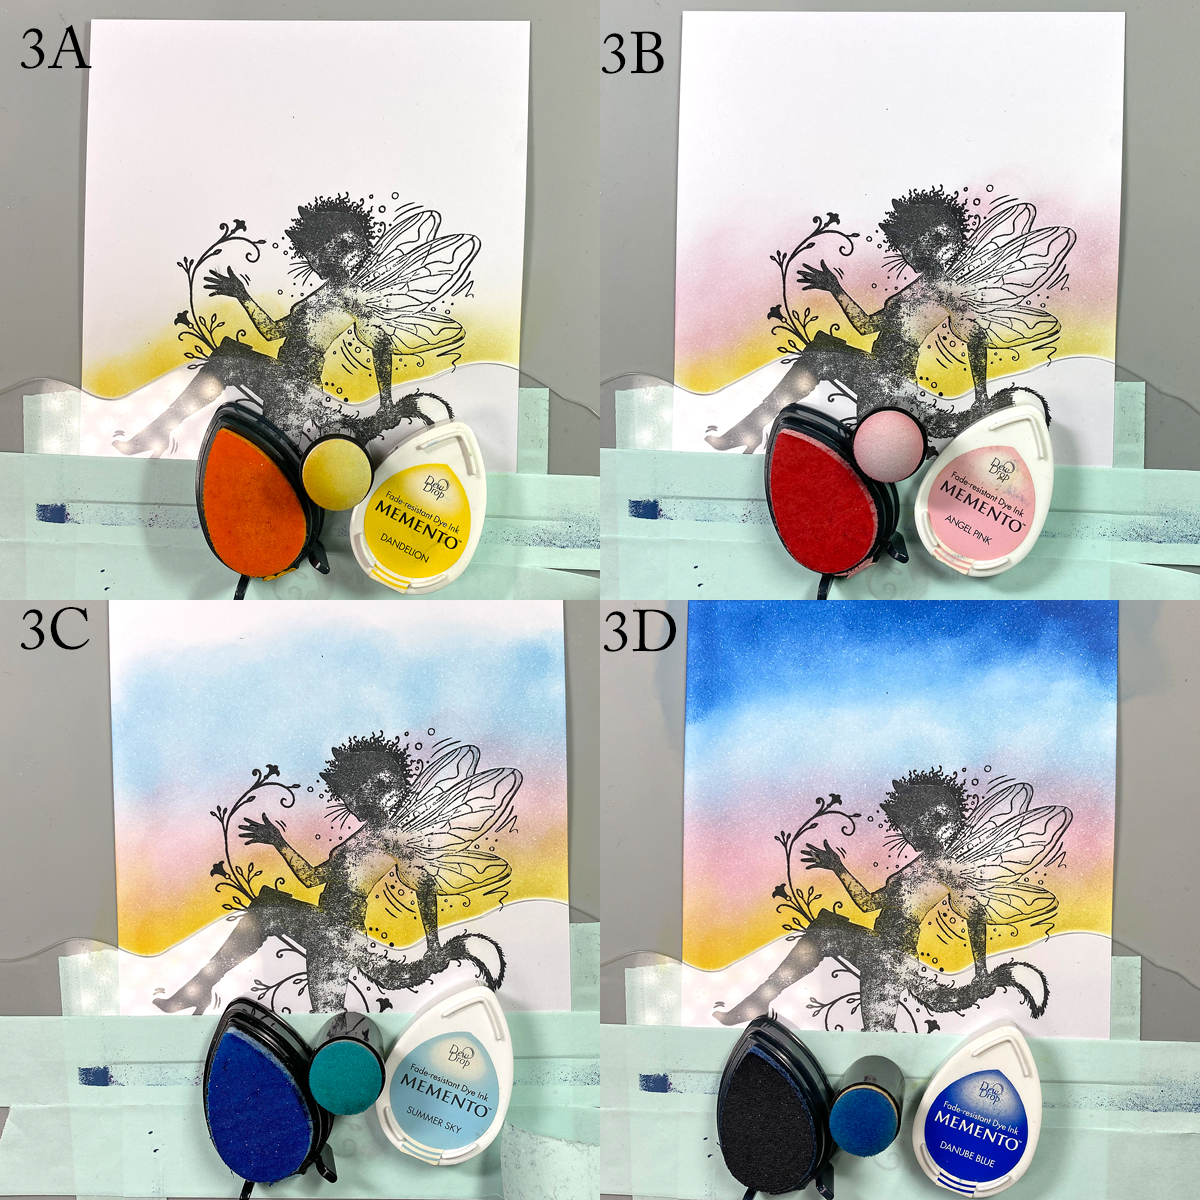
Step 3: Use low-tack tape to secure the rolling hills mask from the Acetate Hills Mask set to the image panel as shown.
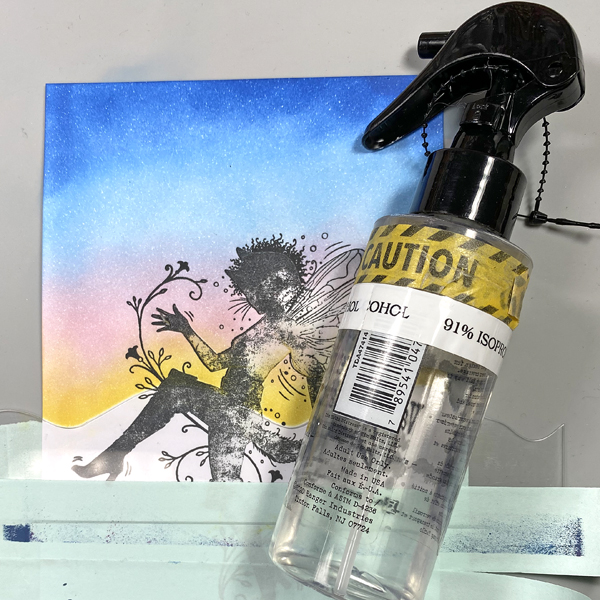
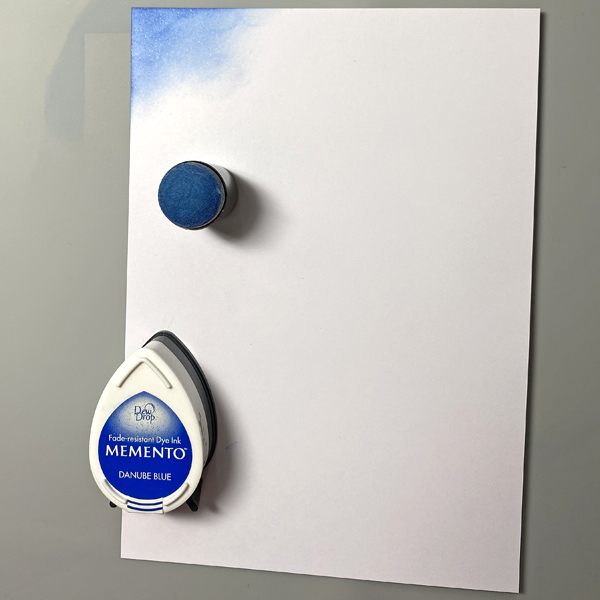
Use a sponge dauber to apply Dandelion Memento ink over the mask and masked image onto the image panel. (3A). Use another dauber to apply Angel Pink Memento ink onto the image panel so the pink ink is slightly overlapping and blending with the yellow ink (3B). Repeat this step with Summer Sky Memento ink (3C), then Danube Blue Memento ink (3D).
Step 4: Spray the image panel with 91% Isopropyl Alcohol to slightly blend the colors and to add some white speckles and splatter.
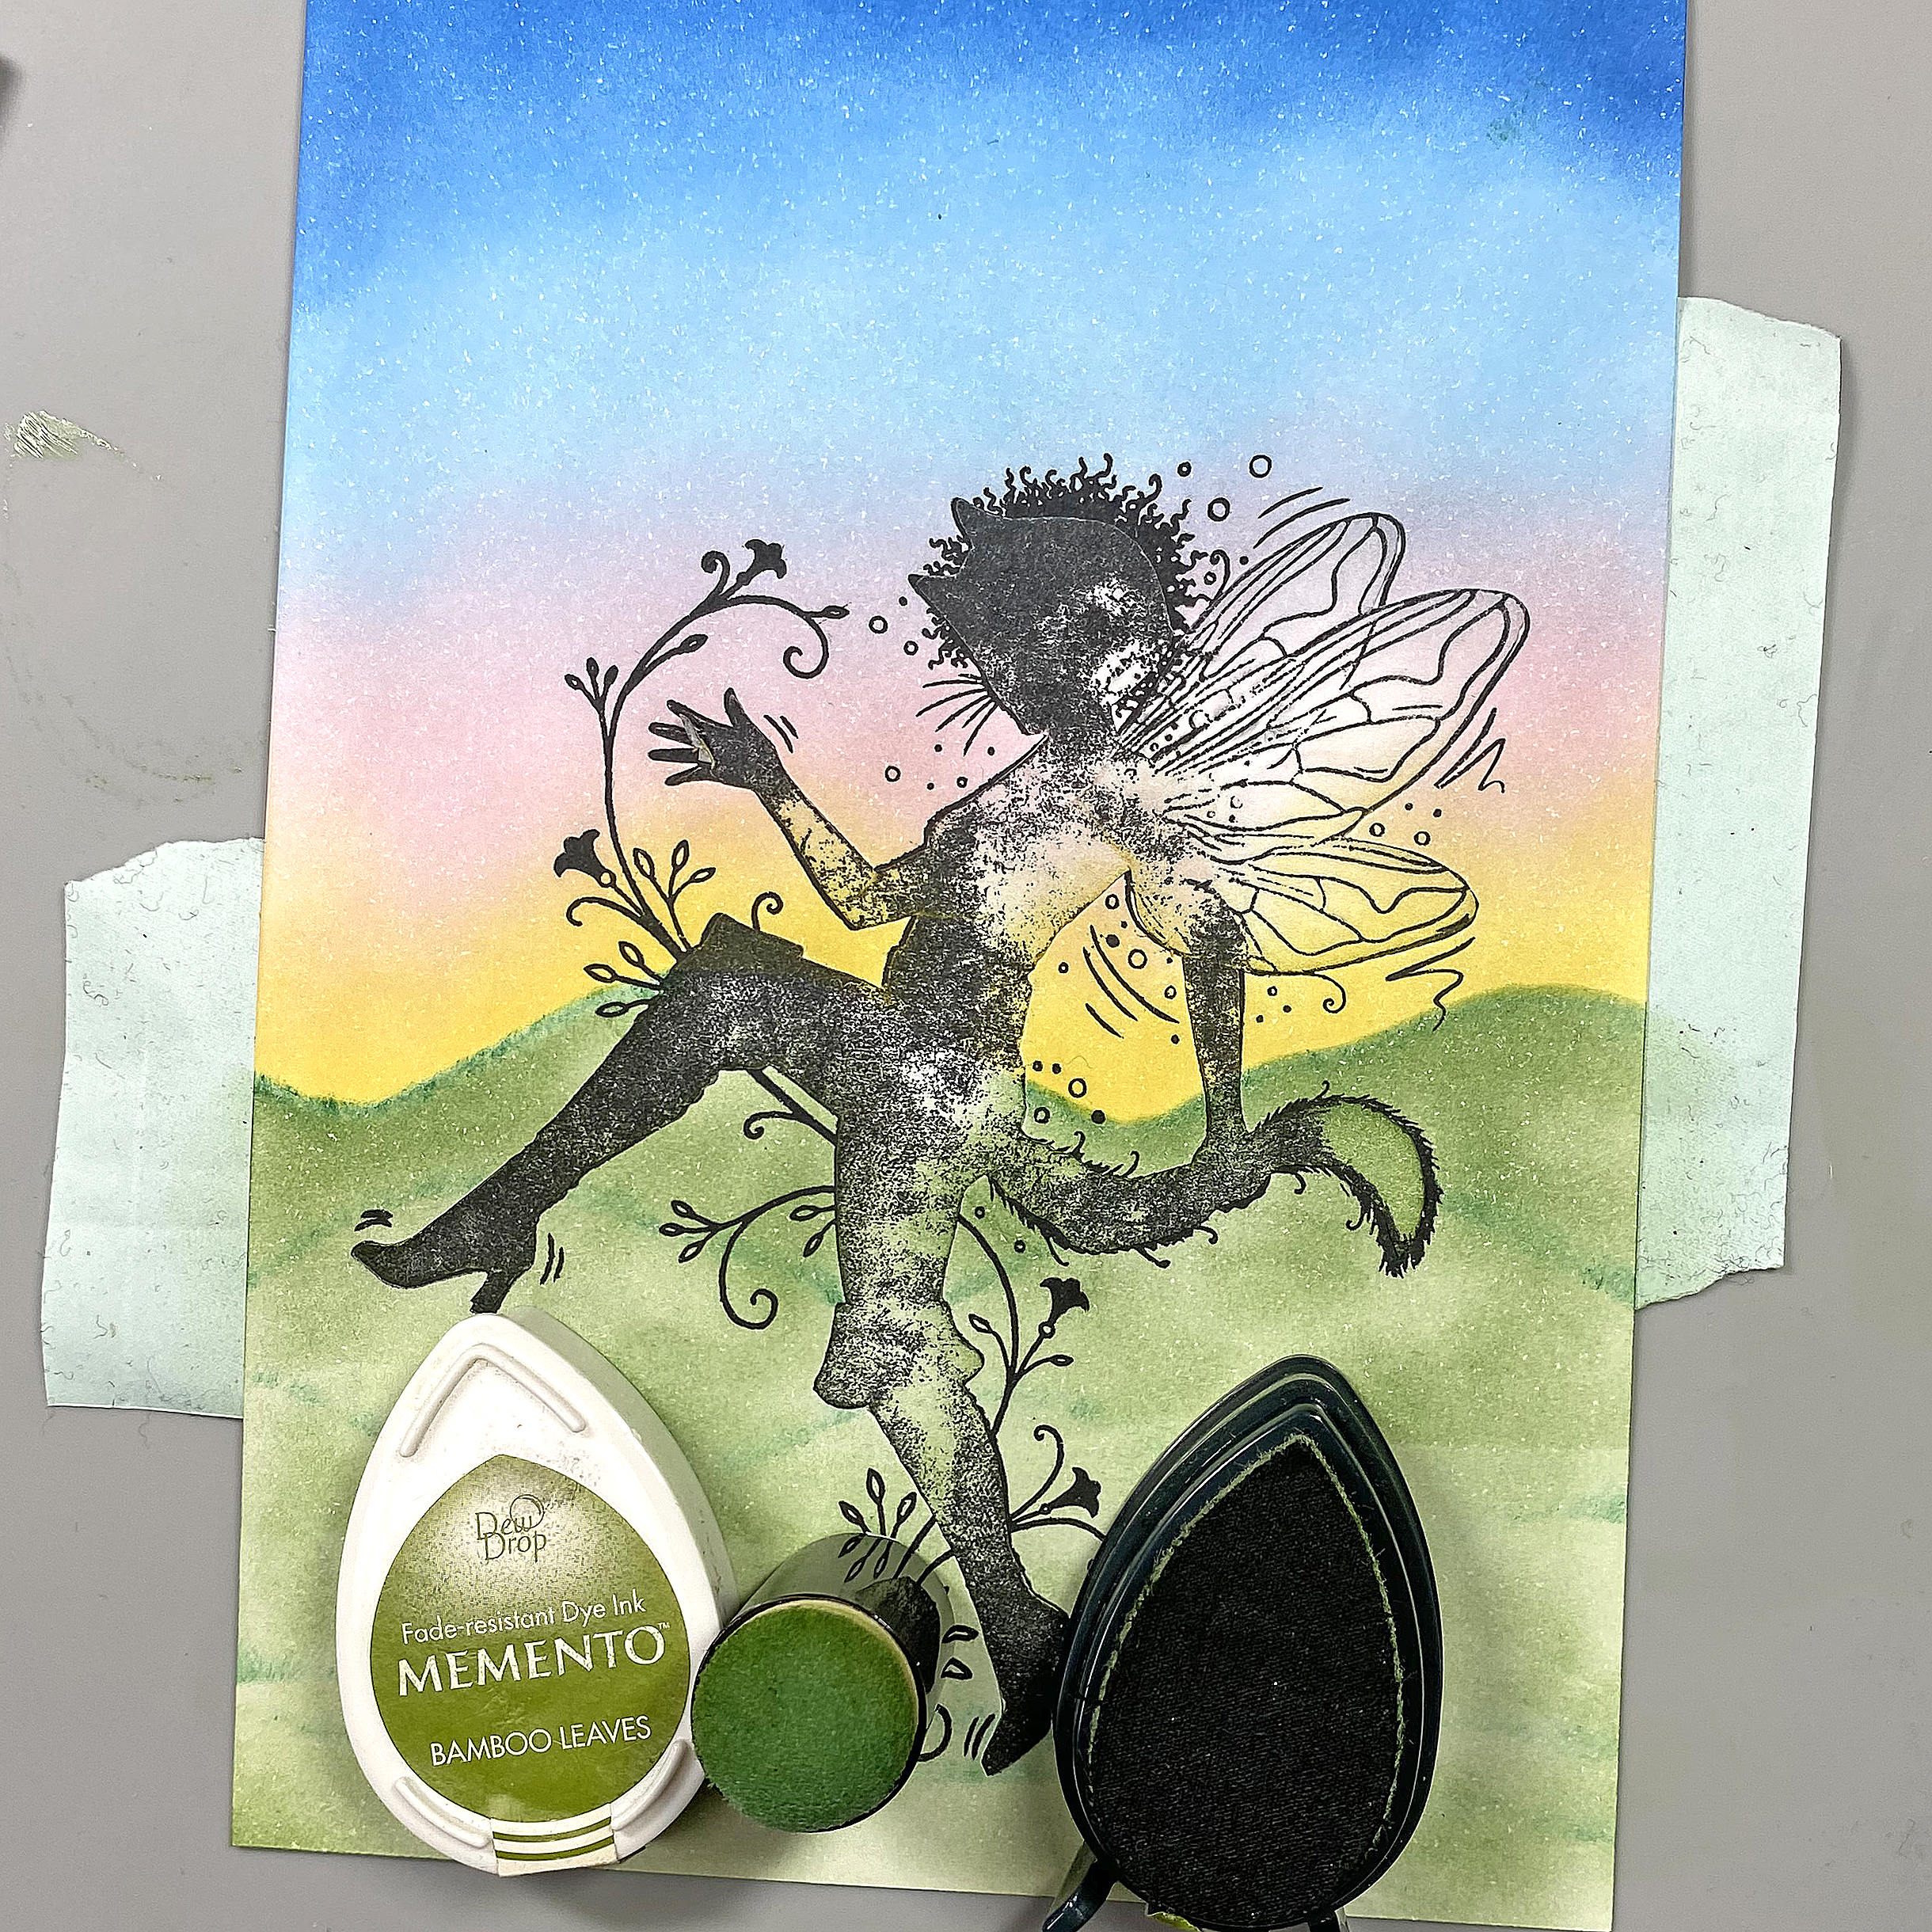
Step 5: Trace the rolling hills mask from the Acetate Hills Mask set onto white cardstock, fussy-cut along the trace lines. Label the top and bottom of the mask so you know which is which. Place the top homemade mask over the sky area of the image panel and secure with low-tack tape. Use a Fantastix to apply Cottage Ivy Memento ink over the mask onto the image panel (5A). Place the acetate rolling hills mask below the hilly horizon. Use a Fantastix to apply Cottage Ivy Memento ink over the mask onto the image panel (5B). Continue this process to add additional grassy hills.
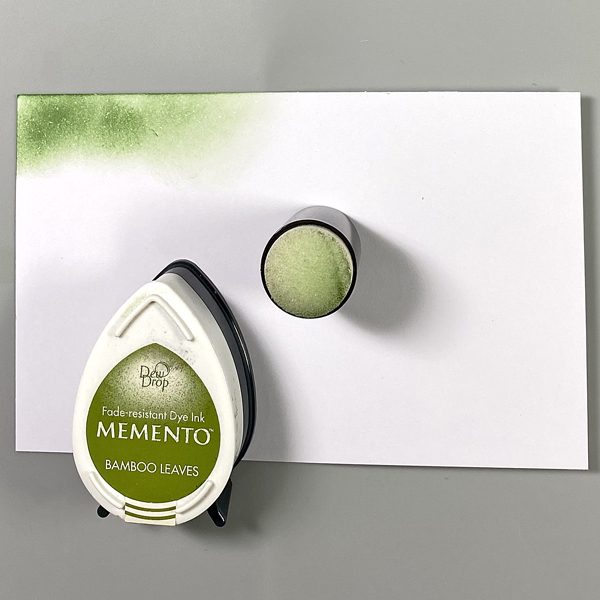
Step 6: Use a sponge dauber and Bamboo Leaves Memento ink to fill in the grassy hills. Colors the white area of the tail and the wings with Copic markers. Set the image panel aside.
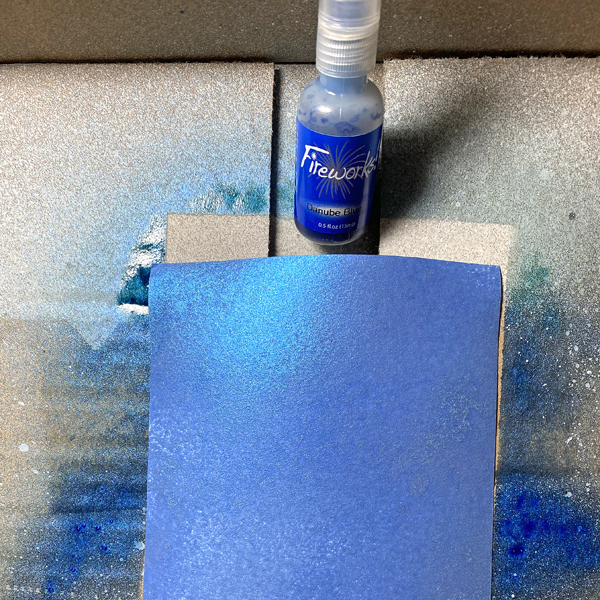
Step 7: Place a piece of 4.75” x 6.75” Mixed Media cardstock into a box. Spray the panel with Danube Blue Firewords Spray to create a shimmery blue background panel. Heat set.
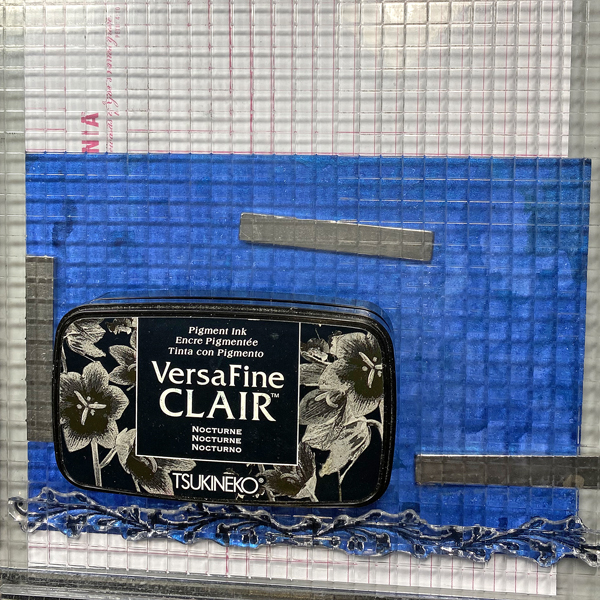
Step 8: Use magnets to secure the background panel to the base of a stamping platform so that panel is sideways. Position the long leafy border stamp from Puss in Boots Clear Stamp Set facedown along the edge of the background panel. Press the platform’s lid onto the back of the stamp, lift the lid, ink the stamp with Nocturne VersaFine Clair, and stamp. Re-ink and stamp again if necessary to attain a good impression. Heat set.
Keeping the stamp on the platform’s lid, flip the background panel, secure it with magnets, and stamp the border on the other side of the background panel. Heat set.
Step 9: Reposition the background panel as shown and secure with magnets. Place the small flourish stamp facedown horizontally on the top left of the background panel. Press the platform’s lid onto the back of the stamp, lift the lid, ink the stamp with Nocturne VersaFine Clair, and stamp. Re-ink and stamp again if necessary to attain a good impression. Heat set.
Clean and dry the stamp. Reposition it so that it’s facedown on the top left of the panel. Press the platform’s lid onto the back of the stamp, lift the lid, ink the stamp with Nocturne VersaFine Clair, and stamp. Re-ink and stamp again if necessary to attain a good impression. Heat set.
Remove the flourish stamp. Place the paw print stamp so that it’s centered and facedown on top of the background panel. Press the platform’s lid onto the back of the stamp, lift the lid, ink the stamp with Nocturne VersaFine Clair, and stamp. Re-ink and stamp again if necessary to attain a good impression. Heat set.
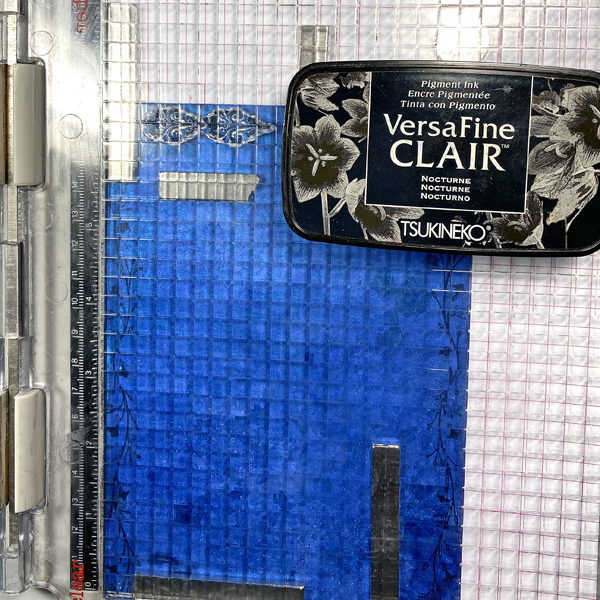
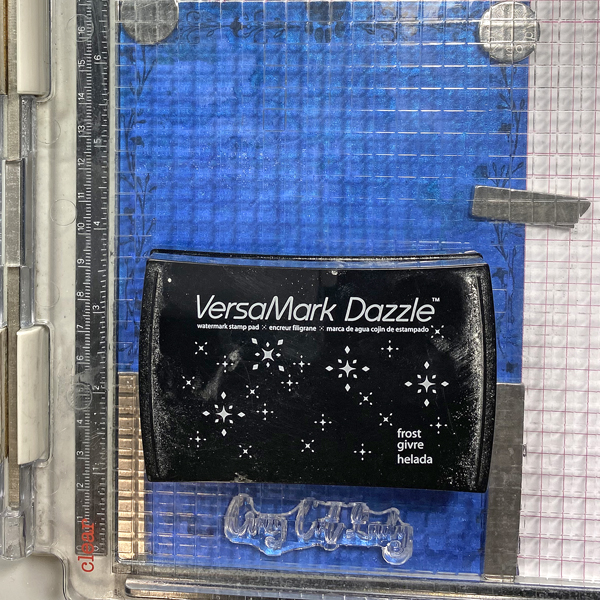
Step 10: Place the “Crazy Cat Lady” stamp facedown so that it’s centered at the bottom of the image panel. Press the platform’s lid onto the back of the stamp, lift the lid, ink the stamp with Frost VersaMark ink, and stamp. Repeat.
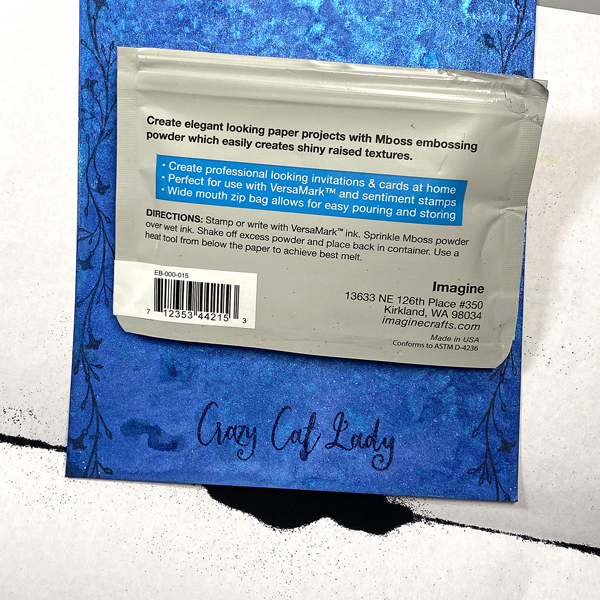
Step 11: Sprinkle on Black MBoss Powder, slide the the excess powder back into the bag, and heat set the sentiment.
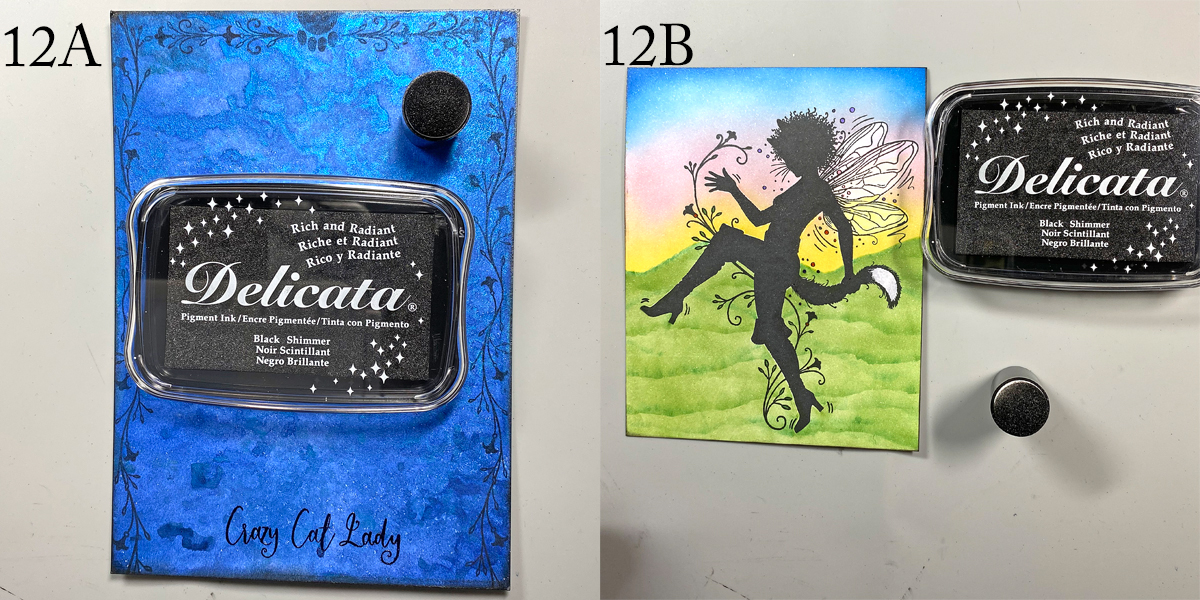
Step 12: Use a Sponge Dauber to edge the background panel with Black Shimmer Delicata ink (12A). Heat set. Trim the image panel to 4.25” x 5.25” and edge with Black Shimmer Delicata ink (12B). Heat set.
Step 13: Use Tear It! Tape to adhere the image panel to the background panel and the background panel to a 5” x 7” black card.
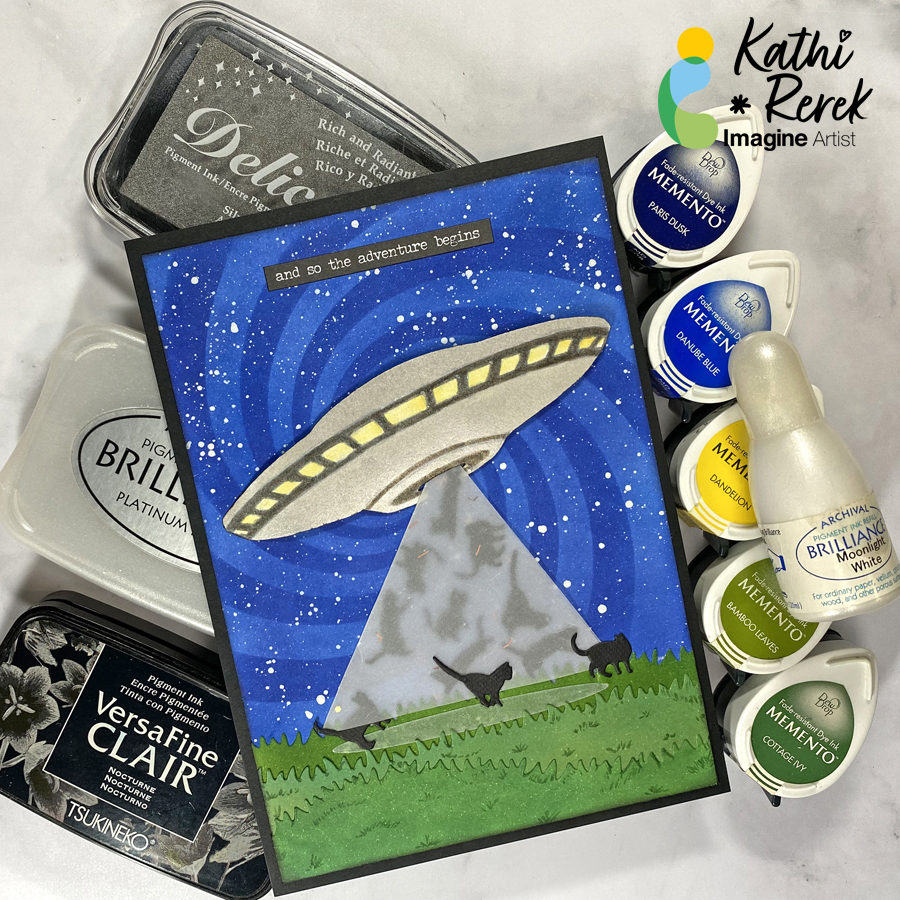
– Here’s a rare project from me that with no stamping at all. I’ve used inks, stencils, and cutting dies to create what will either be a wall hanging or a journal page.
Skill Level: Beginner to Intermediate
Time: 1.5 hours
Step 1.
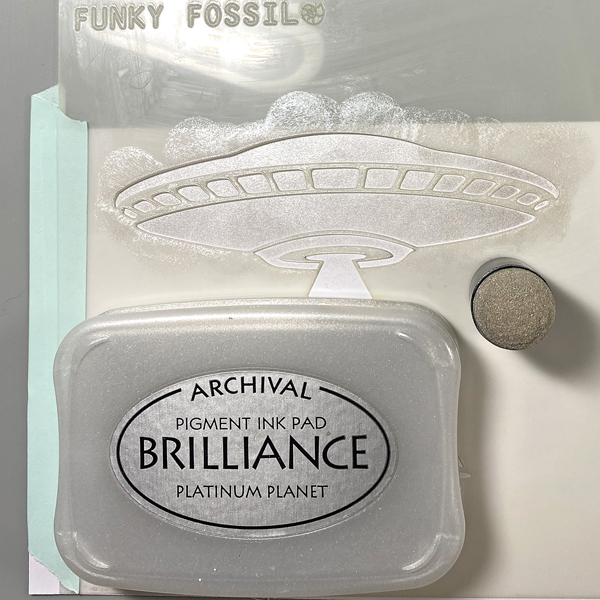
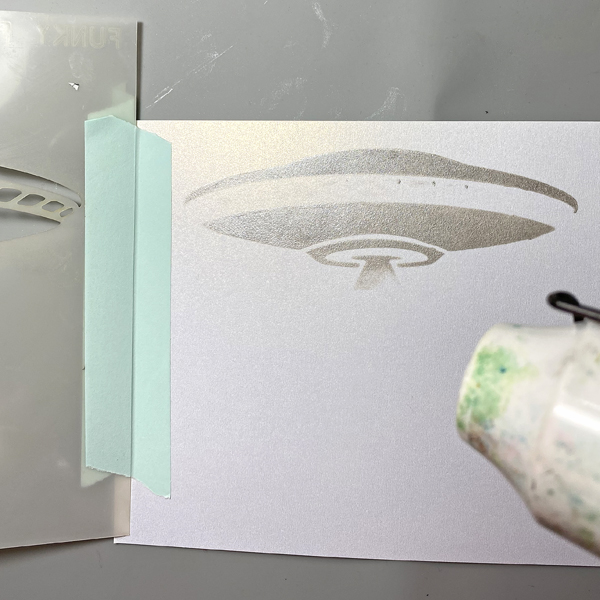
Secure the UFO stencil to a piece of cardstock with removable tape on both sides of the paper, creating a hinge. Apply Platinum Planet Brilliance over the stencil onto the cardstock. Open the hinged stencil and heat set the image panel.
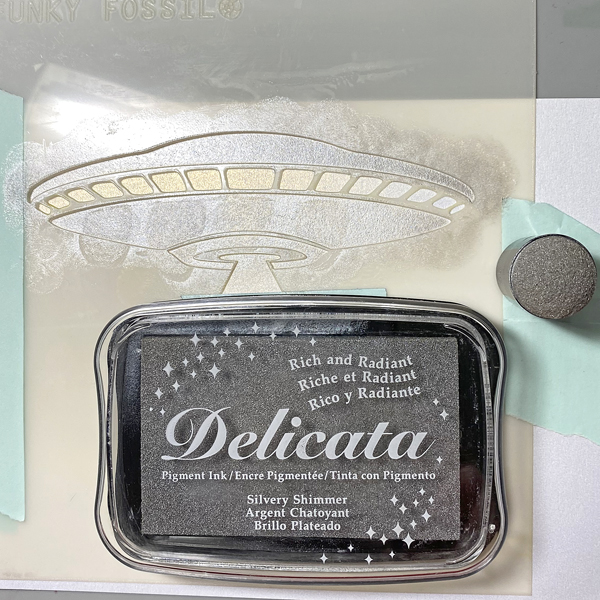
Step 2:
Put the UFO stencil back in place. Use a sponge dauber to apply Silver Shimmer Delicata over the stencil onto the image panel. Open the hinged stencil and heat set the image panel.
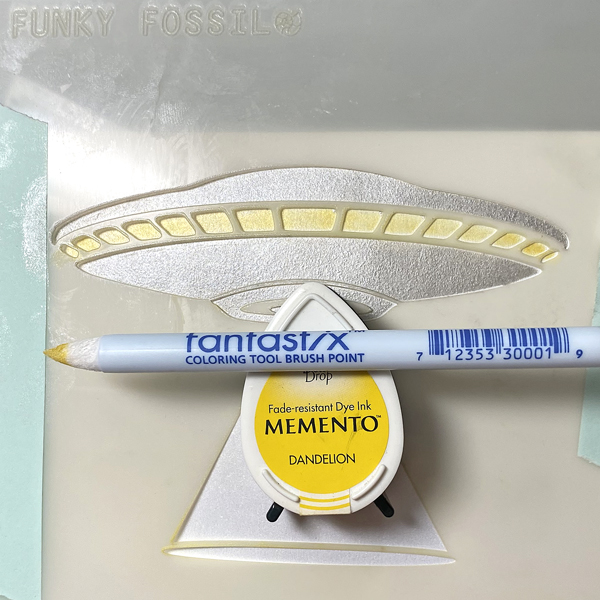
Step 3:
Use a brush-tipped Fantastix to apply Dandelion Memento ink through the UFO’s windows onto the image panel. Remove and clean the stencil.
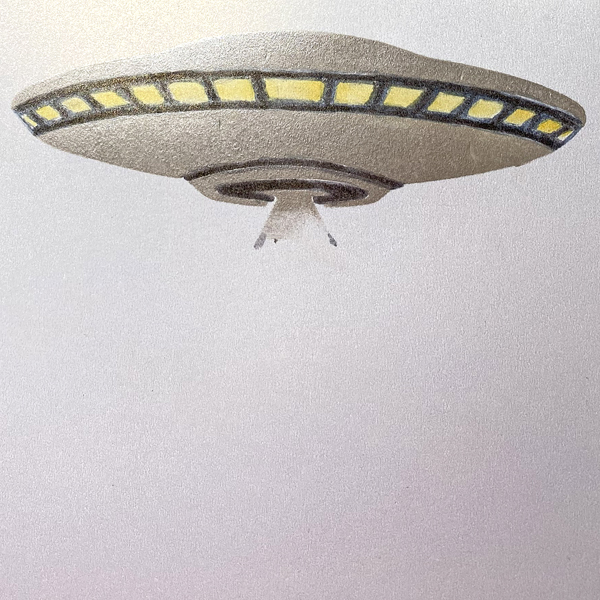
Step 4:
Touch up the windows with the Fantastix. Use a grey watercolor marker to color the window frames and the bottom aperture of the UFO.
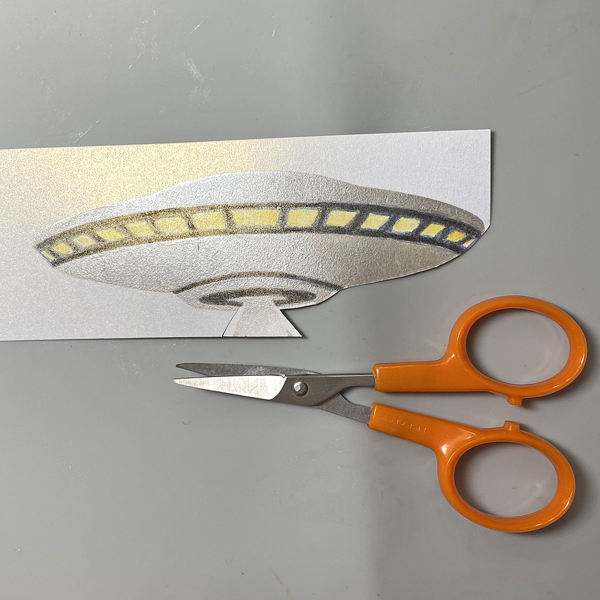
Step 5:
Fussy-cut the UFO, edge with a dark marker, and set aside.
Step 6:
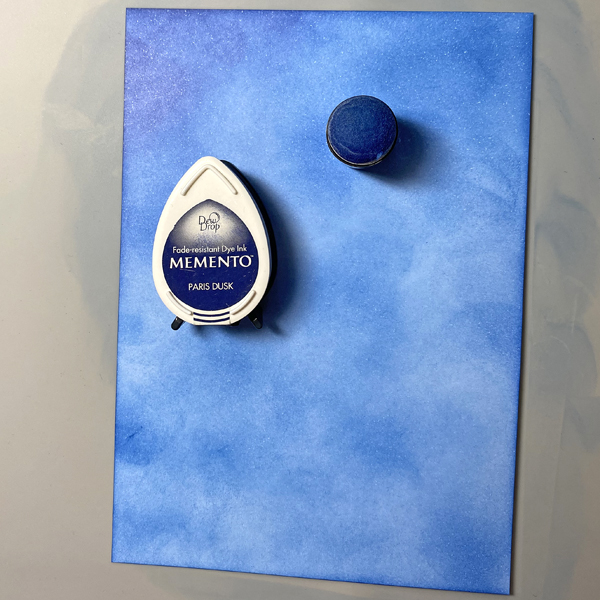
Use a sponge dauber to apply Danube Blue onto a 4.75” x 6.75” piece of Bristol Paper. Use a sponge dauber to blend Paris Dusk onto the Bristol Paper to create a mottled background.
Step 7:
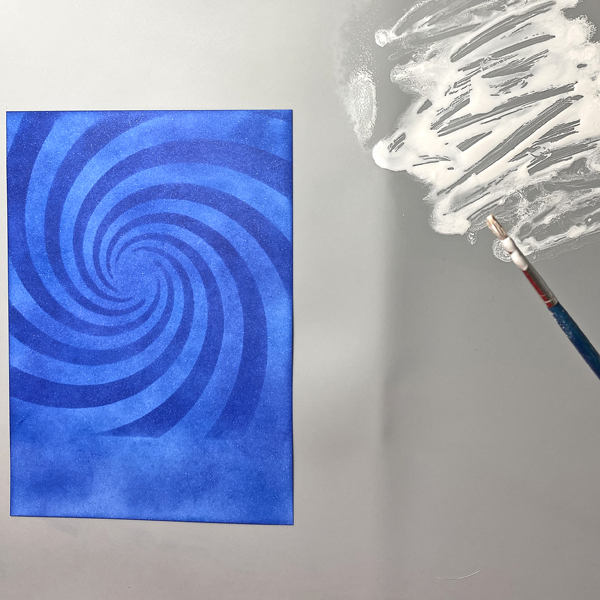
Tape the Time Tunnel Stencil over the inked background panel. Use a sponge dauber to apply Paris Dusk Memento ink over the stencil onto the paper.
Step 8:
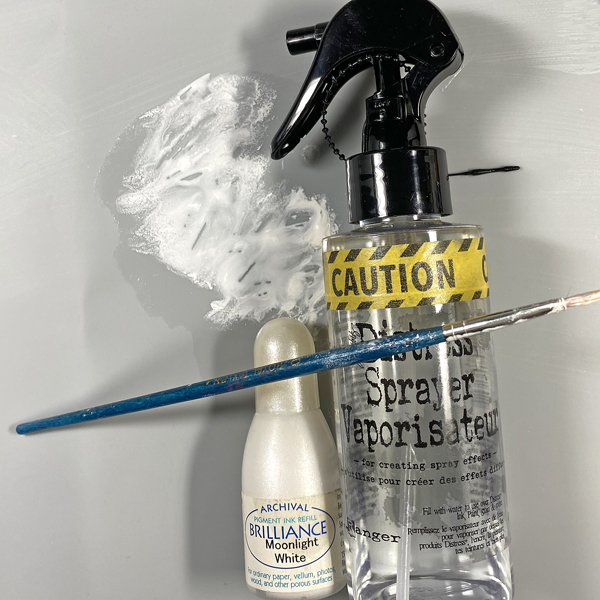
Squeeze a few drops of Moonlight White Brilliance re-inker onto a craft mat. Spray with 91% Isopropyl Alcohol. Use a paintbrush to mix the ink. Load the paintbrush with the diluted Moonlight Brilliance ink and splatter the background panel. Let air dry or heat set.
Step 9:
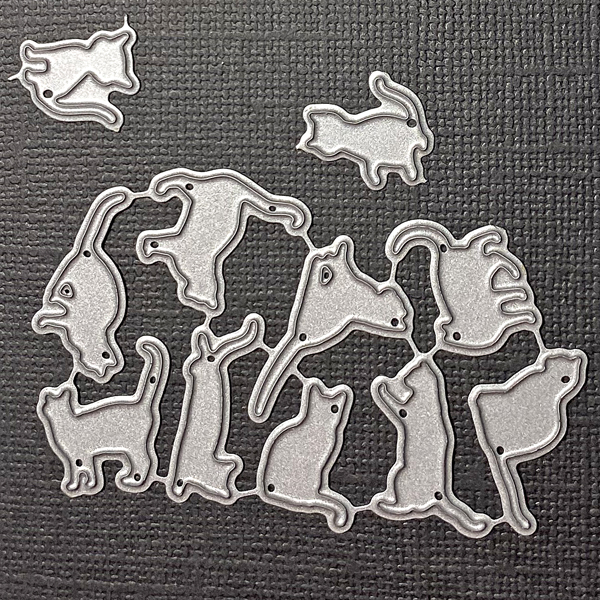
Use the Mini Cats die to cut Raven cardstock. Set the cat dies aside.
Step 10:
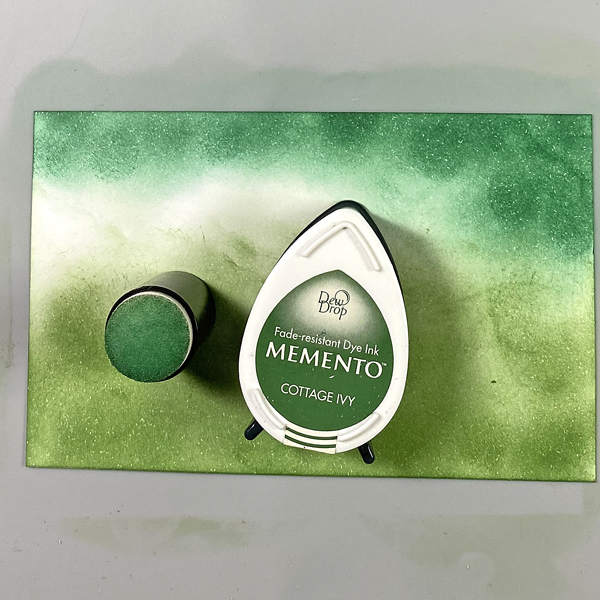
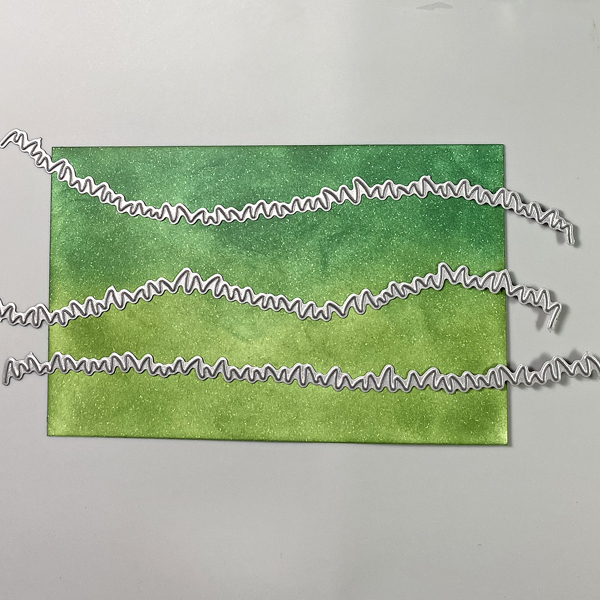
Use a sponge dauber to apply Bamboo Leaves Memento ink onto a white cardstock panel. Repeat Cottage Ivy Memento ink until the panel is covered.
Step 11:
Use the Grassy Hills Die set to cut the inked panels. Use a green Copic marker to edge the grass and to add details. Using Memento Ink to create backgrounds allows you to use Copic markers overtop!
Step 12:
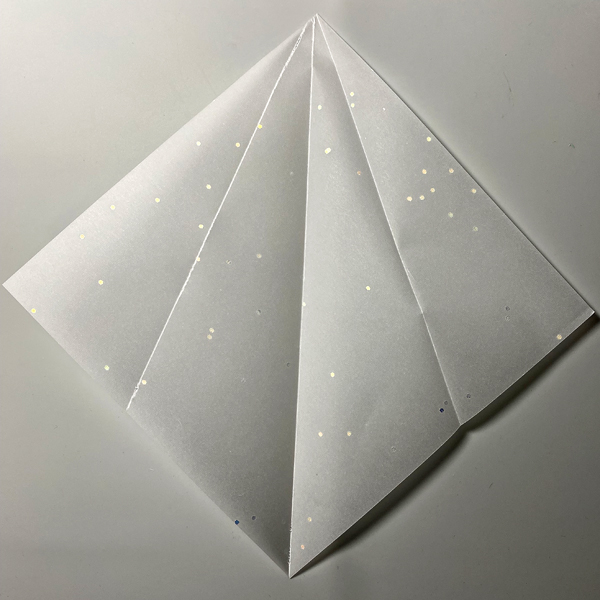
Cut a piece of vellum to 6” square. Score on the diagonal from one point to the opposite point. Fold.
Repeat with both sides until it looks like the above photo.
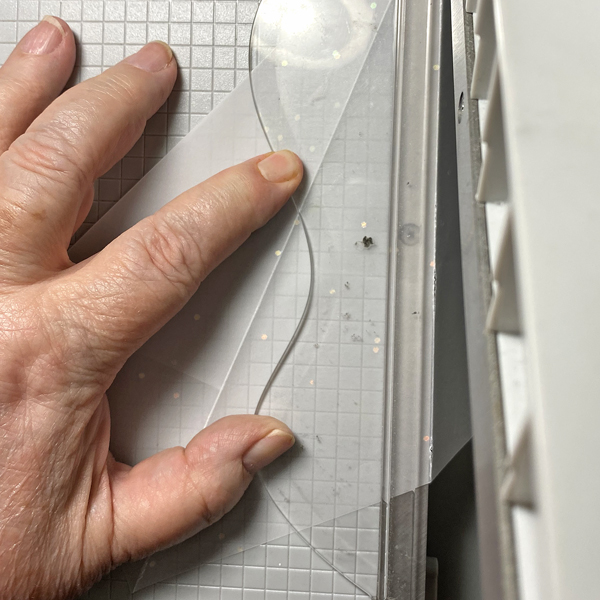
Step 13:
Place one edge of the scored, folded square along the cutting edge of a guillotine trimmer. Cut.
Step 14:
Use On Point Glue to adhere the die-cut cats to the interior of the folded vellum triangle. Sorry that I forgot to take a photo.
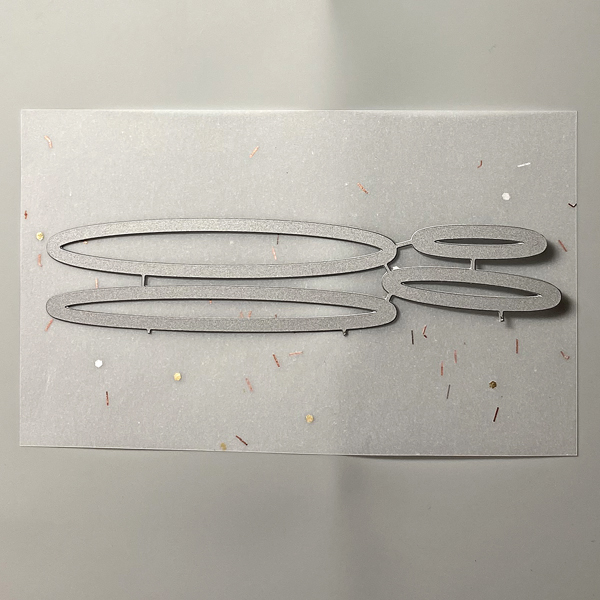
Step 15:
Back a piece of vellum with two-sided tape. Use the Oval Shadows Die-namics to cut the vellum.
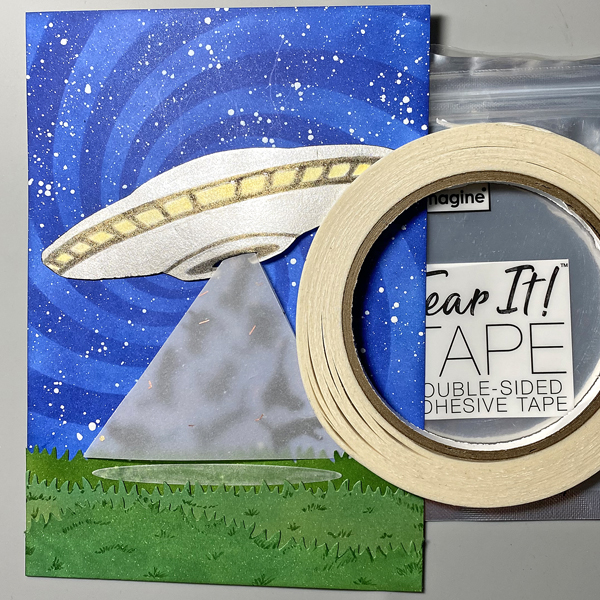
Step 16:
Use Tear It! Tape to adhere the three layers of grass to the background panel as shown. Edge the panel with VersaFine Clair Nocturne .
Adhere the vellum cone and the vellum oval as shown. Use On Point Glue to adhere escaping and/or partially beamed-up cats atop the vellum oval and cone.
Use dimensional foam adhesive to adhere the UFO as shown.
Step 17:
Adhere the image panel to a 5” x 7” piece of Black Mixed Media paper. Add the sentiment sticker to finish the piece.
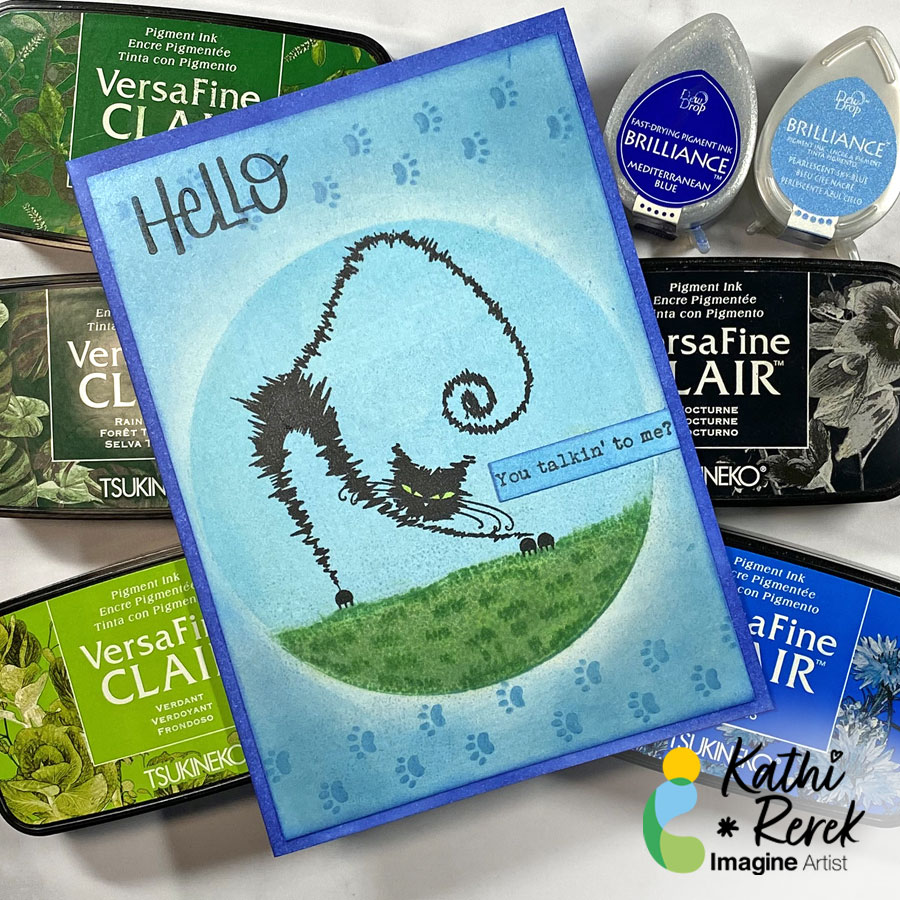
Using a Gel Press with VersaFine Clair inks is a great way to create a quick background.
Skill Level: Beginner to Intermediate
Time: 1 hour
Directions:
Step 1.
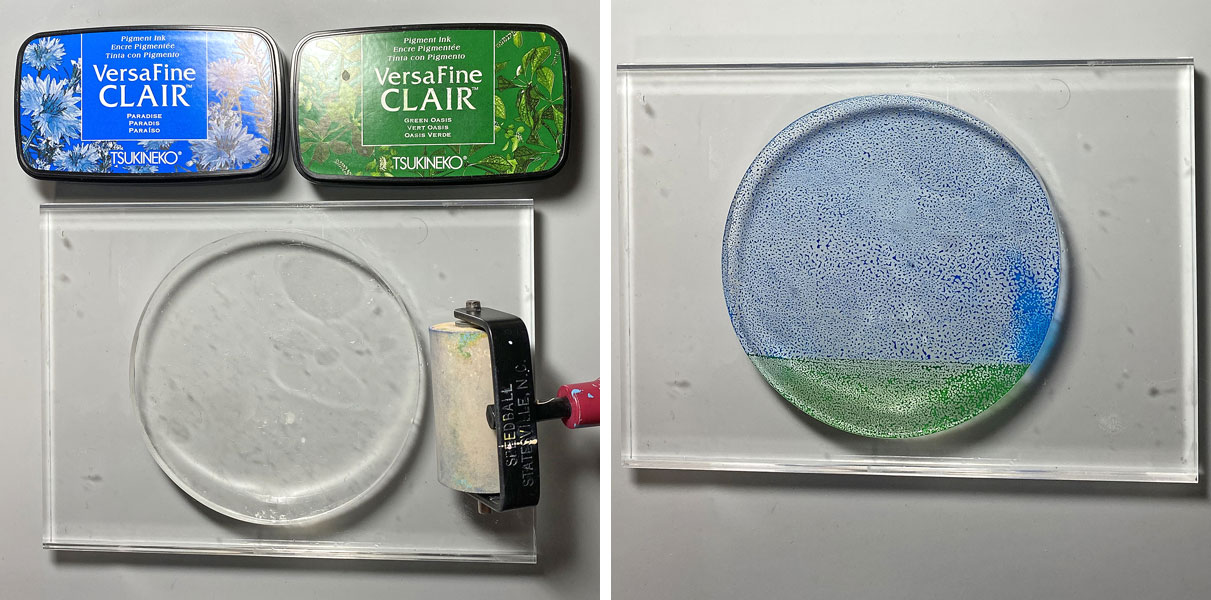
Use a 2” brayer to apply Paradise VersaFine Clair ink to the top part of a 4” round gel press. Clean the brayer, then use to apply Green Oasis VersaFine Clair Ink to the bottom of the gel press.
Press a 6” x 4.25” piece of mixed media paper onto the gel press and pull the print. I actually used a leftover panel from a previous gel print session that was not successful.
Step 2:
Mist the print with with 91% Isopropyl Alcohol.
Use Fantastix to apply Verdant VersaFine Clair Ink to even out the green area of the print and then apply Rain Forest VersaFine Clair Ink to add dimension.
Step 3:
Use paper towel to gently dab the sky and grassy areas of the print with Purell to further blend the ink.
Heat set.
Step 4:
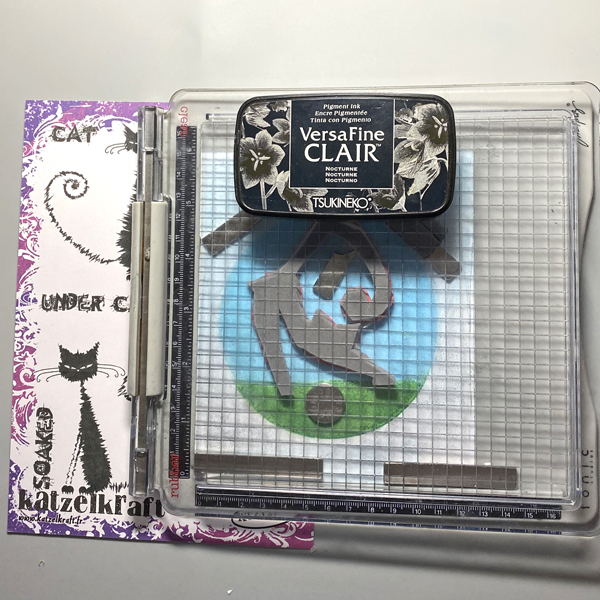
Use magnets to secure the image panel to the base of a stamping platform.
Position the stretching cat stamp from the The Furieux/Caffeinated Cats Unmounted Stamp Set facedown so that its paws are on the grass.
Ink the stamp with Nocturne VersaFine Clair Ink and stamp. Re-ink and stamp again if needed. Remove the stamp and heat set the panel.
Step 5:
The left paws were stamped slightly above the grass, so I used Fantastix and Green Oasis VersaFine Clair Ink to add a tuft of grass under his floating paws and to add detail to the lawn.
Step 6:
Use a Sponge Dauber to apply Pearlescent Sky Blue Brilliance Ink around the image circle, leaving a bit of a halo effect around the circle.
Step 7:
Tape the image panel to the back of the Pawprint Stencil so that the smallest paw prints run horizontally across the top of the image panel.
Use Sponge Daubers to apply Pearlescent Sky Blue and Mediterranean Blue Brilliance Inks over the stencil onto the image panel.
Remove and clean the stencil, then repeat the steps above to stencil the small paw prints across the bottom of the image panel.
Lift the stencil and use the Sponge Dauber to edge the panel with Mediterranean Blue Brilliance Ink. Heat set the panel.
Step 8:
Use a Sponge Dauber to apply Pearlescent Sky Blue Brilliance Ink to a strip of white cardstock. Heat set.
Secure the cardstock strip to the base of a stamping platform. Position the “You talking’ to me?” sentiment from the Whatchamacallit Unmounted Stamp Set facedown on the strip.
Ink the stamp with Nocturne VersaFine Clair Ink and stamp. Heat set.
Use scissors or a die-cut to cut the sentiment and edge it with Mediterranean Blue Brilliance Ink. Heat set.
Step 9:
Cut a piece of white cardstock to 9” x 6.25”, score at 4.5”, and fold to form a 4.5” x 6.25” card.
Use a Sponge Dauber to apply Mediterranean Blue Brilliance Ink around the the edges of the card. Heat Set.
Step 10:
Use Tear It! Tape to secure the image panel to the card front.
Step 11:
After looking at the finished card,I decided that the card needed a larger sentiment up at the top left.
Secure the entire card with magnets to the base of a stamping platform. Position the “Hello” stamp from the Holiday Quotes. Unmounted Stamp Set facedown on the upper left. Use Nocturne VersaMark Ink to stamp the sentiment. Heat set.