Send Birthday Wishes and Puppy Dog Kisses

by Elina Stromberg

Send Birthday Wishes and Puppy Dog Kisses. Use Gold embossing.

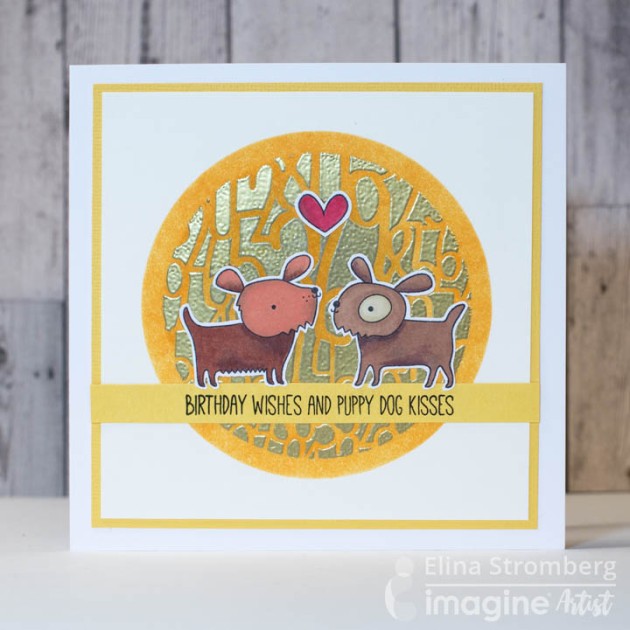
Our color of the month is Golden Glow. Gold is an excellent choice for July a month filled with bright sunshine and sparkle! In today’s tutorial, I create this sweet birthday card theme with two puppies that are colored by hand. This time I used a golden color for decorating the background of a cute birthday card. I love how it turned out!

Skill: Intermediate
Time: 1 hour

Direction

dabbing clear VersaMark on the background, remove the masks, and heat-emboss the revealed pattern using Gold Embossing Powder.
Step 1

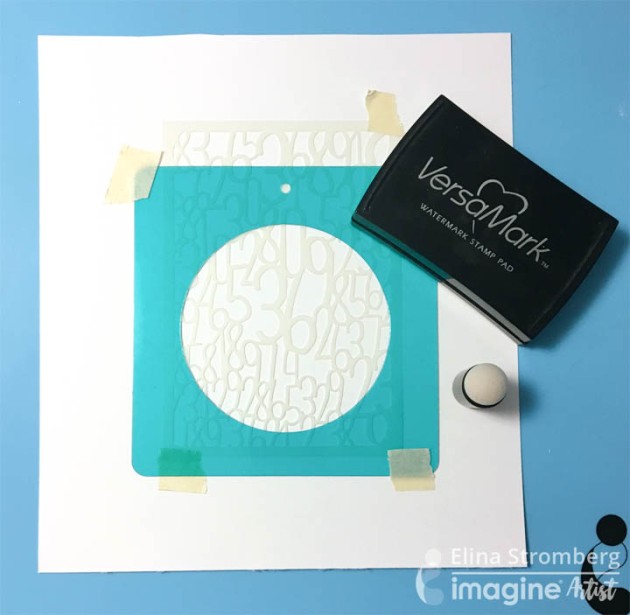
For decorating the card background I used two stencils that I layered on top of each other. I placed the number themed pattern stencil on the card background and masked with a circle stencil. Create the pattern with heat embossing by dabbing clear VersaMark on the background, remove the masks, and heat-emboss the revealed pattern using Gold Embossing Powder.

yellow ‘Cantaloupe’ Memento ink
Step 2

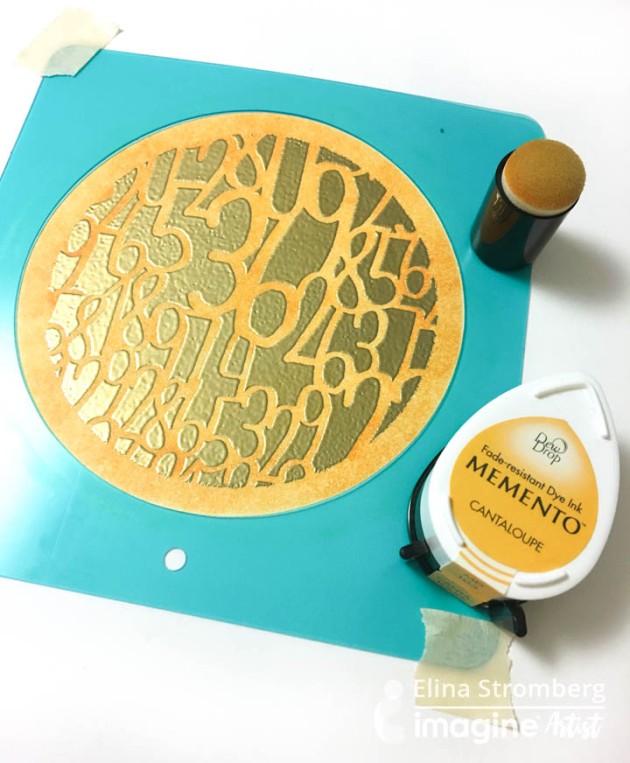
Place another, slightly larger circle stencil on the heat-embossed area, and inked the round background area with yellow ‘Cantaloupe’ Memento ink. This step made the background less busy, letting the stamped, colored, and fuzzy-cut main images pop. When the background was ready I stamped and colored the puppy images on white cardstock. When fuzzy cutting I left a thin area around the images, which made the cutting a lot easier as not all the finest details needed to be cut out.

My Favorite Things Top Dog collection
Step 3

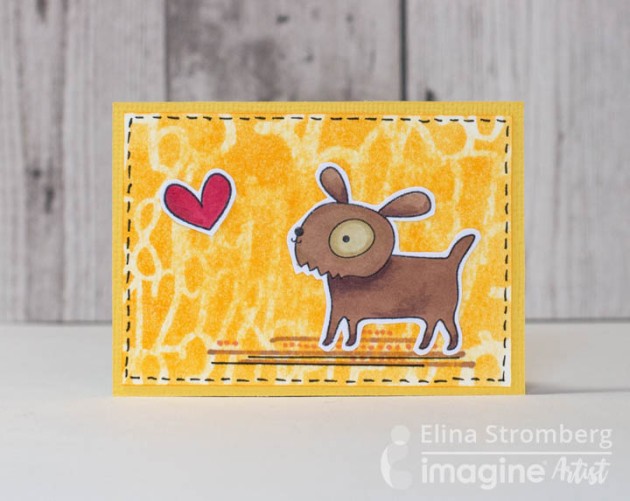
The cute puppy stamps are from My Favorite Things Top Dog collection. The extra copies can be used for trying out new color combinations, but they also become handy if something goes wrong with coloring and you need to start over. I used Promarker alcohol markers for coloring, so for stamping it was important to use a water-soluble Memento. Tuxedo Black was just the right choice for that step.

My Favorite Things Top Dog collection

Supplies

Imagine
Other
  • Cardstock – White
  • Carabelle Studio – Number stencil
  • Two circle stencils
  • My Favorite Things – ‘Top Dog’ stamp
  • Glue
  • Promarkers
  • Scissors
  • Masking tape
  • Cardbase

Say “Hello How are You” with a Handmade Greeting Card

by Arjita Sepaha Singh

Say "Hello How are You" with a Handmade Greeting Card

Hello! How are you? Sometimes we need to simply reach out and say hi to an old friend! In today’s video, I created a very organic and easy card using VersaFine Clair and VersaMagic Chalk ink. I blended three Blue inks on a piece of Iris paper (slightly glossy) with a sponge dauber. I used an arrows stencil and added white and blue ink using finger daubers. To finish the card I heat embossed a sentiment and matted it on a white card base.


Supplies

Imagine
Other

Create Decorative Sand with All-Purpose Ink

by Iris Rodriguez

Create Decorative Sand with All-Purpose Ink

It’s summertime, time for that beach vacation. As you enjoy the sea breeze blowing on your face, the sand tickling your face, the sounds of kids playing, and the seagulls flocking in the distance, let the real world melt away. Much better, right? Before you leave though, pack some sand and bring it home for some fun craft projects, like a sand art terrarium using a glass jar and All-Purpose Inks to color the sand. If you are not going to the beach, it’s okay, you can get sand from the craft store…we won’t tell.

Skill: Beginner
Time: 1 hour

Directions


Step 1

Select a glass container. I used, what used to be a candle jar, measures 4 x 4 x 4 inches, 8 ounces.


Step 2

Cut a piece of foam to fits the center of the jar. Use at least one branch along with the foam to measure the foam’s height. Leave 1 to 2 inches gap from the rim. This will keep the sand from spilling over. The foam will be completely covered by the sand.


Step 3

Arrange the flowers on the foam. Add hot glue to the holes. Artificial succulents and plants will also work. Or you can make it a beach theme by adding seashells.


Step 4

Add hot glue to the bottom of the foam.


Step 5

Glue the foam with flowers in the center of the jar.


Step 6

Place sand in the bag. Fill about a third of the bag, which for the jar used in this project made ¼ to ½ inch layer.


Step 7

Drop in two to three drops of ink. Sand is very porous, a little goes a long way. Seal the bag, ensure to release the air inside.


Step 8

Smoosh the sand around with your fingers and shake so that it moves around. When all of the sand has been colored, you are done. The sand dries instantly. There is no dry wait time. However, if you use a little too much ink, the sand will stay wet. With the ink, it’s not easy to tell it’s wet as you can with water. To test out if the sand is wet, run the sand through your fingers, if it does not run through your fingers smoothly, then it’s wet. Visibly, it will look loosely clumped. Even if slightly wet, it will not go through the funnel or layer smoothly and will stain the layer below. In this case, leave the bag open and let the sand dry.


Step 9

Repeat step 8 for each color. Use a different bag for each color.


Step 10

Pour sand into the funnel and layer the sand. Pour a little bit of sand at a time. Rotate the jar and fill a different area. An alternative is to use a small measuring spoon.


Step 11

Continue to layer until you reach the top and have covered the foam. Use the Imagine’s Doodlestix to reach in and move the sand around.


Now you have a DIY home décor nice or cute gift for that special someone. Hope you give this project a try.

Supplies

Imagine
Other
  • Sand
  • Glass jar or container
  • Artificial flowers or succulents
  • Snack size sealable plastic bags
  • Small funnel or measuring spoon
  • Foam
  • Hot glue

How to Draw the Eiffel Tower in Paris with Washi Tape

by Jennifer Vanderbeek

How to Draw the Eiffel Tower in Paris with Washi Tape

Whether you are able to travel this summer or are staying home, you can create this fun canvas commemorating one of the world’s most recognized landmarks –The Eiffel Tower in Paris, France. After altering our canvas with tissue and Creative Medium, we’ll mask out or elements with washi tape and add layers of Delicata for a burnished patina. Once you’ve got the hang of it, try out more famous places that you’ve visited or only dreamed about.

Supplies

Imagine
Other
  • 10 x 10 Canvas
  • Tissue Paper
  • Paint Brush
  • Plastic Cup
  • Washi Tape in 3 widths

Create a High Contrast Card with Gold Embossing

by Martha Lucia Gomez

Create a High Contrast Card with Gold Embossing

The color challenge for July is Golden Glow and I immediately thought of Gold Embossing! I was so excited because I love Clean and Simple cards and I think using gold as your main color allows for a clean and simple design that is still sure to wow the recipient. While my card is in the style of CAS it is a bit of an advanced technique as it actually has three layers of paper! If you are looking for a beautiful design to create for a special occasion this White and Gold theme is an elegant combination. Enjoy!

Skill: Advanced
Time: 1 hour

Directions


Step 1

With masking tape create a border on the bottom of your card base. The width of the border depends on the size of the die cut letters that you want to use. In my project, I created a 1 inch border because the size of my die cuts is Jumbo. Ink the masked area directly with the VersaMark Inkpad. Cover the inked area with Gold Embossing Powder and melt the powder with the heat tool.


Step 2

Set the card base aside. Use large die letters to cut the letters “H” and “I” for the greeting. Align the letters over the card border and mask the lower portion with masking tape to match the card base border. (I used the same piece of masking tape for step one and two.)


Step 3

Cut a piece of whisper white cardstock to match the same area that is still white on the card base. In my sample, the card is a standard size, so my top layering piece is 5.5″ x 3.25″. Leaving the masking tape attached to the front side, apply On Point Glue on the back of the letters, above the masked area only. Paste the letters onto the separate layer aligning the masked area to the lower edge of your cardstock layer.


Step 4

Stamp a floral image on the left corner of the top cardstock piece with VersaMark and emboss with Gold Embossing Powder. Add a fun foam white layer behind the decorated layer and tape over the card base aligning the gold borders.


Supplies

Imagine
Other
  • Masking Tape
  • Altenew – Persian Motifs Stamp Set
  • Stampin’ Up – Large Letters Framelits
  • Big Shot Die Cutting Machine
  • Heat tool
  • Cardstock – White
  • MISTI Stamping Tool, Stamparatus or acrylic block

Learn How to Craft Your Own Dominos Pieces

by Kyriakos Pachadiroglou

Learn How to Craft Your Own Dominos Pieces

Today’s tutorial is a great summer fun project with a dominos game that can be played by everyone in the family. Having a lot of spare canvas wooden wedges, I decided it was time to alter them in domino pieces, a bit different from the usual ones, giving a distinct way when lining them while playing. Colored with bright Fireworks colors that give a fun summer mood and make them easy to spot when you are at the beach playing on the sand. The dots on domino pieces are made with Radiant Neon Amplify colors and heat set to add volume. A quick and easy fabric pouch colored with Fireworks keeps them safe and easy to take them with you.

Skill: Beginner
Time: 1 hour (40 min without sanding)

Directions


Step 1

Sand the canvas wooden wedges on a piece of sandpaper. This is an optional step as it will make the surface smoother.


Step 2

Color 10 wooden wedges with the Fireworks Bahama Blue color on all sides.


Step 3

Continue by coloring the rest of wooden wedges, split in half, with the Fireworks! Shimmery Craft Spray in Danube Blue and Lilac Posies colors. Let them dry well.


Step 4

Use the Radiant Neon Amplify in White and Electric Yellow colors to make the dots of the numbers on the wedges on half of the wedge. Every number from 0 (blank, no dot) to 6 needs to have a piece with these numbers placed on the other half. If it is a blank half with one dot on the other half, a blank half with two dots and so on. Make sure that you don’t repeat the same piece as you move on to numbers when you to start marking the 1 number (one dot) you will already have the piece with the blank or zero made. Please google “dominos pieces” for a visual guide if you need additional help.


Step 5

When finished, use your heat tool to make Radiant Neon Amplify puff.


Step 6

Cut a 12 x 14 inch piece of white cotton fabric and using an A4 page to cover a part of it, spray with Fireworks Bahama Blue. Move the page further, use the second one to cover the colored part and spray with the Fireworks in Lilac Posies. Finish with the Fireworks in Danube Blue covering the remaining fabric. Let it dry well.


Step 7

Hand sew sides to make the pouch. Use some satin ribbon to tie it.

Supplies

Imagine
Other
  • Canvas wooden wedges (28 pieces)
  • Sandpaper
  • Cotton fabric
  • Heat tool
  • A4 pages
  • Satin ribbon