Make a Graduation Gift Card Holder

By Jessica Lin

Hi everyone! It’s graduation season. Do you have a gift card, a ticket, or even a polaroid photo you would like to send to someone who is graduating? Today I’m sharing my favorite way to send a gift card. It’s super easy and versatile; if you are interested, keep reading!

Skill: Advanced
Time: 1 hour

Directions:

Step 1:
Stamp the images with any waterproof ink. Many Tsukineko ink pads are waterproof when the ink dries; I am using VersaFine Nocturne today. Also, can we talk about how adorable these images are?! They are from It’s a Science stamp set and they’re totally perfect for any science majors. I thought they would look so cute for a graduation card.

Step 2:
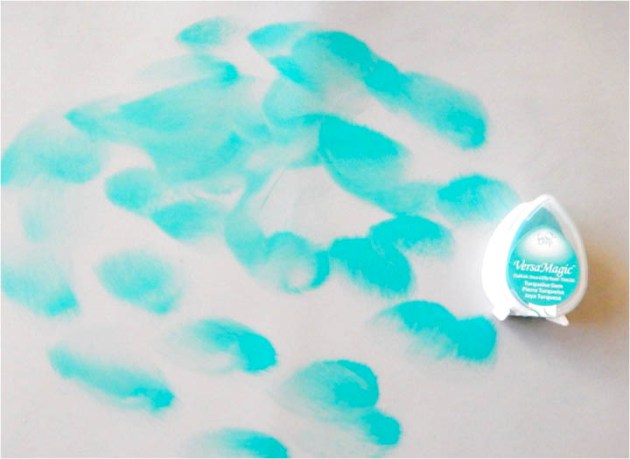
Watercolor with dew drop ink pads. I love to watercolor with my dew drop ink pads. You can choose from the VersaMagic (pigment ink), Brilliance (pigment ink) or Memento (dye ink) lines and they all work great! I smooshed some ink onto my craft mat and colored away!

Step 3:
Fussy cut the images with scissors. If the stamp set has a coordinating die set, you could use that too!

Step 4:
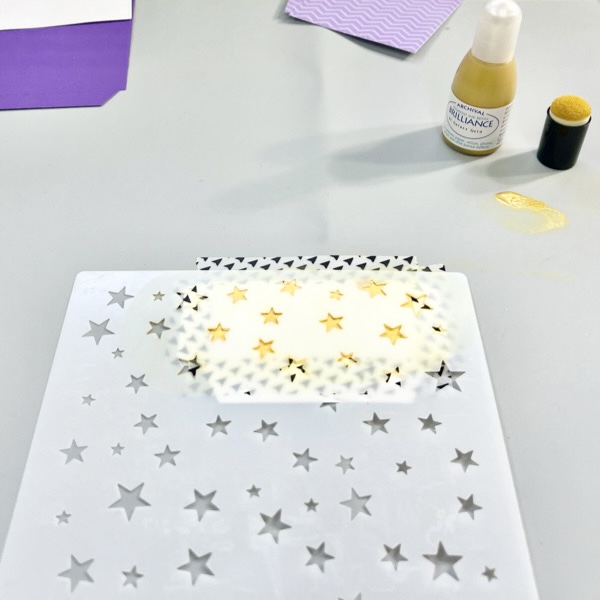
Stamp images with VersaMark ink pad to create details for the background panel.

Step 5:
I actually decided to create a light up card by adding a LED light to the microscope image. If you are interested in seeing a video tutorial, you could follow my YouTube channel: Craft with Jessica V. Lin or search for “Interactive Gift Card Holder that Lights Up”. I’ll edit the video and post it soon.

Step 6:
This is what the LED light looks like when the circuit is finished. It’s really not that complicated, and the result is so worth it!

Step 7:
Finally, for the gift card holder, simply score an A2 card base at 4.5’’, 5.5’’ and 6.5’’. Adhere the bottom edge with Tear-It! Tape (make sure you don’t adhere the entire flap closed). Then, create a gift card opening by die-cutting along the edge of the middle flap. If you don’t have a die that works, you could also cut the opening with scissors.

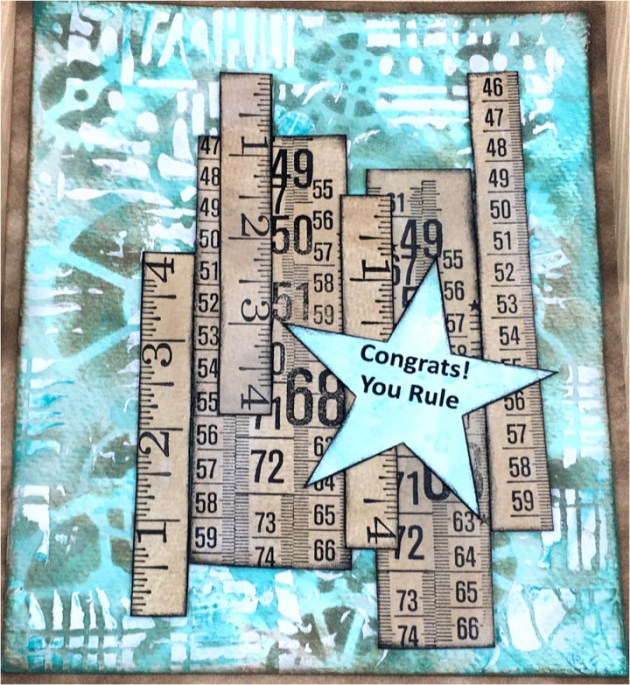
And the gift card holder card is completed! I love this design since it’s super easy and you could easily swap the gift card with tickets (like the Disneyland ticket shown in step 7) or even a polaroid photo if you decided to keep it as a card instead. I hope you give it a try, thanks so much for stopping by!

Supplies Used:

Imagine Supplies:

Other Supplies:

  • Stampin’ Up! – Stamps – It’s a Science
  • Spellbinders – Dies – Labels 17
  • We R – Tool – Precision Press
  • Stampin’ Up! – Tool – Paper Snips
  • Water brush
  • Chibitronics – Tool – LED sticker

Let’s Make A Graduation Card

By Anna Escalada York

In today’s tutorial, I am sharing a graduation card. As a high school teacher, it is the time of year to
stock up on them!

Skill: Intermediate
Time: 1 hour

Directions:

Step 1:
Press ink pads onto a piece of acetate packaging or other non-porous surface. Spray the ink
with Sparkle Sheer Shimmer Craft Spray and then quickly press the acetate onto a panel of
watercolor paper multiple times to press the ink onto the watercolor panel. After the ink dries,
repeat with different colors of ink sprayed with more of the Sparkle Sheer Shimmer Craft Spray.
Both panels feature Turquoise VersaColor ink, with Jumbo Java VersaMagic chalk ink and
Golden Glitz Delicata ink layers, just in different intensities. (I only ended up using one panel,
but will be using the other card for a project in the future.)

Step 2:
Die cut the panel with a mid-sized panel die (there will be another panel that is slightly larger
than this layer from the same nesting die set).

Step 3:
Repeatedly stamp a graduation cap stamp onto the watercolor smooshed panel with more of
the Turquoise VersaColor ink to create your own patterned paper. Then directly press the edges
of the panel into the Turquoise VersaColor ink pad to create a border on the panel.
Optional step: Heat emboss the stamped image and the border with clear embossing powder.

Step 4:
Using a larger panel die, die cut a piece of kraft cardstock to create a matte layer.

Step 5:
Using an ink dauber, ink blend Jumbo Java VersaMagic chalk ink along the edges of the panel.
This ink blending can be very imperfect since most of it will be hidden.

Step 6:
Stamp the sentiment on another piece of watercolor paper with Jumbo Java
VersaMagic chalk ink. Trim the sentiment, with the left and right edge being trimmed on a
diagonal if desired. Then press the VersaMagic chalk Ink pad onto the edges of the sentiment
strip and ink blend the edges with more of the same Jumbo Java ink using an ink dauber.

Step 7:
Attach all of the layers of the card together. Glue the stamped layer onto the larger
(brown, matte) one. Then glue both layers onto an A2 sized kraft card base.
Finally attach the sentiment strip onto the card with foam tape.

Step 8:
Glue copper and blue sequins onto the card.

Art Supplies

Imagine
• Delicata Ink – Golden Glitz
• Sheer Shimmer Spray – Sparkle
• VersaColor Ink – Turquoise
• VersaMagic Chalk Ink – Jumbo Java
• Sponge Dauber

Other Products
• Altenew – Tape – Instant Dimension Foam Tape
• Catherine Pooler Designs – Santa Fe sequin mix (retired)
• Pink & Main – Notched Corners (nesting) die set
• Unity Stamps – Snarky Graduation stamp set
• Clear embossing powder
• Scissors
• Glue

Graduation Gift Card Holder

By Helen Gullett

Hello crafty friends! The Month of May is the month for graduation. It is time to celebrate those who made it through their education journey. Today, I would like to share a way to celebrate and congratulate them with this handmade graduation gift card holder.

Skill: Intermediate
Time: 30-45 minutes


Direction:

Step 1
Cut all the pieces from the gift card holder die set using the pattern cardstock and plain cardstock of your choice. I chose the school colors for my project.

Step 2
Add a small amount of the Brilliance Inker Galaxy Gold on the Imagine Craft Mat.

Use the sponge dauber to add the ink on the cardstock cut out.

Let it dry for a few minutes, then add more ink to it for more color, if needed.

Remove the stencil carefully and let it sit to dry completely or use a craft heat gun to speed up the drying time.

Step 3
On the front piece cut out, stamp the graduation hat and diploma images randomly using VersaFine Clair Nocturne ink pad.

Set aside to dry or use a craft heat gun to speed up the drying time.

Step 4
When all the pieces that need stamping or/and stenciling done, you can put together the cut out pieces following the instruction.

Use a bone folder to fold the pieces.

Use On Point Glue and Tear It! Double-Sided Adhesive Tape to put each piece together.

Step 5
On a white piece of white cardstock, stamp the sentiment using VersaFine Clair Nocturne ink pad and stamping acrylic block.

Cut it with the tag die.

Add the tag to the gift card holder handle with a piece of twine.

Here’s how it looks when it is close. Isn’t that cute little gift card holder?

Hopefully this project will give you an idea for a handmade gift project and you give it a try.
Thanks so much for stopping by our blog today. Have a wonderful day!

Craft Supplies

Imagine Crafts:

Others:

  • Dare 2B Artzy – Purse Gift Card Holder Die Set
  • Dare 2B Artzy – Rectangle Framelits Die
  • Close To My Heart – Diploma Day Stamp Set
  • Close To My Heart – Smarty Pants Stamp Set
  • Sweet ‘n Sassy Stamps – Starry Night Stencil
  • Pattern Cardstock
  • White Cardstock 100 lb
  • Solid Color Cardstock
  • Glitter Cardstock
  • Twine
  • Washi Tape
  • Bone Folder
  • Craft Tweezers
  • Embossing/Diecutting machine
  • MISTI stamping tool

Make a Colorful Card Perfect for Advancing to the Next Grade

2021_Jul_JowilnaNolte_School_1

By Jowilna Nolte 

– I dream in color literally. This was the case the other night when I dreamt about some alcohol ink that wasn’t alcohol ink. And so experimenting started. I used my VersaFine Clair ink pads on Yupo paper. Now technically this will never dry but here is the trick how to create that gorgeous look.

Skill Level: Beginner/Intermediate

Time: 30 minutes

Directions:

2021_Jul_JowilnaNolte_School_step1

Step 1

gorgeous colorful card perfect for advancing to the next grade.

2021_Jul_JowilnaNolte_School_step2
Step 2

I used 200gsm Yupo paper in white. Swipe the first color of ink across the paper once or twice depending on how wide you would like your strip.

2021_Jul_JowilnaNolte_School_step3

Step 3

Now continue with the second and third color of ink.

2021_Jul_JowilnaNolte_School_step4

Step 4

While the ink is still nice and wet use your blending solution and add quite a bit of it onto the ink. Let it sit for a while and then swirl the paper around to mix the colors a bit.

TIP: I also added some into a misting bottle and sprayed the inks to create small little drops of texture on it.

2021_Jul_JowilnaNolte_School_step5
Step 5

Leave to dry. I left mine to dry for a while and still had some thicker areas where the ink pooled that stayed tacky, so I simply used a clear sealant and sprayed that over the paper and left it again. It dried nicely and now all I have to do is use this gorgeous Faux alcohol ink piece of a project.

Trim your panel to fit onto the front of a folded card and adhere the panel using Tear It! Tape.

Add a vinyl decal and stamped sentiment, then finish off your card with a few scattered diamante. And in a few minutes you created this gorgeous colorful card perfect for advancing to the next grade.

Art Supplies

Imagine

VersaFine Clair Paradise
VersaFine Clair Charming Pink
VersaFine Clair Summertime
VersaFine Clair Nocturne
Tear It! Tape
On Point Glue

Other

Yupo paper
Alcohol blending solution
Die-cut: Cricut
Gold vinyl: Cricut
Die-cut machine: Cricut Maker
Embellishments
Stamps: Joy Clair

Use Different Inks to Make a Congrats Graduation Card

by Iris Rodriguez

Use Different Inks to Make a Congrats Graduation Card

Graduation season is upon us. As much as it a joyous time in anyone’s life, you feel the pressure of the final exams, think about that next phase of your life and probably make a big move. Don’t forget the grad in your life, and make him/her a fun, grungy card. I will show you how you can create a simple, yet layered background with fun ruler embellishments and matching sentiment.

Skill: Beginner
Time: 30 minutes

Directions


Step 1

Smoosh the Turquoise Gem VersaMagic ink onto the Imagine Craft Mat.


Step 2

Spray water over the ink. Smoosh the watercolor paper and create a random background. Dry the paper.


Step 3

Stencil the gears with the Vintage Sepia VersaFine ink and Inkblusher.


Step 4

Using the palette knife and modeling paste, stencil another image.


Step 5

Spray some Walnut Ink, then brush the ink with a wet brush. Dry paper.


Step 6

Stamp the ruler stamps with the Piano Black StazOn Pigment ink.


Step 7

Cut out the rulers and ink the edges with the Piano Black StazOn Pigment ink.


Step 8

Assemble card. Glue on the rulers and add a sentiment.


Supplies

Imagine
Other
  • Watercolor Paper
  • The Crafters Workshop – 6×6 Gears stencil
  • Carabelle Studio – Steampunk Metre stamp
  • Stampendous – Ruler stamp
  • Liquitex – Modeling Paste