Double Stencil Technique Halloween Card

By Ceil Pritchett

Hello crafty friends!
It’s Ceal, here. Today I am sharing a fun technique using stencils. It’s called Double Stenciling or Double Trouble fitting for Halloween, right?

Skill Level: Beginner
Time: 30 Minutes

Directions:

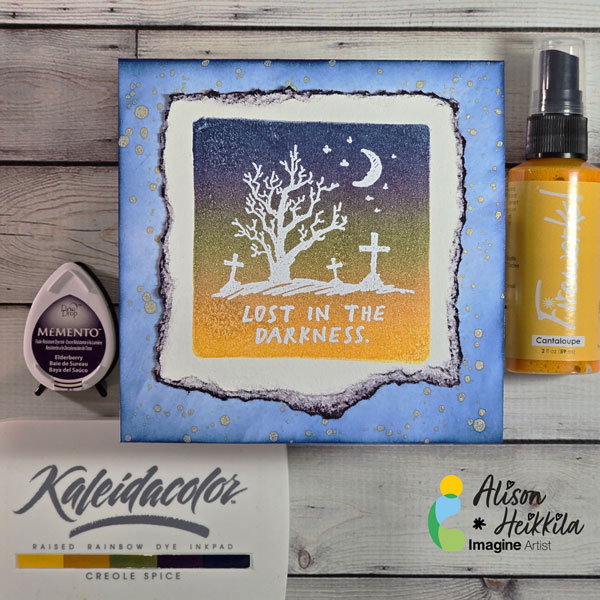
Gather your supplies. You will need two stencils, a Halloween stamp set and a word die cut. You will also need two or three inks. I used one of the newest VersaFine Clair colors along with two of the original ones. A sticky mat, tape or something to hold your stencil in place would be useful as well.

Step 1:
Lay your panel on a sicky mat of tape it down to hold it in place. Lay your first stencil on top and ink it up with VersaFine Clair Monarch.
(As you can see, I don’t usually clean my stencils)

Step 2:
Remove the first stencil and replace it with the second stencil. Ink it up with VersaFine Clair Verdant.

Step 3:
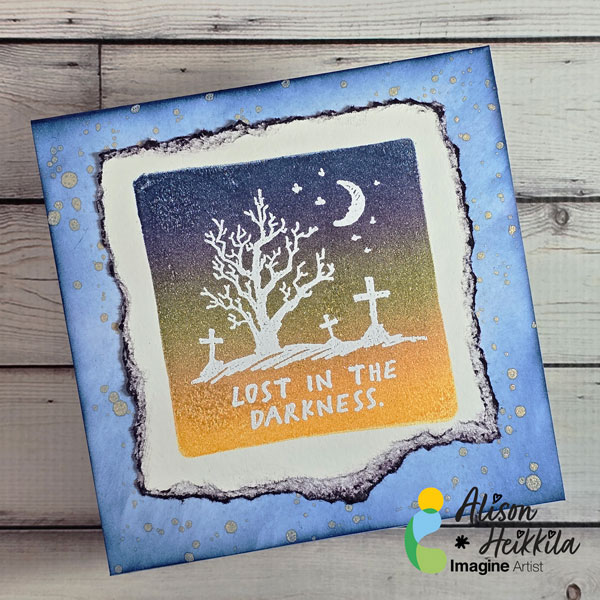
Remove the second stencil and go over the entire panel with VersaFine Clair Lilac Bloom one of our gorgeous new colors.

Afterwards cut the panel down to 5 x 3 3/4

This background reminds me of that old wallpaper you would see in a haunted house.

Step 4:
Stamp, color and fussy cut out the image and word die.

Finish the card by adding the panel to an A2 sized card base and adding the elements placed where you would like them.

Products Used:

 Imagine:
VersaFine Clair: Verdant, Monarch, Lilac Bloom
Memento Markers: Cantaloupe, Grape Jelly, Tuxedo Black ,Gray Flannel and Tangelo
On Point Glue

Other Supplies:
Neenah Classic Crest Solar White 120lb CS – CutCardStock
Neenah Classic Crest Solar White 80lb – CutCardStock
Jack of All Faces Stamp Set – The Rabbit Hole Designs
Boo Word Die – Lil Inker
Stencils – A Colorful Life Designs
Misti 2.0 – My Sweet Petunia
Grip Mat – Waffle Flower

Create a Death-Head Moth Halloween Card Using Ink Blending Techniques

By Anna Escalada York

In today’s card, I used sprays and and ink-blending to make a Halloween card.

Skill: Intermediate
Time: 1.5 hours

Directions:

Step 1:
Stamp the Death’s-Head Moth stamp onto a piece of white watercolor paper with Nocturne
VersaFine Clair ink. Emboss with Clear Mboss powder.

Step 2:
Spray a pre-die cut panel of watercolor paper with Lilac Posies Fireworks! Shimmery Craft
Spray and Rose Gold Sheer Shimmer Craft Spray. Allow the panel to dry.

Step 3:
Color two corner filigree stamps–one at the top right corner and one at the lower left corner–with
the Sweet Plum Memento Marker directly and then stamp the sprayed panel. Flip the panel 180
degrees (so the top is now the bottom) and repeat the process to add a stamped image to each
corner.

Step 4:
Ink blend Perfect Plumeria VersaMagic Chalk Ink around the border of the card panel,
overlapping with the stamped decoration just added. Then ink blend the edge of the panel with
Midnight Black VersaMagic Chalk Ink.

Step 5:
Die cut a piece of black watercolor paper with a frame die. Then spray the die cut with Rose
Gold Sheer Shimmer Craft Spray and let dry. If desired, repeat this process to add more shine
and color.

Step 6:
Fussy cut the Death’s-Head Moth, then use a sponge dauber to ink blend the outer part of the
wings with Perfect Plumeria VersaMagic Chalk Ink.

Step 7:
Spray the moth with Angel Pink Fireworks! Shimmery Craft Spray and allow to dry.

Steps 8 and 9:
Stamp a border and a sentiment on a piece of watercolor paper with Nocturne VersaFine Clair
ink. Heat emboss with Clear Mboss embossing powder. Then fussy cut the border.
Then ink blend the edges of the sentiment with Perfect Plumeria VersaMagic Chalk ink with a
sponge dauber. Then lightly spray the sentiment with Rose Gold Sheer Shimmer Craft Spray.
Allow the spray to dry.

Step 10:
Glue the frame, Death’s-Head Moth and sentiment onto the background panel.

Step 11:
Die cut a piece of sparkly black cardstock with a larger panel die cut. Glue it behind the sprayed
panel as a matte layer.

Step 12:
Glue embellishments onto the panel and finish the card by gluing the whole thing onto an
A2-sized card base.

Art Supplies

Imagine

• Fireworks! Shimmery Craft Spray – Angel Pink and Lilac Posies
• Mboss – Clear
• Memento Marker – Sweet Plum
• Sheer Shimmer Craft Spray – Rose Gold
• VersaFine Clair ink – Nocturne
• VersaMagic Chalk Ink – Midnight Black and Perfect Plumeria
• Sponge Daubers

Other
• Crafty Meraki – Embellishments – Meraki Sparkle Gold
• Erin Lee Creative – Paper – Las Vegas Sparkly Cardstock
• Gina Marie Designs – Die set – Big and Little Chain Rectangle die set
• Whimsy Stamps – Stamp Set – Exquisite Beauty stamp set
• Whimsy Stamps – Die Set – Forever Cameo Frames die set
• Watercolor paper
• Paper Trimmer
• Scissors
• Glue

Spooktacular Backgrounds with Fireworks! Shimmery Craft Sprays

By Alison Heikkila

Greetings! Let’s get a little messy and make a spooktacular Halloween card with Fireworks! Sprays. I’ll be using them in 3 different ways on this card. Which way is your favorite?

Skill Level: Beginner-Intermediate
Time to Complete: 20-30 Minutes

*Some affiliate links are used in this post. That means that if you shop through these links, I may receive a small compensation, at no cost to you.

The video is below. If it doesn’t play properly, please click HERE.

Supplies:
Imagine:
Fireworks! Sprays in Cantaloupe, Tangelo, Love Bug, and Grape Jelly
Memento Ink in Desert Sand
Memento Ink in New Sprout
Sponge Daubers
Tear It! Tape
On Point Glue

Other:
Tim Holtz & Sizzix: Big Frights Die Set
Tim Holtz & Sizzix: Tree Rings Texture Fades Embossing Folder
Strathmore: Smooth Bristol Cardstock
Scrapbook.com: 1mm Foam Tape
Scrapbook.com: Artis Craft Glue
Accent Opaque: 100lb. White Cardstock
Vellum
Purple Cardstock
Paintbrush

Making backgrounds like these can be so satisfying. Watching the colors swirl together, then seeing the shimmer after they’re dried….it’s a great way to spend some time, especially if you’re not feeling super crafty. What are some of the ways you would use Fireworks! Spray? Be sure to visit Imagine to see all the beautiful colors they come in. Thanks so much for stopping by. Have an inspiring day!

Ink Blending With Kaleidacolor Inks

By Alison Heikkila

Hello! I’m Alison Heikkila. Kaleidacolor Inks come in beautiful color palettes and help you do some really fun techniques. I love to use my Kaleidacolor Inks with my Gel Press plates. In this case, we’re using one of the Petite Plates to get the look of a watercolored painting without actually watercoloring.

Skill Level: Beginner-Intermediate
Time to Complete: 20-30 Minutes

*Some affiliate links are used in this post. That means that if you shop through these links, I may receive a small compensation, at no cost to you. 

Supplies:
Imagine:
Kaleidacolor Ink in Creole Spice
VersaMark Ink
White Embossing Powder
Fireworks! Spray in Cantaloupe
Memento Ink in Elderberry

Other:
Gel Press: Petites Set A
Gel Press: Rubber Brayer
Stampers Anonymous: Halloween Sketchbook
The Rabbit Hole Designs: Cotton Tail Blending Brush
Accent Opaque 100lb. White Cardstock
Scrapbook.com: Artis Craft Glue
Watercolor Paper
Stamping Platform

Goosebumps Resist Technique

By Nancy May –

Hey y’all. This is Nancy, the Handi Scandi, for Imagine Crafts. Whether I’m a bit late for Halloween or getting a jump on next year, I have once more Halloween project to share with you today. I’m using Goosebumps through a stencil to create a great resist effect with Fireworks sprays. 

~Nancy

Skill: Intermediate

Time: undetermined

Art Supplies


Imagine

Other

  • Visible Image – Glimmer of Light
  • A Colorful Life Designs – Bold Diamond 6×9 Stencil
  • Simon Says Stamp – Home Sweet Haunted Home

Faux Metal Embossed Tin Foil

By Nancy May

– I love it when I can incorporate everyday items from around the house in my craft room. Today we are paying with tin foil…aluminum foil…kitchen foil…whatever you might call it…We are going to repurpose basic tin foil into faux metal panels, emboss them with embossing folders and see which Imagine products will adhere to the foil to create that beautiful faux metal look. Then we will make a couple of beautiful cards

~Nancy

Skill: Intermediate

Time: undetermined

Art Supplies

Imagine 

• Craft Mat

• IrRESISTible Spray

– Copper

– Bronze

– Bamboo Leaves

– Love Letter

• Fireworks! Shimmery Craft Spray

– Desert Sand

– Tuxedo Black

– Potter’s Clay

– London Fog

• On Point Glue

• Tear It! Tape

Other 

• Sizzix/Stampin’ Up! – Tin Tile Embossing Folder

• Darice – Quatrefoil Embossing Folder

•Simon Says Stamp – Scandinavian Embossing Folder

• Spellbinders – Raven Embossing Folder

• Simon Says Stamp – Layered Pumpkin Wafer Die

• Ideology – Halloween 2022 Backdrops

• Pinkfresh Studio – Alphabet Dies

•     Glassboard Studio: https://shrsl.com/462kl

  **Use code Handi20