See How to Make Earrings with Rinea Foil

by Kyriakos Pachadiroglou

See How to Make Earrings with Rinea Foil

To be a star yourself, you need extra star shine in your jewelry! Crafting a pair of supersize star shape earrings is easy with Imagine Sheet Metal and the Starstruck foiled paper from Rinea. The Sheet Metal star frames that are created with dies, keep inside the double-sided foiled paper that shows on both sides of the earrings with no extra work. Tear It Tape is a great tool to attach the metal pieces and the paper together. A liquid glue that may leak on in the center. To gift the star shape earrings, create a small pocket with more Rinea foil paper and a small sentiment stamped with VersaFine Clair ink. See how I did it! 

Skill: Advanced
Time: 40 minutes

Directions
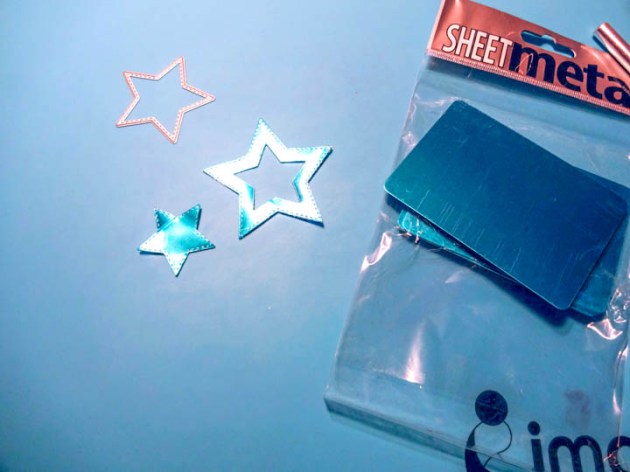
Imagine's Sheet Metal using a 2.5-inch and a 1.75-inch star dies
Step 1

Die cut four star-shaped frames from Imagine’s Sheet Metal using a 2.5-inch and a 1.75-inch star dies.

Die cut 2 Rinea foil paper stars
Step 2

Die cut 2 Rinea foil paper stars using a 2-inch wide star frame.

Tear It Tape around the Sheet Metal star frame
Step 3

Place Tear It Tape around the Sheet Metal star frame on the back side of it.

Rinea foil paper star
Step 4

Set the Rinea foil paper star. It will leave space around it so you can easily glue the second-star frame.

Punch a small hole and add a large jump ring and an earring hook
Step 5

Punch a small hole and add a large jump ring and an earring hook. Repeat on the second earring.

5x5 piece of cardstock
Step 6

Score a 5×5 piece of cardstock at the lower 2-inch mark, place Tear It Tape on the short sides and fold to make a pocket.

Rinea foil, place Tear It Tape and glue on the folded side
Step 7

Cut a 1×5 inch piece of Rinea foil, place Tear It Tape and glue on the folded side.


Step 8

Punch two hole on the main card, leaving 1 ½ in from each side.
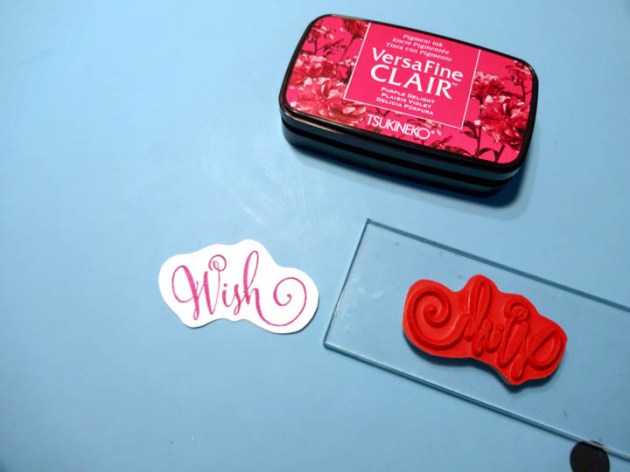
Stamp the "Wish" sentiment stamp with VersaFine Clair Purple Delight ink
Step 9

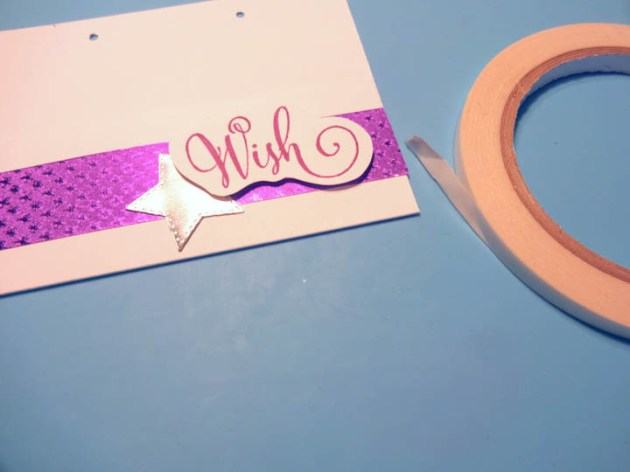
Stamp the “Wish” sentiment stamp with VersaFine Clair Purple Delight ink and cut along.

Step 10

Set a star of Sheet Metal that previously removed to make the frame and the “Wish” stamped paper cutting on the front of the card using Tear It Tape.

make a set of star earrings with a matching wish gift card

Supplies

Imagine
Other
  • Rinea – Starstruck Violet foiled paper
  • 5 x 5 white cardstock
  • Star shape dies
  • Die cutting machine
  • Jump rings and earring hooks
  • Hole punch
  • Crackerbox & Suzy – Wish stamp

Learn How to Create Foil Paper Christmas Ornaments

by Roni Johnson

Learn How to Create Foil Paper Christmas Ornaments

Oh My….Gingerbread! That is the color of the month for November 2018 here at Imagine. Gingerbread is not only one of my favorite holiday treats but it is also one of my favorite colors. I have paired it with another of my holiday favorites…handcrafted ornaments! These star ornaments are so elegant looking on the tree and by making them with Rinea Foiled Papers they add loads of extra sparkle and shine to the mix.

Skill: Intermediate to Advanced
Time: 1 hour per ornament

Directions


Step 1

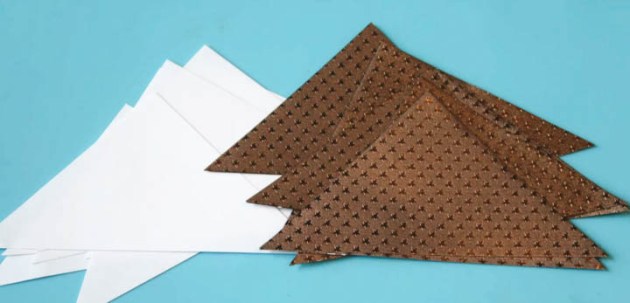
Cut copy weight white paper 4.75” x 4.75”; cut the square into triangles as shown.


Step 2

Cut Mocha/Mocha Starstruck Foiled Paper into 5” squares then into triangles. Note: You will need 9-10 triangles per ornament.


Step 3

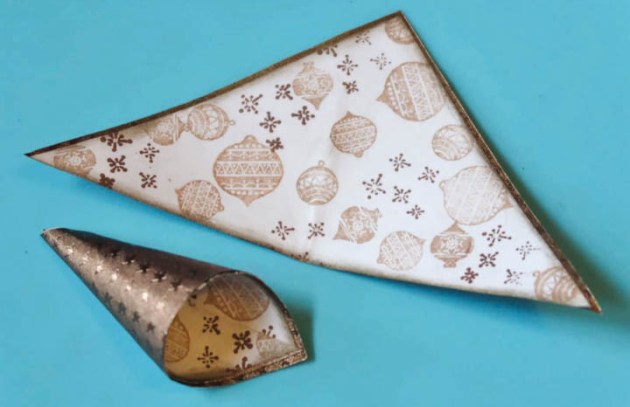
Stamp each triangle with a variety of ornament peg stamps using VersaMagic Gingerbread and VersaFine Clair Acorn inks. Sponge edges with Dark Brown Shimmer Delicata ink.


Step 4

Mount each stamped triangle onto each foiled paper triangle. Roll one side point and affix it to the center point; roll the other point around the side to form a cone. Affix with your favorite adhesive. Repeat until you have 9-10 cones.


Step 5

Die-cut a circle from chipboard and one from gold foiled paper. Trim a 10” piece of stretch cord per ornament.


Step 6

Punch a hole in the chipboard circle. Adhere to 8-10 cones around the circle.


Step 7

Once all the cones are attached or glued down, insert a decorative brad in the center of the ornament to cover the tips of the cones.


Step 8

Cover the back of the ornament with the gold foiled paper circle (to hide the brad); affix the stretch cord hanger. In the photo above, you can see that I have used a different color scheme.


Step 9

Here I have made two versions of the same ornament one is using 10 cones in multiple colors and the other is 9 cones in gingerbread. Above is a comparison of the different looks. The 9 cone ornament is much wider/flatter look to it while the 10 cone ornament is more rounded with the original cone shape still intact. Both beautiful in their own way.

Supplies

Imagine
Other
  • Rinea Foiled Paper – Jolly Foiled Paper Pack; Mocha/Mocha Starstruck Foiled Paper
  • Rubber Stamp Tapestry – Embellished Holiday Wreath Peg Stamp Set; Happy Holidays Peg Stamp Set
  • Joy Clair – Ugly Sweater Background Stamps
  • White Copy Paper
  • Chipboard
  • MFT – Scallop Circle Dies
  • Fancy Brad
  • Stretch Cord

See How to Create a Gingerbread House with Rinea Paper and StazOn Studio Glaze

by Steph Ackerman

See How to Create a Gingerbread House with Rinea Paper and StazOn Studio Glaze

The holidays are almost here and there is nothing as iconic for Christmas as a gingerbread house during the holidays. When the kids have outgrown this tradition, it is still possible to recreate the fun by using your craft supplies. In today’s project, I used StazOn Studio Glaze to fill in some of the details of this gingerbread die.

Skill: Intermediate
Time: 1 hour

Directions

 Gingerbread House from Rinea's Glossy Mocha/Gold Foil
Step 1

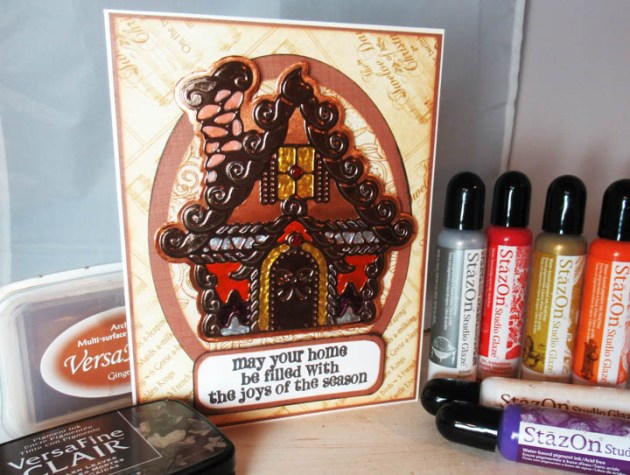
Using Spellbinders dies which includes two layered pieces, die cut the Gingerbread House from Rinea’s Glossy Mocha/Gold Foil. Die cut the second Gingerbread House base piece from Rinea’s Glossy Copper/Gold Foil. Use On Point Glue to adhere the layers together.

StazOn Studio Glaze in Valentine
Step 2

Using StazOn Studio Glaze in Valentine, add color to the candy dots in the Gingerbread House.

color using assorted StazOn Studio Glaze colors
Step 3

Continue adding color using assorted StazOn Studio Glaze colors between the die cut elements of the Gingerbread House. Allow each color to dry before moving onto the next color.

VersaFine Clair in Fallen Leaves
Step 4

Cut cardstock and pattern paper to fit a 5″ x 6 1/2″ card base. Die cut large ovals from cardstock and pattern paper. Ink the edges with VersaMagic in Gingerbread, then adhere to the card. Stamp the phrase with VersaFine Clair in Fallen Leaves, cut to fit and mat with cardstock.

 Gingerbread House for Christmas card
Step 5

Adhere the Gingerbread House and phrase to the card with foam adhesives for dimension. Finish the card with any additional personal touches!

Supplies

Imagine

Other

  • Rinea Foiled Papers – Earth Tones Foiled Paper Variety Pack
  • Bazzill Cardstock – brown, white
  • Graphic 45 – Pattern Paper
  • Spellbinders Dies
  • Hero Arts Stamp
  • Foam Adhesives

Learn How To Make A Gingerbread Theme Gift Tag

by Jowilna Nolte

Learn How To Make A Gingerbread Theme Gift Tag

Make some cute gingerbread theme tags for your gift giving this holiday season. Inspired by the numerous light brown inks and products that fall into this color scheme, I created these holiday tags to inspire you. Enjoy!

Skill: Advanced
Time: 30 minutes per tag

Directions


Step 1

On your Craft Mat mix a small amount of glossy texture paste and Delicata Golden Glitz inker.


Step 2

With a palette knife, apply the colored paste to some white cardstock and leave to dry. A nice thin layer is all you need – add as much texture and dimension as you want.


Step 3

Once the texture paste is dry, use VersaMagic Gingerbread and color the entire piece of cardstock. Blend the ink over the texture paste, then cut a strip about 3cm wide and the length of you tag.


Step 4

Stamps some Christmas baubles (or ornaments) in VersaFine Clair Nocturne.


Step 5

Use a small paintbrush and VersaMagic Gingerbread to add color to your stamped baubles (ornaments). Add ink to your Craft Mat, mist with water and pick up the color to paint your images.


Step 6

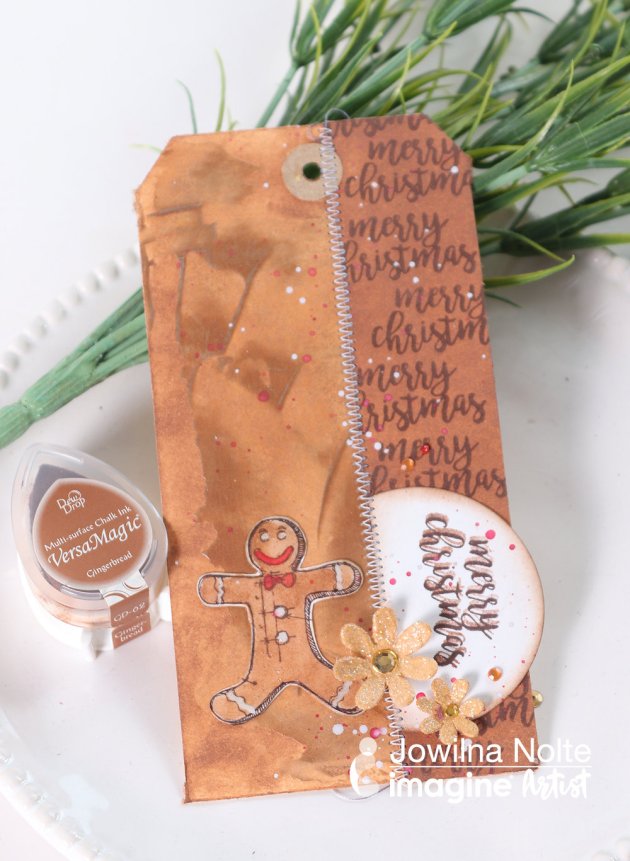
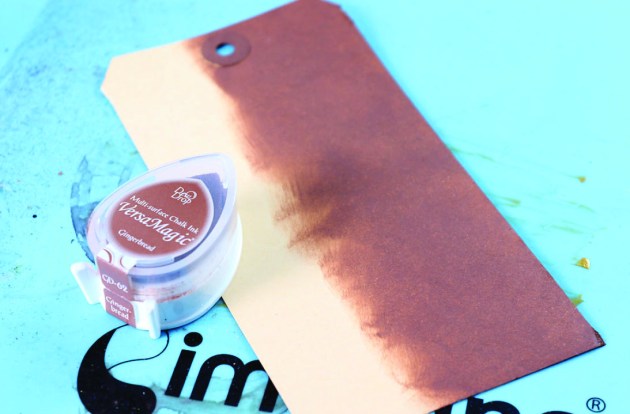
Use the direct to paper technique to color half of the length of your manilla tag using the VersaMagic ink pad.


Step 7

Add irRESISTible Pico embellisher in Shimmer and Desert Sand to your baubles (ornaments) and leave to dry.


Step 8

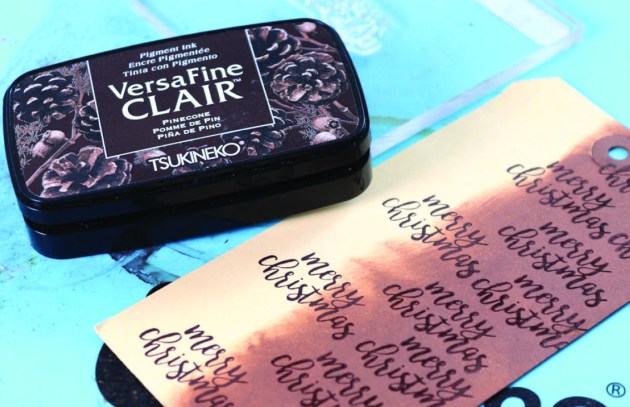
Use VersaFine Clair and a sentiment stamp, and stamp repeatedly down the colored side of the tag.


Step 9

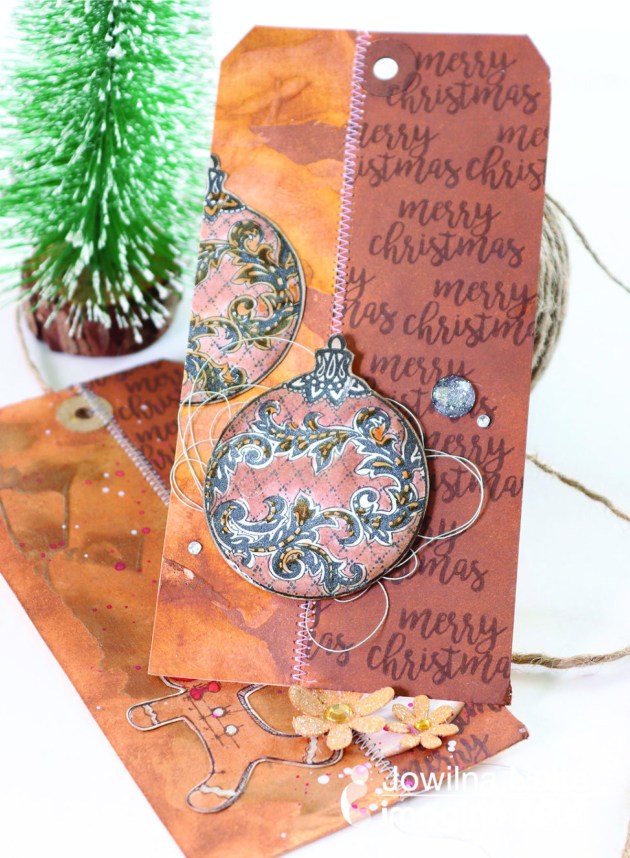
Adhere the paper strip down the left side of the tag and add decorative sewing. Adhere the colored baubles (ornaments) using foam tape for dimension. Adhere one bauble (ornament) flat and cut off overlapping side. Add diamanté and other flourishes to finish it up.

Supplies

Imagine
Other
  • Tags
  • Cardstock – White
  • Stamps – PSX, Kaisercraft
  • Sewing machine
  • Diamante
  • Celebr8 flowers

How to Make Cornucopia Table Place Cards with Rinea Foil

by Jennifer Vanderbeek

How to Make a Cornucopia Table Place Cards with Rinea Foil

Since Rinea foil papers are gorgeous on both sides, I wanted to make something with them that showed off that feature. Paper “sculptures” are good for this, and with the Thanksgiving holidays approaching, a cornucopia seemed the best way to go. It’s a simple shape in that it’s mostly a cone, but to give it a little of a curve, the pattern I’ve devised shifts the “spine” bit by bit on the bottom half of the sheet to add just enough curve to keep things interesting. These place card holders work up quickly, so preparing a table-full will still leave you with plenty of time for holiday fun.

Skill: Intermediate
Time: 15 minutes per place card

Directions

Supplies

Imagine
Other
  • Rinea Foil Paper – Copper Star, Copper/Gold
  • Vintage – Utensils Stamp
  • Acrylic Block
  • Fiskars – Paper Trimmer, Scissors
  • Deco Mesh
  • Hemp Cord

Make a “Sending You Autumn Blessings” Greeting Card

by Roni Johnson

Make a "Sending You Autumn Blessings" Greeting Card

Autumn is my favorite time of the year so when I saw these fun stamps from Honey Bee I knew I had to have them. The pick-up is perfect for all sorts of fun scene cards. Rinea foiled papers make it that much more special. The foiled paper is so easy to stamp on using StazOn inks and can be torn, die-cut or trimmed with scissors as you see here. It’s just so much fun to add a bit of zing to your projects with Rinea Foiled Paper.

Skill: Beginner
Time: 30 minutes

Directions


Step 1

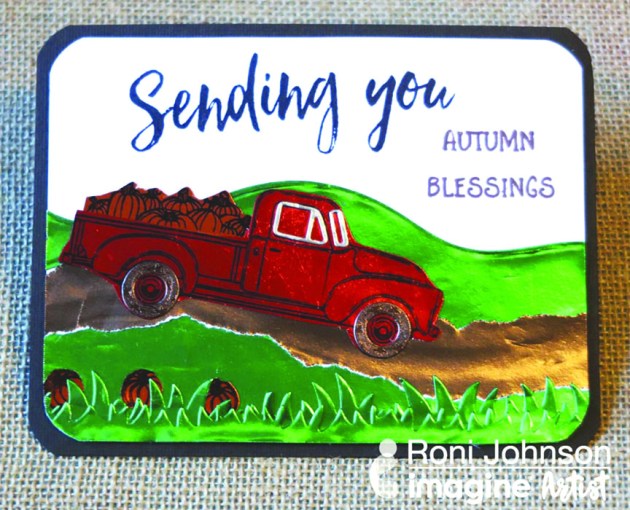
Stamp the truck onto Ruby/Gold Glossy Foiled Paper using Jet Black StazOn Ink. Fussy cut the truck; die-cut the tires from Mocha/Mocha Starstruck Foiled Paper and window detailing from Silver/Gold Glossy Foiled Paper. Adhere these accents to the pickup truck.


Step 2

Stamp pumpkin pile and individual pumpkins on Marigold/Gold Glossy Foiled Paper; fussy cut. Adhere the pumpkin pile to the truck and set the pumpkins aside. Tear a “dirt road” from Mocha/Gold Glossy Foiled Paper. Die-cut grass and hills from Emerald/Gold Glossy Foiled Paper. Adhere hills, grass and road pieces to a white card panel; affix the truck and pumpkins.


Step 3

Stamp “Sending you” with VersaFine Clair Nocturne and “Autumn Blessings” with VersaFine Clair Acorn inks on the card panel. Affix the card panel to a dark brown card blank.

Supplies

Imagine
Other
  • Rinea Foiled Paper – Autumn Variety Pack; Emerald/Gold Glossy Foiled Paper; Silver/Gold Glossy Foiled Paper
  • Honey Bee Stamps – Sending You Sentiments; Little Pick Up Stamps; Little Pick Up Dies
  • White Cardstock
  • Dark Brown
  • Card Blank
  • Adhesive