I love the brillance shimmer that Brilliance Ink adds! I created this entire card using different colors of Brilliance Ink.
Watch my video tutorial below to see how I did it. Enjoy!
Hello friends! Today I have a quick package, normally called ‘Sour Cream Container’ shape. I created it with designer paper and added an extra special touch with Versa Magic Inks. I selected a two-step stamp from Altenew, the Leaf Canopy stamp set. It includes the lineal and solid images but this idea can be made with any type of stamps.
Skill: Intermediate Time: 15 minutes
Directions
Step 1
Stamp, with Memento Tuxedo Black Ink, the lineal stamp using a stamping tool over a yellow piece of designer paper of 6″x 6″ size.
Step 2
Remove the lineal stamp and place the solid stamp over the lineal stamp and pick up with the acrylic door. Ink the solid images entirely with Mango Madness VersaMagic Ink and stamp. Ink up a few touches on the insides of the leaves with Red Magic VersaMagic Ink and stamp. I used the DewDrop inkpads in VersaMagic because with the teardrop shape it is very easy to add the selective color to the images without getting the second color accidentally over the whole image.
Step 4
Add double-sided Tear It Tape to one entire inside border and paste it over the opposite side to create a tube. Add double-sided tape to one end to close by pinching it together. Place the candy or gifts into the tube. Add the tape to the other end and close, pinching in opposite (90 degrees) direction.
Step 5
As a final touch, I added a tiny sentiment that I created with a die-cut and adhered with On Point Glue.
Create a wonderful mixed media “Best Wishes” card that is full of texture, layers, and dimension. Start with a stenciled layer using Creative Medium, add a lace focal point and finish it up with a saying strip mounted with dimensional tape.
Skill: Advanced Time: 1 hour
Directions
Step 1
Apply VersaMagic inks to the Craft Mat, spray with water, and lay cardstock into the wet ink. Trim to size.
Step 2
Mix White Neon Amplify with Iridescent Creative Medium and apply over the stencil using a palette knife. Allow to fully dry.
Step 3
Cut out a rose from a panel of lace and then apply various VersaMagic ink colors to the rose with a Brushstix.
Step 4
Spray lace rose with Shimmer Sheer Craft Spray and allow to dry.
Step 5
Once dry, apply VersaMagic ink in Cloud White to lace rose with Brushstix if you want to soften any of the tones.
Step 6
On a scrap strip of paper trimmed from panel in Step 1, stamp with a script stamp.
Step 7
On the same strip of paper, stamp flower image. Here I used VersaMagic in Mango Madness.
Step 8
Add ink splatters from VersaMagic Ink in Pink Grapefruit by rubbing ink directly to the craft mat and spraying with water. Pick up with a brush and flick onto the card.
Step 9
Edge all elements with VersaMagic in Pink Grapefruit.
Step 10
Stamp script pattern randomly onto the panel.
Step 11
Adhere lace rose to stenciled panel with On Point Glue.
Step 12
Adhere paper strip saying onto the card panel and then highlight rose with irRESISTible Pico Embellisher.
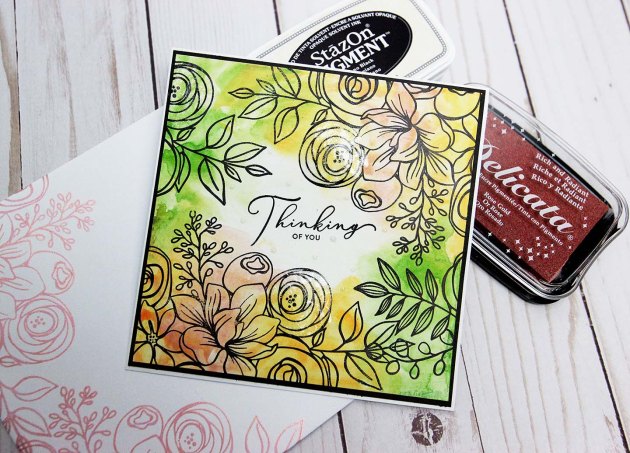
When creative inspiration hits me, I am usually creating layers of mixed media designs on frames or cards. But today, I decided to go a different route. Here is my attempt at a clean and simple Thinking of You card. I love using a mix of Tsukineko inks to create a watercolor effect. They are pigment-rich and blend like a dream. See how I made this card!
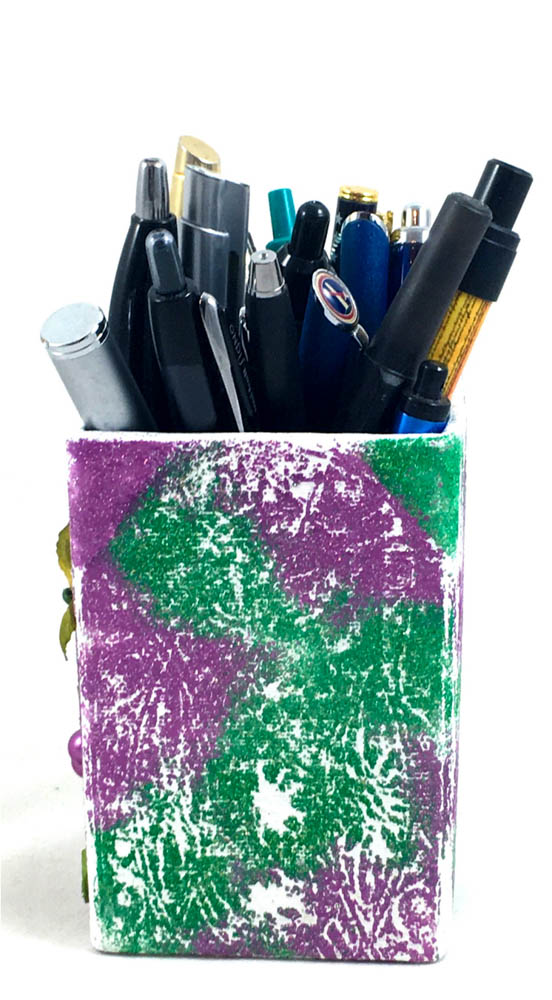
I just love how the glittery combination of Imagine’s new Mboss Embossing Powders shine. I made this cute pen and pencil holder with Princess Party (silver and purple combination) and Lucky Stars (gold and green combination). I love the way these two colors work together to transform a pencil box from neutral colors to bright vibrant home decor.
Skill: Beginner Time: 1 hour
Directions
Step 1
Select a cardboard-based pencil box. A plain box works as well. If it has designs it can be covered with gesso.
Step 2
Apply the gesso to the pencil box making sure to paint on enough layers to fully cover the current design. Allow to fully dry.
Step 3
Stamp the textured image with the VersaMark ink. Apply Mboss embossing powders in Lucky Stars and Princess Party. Apply one color in random areas. Shake off the excess on a clean scrap piece of paper and place back in the bag. Apply the second color in the areas that do not contain embossing powder. Shake off the excess on a different clean scrap piece of paper and place back in the bag. Melt the powder with a heat tool.
See how I use a simple masking technique and water coloring to create a cute and simple woodland creatures card. This stamping and coloring tutorial is a perfect activity for a Sunday afternoon of paper crafting and art-making. Enjoy!