Let’s Ink Blend With Some Unlikely VersaFine Clair Ink Colors To Create A Clean and Simple Mother’s Day Card

By Katy Ingram

Hello Friends! Katy here and today I am excited to share a really cool color combination using VersaFine Clair inks.

In today’s video tutorial, I am sharing how I use 5 unlikely VersaFine Clair ink colors to create a beautiful background for silhouette stamps and turn it into a clean and simple Mother’s Day Card. Video has all the details.

Katy

Skill: Beginner

Time: 15-20 minutes

Art Supplies

Imagine Products

VersaFine Clair – Paradise, Blue Belle, Warm Breeze, Golden Meadow and Shady Lane https://www.imaginecrafts.com/versafine-clair

Sentiment and silhouette stamping done with VersaFine Clair Nocturne

On Point Glue

Tear It! Tape

Other Products Used

White Card Stock (card base and sentiment strip)

Strathmore 500 Series Hot Pressed Watercolor Paper

The Greetery Lovely Silhouettes Stamp Set

Simon Says Stamp Incredible Woman Stamp Set (happy mother’s day)

Create a Double Embossed Wedding/Anniversary Card

By Katy Ingram

Hello Friends! Katy here and today I am excited to share this really cool background technique.

In today’s video tutorial I am sharing how I use a 3D embossing folder and iridescent opaque Mboss embossing powder to create a wedding or anniversary card. The colors I chose definitely give me a beachy vibe and I am loving it!

Katy

Skill: Intermediate, Advanced

Time: 15-20 minutes

Art Supplies

Imagine Products

• Memento Ink: Summer Sky, Teal Zeal and Nautical Blue

• VersaFine Clair: Warm Breeze

• VersaMark Ink

• Mboss Embossing Powder –  Iridescent Opaque

• On Point Glue

• Tear It! Tape

Other Products Used

Tim Holtz/Sizzix 3D Embossing Folder Doily

White Card Stock

Kitchen Sponge

Kraft/Oatmeal Card Stock- Card Base

White Card Stock- Layering

Pearl Vellum (foliage)

The Greetery Pretty Postmarks (text stamping)

The Greetery Lovely Silhouettes Die (Love)

Spellbinders Mini Everyday Sentiments Hot Foil Plate (always and forever)

Spellbinders Hot Foil Skybright

Kat Scrappiness Leaf Dies

Pinkfresh Studio Leafy Branch Die

May Arts Twine – Ivory

How To Create A Dimensional Spring Bouquet With Memento Inks

By Katy Ingram

Hello Friends! Katy here and today I am sharing how I used Memento Dew Drop Inks to create a dimensional Spring bouquet. 

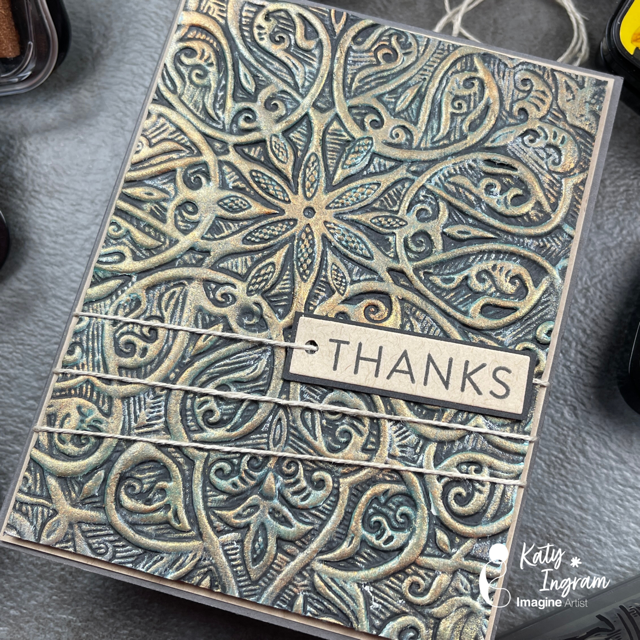
In todays video tutorial I am sharing how I use the perfectly pointed end of the Memento Dew Drop Inks to layer ink colors on a silhouette stamp. I then die cut them out and create a vellum wrap to go around my bouquet. In the video I also follow up on the Press n Seal barrier that I added to my StazOn Pigment ink pad to see if it keeps it from drying out. It has been about three months since I added the barrier, watch the video below to see if it worked. 

Katy

Skill: Intermediate, Advanced

Time: 1 hour

Art Supplies

Imagine Products

Memento Inks 

Dandelion, Cantaloupe, Rose Bud, Lilac Posies, LuLu Lavender, Sweet Plum, Pear Tart and Bamboo Leaves

VersaFine Clair Nocturne

StazOn Pigment Ink Snowflake

On Point Glue

Tear It! Tape

Other Products Used

The Greetery Lovely Silhouettes Stamp and Die set

Hero Arts CG830 Bold Prints Script Background Stamp

Heart Layering Dies

Kat Scrappiness Postage Stamp Dies

Kat Scrappiness A2 Quilted Backdrop Die

Follow Katy Here👇🏻👇🏻👇🏻👇🏻👇🏻

YT: https://youtube.com/c/eastwickspaperandink 

FB: fb.me/eastwickspaper 

IG: https://www.instagram.com/eastwickspaperandink/

Blog: https://www.eastwickspaperandink.com/ 

Pinterest: https://www.pinterest.com/eastwickspaperandink/

How To Create A Gilded Celtic Background With All Purpose And Delicata Inks

By Katy Ingram

Hello Friends! Katy here and today I am excited to share this really cool background technique.

In today’s video tutorial, I am sharing how I use some All Purpose Inks, Delicata Inks and a 3D embossing folder to create a Gilded/Aged Celtic background. I have to admit I am in love with these backgrounds and in the video I show two ways to create it and both give different results depending on how you apply the ink. I also give some alternatives to the products I am using in the video, so be sure and watch to find out what they are. This technique will work with any embossing folder and I will for sure be using it with other folders I have in my stash. 

Katy

Skill: Intermediate, Advanced

Time: 1 hour

Art Supplies

Imagine Products

All Purpose Ink – White

All Purpose Ink – Tropical Lagoon

VersaFine Clair Cheerful

Delicata Golden Glitz

Delicata Silvery Shimmer

Delicata Celestial Copper

VersaFine Clair Nocturne

On Point Glue

Tear It! Tape

Other Products Used

Tim Holtz/Sizzix 3D Embossing Folder Engraved

Black Card Stock

Kitchen Sponge

Slate Card Stock- Card Bases

Kraft Card Stock- Layering 

Sea Glass Card Stock- Layering

Simon Says Stamp Big Thanks Words Stamp Set

Twine

Craft foam 

Follow Katy Here 👇🏻👇🏻👇🏻👇🏻👇🏻👇🏻👇🏻

YT: https://youtube.com/c/eastwickspaperandink 

FB: fb.me/eastwickspaper 

IG: https://www.instagram.com/eastwickspaperandink/

Blog: https://www.eastwickspaperandink.com/ 

Pinterest: https://www.pinterest.com/eastwickspaperandink/

​ @ImagineCrafts   @eastwickspaperandink  #cardmaking #cardmaker #cardmakingtutorial #cardmakingvideo #cardmakingidea #cardmakingideas

Two Watercoloring Techniques with StazOn Studio Glaze

By Katy Ingram

Hello Friends! Katy here and today I am sharing two ways to watercolor with StazOn Studio Glaze. 

In today’s video tutorial I am sharing two watercolor techniques. The first is traditional watercoloring with a watercolor brush and the second technique is the popular ink smooshing technique. Both are great ways to use StazOn Studio Glaze and I hope you hive it a try. Check out the video to see the process in action. I hope you enjoy and thanks for stopping by. 

Skill: Beginner, Intermediate, Advanced

Time: 2 hours

Art Supplies

Imagine Products:

• Brilliance Moonlight White Ink 

• VersaFine Clair Twilight 

• VersaMark Ink

• Sheer Shimmer Spray Sparkle 

• irRESISTible Pico Embellisher Teal Zeal 

• irRESISTible Pico Embellisher Shimmer 

• 1/4 inch Tear It Tape 

• Mboss Embossing Powder White 

• StazOn Studio Glaze Claret 

• StazOn Studio Glaze Gothic Purple 

• StazOn Studio Glaze Blue Hawaii 

• StazOn Studio Glaze Midnight Blue 

• StazOn Studio Glaze Cactus Green 

Other Products Used:

• Spellbinders Arches Dies

• Ellen Hutson Mondo Sakura

• Simon Says Stamp Beautiful Flowers

• The Greetery Pretty Postmarks

• Princeton Neptune Watercolor Brushes 2/4Round

• Hot Pressed Watercolor Paper

How To Create a Mixed Media Valentine

By Katy Ingram

Hello Friends! Katy here and today I am using a variety of products to create this Love You card.

In today’s video tutorial I do some ink blending with VersaFine Clair Verdant and Warm Breeze. I haven’t used these two colors for ink blending before and they blended really well and the colors coordinate perfectly together. I used a heart stencil with VersaFine Clair Paradise to blend over the ink blended panel and then added some Sheer Shimmer Stix in Frost for a bit of shimmer.  I also pulled out some irRESISTible Spray in Paris Dusk and Silver to create some splatter. I finished the panel off by die cutting the words love and you with some metallic blue cardstock. Check out the video to see the process in action. I hope you enjoy and thanks for stopping by. 

Katy

Skill: Beginner, Intermediate, Advanced

Time: 30 minutes 

Directions:

Art Supplies

Imagine Products

• VersaFine Clair Verdant

• VersaFine Clair Warm Breeze

• VersaFine Clair Paradise

• Sheer Shimmer Stix-Frost

• irRESISTible Spray Paris Dusk

• irRESISTible Spray Silver

• irRESISTible Pico Embellisher Teal Zeal

• irRESISTible Pico Embellisher Silver

• 1/4 inch Tear It! Tape

Other Products Used

• Miss Ink Stamps Hand Drawn Hearts Stencil

• Layering Hearts Dies

• scrapbook.com/Pinkfresh Love and You Dies

• Blending Brushes