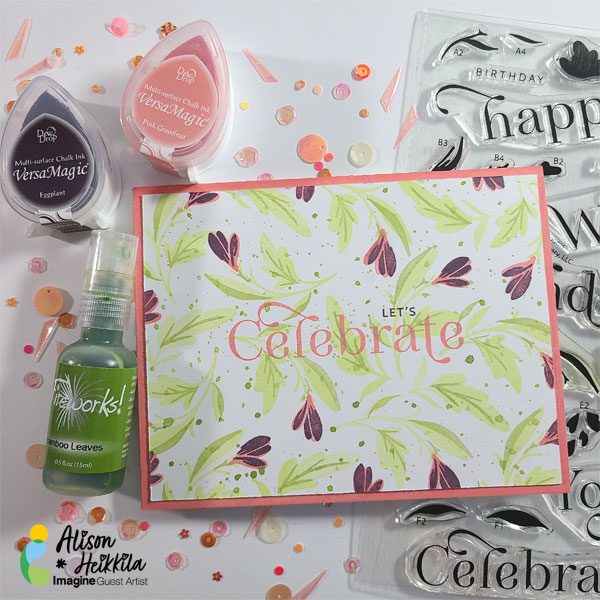
Learn How to Make a Springtime Bee Door Hanger

By Roni Johnson

In today’s tutorial, I show you how to make a fun springtime door hanger using All-Purpose Inks, Fireworks! Spray and Vertigo Film! You will be the buzz of the neighborhood.


Skill: Beginner

Time: 1.5 hours + dry time


Directions:

Step 1

Gather up your supplies.


Step 2

Cut cheesecloth into 1 – 1.5” strips.


Step 3

Dampen the cheesecloth with water and place it into a plastic sealable bag.


Step 4

Use an Ink Dropper and place in a few drops of #11 Lemon Yellow All-Purpose Inks into the bag.


Step 5

Seal the bag and smoosh the ink around until all of the cheesecloth has been colored.


Step 6

Repeat steps 3 – 5 this time using #82 Real Black All-Purpose Ink.


Step 7

Remove the dyed cheesecloth strips from the baggies, unfold and place over a protected surface. Allow the cheesecloth strips to dry completely.


Step 8

Place the embroidery hoops on a piece of cardboard and trace around the shape x 2.

These will help to:

a) stabilize the finished door hanger

b) give you something to glue the cheesecloth to

c) give you a nice finished-looking door hanger.


Step 9

Glue the embroidery hoops to one of the cardboard pieces.


Step 10

Paint the hoops and cardboard with a coat of black acrylic paint.


Step 11

Begin wrapping the body of the bee with the dyed cheesecloth alternating between yellow and black. Wrap the head of the bee with all black cheesecloth. Secure the cheesecloth to the form using hot glue.


Step 12

Cut a stinger from cardboard, paint it black; cover with a layer of On Point Glue and apply glitter.


Step 13

Affix the stinger to the bee form using hot glue.

Step 14

Cut wings from Vertigo film and affix them to the back of the bee form using hot glue.


Step 15

Spray foil leaves and paper flowers using Fireworks! Spray ink and allow them to dry completely.


Step 16

Using hot glue, adhere the leaves, flowers and a ribbon bow to the front of the bee form.


Step 17

Insert a piece of wire into the second cardboard piece for a hanger. Use hot-glue to affix this cardboard piece to the back of the bee form covering the cheesecloth ends and wings.


Other
  • Cardboard
  • Embroidery Hoops
  • Cheesecloth
  • Plastic Baggies
  • Hot Glue Gun
  • Foil Leaves
  • Paper Flowers
  • Ribbon
  • Fairy Hugs Powder (glitter) – Raven

Create a Beautiful Spring Card Using VersaMagic Ink

By Alison Heikkila

Hello! Today I am sharing how to create a beautiful card with layering stamps and VersaMagic Inks. I love this line of inks because of their soft, chalky finish. They blend beautifully, and the color range is just lovely. My card today uses the Birthday Blooms stamp set from The Greetery, which is a pretty layering stamp set that is easy to work with.

Skill Level: Beginner-Intermediate
Time: 30-45 Minutes

Directions:

Step 1:

On a piece of 4″ x 5 1/4″ white cardstock, begin stamping the D1 and C1 images with Key Lime VersaMagic Ink. Work from one side to the other, or from top to bottom.

Step 2:

As you add foliage, also stamp D2, which is one of the blooms, in Pink Grapefruit VersaMagic ink, so that you ensure room for the blossoms.


Step 3:

Continue working across the entire panel with those three stamps until it is filled.


Step 4:

Apply stamps D4 and C2 to the foliage to create the veins and shadows with Tea Leaves VersaMagic ink.

Step 5:

Apply the D3 stamp to the blooms with Eggplant VersaMagic Ink.


Step 6:

Stamp the Celebrate sentiment in the middle of the panel with Pink Grapefruit VersaMagic Ink.

Step 7:

Place the smaller “Let’s Celebrate” sentiment on top of the larger sentiment. We do not need the small “Celebrate,” so only apply Eggplant VersaMagic ink to the “Let’s.” Stamp the small sentiment on to the panel.


Step 8:

Shake up Bamboo Leaves Fireworks! Spray, and unscrew the sprayer. Tap the straw over the panel to get larger droplets on the card. Let dry.


Step 9:

On your card base, ink the edges with Pink Grapefruit VersaMagic Ink.

Step 10:

Adhere the stamped panel to the card base.


I love the soft tones of the VersaMagic Inks. They look so beautiful when layered on top of each other or blended. I hope you’ll give this technique a try! Thanks for stopping by. Have an inspiring day!


Art Supplies:

Imagine:

Key Lime VersaMagic Ink

Tea Leaves VersaMagic Ink

Pink Grapefruit VersaMagic Ink

Eggplant VersaMagic Ink

Bamboo Leaves Fireworks! Spray

Other:

The Greetery: Birthday Blooms Stamp Set

White Cardstock

Acrylic Blocks

Adhesive

Learn How to Make a Spring “Thinking of You” Card with Ink Blending

By Katy Ingram

Hello my crafty friends! Katy here and in today’s crafting video tutorial, I show you how to make a floral “Thinking of You” card with 3 tips for easy ink blending using our Memento inks. This is a great project for the Spring season and by changing the sentiment this card can suit any spring-time occasion.

Skill: Beginner, Intermediate

Time: 30 minutes


Directions:


Art Supplies:

Imagine

• Memento Ink Pad – Rose Bud

• Memento ink Pad – Lilac Posies

• Memento Ink Pad – Lulu Lavender

• VersaFine Clair Ink Pad – Medieval Blue

Other

• Pinkfresh Studio – Blooming Bouquet Stamp Set

• Pinkfresh Studio – Leafy Branch die

• Simon Says Stamp – Thinking of You die

• Pink & Main – Mini Blending Brushes

• Gina K Designs – In The Navy Card stock

• Neenah – Classic Crest Solar White 110 lb Card stock

• Gmund – 100% Cotton Shiny Cream Card stock

How to Create Some Fresh and Funky Cards for Valentine’s Day

By Jowilna Nolte 

Hi everyone, on today’s blog, I am sharing some fun cards I created using StazOn Studio Glaze.
I love this stuff for the fun effects you can achieve as well as the vibrant and amazing colors in the range.

Skill Level: Beginner

Time: 20 minutes

Directions:

Step 1
Squeeze some glaze onto your squeegee and swipe your first color over a sheet of smooth white cardstock.
You can leave this to dry for a few minutes.


Step 2
Apply a second color to your squeegee and swipe it over the first color. I use the rubber side on my squeegee but also sometimes use one of the other edges.
Both edges work perfectly, and you can always create some effects using the textured sides.


Step 3

I also used a second color combination and created another sheet for a fresh spring look.


Step 4

Once your background is dry, use a heart or flower die-cut and die-cut some shapes using your die-cutting machine.


Step 5

Use your VersaFine Clair ink and color some chipboard words by directly inking the words.
Once dry, you can adhere them to your card.


Step 6

Assemble your card by adhering the hearts to your background using foam tape.
Adhere the “love” word using On Point Glue and finish off your card with an enamel dot.


And in a few easy steps, you have a gorgeous set of cards using some fun backgrounds and hearts.

For me the shine, texture, and patterns achieved are what makes these cards so special, and I just love using these glazes.

Until next time – keep on creating!

Art Supplies

Imagine

• StazOn Studio Glaze Orange Zest
• StazOn Studio Glaze St. Valentine
• StazOn Studio Glaze  Emerald City
• Multi-Purpose Squeegee Blue
• On Point Glue
• VersaFine Clair Glamorous
• VersaFine Clair Verdant 


Other 

• White Cardstock
• Heart Die-Cut: Tim Holtz
• DIY Cuts Machine: Kaisercraft
• Chipboard Word: Kiriche Laser
• Enamel Dots
• Foam Tape
• Smooth White Cardstock

Learn How to Make Decorative Tea Light Candle Holders

By Kyriakos Pachadiroglou


Skill: Beginner, Intermediate, Advanced

Time: 45 min

Directions:

Cover glasses with All-Purpose ink and StazOn Studio Glaze to create frost and smoke effects. Die-cut and emboss SHEET metal to make embellishments that are covered with StazOn colors.


Step 1

Cover the glass surface with All-Purpose Ink white using a Sponge Dauber and lightly pressing on it creating a frost effect. Let it dry. (Use a heat tool to speed up the process)


Step 2

With a Sponge Dauber repeat the above using the StazOn Studio Glaze Cloudy sky.


Step 3

Place Tear It! Tape around the mid section of the glasses.


Step 4

Place the jute cord over the Tear It! Tape and wrap around to cover.


Step 5

Die-cut heart shapes of the SHEET metal in two different sizes. (If you don’t have a die cutting machine, use scissors to easily cut heart shapes of the SHEET metal).


Step 6

Cover with the StazOn Black Cherry using a Sponge Dauber.


Step 7

Continue with the StazOn Studio Glaze Claret.


Step 8

Lightly sand the SHEET metal hearts to reveal the silver color.


Step 9

Make some loops with the jute cord, glue them on the glasses and add the hearts.

Art Supplies

Imagine

SHEET Metal – ATC card 

All-Purpose Ink – White

StazOn Studio Glaze – Cloudy Sky, Claret 

StazOn – Black Cherry

Sponge Daubers

Tear It! Tape


Other

Heart Dies and die-cutting machine

Embossing folder

Glasses

Sanding paper

Jute cord

Hot glue

Make a Card Using Recycled Plastic

By Baerbel Born

Skill: Beginner

Time: 30 Minutes

Stamping on a budget doesn’t have to look ordinary, in fact, it can have a spectacular shiny and elegant look.
Join Guest Designer Baerbel Born from Germany as she teaches us how to craft using recycled materials.
StazOn Ink on a plastic lid is almost free and so much fun!


Art Supplies:

Imagine:

StazOn Ink Pads and Refills

• StazOn Stamp Cleaner


Other:

• Stamp and Acrylic Paint: Rayher Craft Supplies

• Paper: BoBunny

• Ribbon: May Arts

• Plastic Lid