Make Your Own Plaid with Tear It! Tape

By Alison Heikkila

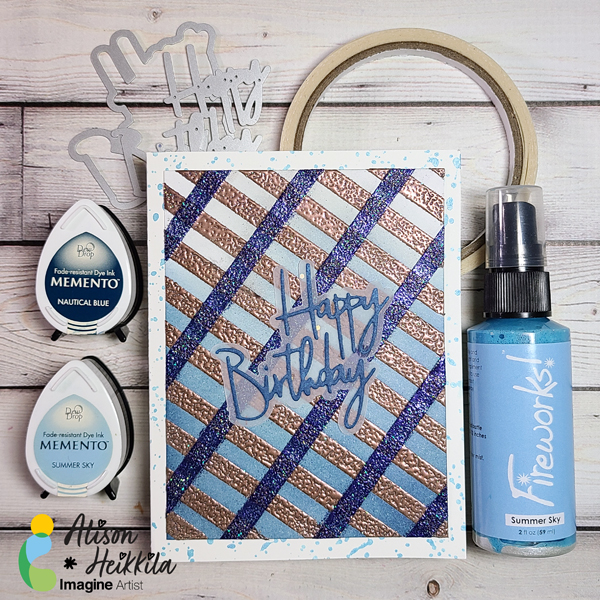
Greetings! One of my favorite products from Imagine is Tear It Tape. That may be surprising, considering all of the fantastic inks and colors they offer. But, Tear It! Tape is an exceptional adhesive that has some cool properties you may not be aware of, namely the fact that it is heat safe. That means you can emboss right on top of it, so I decided to make a plaid, embossed background using it. This doesn’t take too long, but you do need to be precise, which is something I don’t normally try to be when I’m crafting.

*Some affiliate links are used in this post. That means that if you shop through these links, I may receive a small compensation, at no cost to you. For more information, please see my Affiliates page, where I also have some coupon codes.

Time to Complete: Approx. 30-45 Minutes
Skill Level: Intermediate to Difficult

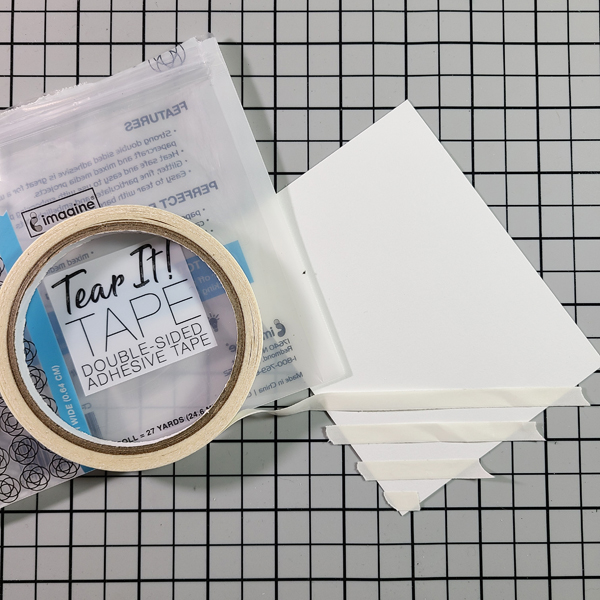
Step 1: Lay your Craft Mat with the grid side up. It’s going to be necessary to use it to not only make sure our lines are straight, but also evenly spaced.

Step 2: Lay your cardstock at an angle on the grid. The angle doesn’t really matter.

Step 3: Apply a strip of Tear It! Tape at every horizontal grid line. I placed mine above the line consistently.

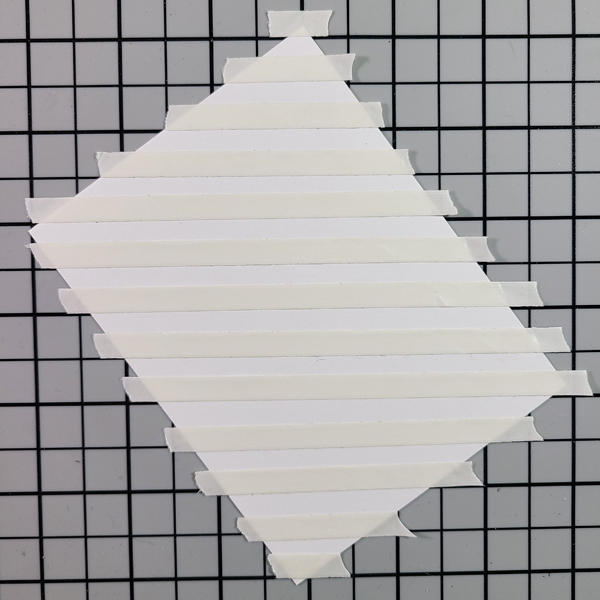
The panel will look like this when you’re done.

Step 4: Cut off the excess ends to make the tape flush with the edge of the panel.

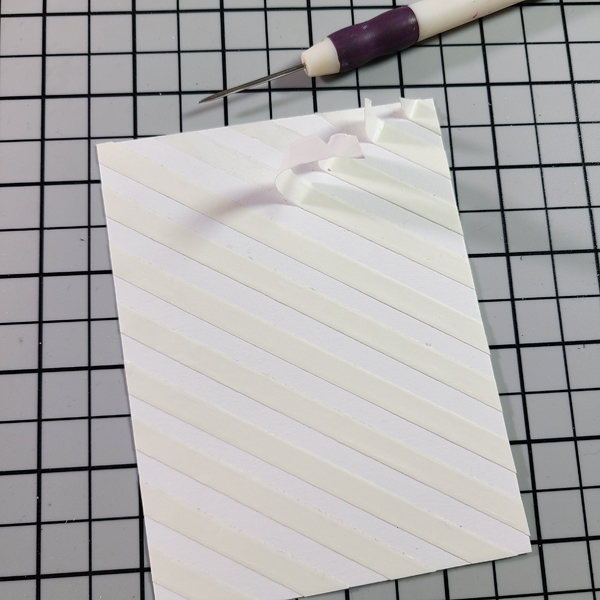
Step 5: Begin to partially remove the release paper from the Tear It! Tape. I found it to be easier to only pull it off part of the way, so that I could still move the card around without getting my fingers on the sticky tape. When you finish lifting a bit of each strip, finish pulling off the release paper.

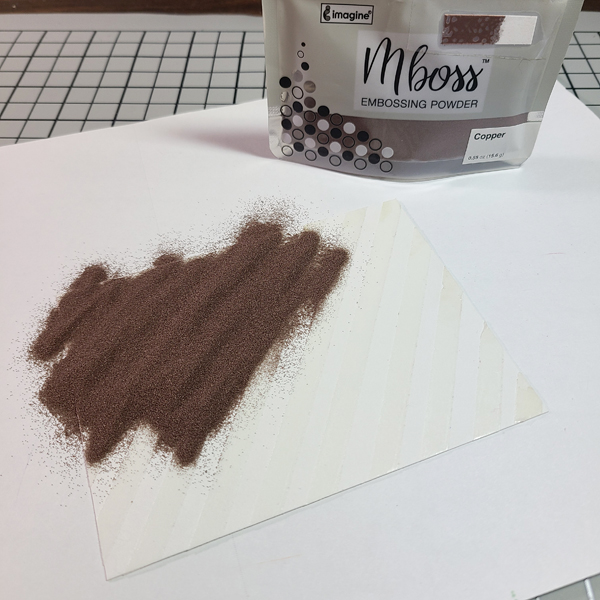
Step 6: Pour Copper MBoss embossing powder on to the panel. I put a piece of copy paper underneath so that I can pour the excess back into the bag. I recommend rubbing your finger across the panel to ensure good coverage of the powder.

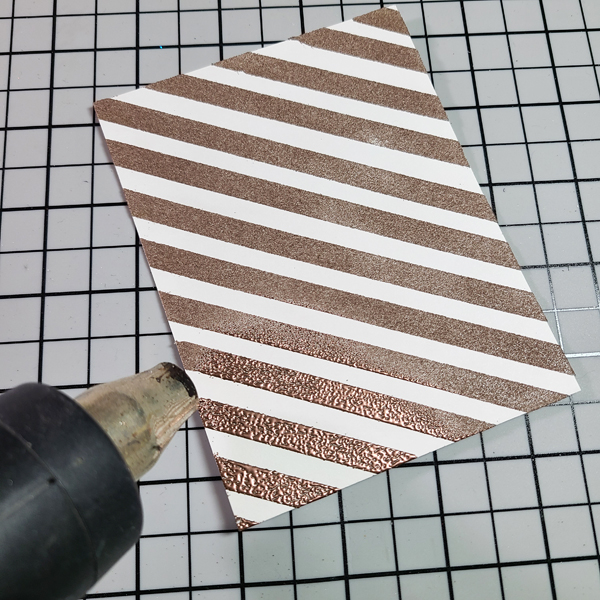
Step 7: Shake off the excess powder on to the copy paper, and heat set the powder that’s on the panel.

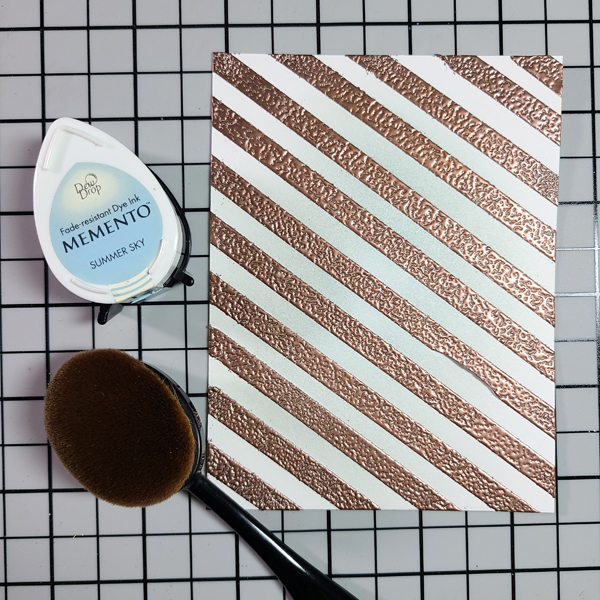
Step 8: Begin applying Summer Sky Memento Ink in the middle of the card panel using the applicator of your choice. Admittedly, my brush wasn’t thoroughly clean, so my inking doesn’t look exactly like the ink color.

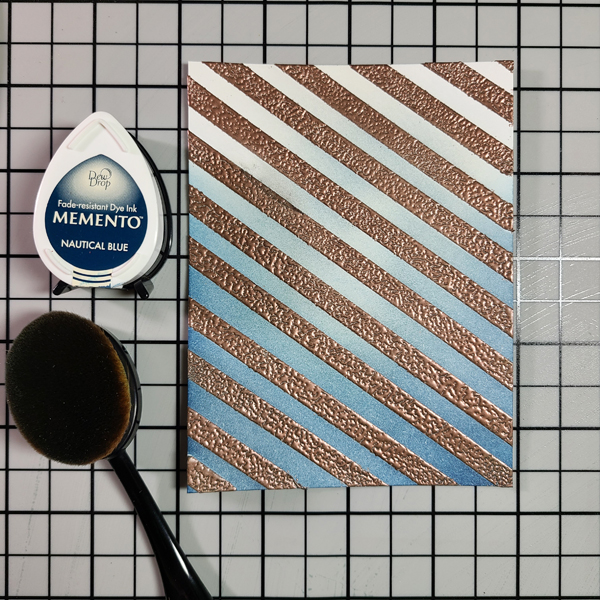
Step 9: Apply Nautical Blue Memento around the Summer Sky Ink, in a “U” shape.

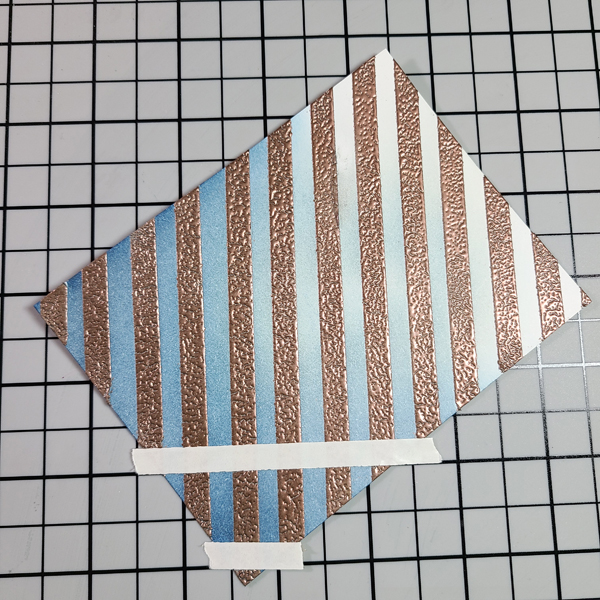
Step 10: Lay the inked panel back on to the grid at a different angle from before and begin laying down more Tear It! Tape. This time, I only applied the tape where the lines were bold, so every inch.

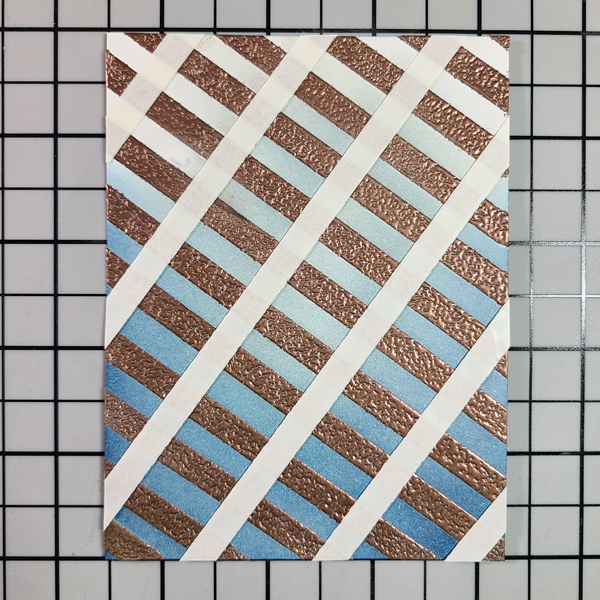
When done applying the tape, this is what the panel should look like.

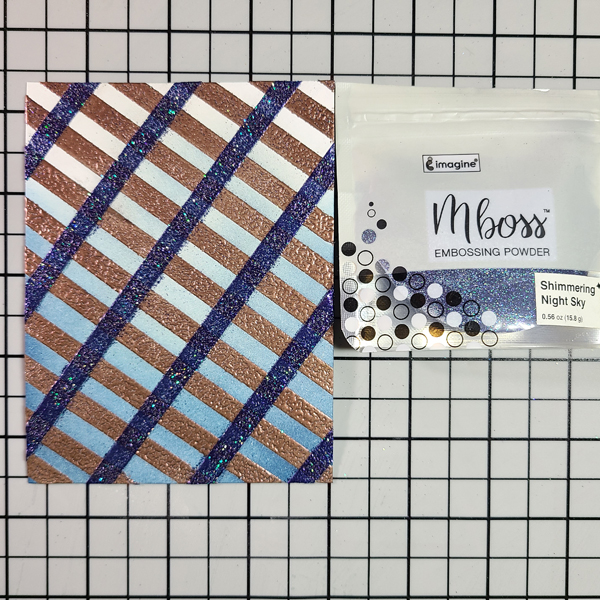
Step 11: Remove the release paper, sprinkle on Shimmering Night Sky MBoss, shake off the excess, and heat set.

Pro Tip: You may be wondering why we didn’t ink the panel after the second layer of MBoss was applied, instead of before. The Shimmering Night Sky powder has glitter in it, which could cause some drag or pulling on your ink applicators when you blend the ink. To avoid that, inking before applying a sparkly powder is advised. The Copper powder is metallic, so there’s no drag, and excess ink can be buffed away with a cloth or paper towel.

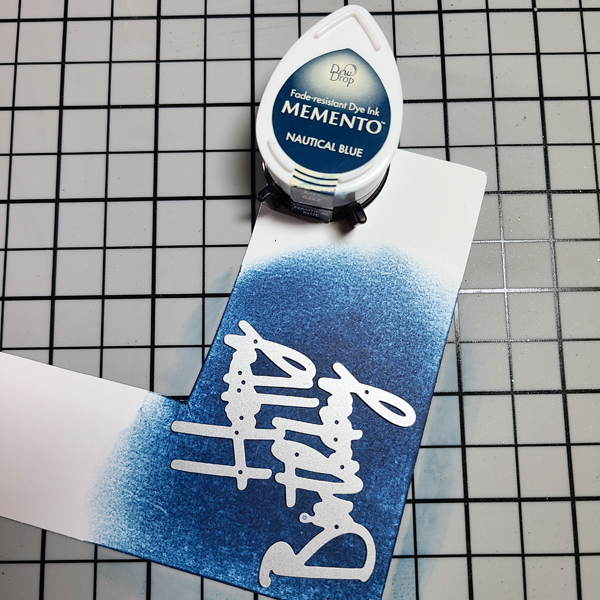
Step 12: To make perfectly coordinated cardstock for your sentiment, ink up a piece of white with Nautical Blue. Die cut the sentiment. Cut the shadow layer from vellum.

Step 13: Shake up the Summer Sky Fireworks Spray, unscrew the bottle and flick the straw on your card base to create splatters. Let dry.

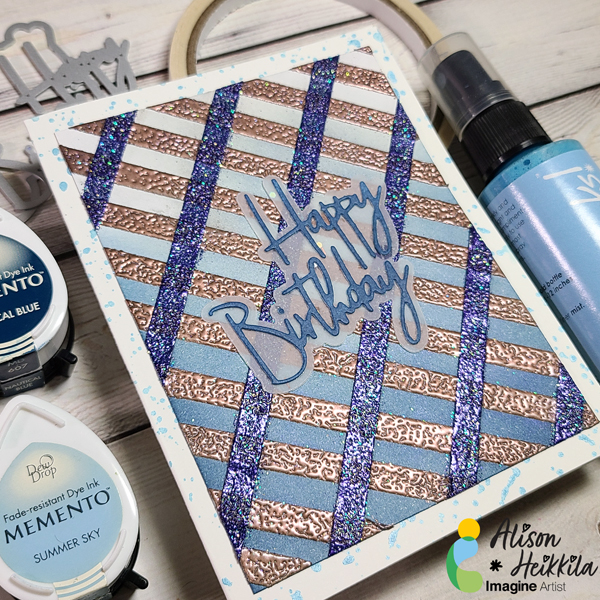
Step 14: Assemble your card with Tear It Tape for the panel, and On Point Glue for the die cut sentiment.

I love how this card came out! It’s got lots of shine, but with a masculine vibe. You can change the powders and ink colors however you like to suit your needs. I love the indigo tones we’ve got going here. I hope that you’ll try making your own plaid. Thanks for stopping by. Have an inspiring day!

Supplies:
Imagine:
Tear It!Tape
Craft Mat
On Point Glue
MBoss Embossing Powder in Copper
MBoss Embossing Powder in Shimmering Night Sky

Memento Ink in Summer Sky
Memento Ink in Nautical Blue
Fireworks Spray in Summer Sky

Other:
Pinkfresh Studio: Classic Words Die Set
Blending Brush (or other ink applicator)
Strathmore Smooth Bristol Cardstock (for focal panel)
White Cardstock for card base

Quick and Easy “Happy New Year” Banner

By LeeAnn McKinney

Howdy friends and fellow crafters, LeeAnn here with a quick and easy project for you.

This “New Year’s” Banner is easy to make. I made it to hang in my craft room ushering in 2023.

Skill Level: Beginner

Time: 30 minutes

Art Supplies:

Imagine:

• Craft Mat

• On Point Glue

• Delicata: Golden Glitz

• Delicata Shimmery Silver

• MBoss Gold

• Mboss Embossing Powder Silver

• Tear It! Tape

• VersaFine Clair Nocturne

• StazOn Stamp Cleaner

Other Supplies:

• Darice Heat Tool

• Accent Opaque 120lb Cardstock

Let’s Make Holiday Treat Boxes

By Annie Collins –

Hello Crafty Friends – Annie here with some fun an easy mini holiday treat boxes.

Skill Level: Beginner

Time to Complete: 30 Minutes

Art Supplies

Imagine:

• Kaleidacolor – Vineyard Ink

• Delicata Ink: Golden Glitz

• Memento Markers: Rich Cocoa,  Cantaloupe and Rhubarb Stalk

• Fireworks! Shimmery Craft Sprays: Ladybug, Cottage Ivy and Bamboo Leaves

• Tear It! Tape

• On Point Glue

Other Supplies:

• InkyStamper- Dies: Small Fry Box

• The Maker’s Movement: Winter Foliage Die Set

• Feather die

• Recollections Brand 80lb Cardstock: Light Cream, Medium Cream & White.

Imagine Crafts Resident Artist

Annie Collins

My Blog:  https://littlewingscreates.blogspot.com/

Instagram: https://www.instagram.com/anniec09

Facebook: https://www.facebook.com/Little-Wings-Creates-275422213079163/

Pinterest: https://www.pinterest.com/acollins01/

YouTube: https://www.youtube.com/c/AnnieCollins09

Fall Themed Note Cards Using First and Second Generation Stamping With Memento Inks  

Sept-2022_Katy-Ingram_Fall-Thanks_Group-IG-1

By Katy Ingram –

Hello Friends! Katy here and today I am creating some fall themed note cards with second generation stamping. This is a great way to get more from your inks and create a beautiful subtle look to your projects. 

In todays video tutorial you will see both first and second generations stamping with a variety of fall color Memento Inks and a quick way to add interest with a bit of twine. Video has all the details. Thanks for joining me today.

Skill: Intermediate
Time: 10 minutes

Sept-2022_Katy-Ingram_3-leaf-cards_4

Sept-2022_Katy-Ingram_4-leaf-cards_IG-2

Sept-2022_Katy-Ingram_5-Leaf-Cards_IG-3

Art Supplies:

Imagine:

• 5 Leaf Card 

– Memento Inks: Bamboo Leaves, Pistachio, Olive Grove, Northern Pine, Toffee Crunch

“Thanks” Sentiment: Memento Rich Cocoa

• 4 Leaf Card

– Memento Inks: Desert Sand, Peanut Brittle, Potters Clay, Morocco

“Thanks” Sentiment: Stamped with VersaFine Clair Pinecone and Memento EspressoTruffle

• 3  Leaf Card

Memento Inks: Rhubarb Stalk, Olive Grove, Toffee Crunch

“Thanks” Sentiment: VersaFine Clair Pinecone

– Tear It! Tape

Other Products Used:

• Gina K Designs Skeleton Leaves Stamp Set

• May Arts Jute Twine

• MISTI Stamping Tool

• Heavyweight White Cardstock panel 2 1/2 inches wide by 4 inches long

• Heavyweight White Cardstock Base 7 inches by 4 7/8 inches score at 3 1/2 inches on the 7 inch side.

Follow Katy Here:

Youtube: https://youtube.com/c/eastwickspaperandink 

facebook: fb.me/eastwickspaper 

Instagram: https://www.instagram.com/eastwickspaperandink/ 

Blog: https://www.eastwickspaperandink.com/

Gorgeous Wedding Card with Memento and Ink Potion No. 9 


By Katy Ingram –

Hello Friends! Katy here and today I am sharing an easier way to color your own cardstock using Memento Inks andInk  Potion No. 9 blending solution. 

In todays video tutorial I use our newly colored cardstock to create some 3D flowers for a beautiful summer wedding card. Thanks for joining me today. I hope you enjoy.

Skill: Beginner, Intermediate, Advanced
Time: 30 minutes

Art Supplies:

Imagine:

Memento Inks – 

Angel Pink, Rose Bud, New Sprout, Cottage Ivy, Northern Pine, Bamboo Leaves and Dandelion

Ink Potion No. 9

1/4 inch Tear-It! Tape 

Other Products Used:

Spellbinders Double and Single Peonies Die 

Susan’s Garden Tool Kit

Watercolor Paper

PVA Glue or Hot Glue

Heavyweight White Cardstock

Kat Scrappiness Quilted Background Die

Essentials By Ellen Hutson Rectangle Dies

The Greetery Sentiments Suite Love Stamp Set

The Greetery Pretty Postmarks

Clear Box A2 Size  4 1/2 inches x 1 inch x 5 7/8 inches

Follow Katy Here:

Youtube: https://youtube.com/c/eastwickspaperandink 

facebook: fb.me/eastwickspaper 

Instagram: https://www.instagram.com/eastwickspaperandink/ 

Blog: https://www.eastwickspaperandink.com/

How To Use All-Purpose Inks On Canvas With Ink Potion Number 9

2022-July-Katy-Ingram-Coastal-700x700

By Katy Ingram –

Hello Friends! Katy here with something a bit different today. I am using some All-Purpose Inks and Ink Potion Number 9 to do some painting on canvas. I did some research and could’t find anything that shows All-Purpose Inks being used on canvas so I thought I would share my experience today.

I used the All-Purpose Inks to create a Coastal painting and used some sea shells, sharks teeth and a small pelican feather that my husband and I have found on our many beach walks over the years. 

Check out the video below to see how this came together and get some tips and tricks for painting on canvas with the All-Purpose Inks and Potion Number 9.

Skill: Beginner, Intermediate, Advanced

Time: 2 hours minutes 

Art Supplies:

Imagine

magine Products

• All-Purpose Inks

White 

Sky Blue 

Autumn Leaf 

Sky Mist 

Tropical Lagoon 

Chocolate 

Banana Cream 

• Ink Potion Number 9  

• On Point Glue

• InkBlushers

Other Products Used

• Canvas

• Detail Paint Brush

• Shells

• Eye Dropper

• Plastic Palette

• Acrylic Sealer


Follow Katy Here:

Youtube: https://youtube.com/c/eastwickspaperandink 

facebook: fb.me/eastwickspaper 

Instagram: https://www.instagram.com/eastwickspaperandink/ 

Blog: https://www.eastwickspaperandink.com/