The inspiration for this piece was the quote I included on the canvas. I am forever on the lookout for inspiring and uplifting quotes. Things that make you think, or give you the push you need to move forward. I really also love working with upcycled materials. We don’t need more trash in the landfills, right?! I knew that my Imagine mixed media products would work wonders to make this piece come alive! When i’m working with resin pieces, I always reach for my Fireworks sprays and All-Purpose Ink. They both cover beautifully. This quote on the canvas is very near to my heart and all of the elements came together perfectly to give it a home.
In this video, I’ll share how you can stretch the use of your VersaMark ink pads and create easy backgrounds with them. Even though VersaMark is generally used for heat embossing, it’s also a great ink for tone-on-tone or monochrome stamping. Let me know if you’d like to try this easy, minimal supply technique, and are interested in seeing more of these tutorials.
I have always considered myself as an eclectic type crafter and this card is the perfect representation of my style. It has a little bit of modern, vintage and grunge mixed together using several different techniques and products. Watch my video below to see how I did it. Enjoy!
For today’s card, I stamped two super adorable seal images using black ink and colored them using few shades of brown Memento ink. Then I used my sharp pair of scissors to cut them. To create a fun background I used a solid stripe stamp and two Versamagic inks which give a beautiful opaque chalky result. I repeatedly stamped them to create a cute plaid background. I arranged the layout for my card and its quick and easy card perfect for valentine’s day.
Who wants to “Make things happen” in 2019? I sure do and that is what inspired me to make this 4” x 6” Art Journal page featuring a variety of Imagine products. The tutorial includes how to use your Craft Mat to create a watercolor background effect with irRESISTible sprays as well as how to create a watercolor palette for detail coloring with Memento inks.
Skill: Beginner Time: 1 hour
Directions
Step 1
Apply VersaFine Clair (Medieval Blue & Teal Zeal) to a 4” x 6” Art Journal panel with Jumbo Daubers.
Step 2
Spray panel with Ink Potion No. 9 and encourage the ink to blend.
Lay the panel, facedown, into the wet ink and lift. Set aside and allow to dry.
Step 5
Spray Teal Zeal irRESISTible ink directly onto the panel in a few key areas. Allow to dry.
Step 6
With VersaFine Clair in Nocturne, randomly stamp script across the panel.
Step 7
Spray Art Journal Panel with Sheer SHIMMER Craft Spray in Sparkle. Allow to dry.
Step 8
Stamp the four-butterfly image (from the Tim Holtz Alterations French Flight stamp/die set) on to the panel with VersaFine Clair in Nocturne. Stamp the image just off center and then to the left of the panel.
Step 9
From the same Butterfly stamp set, stamp the large butterfly image into a piece of white cardstock with VersaFine Clair in Nocturne.
Step 10
Apply three colors of Memento (Morocco, Teal Zeal, Elderberry) directly onto your Craft Mat and then add water; use like you would watercolors to paint the butterfly image. Allow to dry.
Step 11
Spray the butterfly image with Sheer SHIMMER Spray in Sparkle. Allow to dry.
Step 12
With the coordinating die from the stamp set, die cut the butterfly image.
Step 13
Adhere black thread, in a circle pattern, underneath the butterfly and then mount to panel with double-sided foam tape (directly over the previously stamped image).
Step 14
With a paintbrush, apply GooseBumps Clear Texture Spray to butterfly. Allow to dry.
Step 15
Edge panel with VersaFine Clair in Nocturne and then embellish with adhesive pearls.
Step 16
Add sticker sentiment “Make It Happen” below the colored butterfly.
Step 17
Add the pages, back panel and metal rings to transform this project into an art journal.
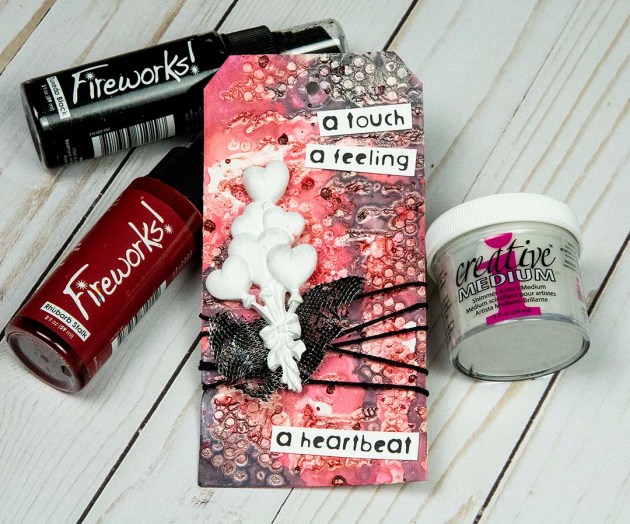
I’m always looking for different textures to include in my paper crafting projects. It’s a fun challenge for me and this tag really brought some interesting textures together in a great way! I can always count on Imagine to have just the right product to bring gorgeous color to these textures. Fireworks spray really shines when used over a stencil textured background. You will see in this video, I add a little water and the shimmer and pigment will settle in between the shapes, giving great depth to this tag. I also really love that I can layer different colors of Fireworks spray over the top of each other. I used irRESISTible Pico Embellisher on the wire mesh texture to give it a little bit of color. It’s just thick enough to fill the holes and looks fantastic! I wanted the resin hearts to be stark white and stand out so I used All-Purpose Ink in White, which provided great coverage and opacity. Watch my video today and like and share if you enjoy it!