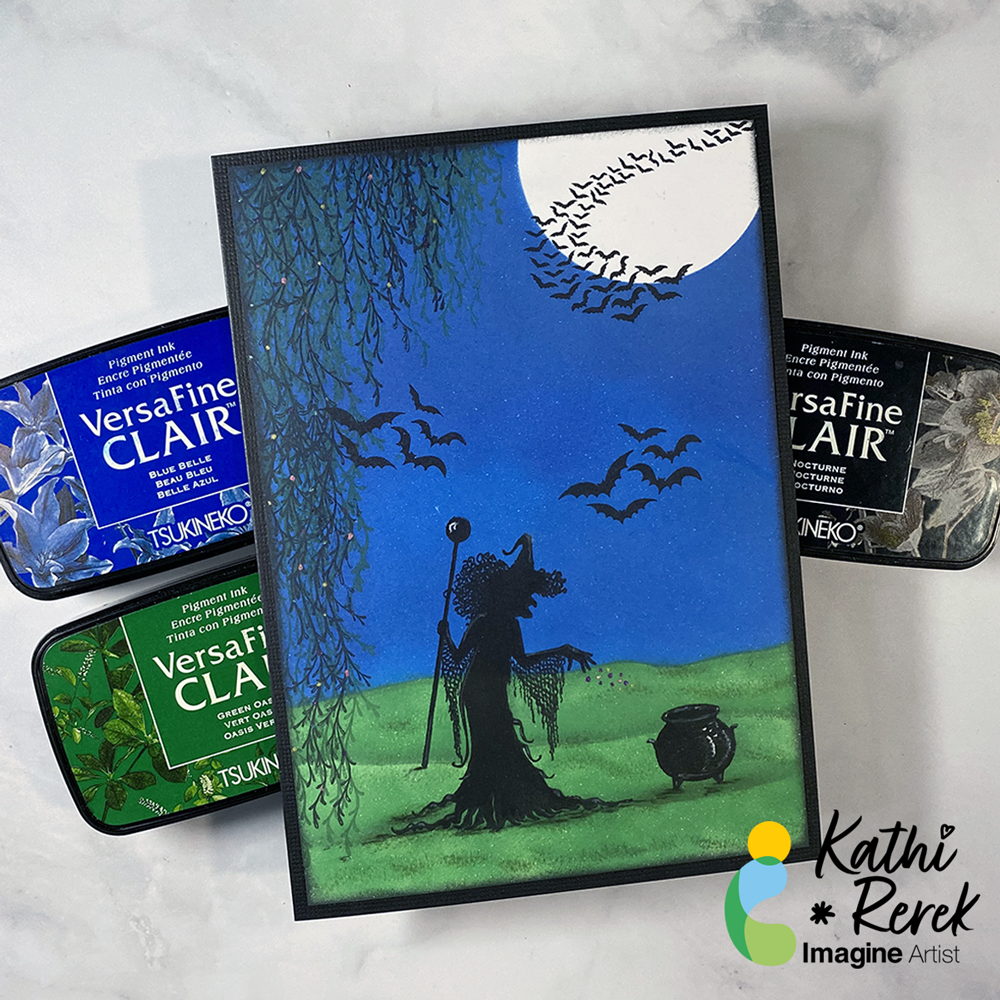
By Kathi Rerek
VersaFine Clair Inks make it easy to create a quick and bewitching Halloween scene!
Skill Level: Beginner to Intermediate
Time: 1 hour
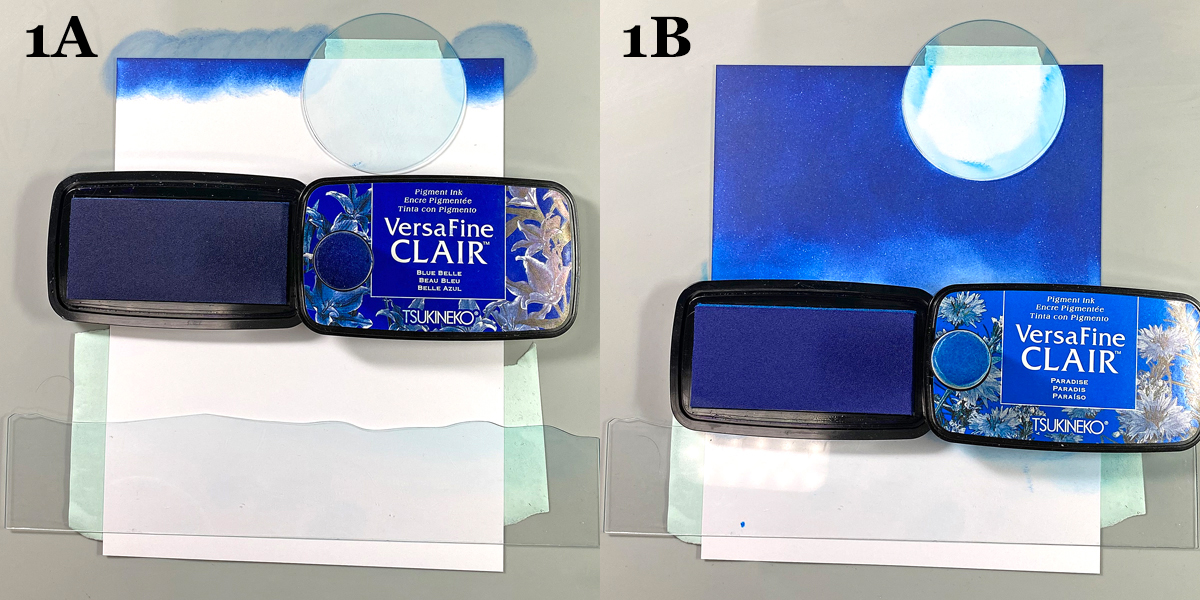
Step 1.
Use tape to secure the Moon mask and the flattest of the Hills mask to the back of a 4.75” x 6.75” panel of white cardstock.
Use a sponge dauber to apply Blue Belle VersaFine Clair Ink over the Moon mask onto the top part of the image panel to create a night sky.
Use another sponge dauber to apply Paradise VersaFine Clair Ink over the top of the Hills mask onto the image panel until the panel is covered.
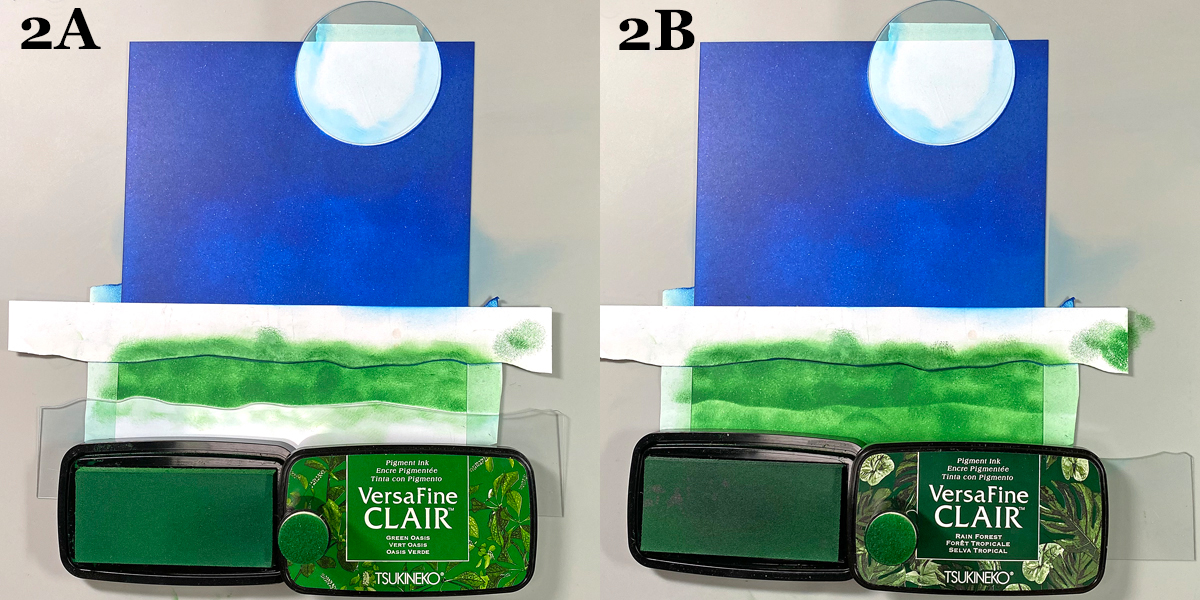
Step 2:
Move the Hills mask slightly downward and use the existing tape to secure it in place.
I had previously traced the Hills mask onto a piece of cardstock and fussy-cut it to create a paper mask for the negative portion of the mask. This was placed over the night sky.
Use a sponge dauber to apply Green Oasis VersaFine Clair Ink between the paper and acetate mask. Move the acetate mask downwards again and sponge Green Oasis VersaFine Clair Ink to fill in the grassy areas.
Use a different sponge dauber to apply Rain Forest VersaFine Clair Ink below the paper mask to add contrast and fill in the lawn. Remove the masks and heat set the panel.
Use a black chalk pencil to deepen the shadows in the grass.
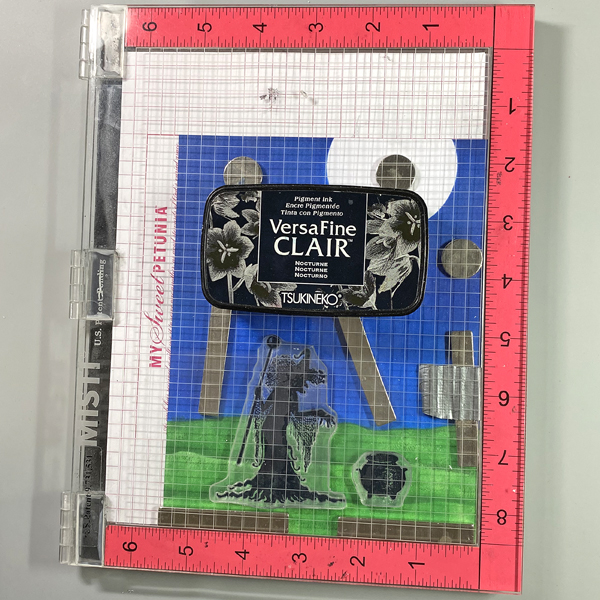
Step 3:
Use magnets to secure the image panel to the base of a stamping platform. Position the witch and the cauldron stamps facedown as desired. Press the platform’s lid onto the back of the stamps, lift, and ink the stamps with Nocturne VersaFine Clair Ink. Stamp. Re-ink and stamp again if needed to attain a good impression.
Use a black chalk pencil to add shadows below the witch and the cauldron.
Step 4:
Position the Bats stamp on the right side of the witch and above the cauldron. Use Nocturne VersaFine Clair Ink to stamp the image. Oops. No photo.
Clean and dry the Bats stamp. Reposition it so that it’s to the left of the witch. Use Nocturne VersaFine Ink to stamp the image.
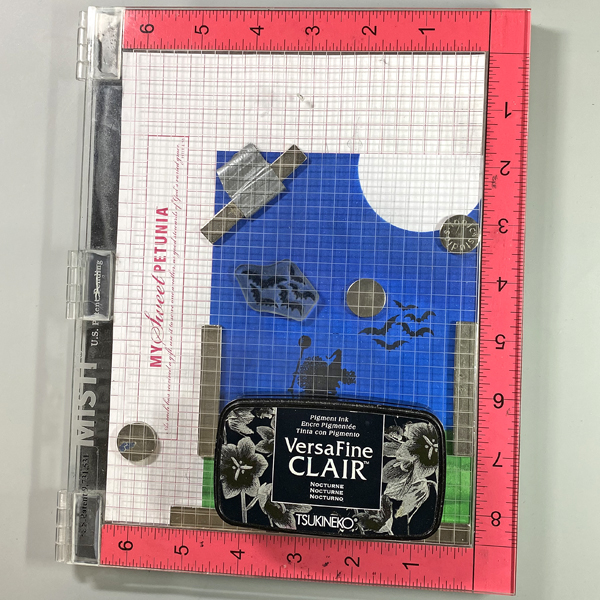
Step 5:
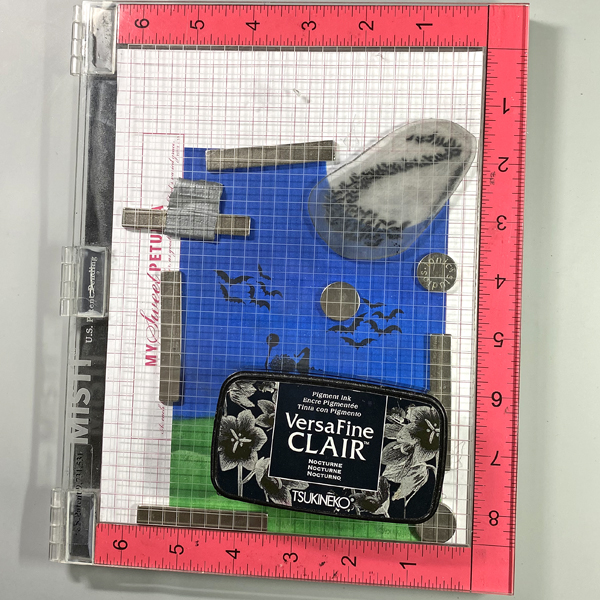
Position the Bat Colony stamp at the top right of the image panel so the bats are in front of the moon. Use Nocturne VersaFine Clair ink to stamp the image.
Step 6:
Position the larger of the Spanish Moss stamps along the right side of the image panel. Ink the stamp with Rain Forest VersaFine Clair Ink and stamp. Clean and dry the stamp. Move the stamp down, ink the stamp with Rain Forest VersaFine Clair Ink and stamp to extend the moss.
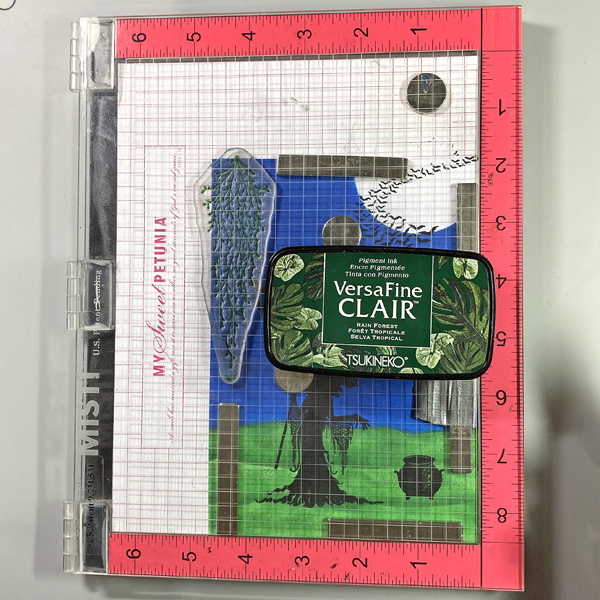
Step 7:
Position the smaller of the Spanish Moss stamps to the right of the stamped moss. Ink the stamp with Shady Lane VersaFine Clair Ink and stamp. Clean and dry the stamp. Move the stamp to the right, ink the stamp with Shady Lane VersaFine Clair Ink and stamp.
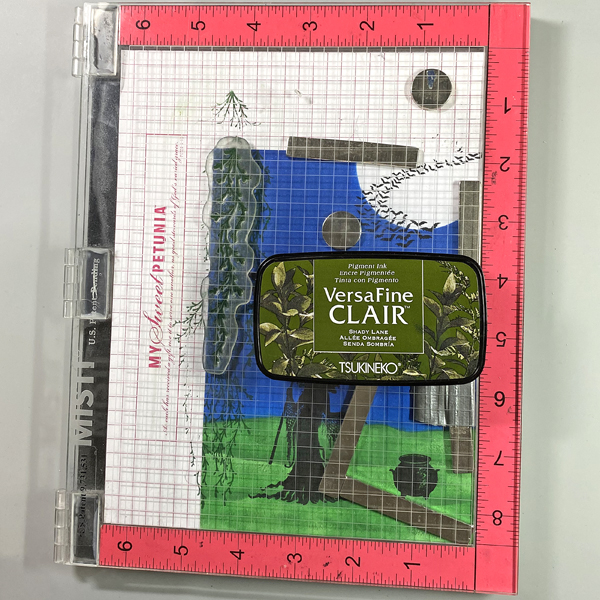
Step 8:
Clean and dry the stamp then move it back to the left. Ink the stamp with Nocturne VersaFine Clair Ink and stamp.
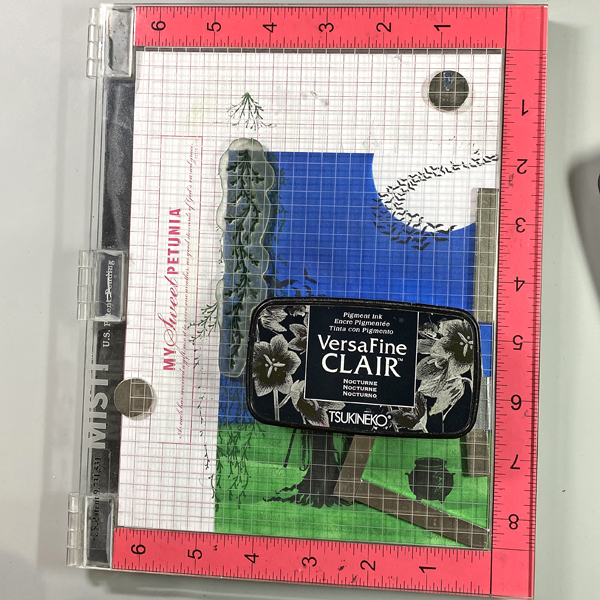
Step 9:
Place the larger of the Spanish Moss stamps onto an acrylic block. Ink the stamp with Nocturne VersaFine Clair Ink and stamp over the previous impressions using first and second generation stamping. Sorry there’s no photo.
Heat set the image panel.
Step 10:
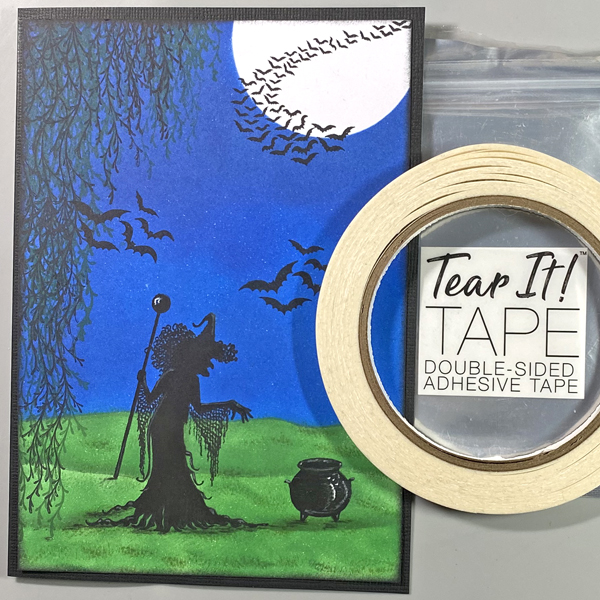
Use Tear It! Tape to adhere the image panel to a 5” x 7” black card.
Step 11:
Use a white Gelly Roll Gel pen to add highlights to the cauldron. Use a white colored pencil to add shading to the witch and the cauldron.
Use Stardust Glitter Gel pens to add sparkle to the contents being thrown in the cauldron and to the Spanish Moss.
Imagine Crafts Supplies:
- VersaFine Clair Ink – Blue Belle, Paradise, Shady Lane, Rain Forest, Green Oasis and Nocturne
- Sponge Daubers
- Tear It! Tape
- Craft Mat
Other Supplies:
- Solar White Classic Crest Cardstock by Neenah Papers
- Raven Cardstock by Bazzill Basics
- Acetate Circle Masks by Lavinia Stamps
- Acetate Hills Masks by Lavinia Stamps
- Willow the Witch Clear Polymer Stamp Set by Lavinia Stamps
- Bats Clear Polymer Stamp by Lavinia Stamps
- Bat Colony Clear Polymer Stamp by Lavinia Stamps
- Spanish Moss Clear Polymer Stamp Set by Lavinia Stamps
- White Gelly Roll Gel Pen by Sakura of America
- Purple, Rose, Sky Blue, and Gold Stardust Glitter Pens by Sakura of America
- White Colored Pencil by Prismacolor
- Black Chalk Pencil by General’s
- Heat Gun by EK Success
Mini Guillotine Trimmer by Tim Holtz for Tonic Studios
Misti Stamping Platform by My Sweet Petunia