Create A Simple Card Design For Any Occassion


2022-March-Katy-Hello-Spring-700x700

By Katy Ingram –

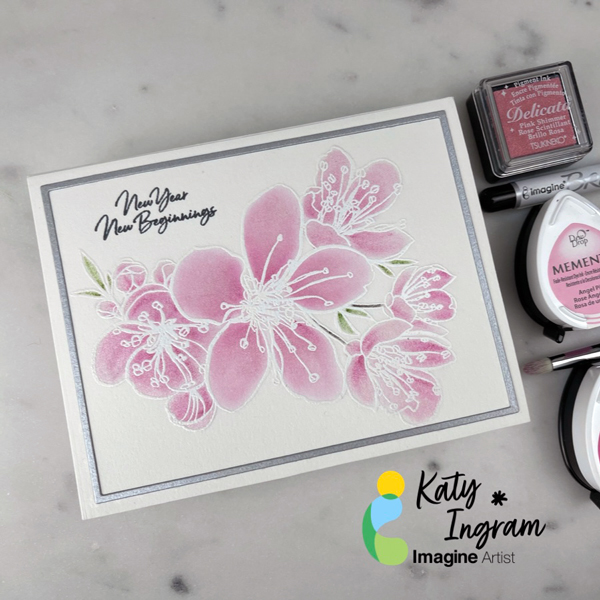
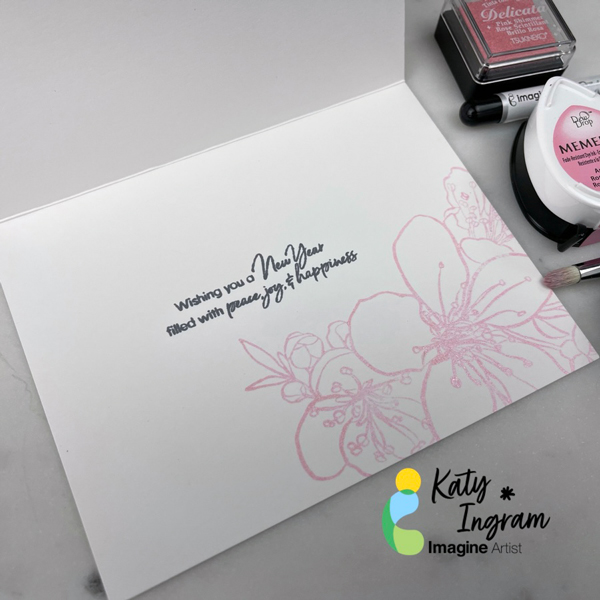
Hello Friends! Katy here with another quick project for you. Today’s card is super simple and is great for all occasions from just a note to sympathy and everything in between. I initially started off with this “Hello Spring” card, but it quickly rolled into 8 cards and I have several more I can create by using more of those small sentiments we get with most of our stamp sets. I used a single stemmed floral and some ink pad swiping and then a small sentiment. I have a video for you showing just how easy it is and share some stamps from my stash to give you ideas. I also found that stamping over VersaMagic ink with VersaFine Clair will soften the look of the VersaFine Clair ink giving you another way to use both of those inks.

Skill: Beginner, Intermediate, Advanced
Time: 5 minutes

Art Supplies:

Imagine

VersaFine Clair

VersaMagic

Memento

Tear It! Tape 

 
Other Products Used:

•Maker Forte Hello Spring Layering Stamp

Simon Says Stamp Beautiful Flowers 2 Stamp

Maker Forte Eclipse Black Card Stock

Gina K Designs White Layering Card Stock

Lavinia Stamps Multifarious Card Stock


Create A Quick Set of Ink Blended Note Cards with Embossing Powders

2022-feb-katy-ingram-card-set-IG_700x700


By Katy Ingram –

Hello Friends! Katy here with another quick project for you. I don’t know about you, but I am always looking for quick card ideas to save me some time and in today’s video, I have a simple card that is easy to replicate and all you need is some inks (VersaFine Clair in this case) some Mboss embossing powders a background stamp and some word dies. I made 6 cards in about an hour and what I love about them is that they can be used for anyone or any occasion. I hope you enjoy the video. Thanks so much for watching.

Skill: Beginner, Intermediate, Advanced

Time: 25 minutes

Art Supplies:

Imagine

VersaFine Clair

Glamorous 

Monarch

Verdant 

Green Oasis 

Twilight 

Morning Mist 

Charming Pink 

Purple Delight 

Fantasia 

Warm Breeze 

Paradise 

Blue Bell

Cheerful 

Summertime 

VersaMark Dazzle Frost 

VersaMark Ink Pad 

Mboss Embossing Powder – White 

Mboss Embossing Powder – Gold 

Point On Point Glue

Tear It! Tape

 
Other Supplies Used:

Concord & 9th Barnwood Background Stamp

Spellbinders Simply Perfect Mix & Match Sentiments

Fabriano Artistico Cold Pressed Watercolor Paper

Classic Crest Epic Black 130lb Card Stock

Accent Opaque 110 lb Card Stock

Misti Stamping Tool

Kaolin Clay Powder Tool


New Ink Blending Technique Using Eyeshadow Brushes With Memento and Delicata Inks


2022-jan-katy-new-year-new-beginnings-Blog

2022-jan-katy-new-year-new-beginnings-inside-Blog-2

By Katy Ingram –

Hello Friends! I am so excited to be back with you for another year of card making and crafting here at Imagine Crafts. I know for many, Valentine’s Day cards are in full swing, but I thought it would be fun to start the year off with something a bit different. However; this card can also be turned into a Valentine or a Mother’s Day card which gives you some versatility. In todays video I show you how to use eyeshadow brushes to color your images using Memento and Delicata Inks. I hope you enjoy the video. Thanks so much for watching.

Skill: Beginner, Intermediate, Advanced
Time: 25 minutes


Art Supplies:

Imagine

• Memento Ink Pad – Angel Pink 

• Memento Ink Pad – Rose Bud

• Memento Ink Pad – Gray Flannel 

• Memento Ink Pad – Bamboo Leaves 

• Memento Ink Pad – Espresso Truffle 

• Memento Ink Pad – Rich Cocoa 

• Delicata Ink Pad  – Pink Shimmer 

• VersaMark Ink Pad 

• Mboss Embossing Powder – White 

• On Point Glue 

• Brushstix Chisel Tip 

Other Products Used:

• Ellen Hutson – Mondo Sakura Stamp Set

• Waffle Flower – New Beginnings Stamp Set

• Ellen Hutson – Essentials Rectangles Die Set

• Waffle Flower – A2 Layering Rectangle Die Set

• Stathmore 500 Series – Hot Pressed Watercolor Paper

• Stardream Metallic Silver

• Accent Opaque 110 lb Card Stock

• Misti Stamping Tool

• Couture Creations Precision Stamp Press

• Kaolin Clay Powder Tool


Make a “Sending My Love” Card for your Valentine

2022-LeeAnn-January-700x700

By LeeAnn McKinney

– Hey there friends, LeeAnn here with a fun project that the idea will work any time of year, but this one especially is for Valentine’s Day. I did direct ink to paper, and blending Rose Bud, Love Letter and Angel Pink Memento Dye Ink in dew drop form.

I then ran the panel through my Big Shot with a die that embossed stitching into the background and made the perfect a2 cut around the panel. I then did direct to paper with VersaMark which I the poured Gold Mboss and then took my heat tool to melt it. After using my Big Shot to cut out the sentiment with the embossed panel and 3 layers of white, I cut the shadow layer out of vellum.

Then I used On Point Glue to adhere the layers together, and attached to the card panel, I used Tear It Tape to attach the panel with my card base. I followed that up with a few drops of On Point Glue to adhere some flat backed Gold Pearls to my panel and spritzed it with Sparkle Simmer Spray. With that this 20 minute video was complete (actually 6 video’s spliced together) I sped it up and cut the messy parts and you now have more time to enjoy the rest of your day. Thank you for watching, and I would love to see what you make that perhaps this project inspired you with.


Art Supplies

Imagine:

• Memento Love Letter 

• Memento Angel Pink

• Memento Rose Bud 

• VersaMark Watermark Ink

• Mboss Gold 

• On Point Glue 

• Tear It! Tape 

• Sheer Shimmer Sparkle 

• Craft Mat 

• Miscellaneous  Stamp Cleaner  

Other Products:

• Kat Scrappiness Sending My Love Die with Shadow

• Kat Scrappiness Stitched Hearts Coverplate Die


Create Elegant Heart Embossed Holiday Cards

2021-Lee_Ann_Dec_Blog

By LeeAnn McKinney –

Hi there friends and fellow crafters, LeeAnn here. Today I am making 2 cards using one of my favorite techniques… HEAT EMBOSSING. So for the next 5 minutes please relax, and watch as I make these 2 cards. Actual crafting time was 17 minutes not counting the cutting of the cardstock which I did before turning on the camera.


Art Supplies

Imagine:

• Craft Mat

• Tear it! Tape

• Mboss

• VersaMark Watermark Ink


Other Supplies Used:

• CARD STOCK 8.5 X 11- White- Layering Weight – Gina K Designs

——— https://ldli.co/e/43kgz90 [ ginakdesigns.com ]

• STAMPS- Holiday Tapestry – Gina K Designs

• CARD STOCK 8.5 X 11- Black Onyx- Heavy Weight – Gina K Designs

• CARD STOCK 8.5 X 11- Red Velvet- Heavy Weight – Gina K Designs

• CARD STOCK 8.5 X 11- Blue Denim- Heavy Weight – Gina K Designs


How To Create A Winter Background With Memento Inks

Katy Ingram_Winter Sky_IG

By Katy Ingram –

Hello and welcome! Katy here with a new video. Today I have a new way of ink blending to share with you that anyone can do. I know may people struggle with ink blending in general and the technique I share with you in the video couldn’t be simpler to replicate and is a bit easier on the hands and wrists. I also talk a bit about the difference between hot and cold pressed watercolor paper for those that may not know and for a change of pace I used Memento inks to do my ink blending and created a beautiful crisp winter night sky. I hope you find these tips helpful and I hope you enjoy the video. Thanks so much for watching.

Skill: Beginner, Intermediate, Advanced
Time: 35 minutes

Art Supplies:

Imagine

• Delicata Silvery Shimmer
• Memento Inks – Summer Sky, Bahama Blue, Teal Zeal and Nautical Blue
• On Point Glue
• Tear it! Tape
• Sheer Shimmer Spritz in Sparkle 

Other Products Used:

• Gina K Designs Delicate Snowflakes Background Stamp
• Waffle Flower Oversized Joy Stamp and Die Set
• Red Foil Cardstock
• Accent Opaque 100 & 120 lb cover cardstock
• Strathmore 500 Series Hot Pressed Watercolor Paper
• Blending Brushes
• Fiskars Wire Guide Trimmer