Make a “Sending My Love” Card for your Valentine

2022-LeeAnn-January-700x700

By LeeAnn McKinney

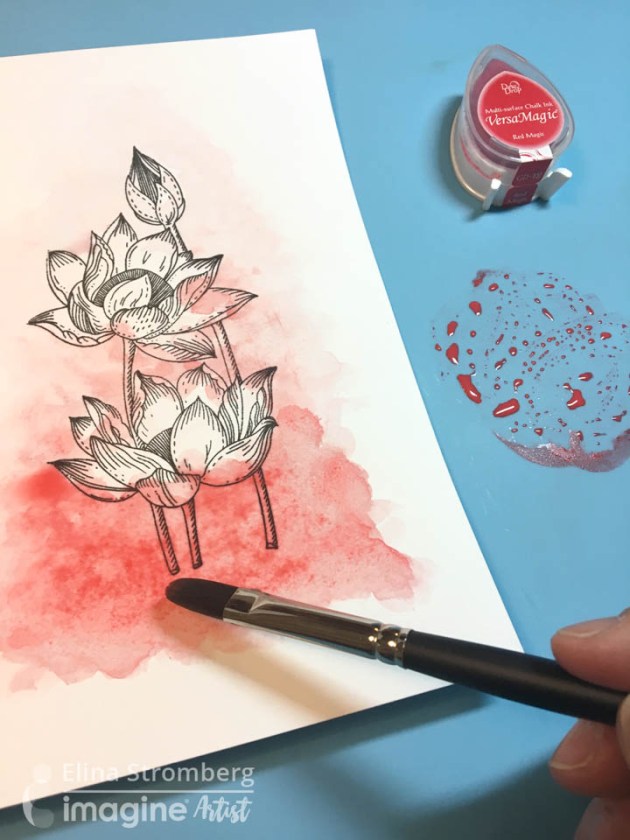
– Hey there friends, LeeAnn here with a fun project that the idea will work any time of year, but this one especially is for Valentine’s Day. I did direct ink to paper, and blending Rose Bud, Love Letter and Angel Pink Memento Dye Ink in dew drop form.

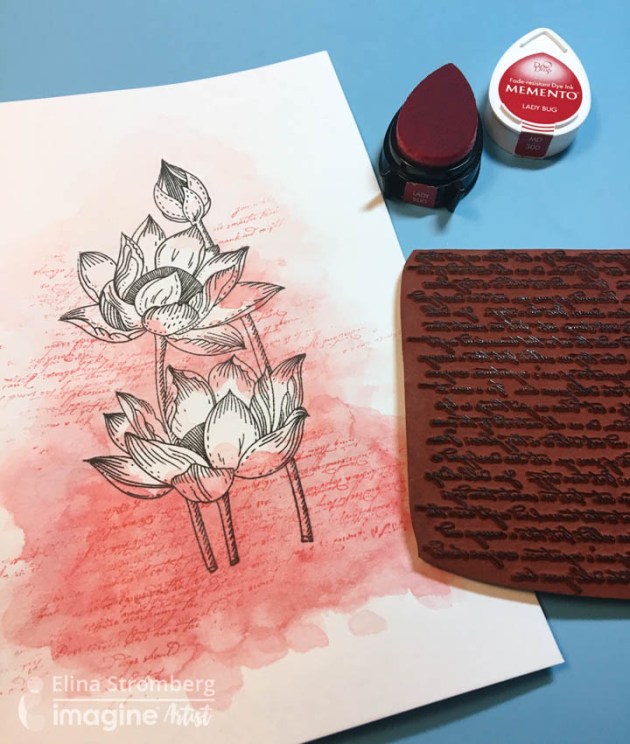
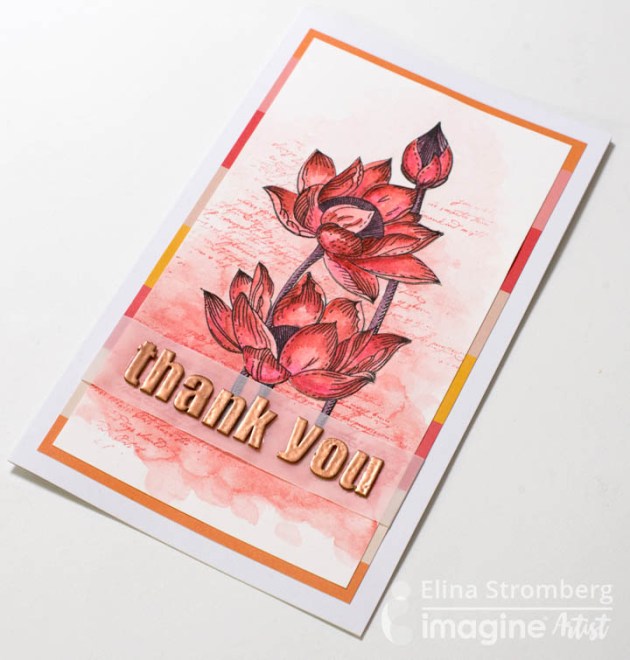
I then ran the panel through my Big Shot with a die that embossed stitching into the background and made the perfect a2 cut around the panel. I then did direct to paper with VersaMark which I the poured Gold Mboss and then took my heat tool to melt it. After using my Big Shot to cut out the sentiment with the embossed panel and 3 layers of white, I cut the shadow layer out of vellum.

Then I used On Point Glue to adhere the layers together, and attached to the card panel, I used Tear It Tape to attach the panel with my card base. I followed that up with a few drops of On Point Glue to adhere some flat backed Gold Pearls to my panel and spritzed it with Sparkle Simmer Spray. With that this 20 minute video was complete (actually 6 video’s spliced together) I sped it up and cut the messy parts and you now have more time to enjoy the rest of your day. Thank you for watching, and I would love to see what you make that perhaps this project inspired you with.


Art Supplies

Imagine:

• Memento Love Letter 

• Memento Angel Pink

• Memento Rose Bud 

• VersaMark Watermark Ink

• Mboss Gold 

• On Point Glue 

• Tear It! Tape 

• Sheer Shimmer Sparkle 

• Craft Mat 

• Miscellaneous  Stamp Cleaner  

Other Products:

• Kat Scrappiness Sending My Love Die with Shadow

• Kat Scrappiness Stitched Hearts Coverplate Die


All About You!!! An Emboss Resist How To

By LeeAnn McKinney

LeeAnn here with a fun project I made for a friend’s birthday. While looking at my stamps and thinking about what I wanted to do for this project it popped into my mind, and then a happy accident happened while making this mini slimline card that just “Sealed it” for me.


Skill: Beginner

Time: 30 Minutes


Art Supplies

Imagine:

• Imagine Craft Mat

• Clear MBoss

• Memento Rose Bud Dye Ink

• Memento Tangelo Dye Ink

• Memento Dandelion Dye Ink

• Memento Grape Jelly Dye Ink

• Imagine Tear It Tape

• VersaMark

• Memento Dew Drop Bahama Blue

• Memento Dew Drop Bamboo Leaves

• StaZon Stamp Cleaner

• Memento Dew Drop Love Letter

Other Products Used:

• Scrapbook Adhesives Foam Squares

• Recollections 110 lb Cardstock

• Recollections 65 lb Cardstock

• Darice Heat Tool

• Picket Fence Studios- Spotlight On You Stamp

Create A Beautiful Hologram Flower Outline With Mboss

by Melissa Andrew

Create A Beautiful Hologram Flower Outline With Mboss

Today I am sharing the fabulous new Hologram Mboss embossing powder from Imagine. This fabulous embossing powder is fine for detailed stamping but also sparkles with colors of the rainbow. In this video, I show you how to stamp, emboss and fill in with a watercolor technique. The Memento inks are perfect for creating the peachy blended look.

Skill: Intermediate
Time: 1 hour

Directions

Supplies

Imagine
Other
  • LDRS Creative – If Friends Were Flowers stamp set
  • Whimsy Stamps – Card Builders Window die set
  • Antistatic tool
  • Paper Trimmer
  • White Card
  • Bristol Smooth cardstock
  • MISTI Stamping Platform
  • Gemini Jr. Die Cut machine
  • 6 round paintbrush
  • Spray bottle

How To Create A Beautiful Embossed And Watercolor Thank You Card

by Elina Stromberg

create a thank you card using memento inks and versamagic

Our lovely color of the month is ‘Passion Red’. What a perfect choice for a bright blooming flower card! I wanted to create a soft water-color painted look on my card, and all I needed was my water-soluble Memento and VersaMagic stamping inks and my Craft Mat as my palette.

Tsukineko ink pads come in several beautiful red colors, so I chose a few of my favorite reds and used them both for coloring the card background and for painting the beautiful Penny Black flower image. The trick was to stamp the main image twice and to layer the fuzzy-cut image on top of the stamped background; by using this technique the main image on the finished card has a beautiful, crispy edge, and while painting you don’t need to worry about the wet color running over the stamped lines!

Skill: Intermediate
Time: 1.5 hours

Directions


Step 1

Stamp flower image with VersaFine ink on white watercolor or mixed media paper. Apply ‘Red Magic’ VersaMagic ink on the Craft Mat. Using a hint of water pick up the rich, creamy color with a brush and color the background. Apply more red pigment on the bottom, and mix the color with water to create a lighter color for the top of the card. Do not mind painting over the stamped image; it will be covered with a second image layer later. Let air dry or dry with a heat gun.


Step 2

Add texture to the painted background. Stamp random patterns here and there using red ‘Lady Bug’ Memento color. Keep the stamp in your hand (do not attach to an acrylic stamping block) and bend it while stamping.


Step 3

Re-stamp the main flower image on another sheet of white mixed media paper. Color the image using a water brush and a few hues of red ink. I used Memento ‘Lady Bug’, bit darker red ‘Rhubarb Stalk’, dark purple ‘Sweet Plum’, and VersaMagic ‘Red Magic’ for coloring the background. Use the Craft Mat as your palette and apply more ink if needed. Once dry, cut out the image.


Step 4

Glue the fussy cut image on the background. Trim the background to size.


Step 5 

Color the letters for the sentiment word. Press each chipboard letter on clear VersaMark ink. Pick up the letter with a tweezer, dab into copper embossing powder, and heat-set the powder by heating the chipboard on the Craft Mat. Glue letters on a strip of vellum. Fold ends of the vellum strips on the card background and secure them with double-sided tape. This will keep the strip in place; there’s no need to glue it on the card front.


Step 6

Mat card front on striped patterned paper and attach on the card base. Done!

Supplies
Imagine

VersaMagic DewDrop in Red Magic

Imagine Craft Mat

Memento DewDrop in Lady Bug

Memento DewDrop in Rhubarb Stalk

Memento DewDrop in Sweet Plum

VersaMark

VersaFine Clair in Nocturne

Embossing Powder in Copper

Other
  • White mixed media paper
  • Brush
  • Water brush
  • Penny Black Stamps – Awaken
  • Background pattern stamp
  • White vellum
  • Chipboard letters
  • Scissors
  • Tweezers
  • Heat gun
  • Glue
  • Striped patterned paper
  • White card base

September Color of the Month is Sangria

September Color of the Month is Sangria - Imagine Crafts and Tsukineko USA

As we get closer to Fall we enjoy seeing some of the rich Fall colors come into fashion. For September we felt the deep reddish purple of a Sangria Wine would be perfect for the Color of the Month. Inks from the Imagine Shop that resemble Sangria include All-Purpose Ink in Vintage Wine, VersaFine Clair in Chianti, and Memento in Rhubarb Stalk. Be sure to collect some of these fabulous colors! In the meantime, we have a lovely tutorial for you to kick off September!

Sangria Colored Birthday Wishes by Elina Stromberg

Our beautiful September Color of the Month is ‘Sangria’. That warm red color is a perfect choice for Christmas crafts, but it can very well be used for various crafting projects throughout the year. My ‘Sangria’ inspired project was a monochromatic dimensional flower card, on which the pretty red color really stands out!

Skill: Intermediate
Time: 1 hour

Directions


Step 1

Stamp flowers and leaves on watercolor or mixed media paper using ‘Chianti’ VersaFine Clair. Dab red ‘Rhubard Stalk’ Memento ink on the craft mat. Using the craft mat as palette paint the stamped flowers and leaves. Let dry. Fuzzy cut flowers and leaves and bend the petals gently with your fingers.


Step 2

Place a circle stencil over a sheet of white mixed media paper. Secure with small pieces of masking tape. Ink circle with two Memento colors; ‘Rhubard Stalk’ and ‘Sweet Plum’ stamp.


Step 3

To create patterns on the inked circle keep the stencil still in place, dab water drops on the ink. Memento inks are water-soluble so the inked surface will react with water. When you’re happy with the pattern, lift the excess water with a paper towel and let dry.


Step 4

Trim card front to the desired size. Heat-emboss the sentiment on the card, mat card front on a piece of matching ‘Sangria’ colored paper. Attach card front to a white card base. Glue painted and fuzzy-cut flowers on the card front. Decorate flowers with metallic seed beads.

Extra: To create a more dramatic look with the large flowers, bend them in the center and work the paper until the petals pop forward off the card!

Supplies

Imagine
Other
  • Mixed media paper – White
  • Card base – White
  • Cardstock – Red, Brown
  • Paintbrush
  • Heat gun
  • Stampin’Up – ‘Birthday Blossoms’ Sentiment and flower stamps
  • Glue
  • Metallic Bead seeds