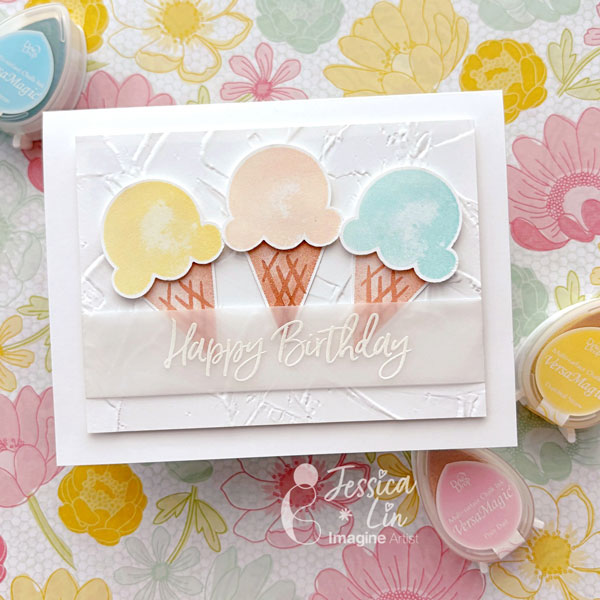
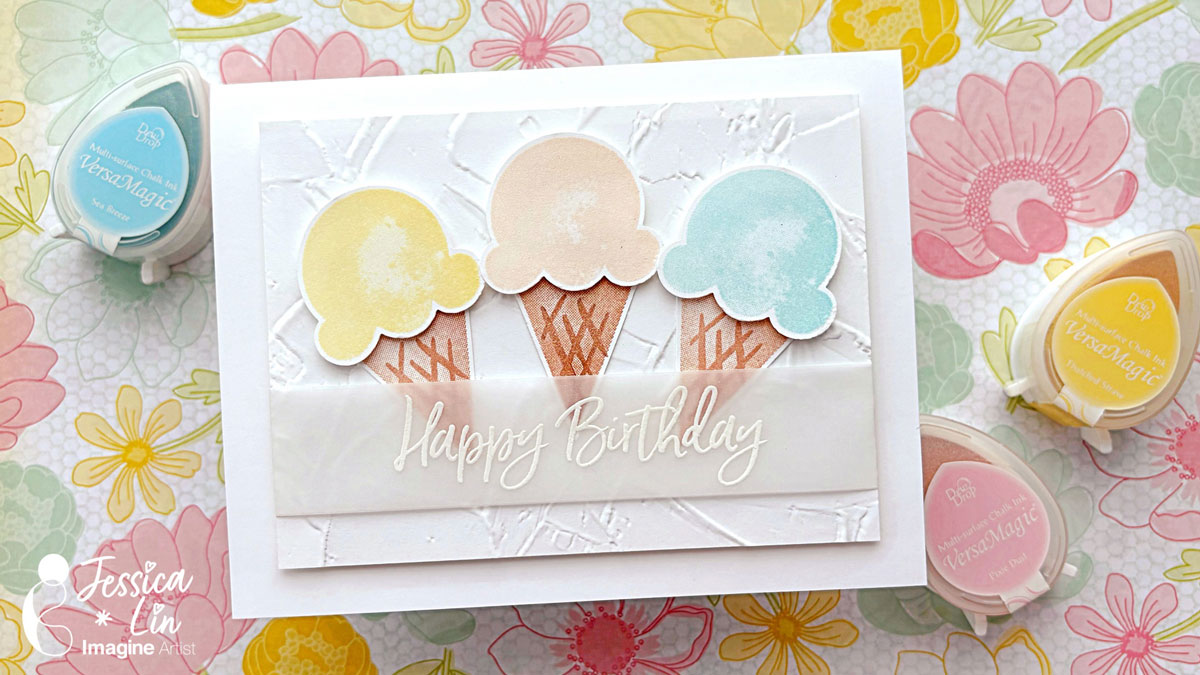
Hi everyone! It’s Jessica here. Today I am sharing a birthday card using one of my favorite ink pads – VersaMagic. They have great pastel colors that are just perfect for sorbet and ice cream images.
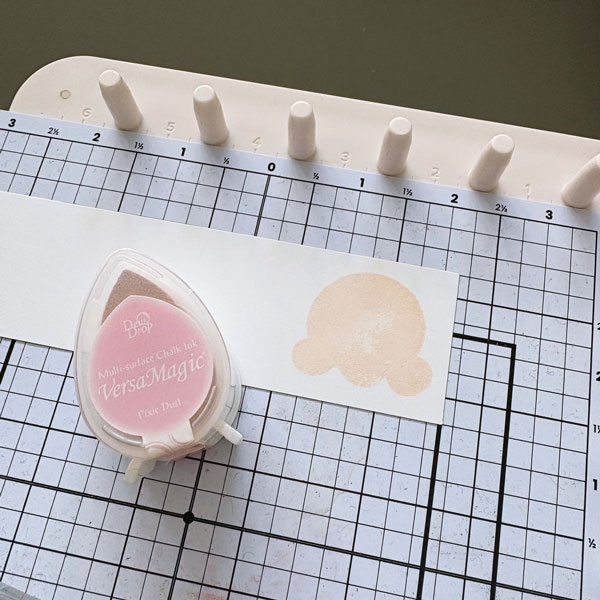
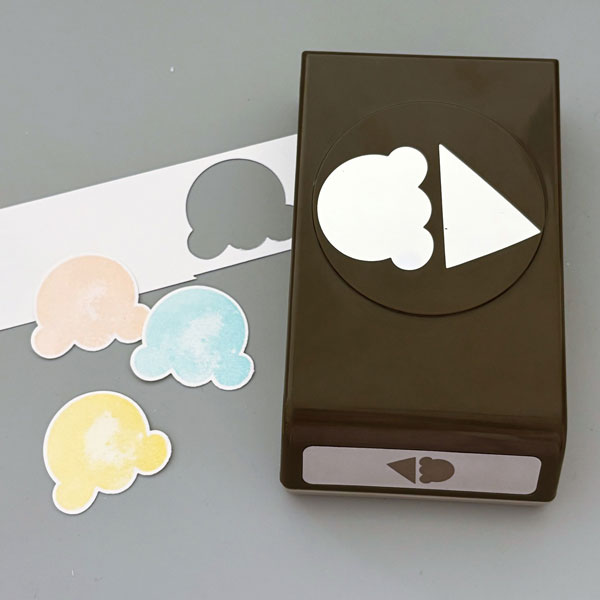
Step 1: The first color I chose is VersaMagic Pixie Dust – it reminds me of the classic strawberry ice cream. I used it to stamp the ice cream scoop image from Stampin’ Up’s Sweet Ice Cream set.
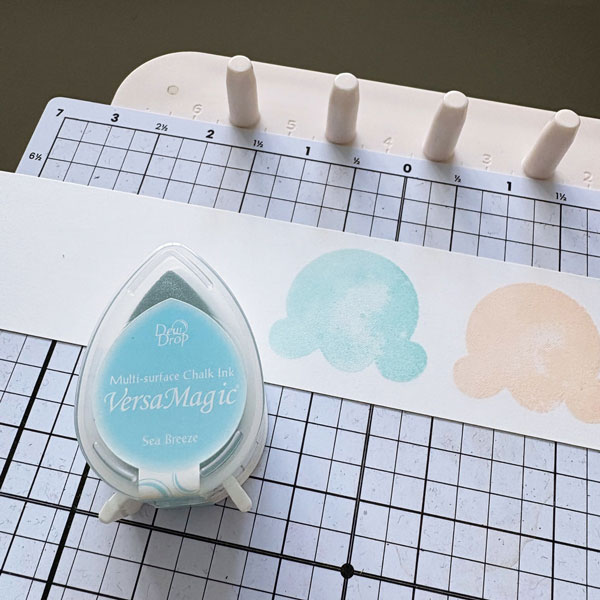
Step 2: Then I used VersaMagic Sea Breeze to stamp my second scoop of ice cream. You will notice that the ice cream image is not entirely solid. I really like the “watercolor” look it gives off.
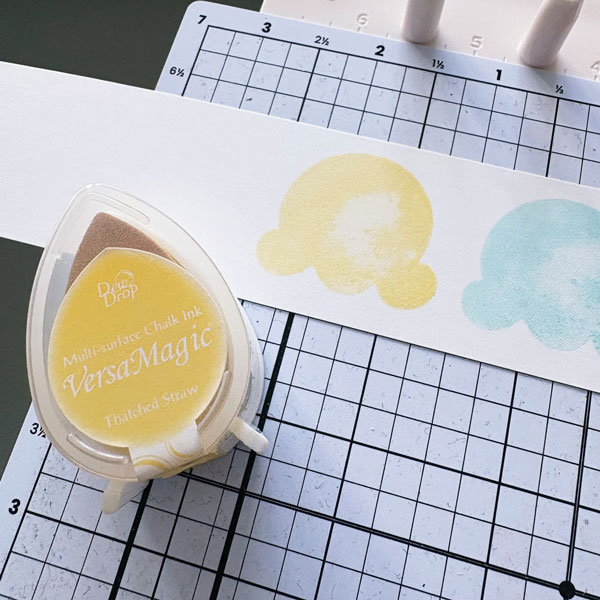
Step 3: For my last scoop of ice cream, I used VersaMagic Thatched Straw. A soft yellow like this is hard to find in the ink pad world. I have yet to find a similar hue as soft as this color.
Step 4: Once the stamped images are left to dry for 5-10 minutes, I punched them out with the coordinating Ice Cream Cone Builder punch.
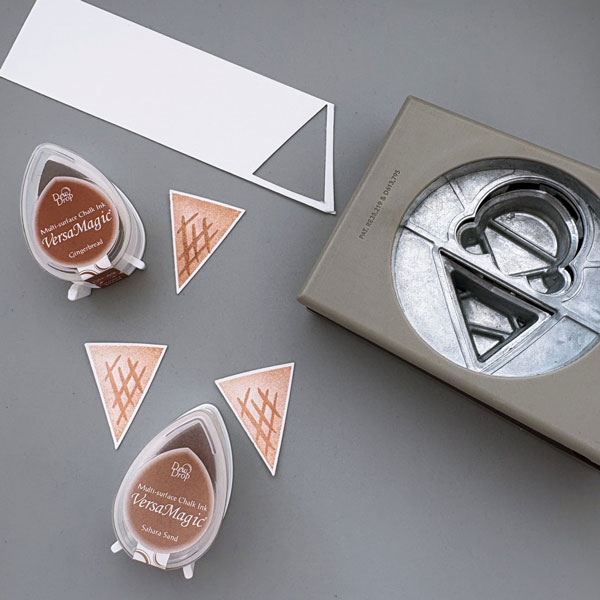
Step 5: For the ice cream cones, I used VersaMagic Gingerbread and Sahara Sand. The darker one on top is stamped with Gingerbread, and the two lighter ones on the bottom are stamped with Sahara Sand.
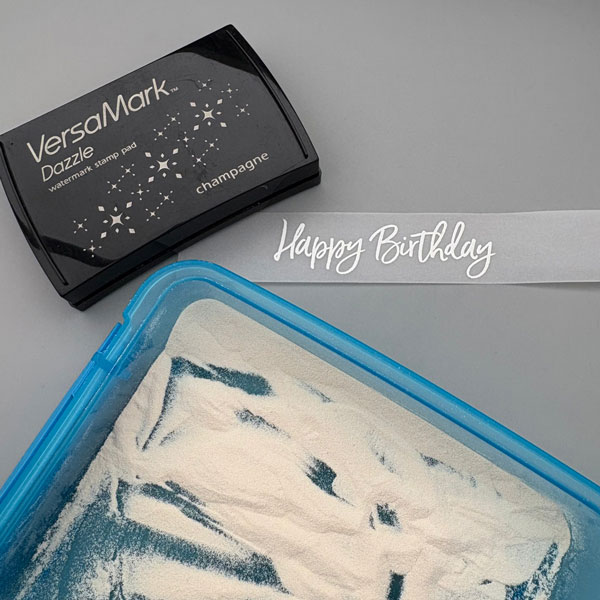
Step 6: I decided to heat emboss the sentiment on vellum to match the soft, pastel palette of the card. I stamped the “Happy Birthday” stamp with VersaMark Dazzle Champagne and heat embossed with white Mboss powder.
Step 7: To complete the card, I adhered all of the elements onto a card panel that I embossed with Stampin’ Up Painted Texture embossing folder. I hope you enjoyed today’s tutorial and have a sweet day!
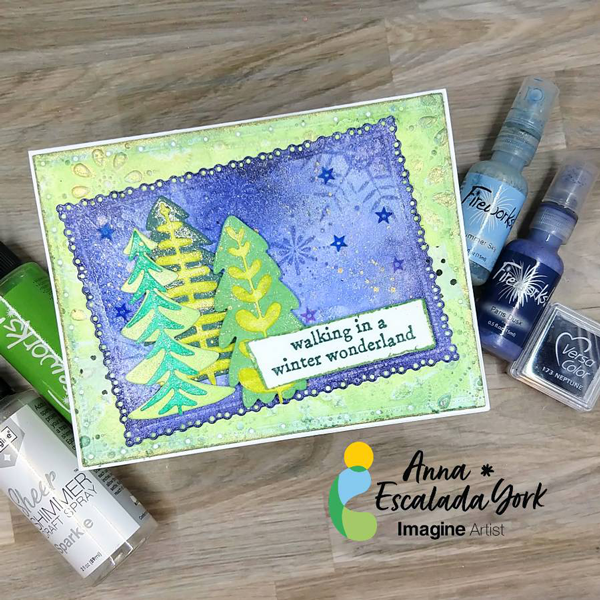
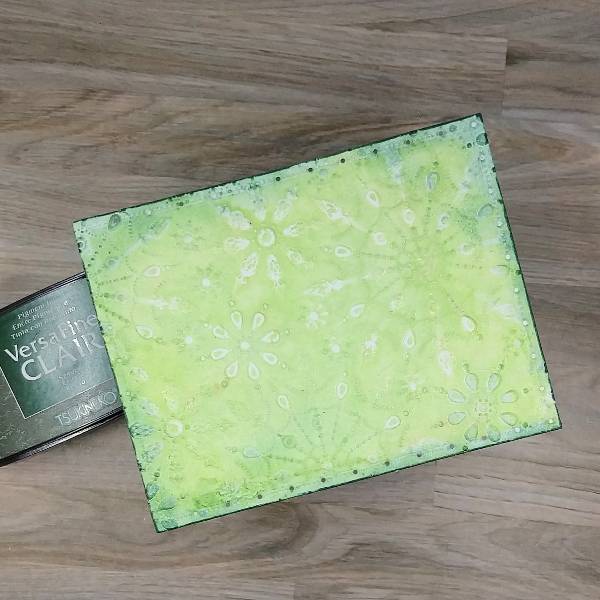
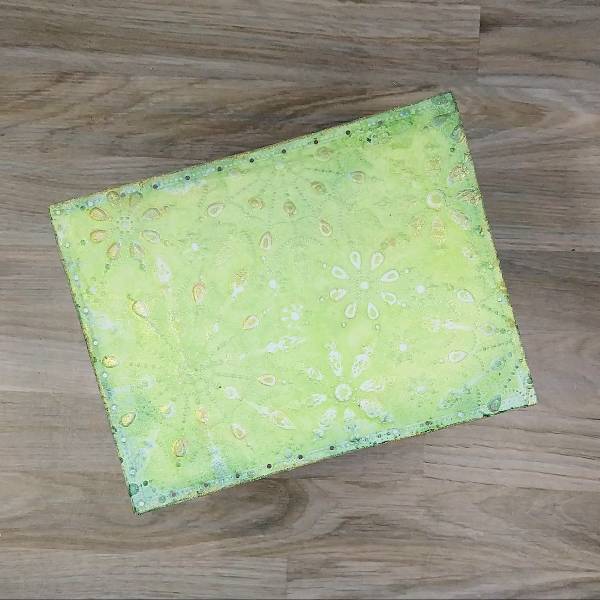
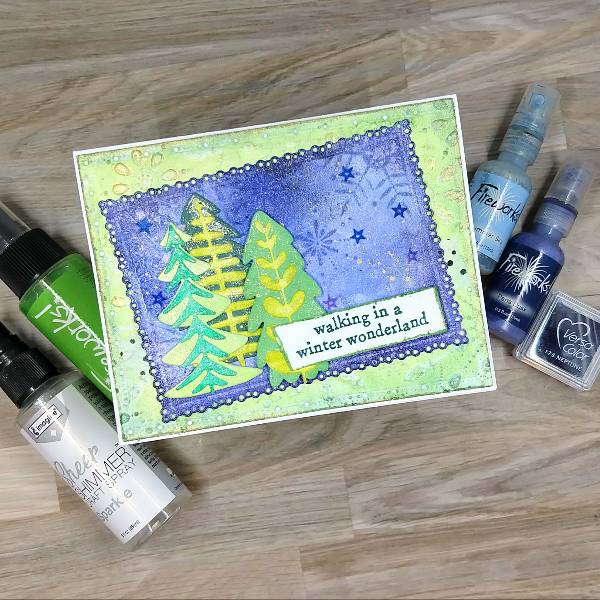
Today’s card is a winter card featuring some of the new VersaFine Clair colors.
Skill: Intermediate Time: 2 hours
Directions:
Step 1:
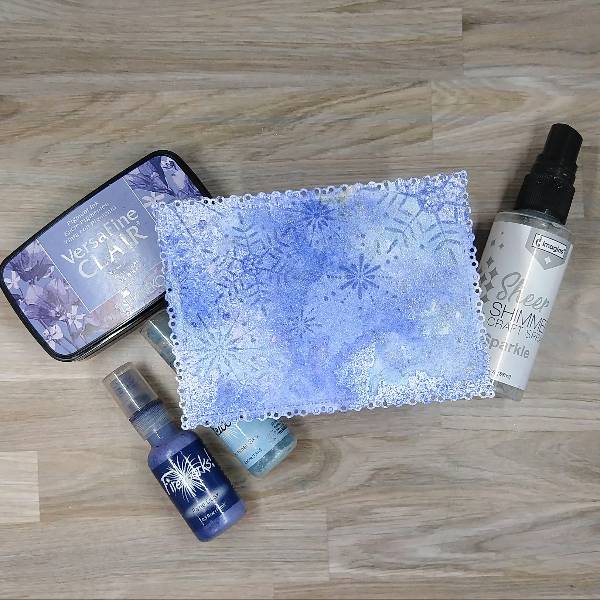
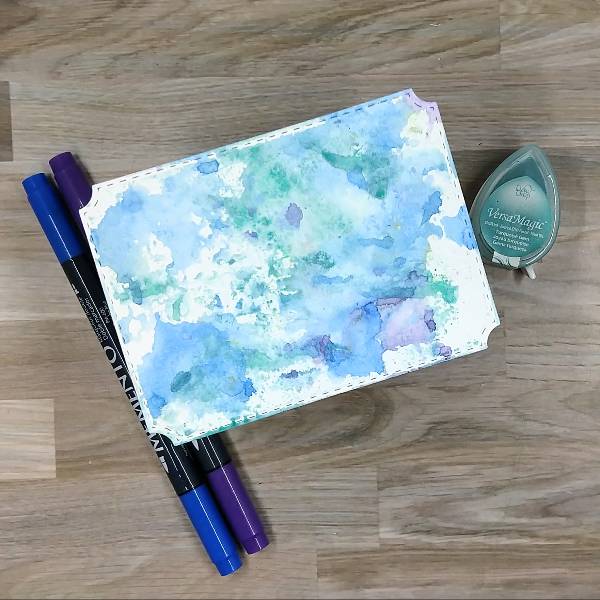
Watercolor smoosh a die cut watercolor paper panel with three sprays sprayed onto a piece of acetate packaging: Summer Sky and Paris Dusk Fireworks! Shimmery Craft Spray as well as Sparkle Sheer Shimmer Craft Spray.
(I accidentally smudged the upper edge of the panel with some yellow ink during the process, but planned on covering the color in the next few steps.)
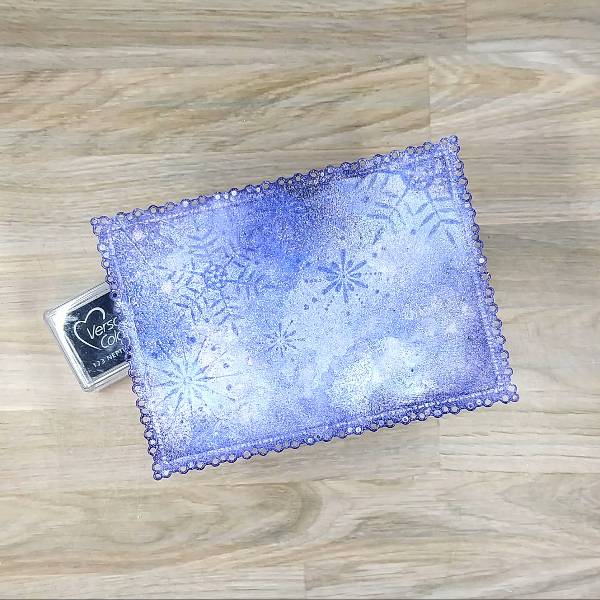
After the sprays dried, the upper left corner of the panel was stamped with Very Peri VersaFine Clair Ink using a woodblock rubber stamp. The ink was then heat embossed with clear Mboss powder.
Step 2:
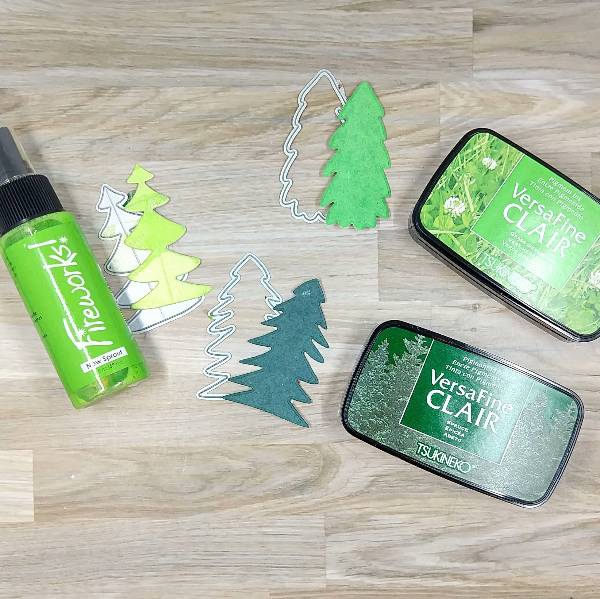
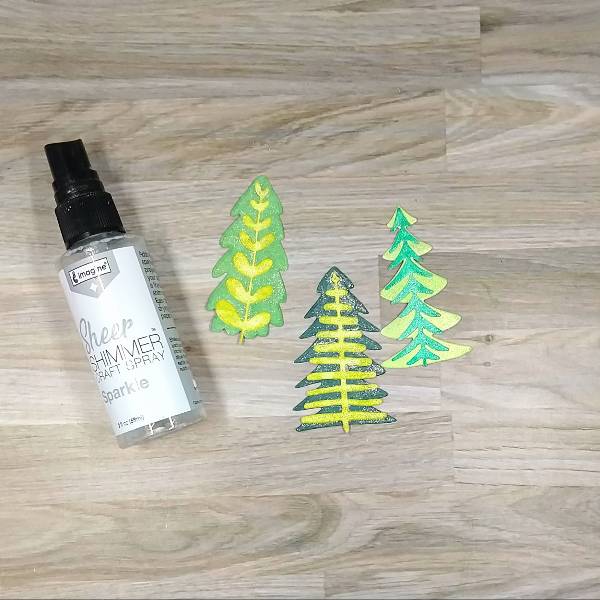
Color small pieces of watercolor paper (or in my case watercolor paper scraps) with a variety of greens: Spruce and Grass Green VersaFine Clair ink and New Sprout Fireworks! Shimmery Craft Spray. The scrap on the left was sprayed multiple times with the Fireworks! Spray and set aside to dry; the two straps on the right were pressed directly into the two ink pads until the whole scrap was colored with the ink. While there was a small space on the dark green tree (on the lower right in this picture) left uncolored, I knew that it would be covered up in the next few steps.)
After all of the papers had dried, I die cut the three small pieces of watercolor paper with three different tree dies.
Step 3:
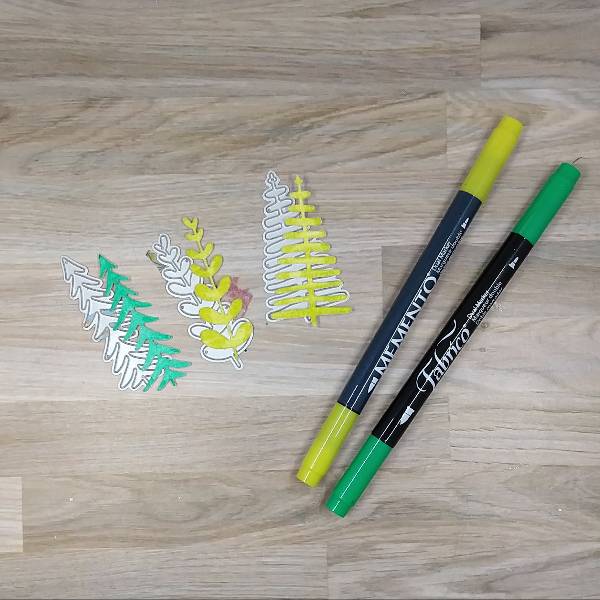
Color three more scraps of watercolor paper with Pear Tart Memento Double Marker and Emerald Fabrico Dual Marker. After the markers had dried, these three scraps were die cut with three more tree die cuts.
Step 4:
The layers of the dies were glued together. Then Sparkle Sheer Shimmer Craft Spray was sprayed onto more acetate packaging and used to paint sparkle onto the trees.
Step 5:
Ink blend the edges of the panel with Neptune VersaColor Ink until it reaches the saturation of color desired. Heat emboss with more of the clear Mboss powder.
Step 6:
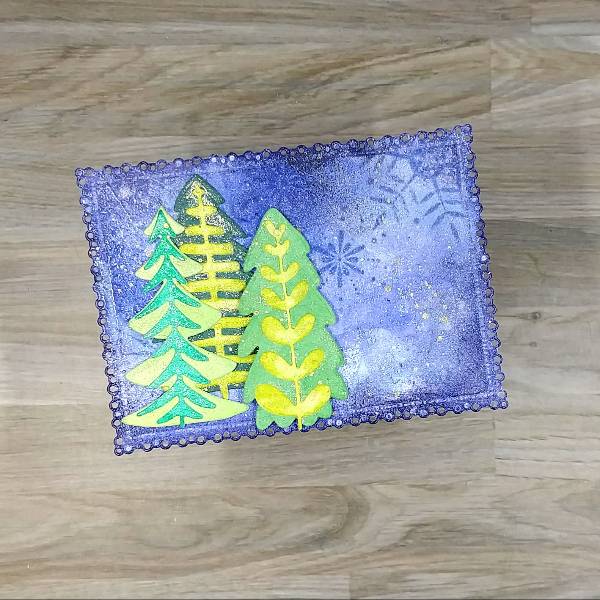
Glue the three die cut trees onto the panel. Splatter with gold watercolor.
Step 7:
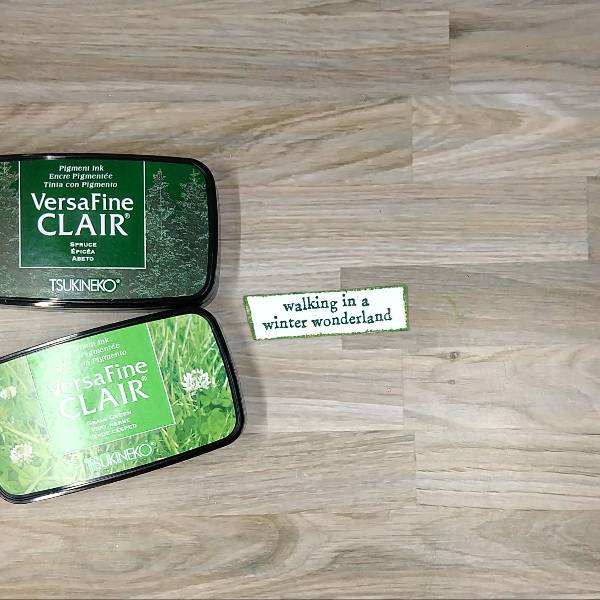
Stamp the sentiment on a piece of watercolor paper with Spruce VersaFine Clair Ink and heat emboss with clear Mboss powder. Trim the paper with a paper trimmer. Distress the edges with a pair of scissors. Then press the edges of the sentiment strip into the Grass Green VersaFine Clair Ink pad. After the ink dried, paint the edges with more of the gold watercolor. Set aside to dry.
Step 8:
Spray New Sprout Fireworks! Shimmery Craft Spray directly onto an embossing folder. Place a die cut watercolor panel into the embossing folder and run it through a die cutting machine. Set the panel aside to dry.
Step 9:
Distress the edges of the panel with scissors. Run the edges of the panel through the Spruce VersaFine Clair ink pad to add ink directly to the edges. Then ink blend the edges with more of the Spruce VersaFine Clair Ink pad using a sponge dauber.
Step 10:
Watercolor the embossed panel with more of the gold watercolor and allow to dry.
Step 11:
Add a strip of black and white polka dotted washi tape onto the green panel. (The washi tape I used is very wide, so I ripped it into a thinner strip before attaching it to the card panel.)
Glue the smaller (blue) panel onto the larger, green panel at an angle. Glue star sequins onto the blue panel. Finally, glue the whole thing onto an A2-sized white card base.
Other • Altenew – die set – Tree Mix • Gina Marie Designs – die set – Big and Little Chain Rectangles • Gina Marie Designs – die set – Pleated Lace Rectangles • Hero Arts – woodblock stamp – Stunning Snowflakes (retired) • Kat Scrappiness – sequins – Winter Wonderland mix • Kuretake – watercolors – Starry Colors • Sizzix – embossing folder – Jeweled Snowflakes (664489) • Stampers Anonymous – stamp set – Cozy Christmas • Watercolor paper • Die cutting machine Paint brush • Paper trimmer • Scissors • Glue
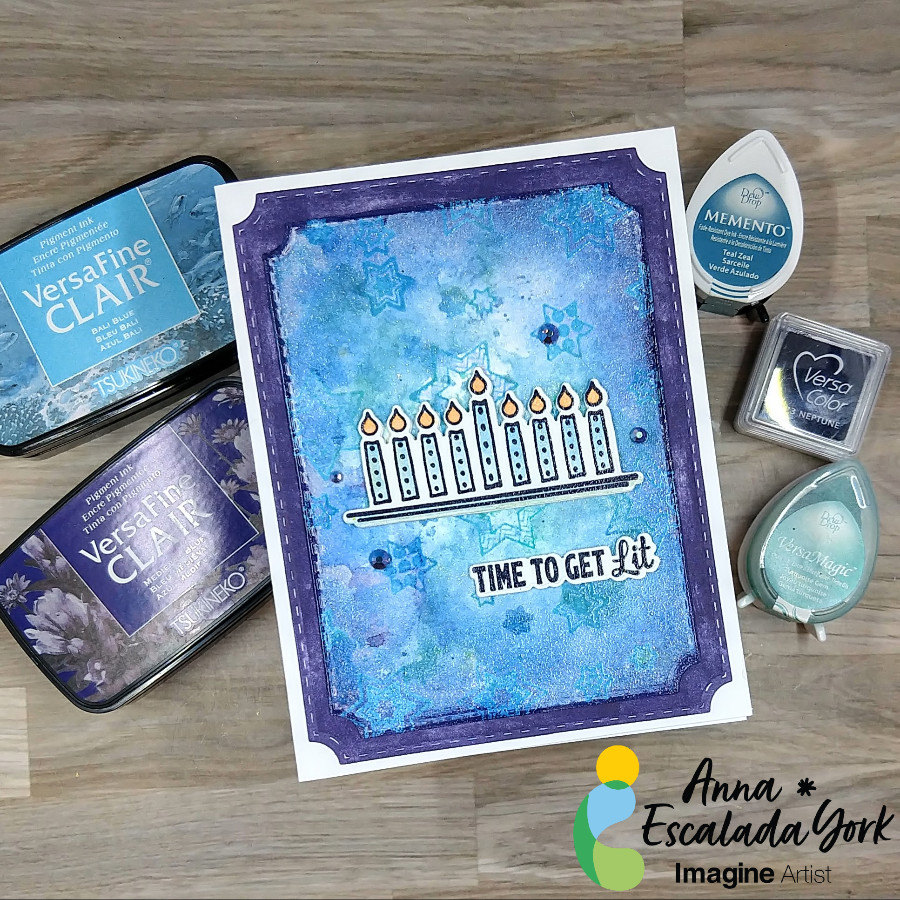
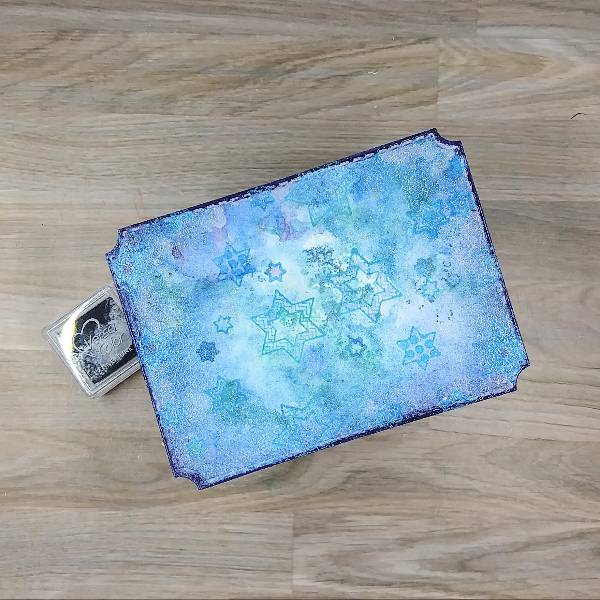
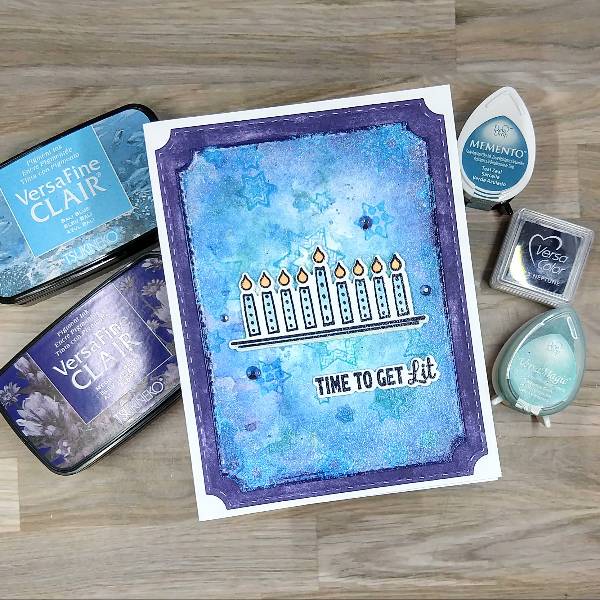
Since we are deep in holiday card making seasons, I am sharing a Hanukkah card featuring a lot of different blues.
Skill: Intermediate Time: 2 hours
Directions:
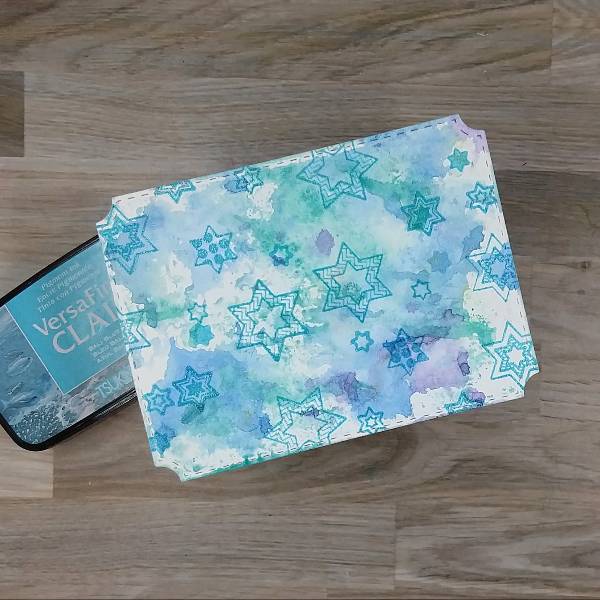
Step 1: Watercolor smoosh Danube Blue and Grape Jelly Memento Dual Markers as well as Turquoise Gem VersaMagic Chalk Ink mixed with water on a piece of scrap acetate packaging onto a watercolor panel. Allow the panel to dry.
Step 2: Arrange a variety of six-sided stars onto one side of the watercolor panel in a stamp positioner. Stamp the stars onto the panel with Bali Blue VersaFine Clair Pigment Ink and then heat emboss with clear Mboss powder. Flip the panel and repeat the process. Move any of the stars around on the stamp positioner to fill in any holes on the panel.
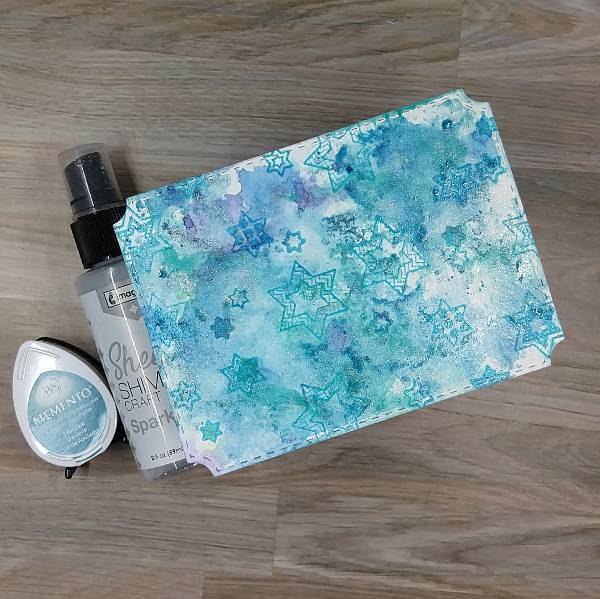
Step 3: Watercolor smoosh the panel again, this time with Teal Zeal Memento Dye ink mixed with Sparkle Sheer Shimmer Craft Spray on the acetate packaging.
Step 4: Color in the six-sided stars with Summer Sky and Lulu Lavender Memento Dual Markers.
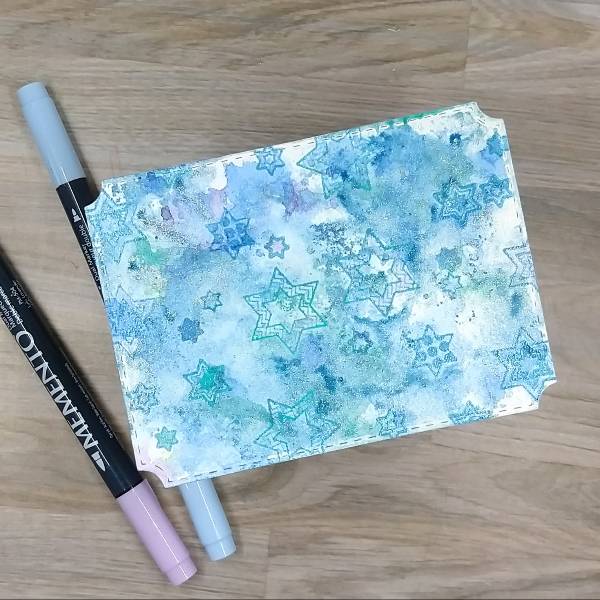
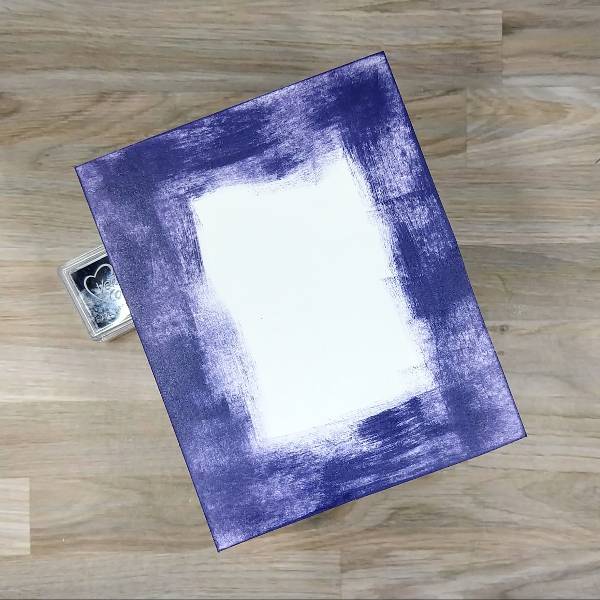
Step 5: Ink blend the edges of the panel Neptune VersaColor ink with a sponge dauber. Run the edges of the panel through the Neptune VersaColor ink pad and then heat emboss with more clear Mboss powder.
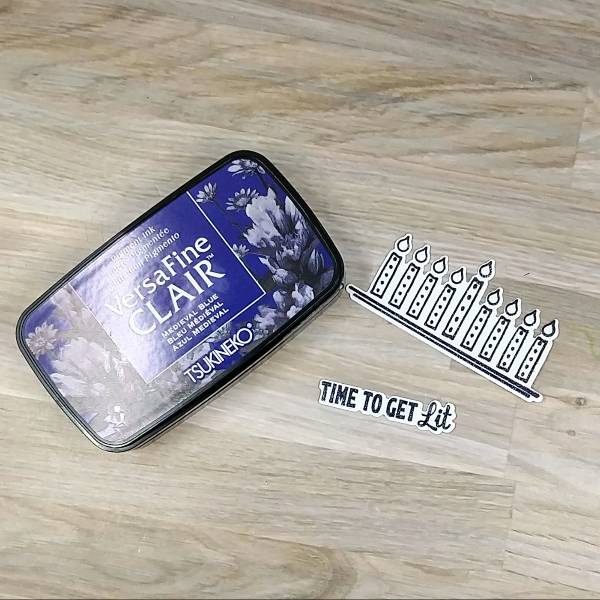
Step 6: Stamp the menorah and sentiment on watercolor paper with Medieval Blue VersaFine Clair ink. Heat emboss with more clear Mboss powder. Then die cut with the corresponding dies from the matching die set.
If desired, die cut some scraps of cardstock with the two dies two more times (to create two layers to glue behind the menorah and two layers to glue behind the sentiment) for strength and dimension.
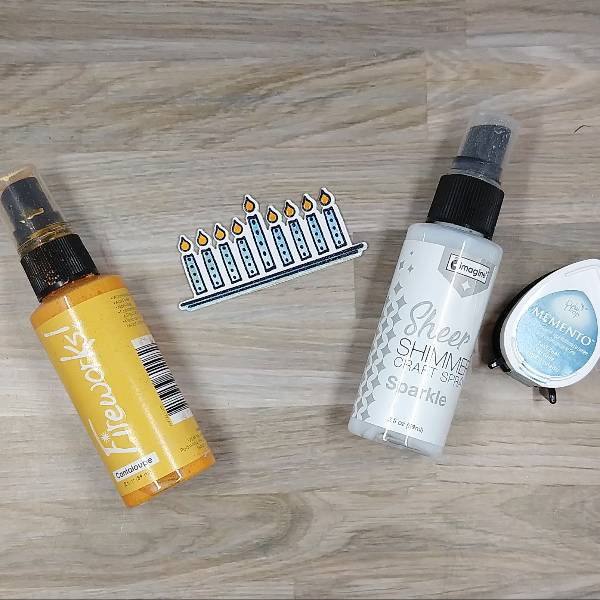
Step 7: Watercolor the flames with Cantaloupe Fireworks! Shimmery Craft Spray. Then use some of the remaining Teal Zeal Memento dye ink mixed with Sparkle Sheer Shimmer Craft Spray (from step 3) to watercolor the tops of each candle. Add some of the Sparkle Sheer Shimmer Craft Spray (by itself) to the bottom of each candle.
If desired, watercolor the base of the menorah with more of the same Tael Zeal Memento dye ink mixed with Sparkle Sheer Shimmer Craft Spray.
Set the die cut aside to dry.
Steps 8 and 9: Add Neptune VersaColor ink directly to another panel of watercolor paper that is slightly larger than the first panel. You may need to do this a few times to get the coverage you want. Allow the panel to dry.
(And this is where my camera crashed after taking pictures so I can’t share the next few steps.) Die cut the panel with a die slightly larger than the stamped panel.
Then glue the two panels together, glue the menorah onto the center of the top panel and the sentiment a little lower and right of the sentiment. Then glue blue gems around the menorah.
Steps 10: Glue the panel onto an A2-sized white card base.
Other • Crafty Meraki – embellishments – Meraki Sparkle Prismatic Blue • Pink & Main – die set – Notched Corners • Simon Says Stamp – die set – Light the Menorah • Simon Says Stamp – stamp set – Light the Menorah • Watercolor paper • Die cutting machine • Paint brush • Paper trimmer • Scissors • Glue
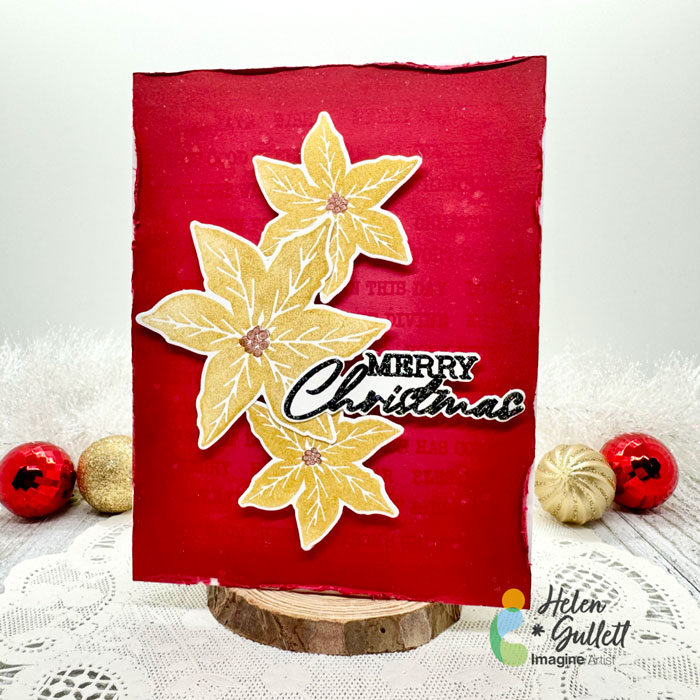
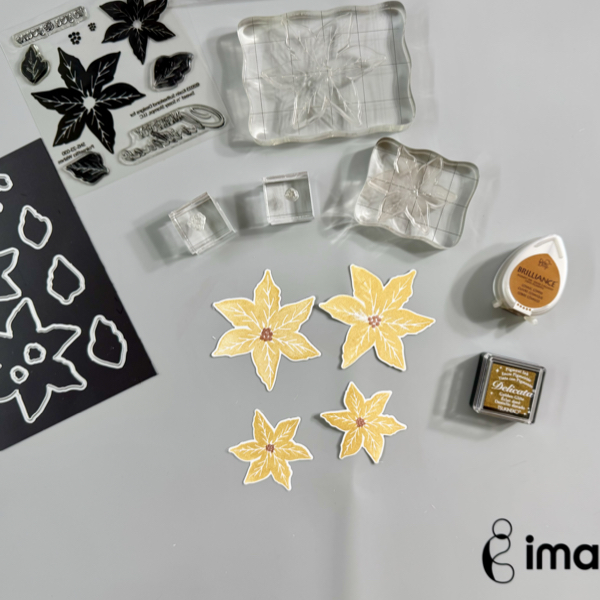
Hello crafty friends! It’s the time of the year to start making some Holiday projects. As for me, I love making and sending handmade Christmas cards. Today, I wanna share how to make this CAS Christmas Poinsettia Card.
Let’s get crafting!
Skill: Intermediate Time: 15-20 minutes
Direction:
Step 1
Cut out a piece of any color cardstock into 4.25 inch x 5.5 inch that you want to use as your background panel.
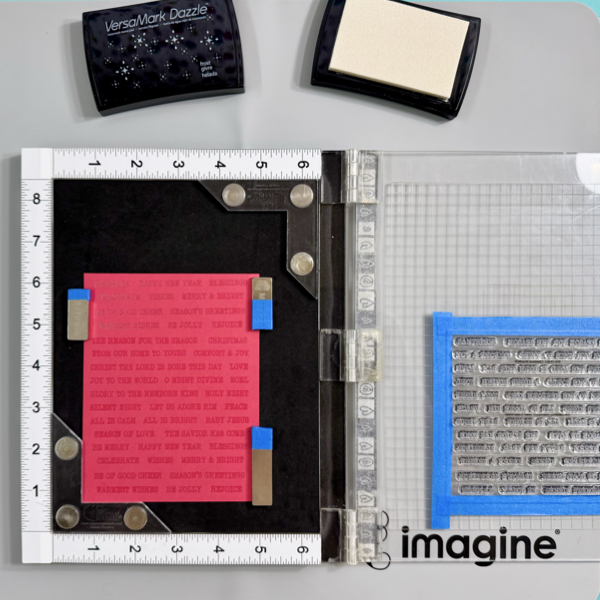
I used all the words on the stamp set I used so I taped the whole sheet on the stamping tool lid instead of taking it out one by one. You can use any word stamp set you have to create a similar background pattern.
Stamp the words on the cardstock using VersaMark Dazzle. Make sure to cover the whole panel.
Step 2
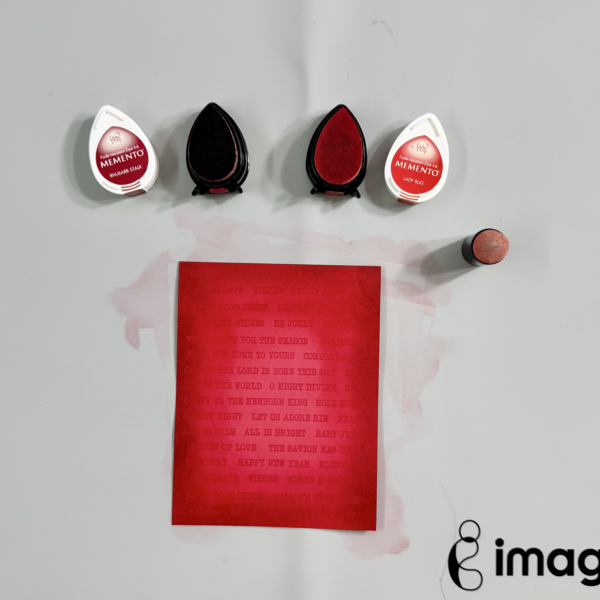
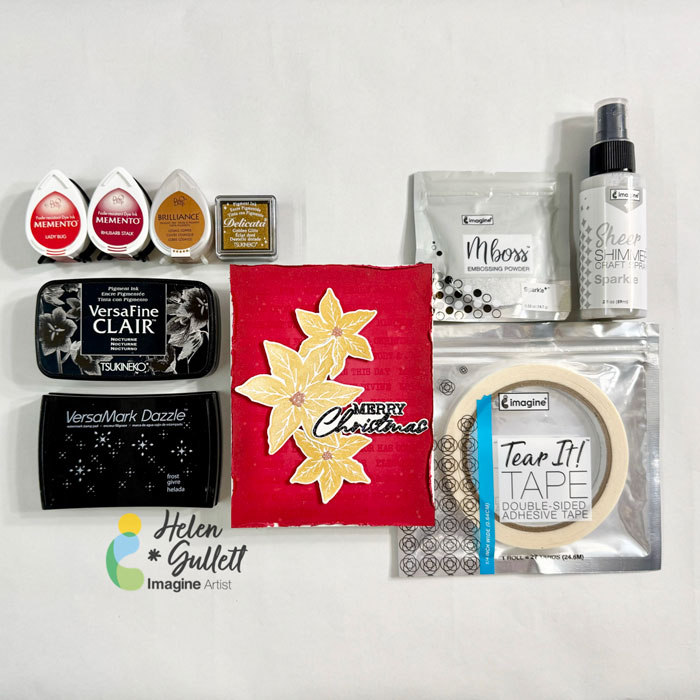
Add some darker shadow to the edges of the background panel using Memento Dew Drop ink pads and finger sponge dauber.
First, add the Lady Bug ink on the panel, then add the Rhubarb Stalk ink, and then add the Lady Bug ink again to blend them together.
Step 3
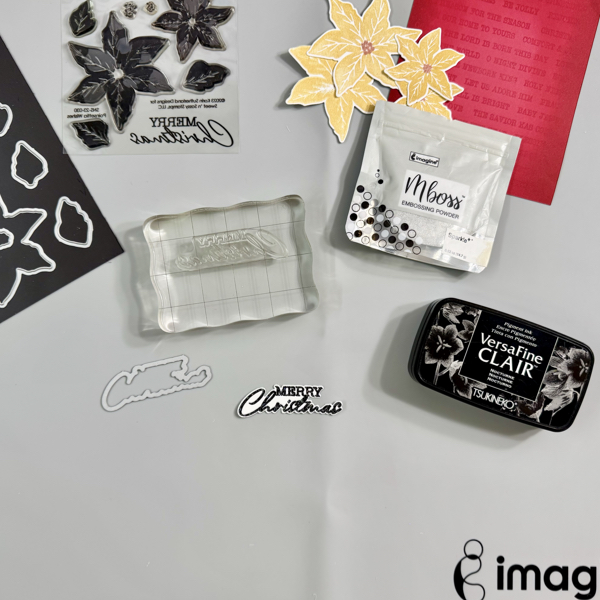
Stamp each layer of the poinsettia flower with the Delicata Golden Glitz ink.
Stamp the middle buds part of the poinsettia with the Brilliance Cosmic Copper ink. Dry the stamped images with a craft heat gun.
Cut each of the images with their matching dies, or you can fussy cut them if you don’t have the matching dies.
Step 4
On a piece of white cardstock, stamp the sentiment with VersaFine Clair Nocturne, and then add some of the Sparkle Mboss Embossing Powder, then heat set it with a craft heat gun.
Cut the sentiment with the matching die set, or you can fussy cut it with scissors if you don’t have a matching die.
Step 5
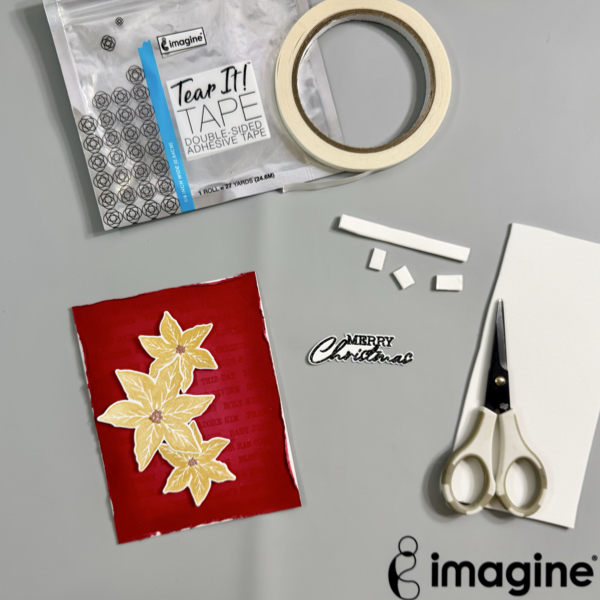
Distress all edges of the background panel with distresser tool or scissors. Add the background panel to the card base with some of the Tear It! Tape.
Add the poinsettia flowers and the sentiment to the card with some of the fun foam and Tear It! Tape for some dimension.
Step 6
For more extra sparkle to the Christmas card, add some splatters of the Sheer Shimmer Craft Spray using a fan brush.
Use the craft heat gun to dry the splatters.
Hope this Christmas card gives you an idea to start your Holiday projects. Thank you for stopping by our blog today. Have a fabulous day!
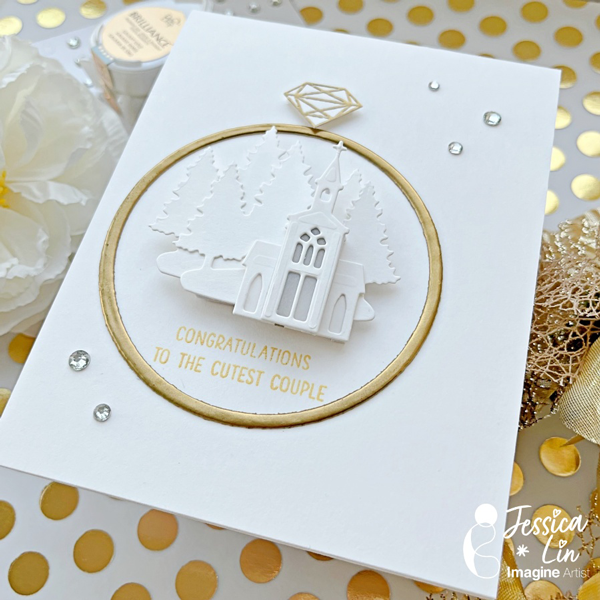
Hi everyone! It’s Jessica here and I’m excited to share this elegant winter wedding card with you today. If you enjoy simple, monochromatic cards, this is the perfect card for you!
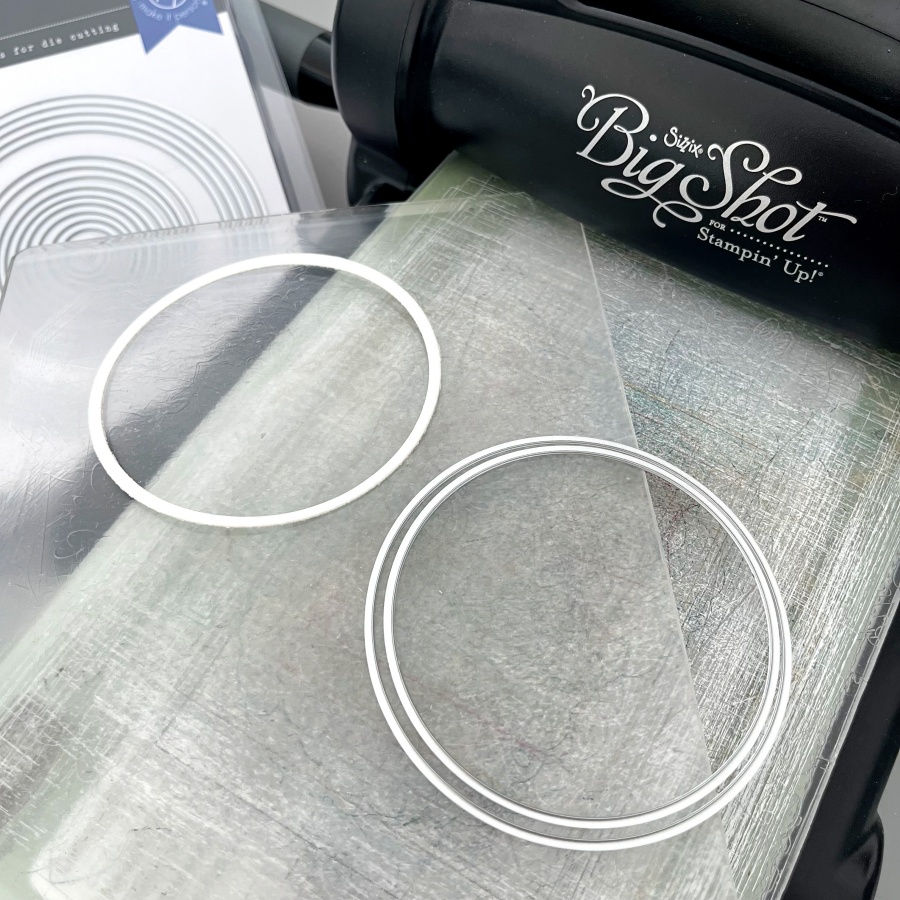
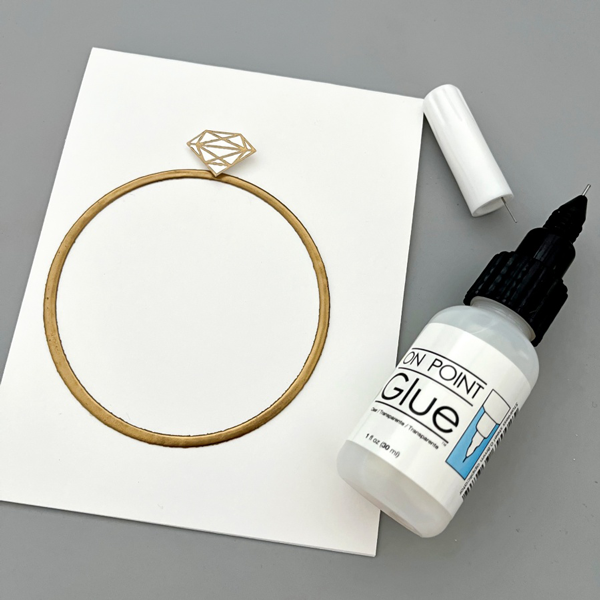
Step 1: The idea for this card is to create a winter wedding church scene inside a wedding ring. I started off by die cutting a narrow circle that will be the base of the wedding band. A trick here is to use layering dies to customize any die cut size you may need.
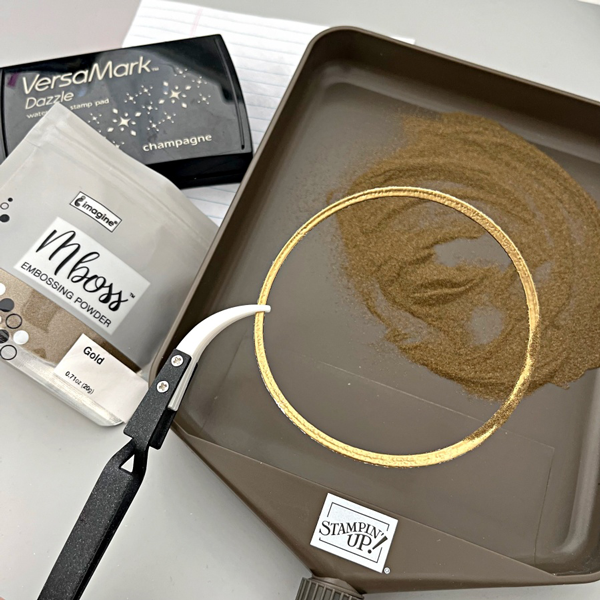
Step 2: Then I took my VersaMark ink pad and “stamped” it directly onto the circle die cut piece. After that, I applied a generous coat of gold embossing powder and heat set it with a heat tool. For a smoother finish, I repeated these steps again. After two coats of embossing, the gold embossed surface is shiny and smooth, which really mimics a gold wedding ring.
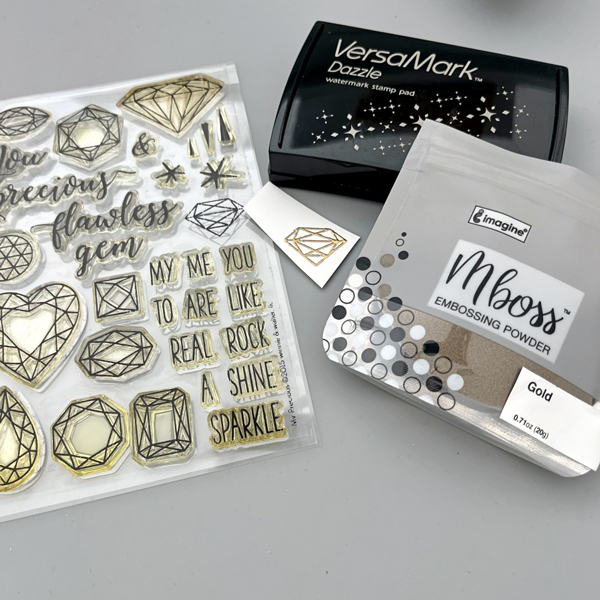
Step 3: The Winnie & Walter My Precious stamp set is my favorite for any diamond and gems images. I heat embossed the smaller diamond with gold Mboss powder.
Step 4: After fussy cutting the embossed diamond image, I adhered both of the wedding ring elements with On Point Glue.
Step 5: For the wedding church scene, I used the dies from Stampin’ Up!’s Snowglobe Scenes set. I die cut two pieces of the forest backgrounds and layered the church buildings with foam tape. I even added a tiny piece of vellum behind the first church die cut to create the illusion of glass windows. For the sentiment, I stamped this really adorable greeting using Brilliance Galaxy Gold ink pad.
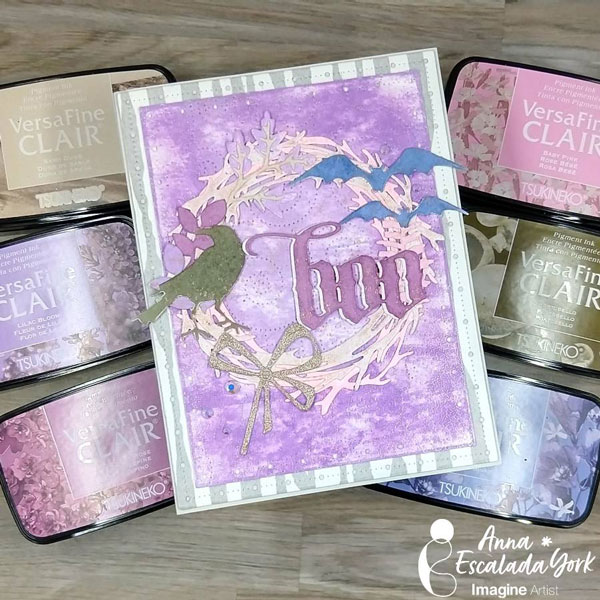
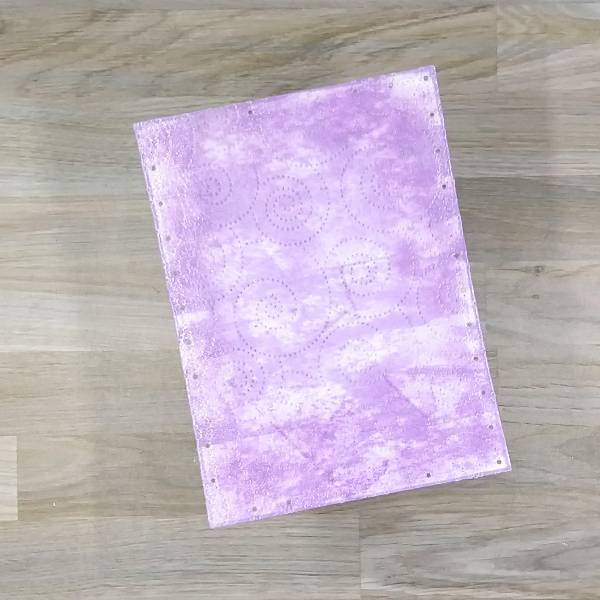
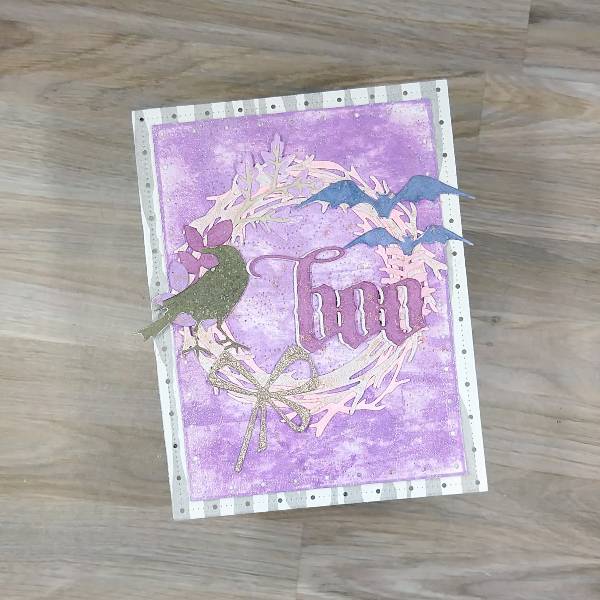
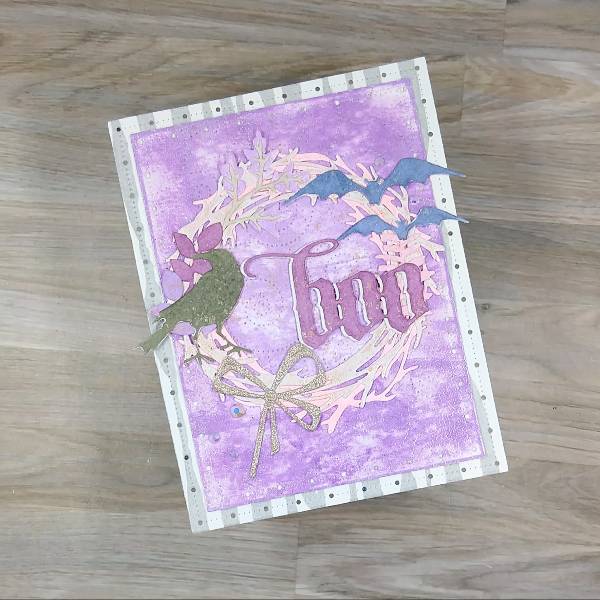
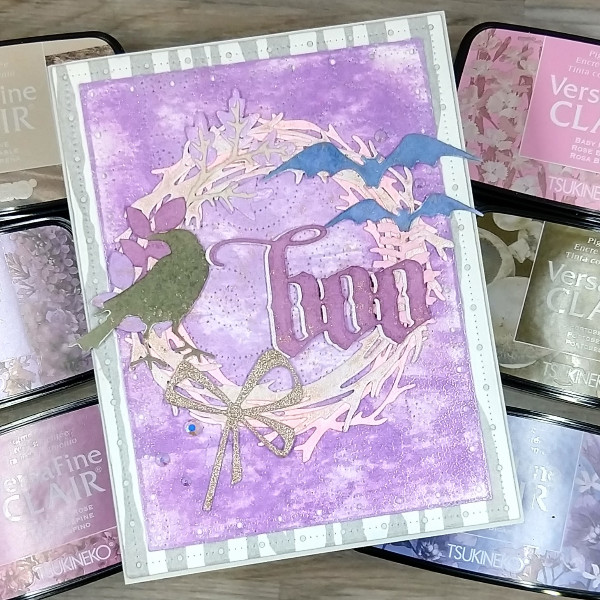
In today’s card, I used many of the new VersaFine Clair Ink colors to make another Halloween card.
Skill: Intermediate Time: 1.5 hours
Directions:
Step 1: Die cut leaves and stems out of watercolor paper. Ink blend the fern-y shaped leaf with Baby Pink VersaFine Clair ink and the individual leaves with Lilac Bloom VersaFine Clair ink. I pressed the stem die cut into the Sand Dune VersaFine Clair ink pad and the leaf cluster die cut into the Lilac Bloom VersaFine Clair ink pad. These were all set aside.
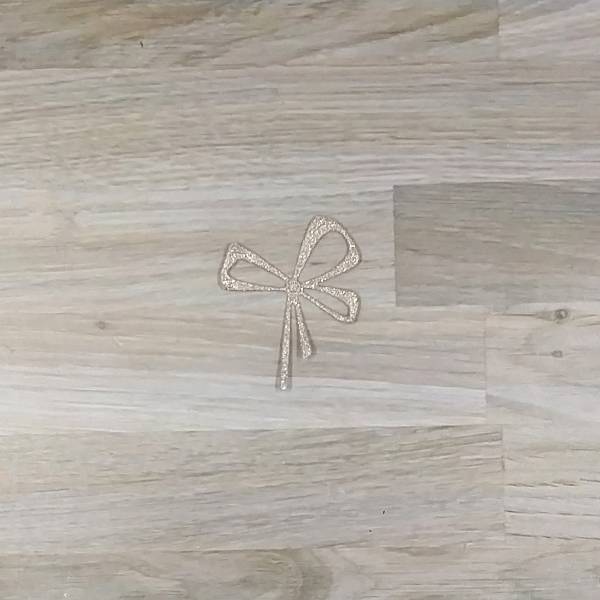
Step 2: A sparkly piece of rose colored cardstock was die cut with a bow die cut.
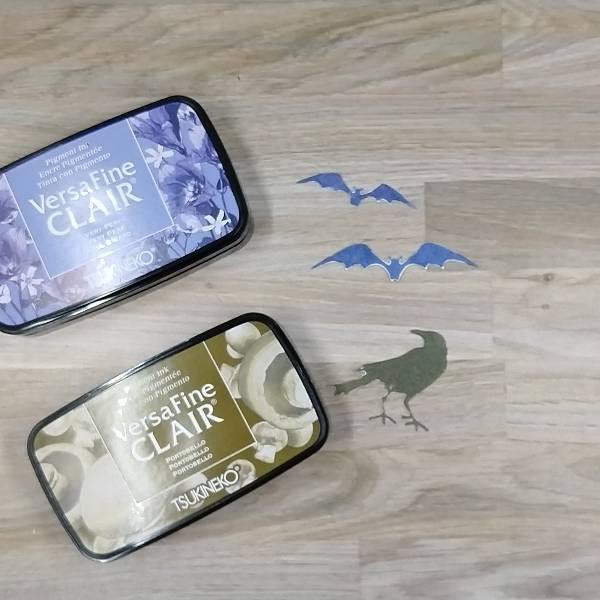
Step 3: Two bats and a crow were die cut out of watercolor paper. The crow die cut was pressed into the Portobello VersaFine Clair ink pad and the two bats were pressed into the Very Peri VersaFine Clair ink pad.
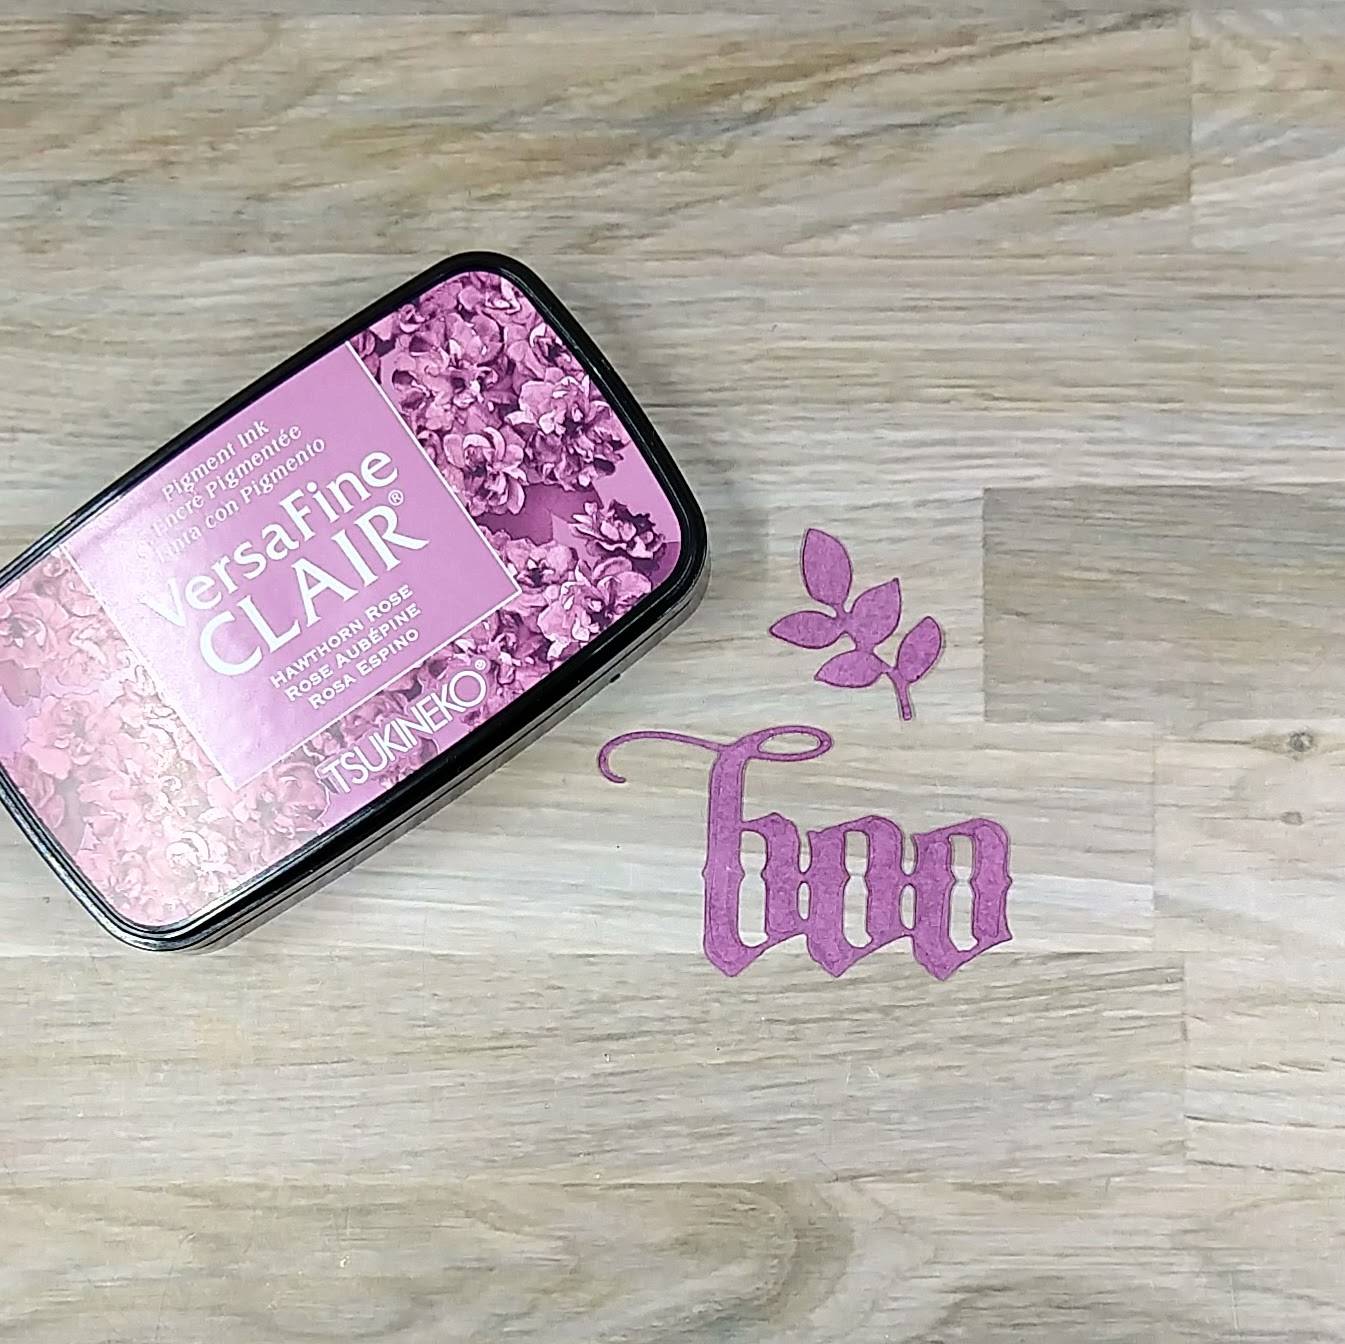
Step 4: Press a die cut leaf cluster and boo sentiment die cuts into the Hawthorn Rose VersaFine Clair ink pad.
Not pictured: die cut a piece of sparkly white cardstock with the same boo sentiment. If desired, also die cut scrap cardstock twice with the same sentiment. Glue the sparkly white cardstock behind the boo sentiment so that the white sparkly cardstock peeks out on the side (like a shadow).
If adding the two layers of scrap cardstock layers behind the sentiment, trim the second o (the one on the right side) off both layers so that when it gets glued onto the wreath, it lays flat.
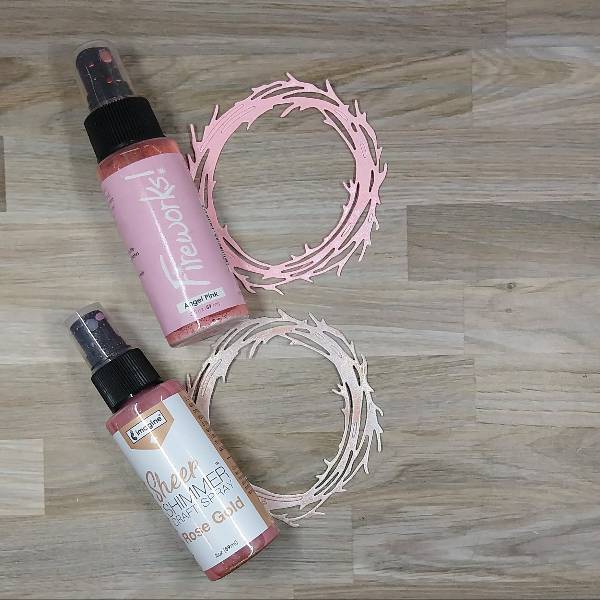
Step 5: Die cut the wreath twice–once out of watercolor paper and once with more of the white sparkly cardstock. Spray the watercolor paper wreath with Angel Pink Fireworks! Shimmery Craft Spray and the white sparkly cardstock wreath with Rose Gold Sheer Shimmer Craft Spray. Set aside to dry.
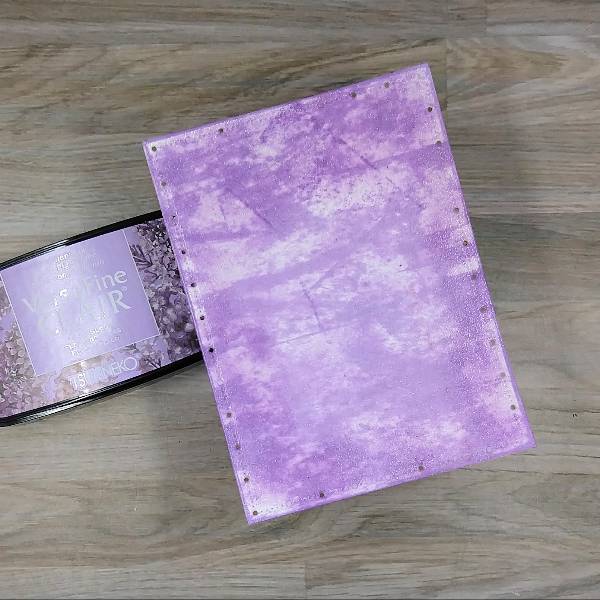
Step 6: Die cut another piece of watercolor paper with a smaller panel die cut. Roughly ink blend the panel with more of the Lilac Bloom VersaFine Clair ink. Then swipe the panel with the ink pad in a variety of directions and the edges of the panel. Add Clear Mboss embossing powder to the edges fo the panel and heat emboss.
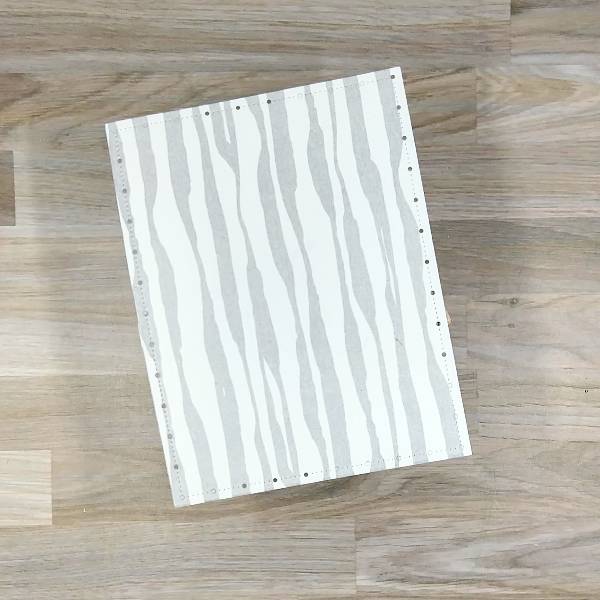
Step 7: Add a piece of patterned washi tape to a piece of scrap cardstock and die cut with a larger panel die cut. (If you don’t have washi tape, use patterned paper or a colored piece of cardstock.)
Step 8: Run the smaller card panel through the die cutting machine with the plate die to add some additional texture.
Step 9: Glue all of the die cut elements together. Start with the two wreaths, with the pink layer underneath the rose gold sparkly wreath on the top, making sure they are off set. Then glue the leaves, the crow and the bats along the wreath. The bow is glued down on the lower left part of the wreath. Glue the wreath onto the purple panel. The sentiment was glued down next. Gle the whole panel onto the larger, washi tape panel. Then splatter the whole thing with more of the Rose Gold Sheer Shimmer Craft Spray. Let dry.
Step 10: Glue the frame gems on the lower left and upper right parts of the panel.
Step 11: Glue the whole thing onto an A2-sized gray cardbase.