Learn How to Create a Christmas Card with Rinea Foil Paper!

by Melissa Andrew

Learn How to Create a Christmas Card with Rinea Foil Paper!

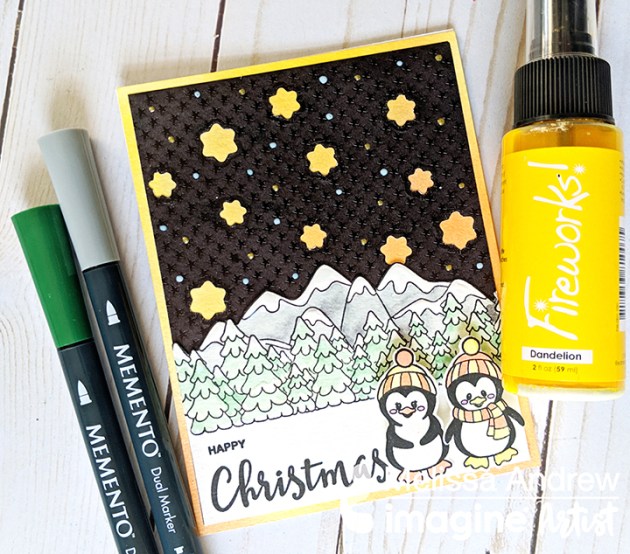
Today, I show you how to create a simple overlay background with Rinea foil paper over a Fireworks Shimmer Spray background for a Christmas card. In addition, I teach you how to use a simple masking technique to double your stamping effect as well as Memento markers to create dimension. Enjoy!

Skill: Advanced
Time: 1 hour +

Directions

Supplies

Imagine

• Fireworks Shimmery Craft Spray – Tangelo, Dandelion
• VersaFine Clair – Nocturne
• Memento Markers – Cottage Ivy, New Sprout, London Fog, Tuxedo Black
Irresistible Pico Embellisher – Gold Shimmer, Wedding Dress White
• On Point Glue
• Tear It! Tape

Other

• Rinea Ebony Foil Paper – http://bit.ly/2zZa308
• Little Darlings Rubber Stamps – Tree line http://bit.ly/2PyzMHs and Mountains http://bit.ly/2ORquRI
• Whimsy Stamps – Everyday Scripted Sentiments http://bit.ly/2Ke3Sub
• Whimsy Stamps – Penguins Winter Adventure http://bit.ly/2A2uEku
• Paper Trimmer
• Scissors
• Masking Paper
• Watercolor Paper
• White Card Stock
• Heat Tool

Use a Ghosting Technique to Create a Unique Christmas Card

by Martha Lucia Gomez

Use a Ghosting Technique to Create a Unique Christmas Card

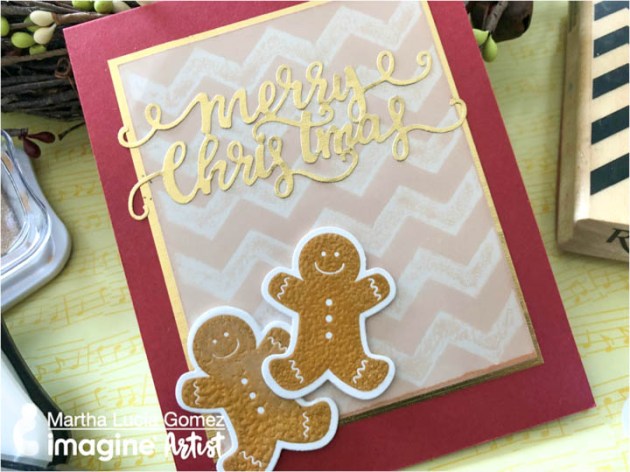
Hello everyone! Ghosting technique was one of the first techniques that I learned in cardmaking crafts and today I am sharing with you a lovely way to incorporate this ghosting technique in a Christmas Gingerbread Card. To realize this technique you only need glossy card stock and VersaMark ink to stamp the ghost image. In my project, I am using a Chevron Background from Recollections, but let me show you the process!

Skill: Intermediate
Time: 1 hour

Directions

Step 1

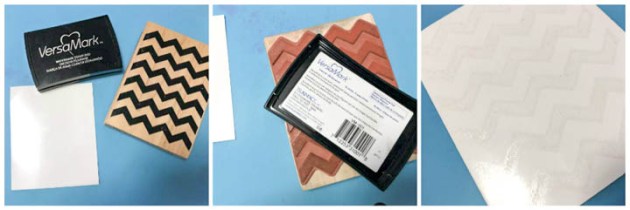
Take a piece of white glossy card stock and ink your stamp or stamps with VersaMark Ink and stamp directly over the glossy side and set this piece aside for a few minutes so the ink can dry.

Step 2

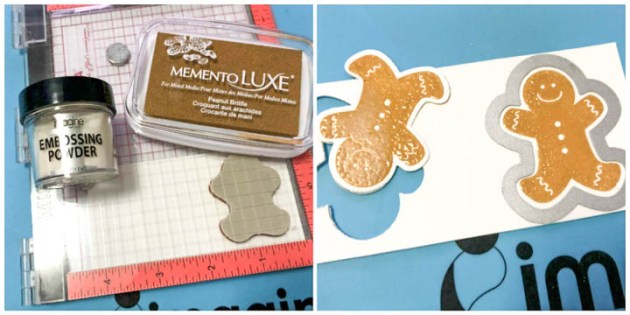
On a regular piece of cardstock, stamp the holiday-themed images that you want to use to decorate your card. I used a gingerbread image from a Stampin Up Set. I stamped the images with Memento Luxe Peanut Brittle and Clear Embossing Powder that I activated with the heat tool. Then I cut the gingerbread with the corresponding die cut.

Step 3

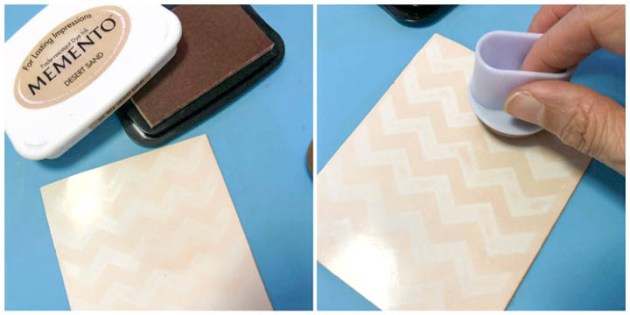
When the glossy card stock was totally dry, I sponged several times in circular motion with Desert Sand Memento Ink. If you want you can also use a brayer to create the resist effect.


Step 4

To finalize the card, I resized the glossy layer and created a gold mat using Gold Starstruck Rinea Foiled Paper and pasted this layer directly over the Cherry Cobbler card base. Then I cut the sentiment Merry Christmas using the same Gold Starstruck Rinea Foiled Paper with a Gina Marie Design Die Cut and pasted it over the chevron background and pasted the gingerbread using dimensional dots or tape. You can use any type the stamps to create this technique, not necessarily background stamps, all depends on the theme that you wanted to use in your card.

Supplies

Imagine
Other
  • Stampin Up – Scentsacional Season Stamp Set & die cut (retired)
  • Recollections – Chevron Background
  • Stampin Up – Cherry Cobbler Card Stock, White Glossy Card Stock
  • Rinea Foiled Paper – Gold Starstruck
  • Gina Marie Designs – Merry Christmas die cut
  • Dimensional tape or dots


Dewlet Poinsettia Card Plus A Giveaway

by Nadine Carlier

Have you seen the new Dewlet Etched Metal Dies yet? The possibilities are endless as to what you can create with these fun little dies. For example, the Poinsettias on these cards were created using the Dewlet dies and Memento Dew Drops and embellished with some irRESISTible Pico Embellishers. Watch my video below to find out how you can win all the Imagine products I used, including the Dewlet dies!

Head over to our YouTube Channel! Comment and subscribe on this video by the end November 20th, 2018 (midnight) for a chance to win craft products by Imagine.

Skill: Intermediate
Time: 15 minutes

Directions


Supplies

Imagine
Other

Visit our YouTube Channel for more inspirational videos and subscribe to get updates when we post new videos.

See How to Create a Beautiful Autumn Nature ATC Card Set

by Elina Stromberg

See How to Create a Beautiful Autumn Nature ATC Card Set

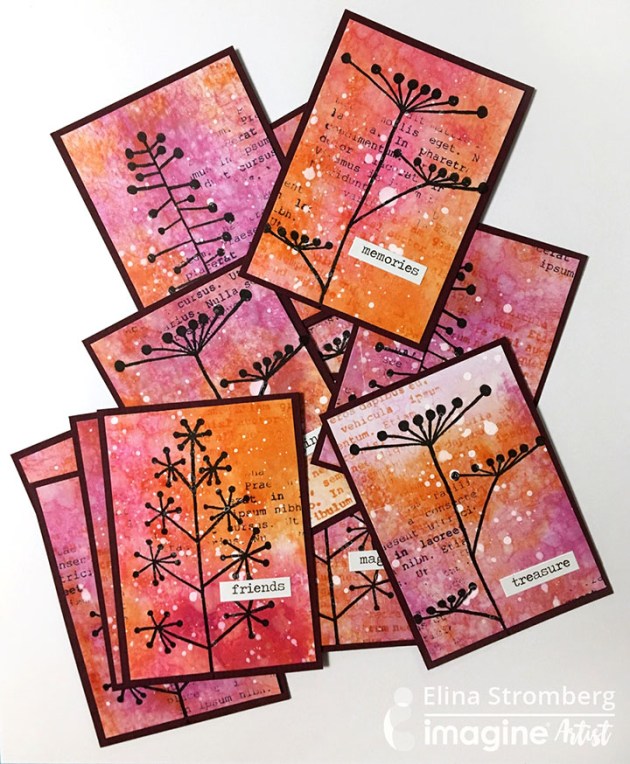
Artist Trading Cards aka ATC’s are wonderful little pieces of art. Their small 3.5” x 2.5” size doesn’t require too many materials nor too much time. Using just one single sheet of mixed media or watercolor paper you can create a pile of cards on one go. This set of ATC’s was inspired by the beautiful autumn nature. Bright, bold colors, and wilted garden flowers getting ready for winter. Simple but elegant, and so fun to create!

Skill: Beginner
Time: 1 hour

Directions


Step 1

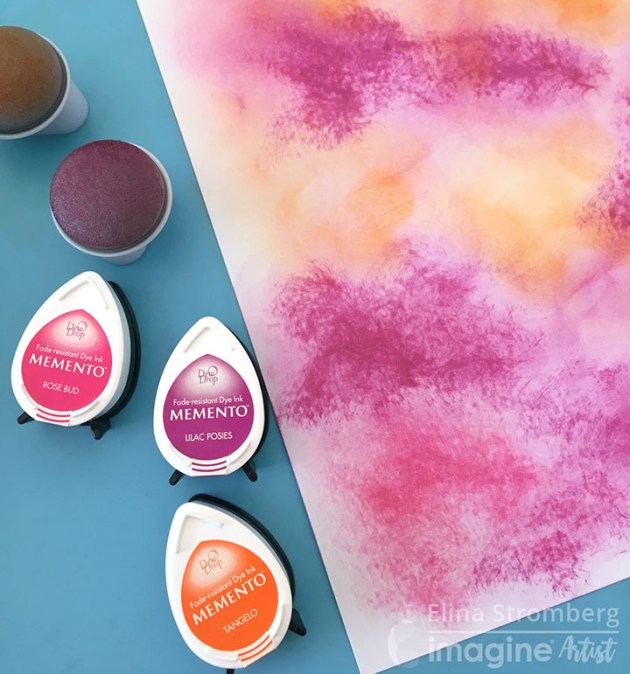
Apply purple, pink, and orange Memento DewDrops on a white mixed media paper with Jumbo Daubers. Sprinkle water on the inked paper, letting the colors to mix. Let dry or dry with a heat gun.


Step 2

Decorate paper by stamping random text patterns on the paper. Use only one pattern stamp, but two ink colors (orange Memento Tangelo and dark purple VersaFine Clair Fantasia). Cut several cards from the inked and stamped sheet. The standard size of ATC is 2.3” x 3.5”. If you want to mat the cards on a solid color cardstock, trim these foreground cards slightly smaller than ATC. Mix white acrylic paint with water, and sprinkle paint drops on the cards. Let dry.


Step 3

Cut ATC backgrounds from dark red cardstock. Attach card fronts on the backgrounds with two-sided tape. Stamp flower shapes on the cards using black VersaFine Clair. Decorate ATC’s with word stickers that express sentiments such as “friends,” “treasure,” and “inspiration.”

Supplies

Imagine
Other
  • White mixed media paper
  • Cardstock – Dark Red
  • Acrylic paint
  • Stamps – Text stamp (‘Tekst’ by Wycinanka); Flower stem stamps (Artemio)
  • Word stickers
  • Double-sided tape

How to Make Cornucopia Table Place Cards with Rinea Foil

by Jennifer Vanderbeek

How to Make a Cornucopia Table Place Cards with Rinea Foil

Since Rinea foil papers are gorgeous on both sides, I wanted to make something with them that showed off that feature. Paper “sculptures” are good for this, and with the Thanksgiving holidays approaching, a cornucopia seemed the best way to go. It’s a simple shape in that it’s mostly a cone, but to give it a little of a curve, the pattern I’ve devised shifts the “spine” bit by bit on the bottom half of the sheet to add just enough curve to keep things interesting. These place card holders work up quickly, so preparing a table-full will still leave you with plenty of time for holiday fun.

Skill: Intermediate
Time: 15 minutes per place card

Directions

Supplies

Imagine
Other
  • Rinea Foil Paper – Copper Star, Copper/Gold
  • Vintage – Utensils Stamp
  • Acrylic Block
  • Fiskars – Paper Trimmer, Scissors
  • Deco Mesh
  • Hemp Cord

“Wishing You a Merry Christmas” Treat Bags

by Steph Ackerman

"Wishing You a Merry Christmas" Treat Bags

As we near the holidays and time gets more elusive, consider creating your holiday projects in assembly-line style.  In this fashion, you can create your projects in stages and not get overwhelmed.  I love creating colorful gift bags, placing little goodies inside and giving them to friends and neighbors during the holidays.  A large background stamp inked with Onyx Black sets the stage for the addition of colorful images using Memento Markers.  Not only are gift bags fun to make, but they can also easily be customized using the wide assortment of inks and markers available from Imagine.

Skill: Intermediate
Time: 1 hour

Directions


Step 1

Ink background stamps with VersaFine Onyx Black Ink. Stamp onto gift bags. If the stamp is not wide enough to cover the gift bag, reink a portion of the stamp and stamp it again on the gift bags.


Step 2

Fold down the tops of the gift bags and ink the edges with VersaMagic Red Magic Ink.


Step 3

Stamp images with VersaFine Onyx Black Ink and use the coordinating dies to die cut the images. Using assorted Memento Markers, color the images. Die cut a larger green circle and adhere to each bag. Adhere the trucks and packages across the center of each bag. Stamp the phrases with VersaFine Onyx Black Ink and VersaMagic Red Magic. Mat the phrases with cardstock and adhere above the trucks.


Step 4

Fill the bags with assorted goodies. Punch holes in the tops and tie closed with twine.

Supplies

Imagine
  • VersaFine Inkpad – Onyx Black
  • VersaMagic – Red Magic
  • Memento Markers – Angel Pink, Bahama Blue, Cantaloupe, Dandelion, Desert Sand, Lady Bug, London Fog, Pear Tart, Rich Cocoa, Rhubarb Stalk, Summer Sky, Tuxedo Black
Other
  • Just For Fun Rubber Stamps – Background
  • Stampendous – Truck and Packages stamps and dies
  • Whisker Graphics Bags
  • Twine
  • Spellbinders – Circle dies
  • Cardstock – White, Green