Be a Star with New Embossing Techniques

2022-June-Martha-Lucia-600x600_1

By Martha Lucia Gomez –

Hello there! In today’s crafting tutorial, I will be sharing two easy ways to upgrade the basic embossing techniques using a Brilliant Ink and embossing power or MBoss.  This is a great idea for any occasion, however like summer is around the corner, I created a Patriotic Card honoring 4th of July.

Skill Level: Intermediate
Time to Complete: 1 hour

Directions:


2022-June-Martha Lucia - Patriotic Card - Step 1
Step 1:

Select a piece of card stock and embossing folder. Use a piece of cardstock larger than the folder. Dry emboss it in the normal way using your die cut machine. 
2022-June-Martha Lucia - Patriotic Card - Step 2

Step 2:

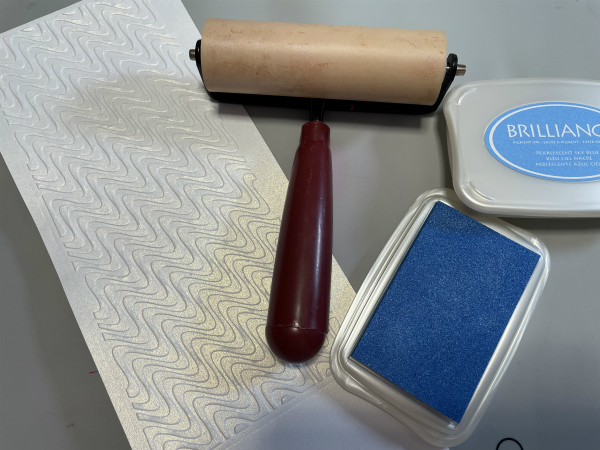
Pick a brayer or any type of roller to add ink to the emboss design. Noticed that you can use any face of the embossed piece to develop this technique. I am using Brilliance Pearlescent Sly Blue and Shimmer White Cardstock.

2022-June-Martha Lucia - Patriotic Card - Step 3

Step 3:

Ink your brayer completely and apply the Brilliance Ink over the surface with a soft movement. You don’t want to transfer the ink to the debossed part.


2022-June-Martha Lucia - Patriotic Card - Step 4

Step 4:

Repeat the step 3, until you are satisfied with the color of the layer. In my sample, I made this step three times to have a great covering.

2022-June-Martha Lucia - Patriotic Card - Step 5

Step 5:

Create the card base and layers that you wanted to use. In this model I am using white card base, and blue die cut layer to create a contrast. Resize your inked embossed piece to use it as top layer over the die cut piece. Select a shadow die set with a sentiment or any other type of image to create a window over your inked layer. Don’t paste your layers yet.

2022-June-Martha Lucia - Patriotic Card - Step 6

Step 6:

With the shadow or die base of your die cut, create a window over the inked layer. If you want you can save the die cut layer to use in another project.

2022-June-Martha Lucia - Patriotic Card - Step 7

Step 7:

Paste the inked embossed layer over the die cut layer using your favorite adhesive. If you want to have more dimension, you can use foam tape. Paste the decorative piece over the card base. 

Cut the word or image according with the die cut that you selected.


2022-June-Martha Lucia - Patriotic Card - Step 8

Step 8:

With masking tape, cover the half of the die cut word and made a partial hot embossing using VersaMark Ink and your favorite color of embossing powder or MBoss. In my model, I am using the Metallic Berry. 

Don’t remove the masking tape if you want to repeat the above step and obtain shinier and dimension with the hot embossing. I repeated this step twice.


2022-June-Martha-Lucia-600x600

Step 9:

Paste the embossed word and decorate with a complement sentiment and/or embellishments. I used a tiny sentiment stamped with Memento Paris Dusk and a few die cut stars in white cardstock.


Art Supplies:

Imagine:

• Brilliance – Pearlescent Sky Blue

• VersaMark – Clear

• MBoss – Metallic Berry


Other:

• Whimsy Stamps – Slimline Embossing Folder Wave Length

• Joy Clair Designs – White Smooth Cardstock and Loopy Rectangle Slimline Dies.

• Birch Press Design – Big Sending Sugar Scrip

• Scrapbook Adhesives – Crafty Foam Tape

• Die Cut Machine

• Heat Tool

• Brayer


• Heat Tool

• Brayer


Fourth of July Layout Made Easy with Memento inks and Fireworks!

2022_June_Neva_Scrapbook_blog

By Neva Cole –

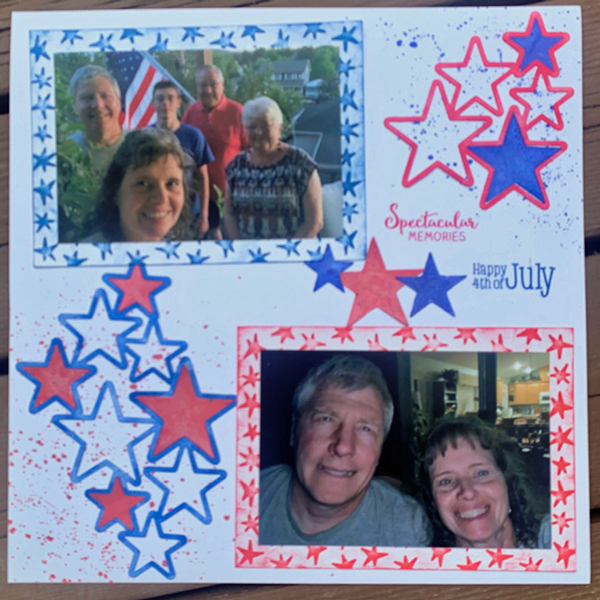
Today I will share how easy it is to create a very cohesive layout using just two ink colors and the matching Fireworks! colors for an amazing Fourth of July scrapbook layout.  With just white cardstock, an embossing folder, a large die cut, and stamps this layout is perfect for Independence Day

Skill:  Beginner

Time:  30 Minutes

Directions:

2022_June_Neva_4thofJuly_step1

Step 1

Trim white cardstock to 1” on each edge larger than the photos.  Pressure emboss with Star Blanket.  Ink raised portion of embossed areas and edges with Memento Danube Blue or Lady Bug.  For my layout I trimmed two sections 5” x 7”, three sections 4” x 5”, and one section by 4” x 4” to back my photos.

2022_June_Neva_4thofJuly_step2
Step 2

Die cut two sets from Spellbinders Cascading Stars die and remove the stars.  Trim one outline die cut into a section of five stars, with the other being four stars.  Use Jumbo Dauber to tap Memento Danube Blue over one die cut and the smaller portion of the trimmed die cut.  Tapping the ink onto the paper keeps from damaging the die cut, which can occur if a rubbing motion is used.  The larger portion of the trimmed die cut is inked in Memento Lady Bug.  Continue to add ink until it is the desired hue. 

2022_June_Neva_4thofJuly_step3

Step 3

The splatter method is used with Fireworks! to add some interest to the white background.  Shake the bottle to distribute glimmer and then remove spritzer nozzle and gently tap the top to splatter ink from the outside of the spray tube.  Continue to tap until the desired amount of ink is on the paper.  I choose sections where the die cuts would be eventually placed.  I alternated the color choices from the die cut color.  This is the lower right corner of the right page.  

2022_June_Neva_4thofJuly_step4

Step 4

The left side of the layout shown completed with splattered Fireworks! in Memento Lady Bug and Danube Blue.

2022_June_Neva_4thofJuly_step5

Step 5

Determine placement placement of elements to add stamped sentiments.  Place on layout and remove other elements.  Use a stamp platform to stamp sentiments in proper position.

2022_June_Neva_4thofJuly_step6

Step 6

On the right page the stamped elements are determined, then half are removed before stamping to allow for clean stamping of correct colors.  The remaining elements are added and stamped.  It was easier to stamp all the images Memento Lady Bug at one time, then follow with images in Memento Danube Blue.

2022_June_Neva_4thofJuly_step7

Step 7

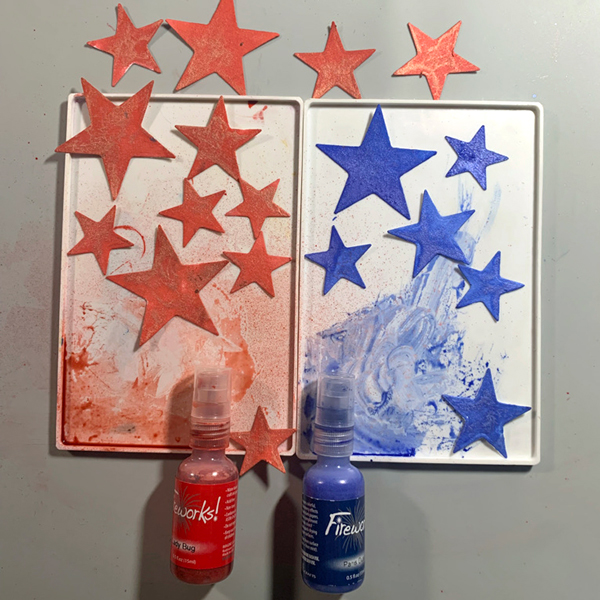
Spritz Fireworks! into a plastic tray or surface.  Place die cut stars from step 2 face down on the Fireworks! ink to add color.  Use tweezers to move around in the ink and add more ink to tray as needed.  About a third of the stars were inked with Fireworks! in Lady Bug the remaining in Fireworks! Danube Blue.

2022_June_Neva_4thofJuly_step8

Step 8:

Determine correct placement of Fireworks! stars in the die cut.  I rotated the star until it fit properly into the die cut area.  Not all the stars are identical, so taking the time to find the right one was worth the effort for a seamless look.  

2022_June_Neva_4thofJuly_step9

Step 9:

Adhere elements to layout.  Tear It! tape was used to adhere the photos to the textured mats.  The die cuts are adhered with On Point Glue.  The small dots around the star frames keep the layout clean and smudge free.  

Art Supplies

Imagine

Memento–Lady Bug and Danube Blue

Fireworks!–Lady Bug and Danube Blue

Jumbo Dauber

Tear It! Tape

On Point Glue

Other

White Cardstock

Cuttlebug Star Blanket embossing folder

Spellbinders Cascading Stars

Technique Tuesday Spectacular Memories

Hero Arts CL493 Holiday Sentiments

Tweezers

Die Cut machine

Stamp Platform

Learn How to Make a Mini Slimline Happy July 4th Card

Happy-July-4th-card-Blog-2

By Annie Collins

Hello Crafty Friends – Annie here with a fun July 4th mini slimline card, featuring Fireworks! Shimmery Sprays.

Directions:

Art Supplies:

Imagine

• Fireworks! Shimmering Spray: Bamboo Leaves, Summer Sky and Danube Blue

• Mboss Embossing Powder: Shimmering Night Sky, Silver and Irridescent

• Memento Marker: Tuxedo Black

• VersaMark Watermark Ink

• On Point Glue

• Tear It! Tape

Other:

• Hero Arts Stamp & Die Set: DC150 Happy
https://heroarts.com/

• Maker’s Movement Stamp: Sarcastic New Year
https://themakersmovement.com/MOS231-Sarcastic-New-Year-Stamp-Set/

• Gina Marie Designs: Adirondack Beach Chair
Adirondack Beach Chair – Gina Marie Designs

• Recollections Planner Die: Months

• Recollections Brand 110# Cardstock: White

• Recollections Brand 65# cardstock: Red, White & Blue

Honoring the Red, White and Blue

LMckinney_June-2021

By LeeAnn McKinney

Hey there friends and fellow crafters. As we are entering the calendar Patriotic Season here in the US, this card was screaming at me to be made. I have so much fun creating these videos, and this one has a lot of meaning. 


Art Supplies

Imagine:

• Versafine Clair Ink Pad – Nocturne

• Mboss

• Tsukineko Full-Size VersaMark Clear Embossing Ink Pad

• Fireworks! Craft Spray – Lady Bug

• Fireworks! Craft Spray – Danube Blue

• VersaFine Clair, Nocturne, Paradise

• Craft Mat

• Tear It! Tape


Other Products Used:

• CARD STOCK 8.5 X 11- White- Heavy Weight – Gina K Designs

• New Original MISTI Laser Etched Stamping Tool– Kat Scrappiness, Inc

• Tonic Studios, Tim Holtz – 8.5 Inch Comfort Trimmer

• Cling Mount Stamp: My Hero Honors MC0344FCL

• Gina K Designs White Foam Tape – 3/8”X12ft – Kat Scrappiness, Inc