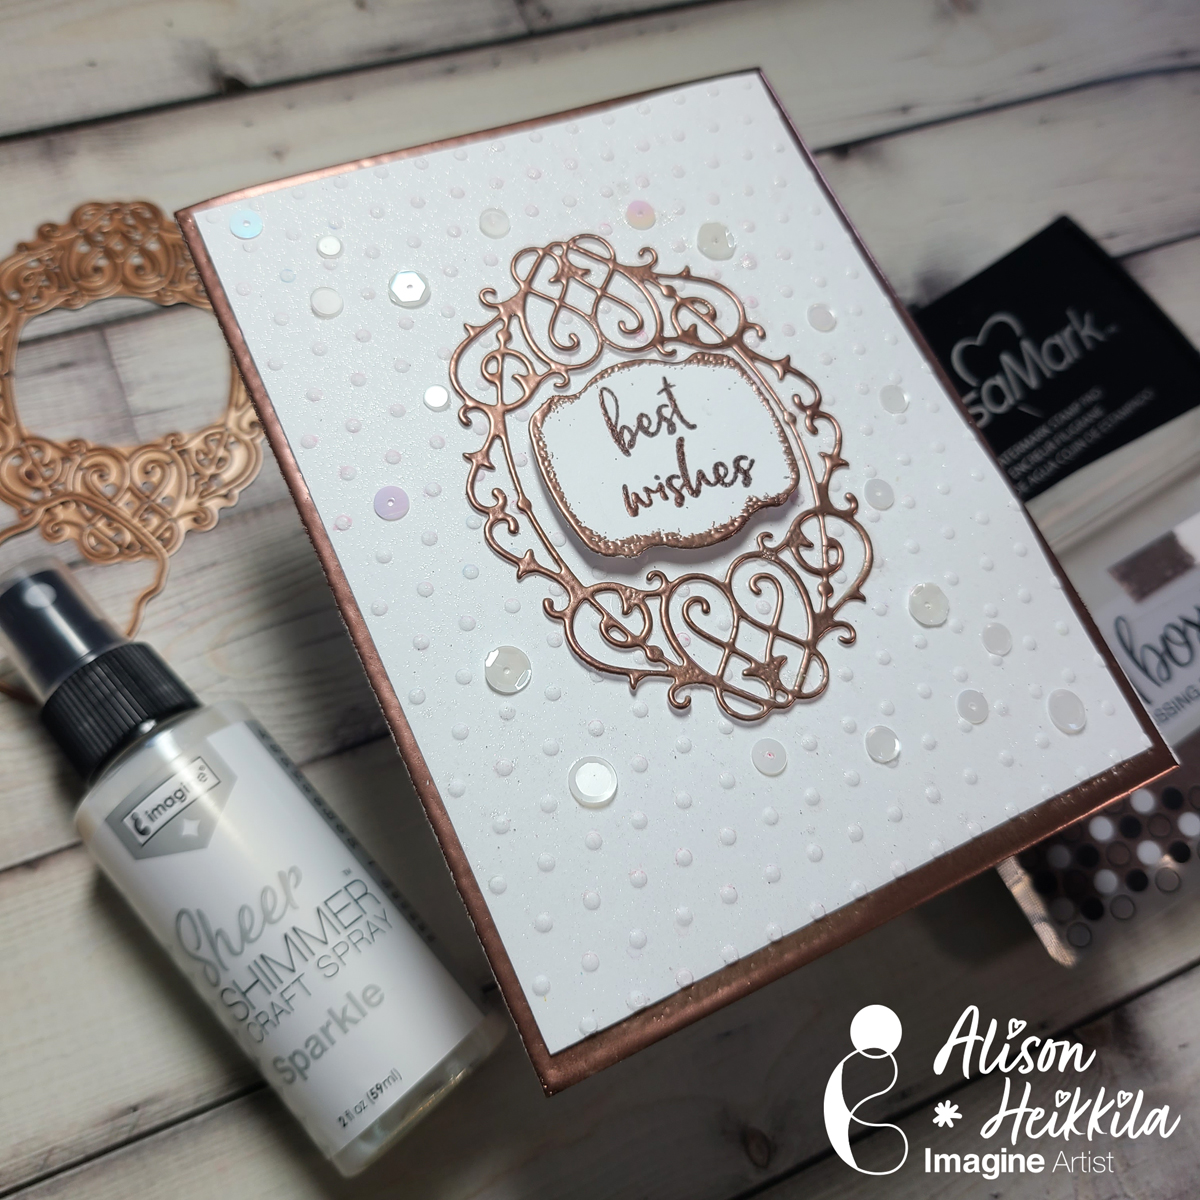
Hello! My latest video for Imagine is a wedding-themed card, though it can certainly be used for other occasions too. We’re going to use embossing powder in a few ways on this card, and they’re all fairly simple to do.
*Some affiliate links are used in this post. That means that if you shop through these links, I may receive a small compensation, at no cost to you.For more information, please see my Affiliates page, where I also have some coupon codes.
Skill Level: Intermediate Time to Complete: 30 minutes
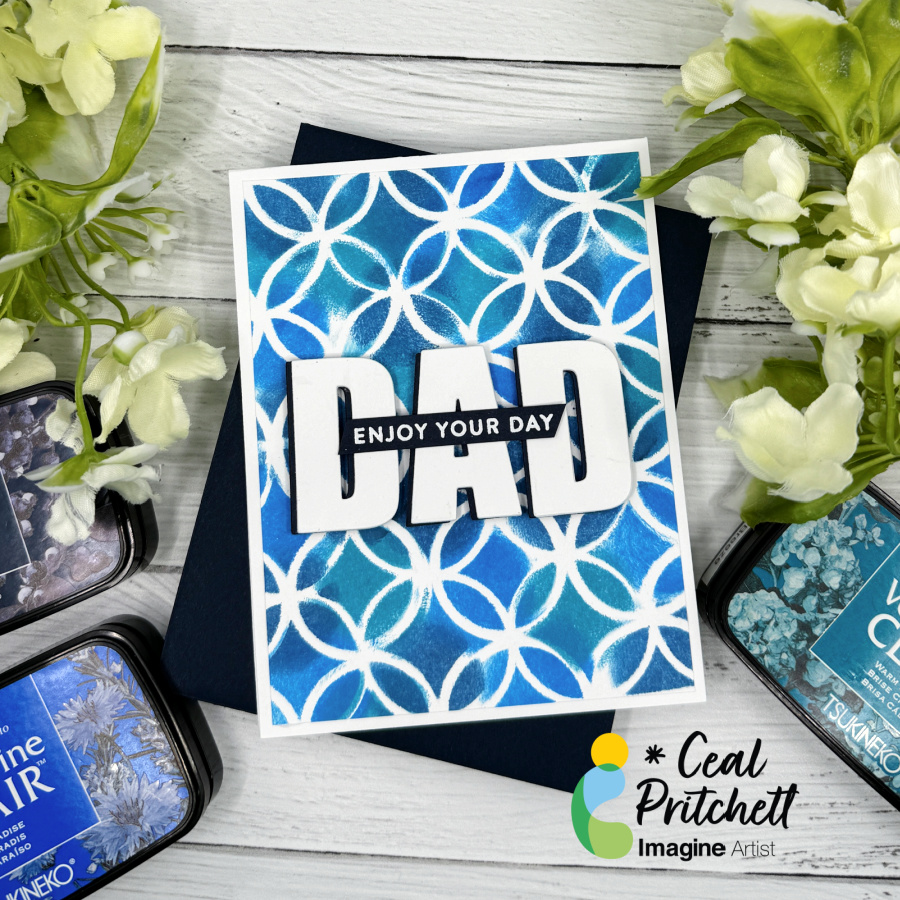
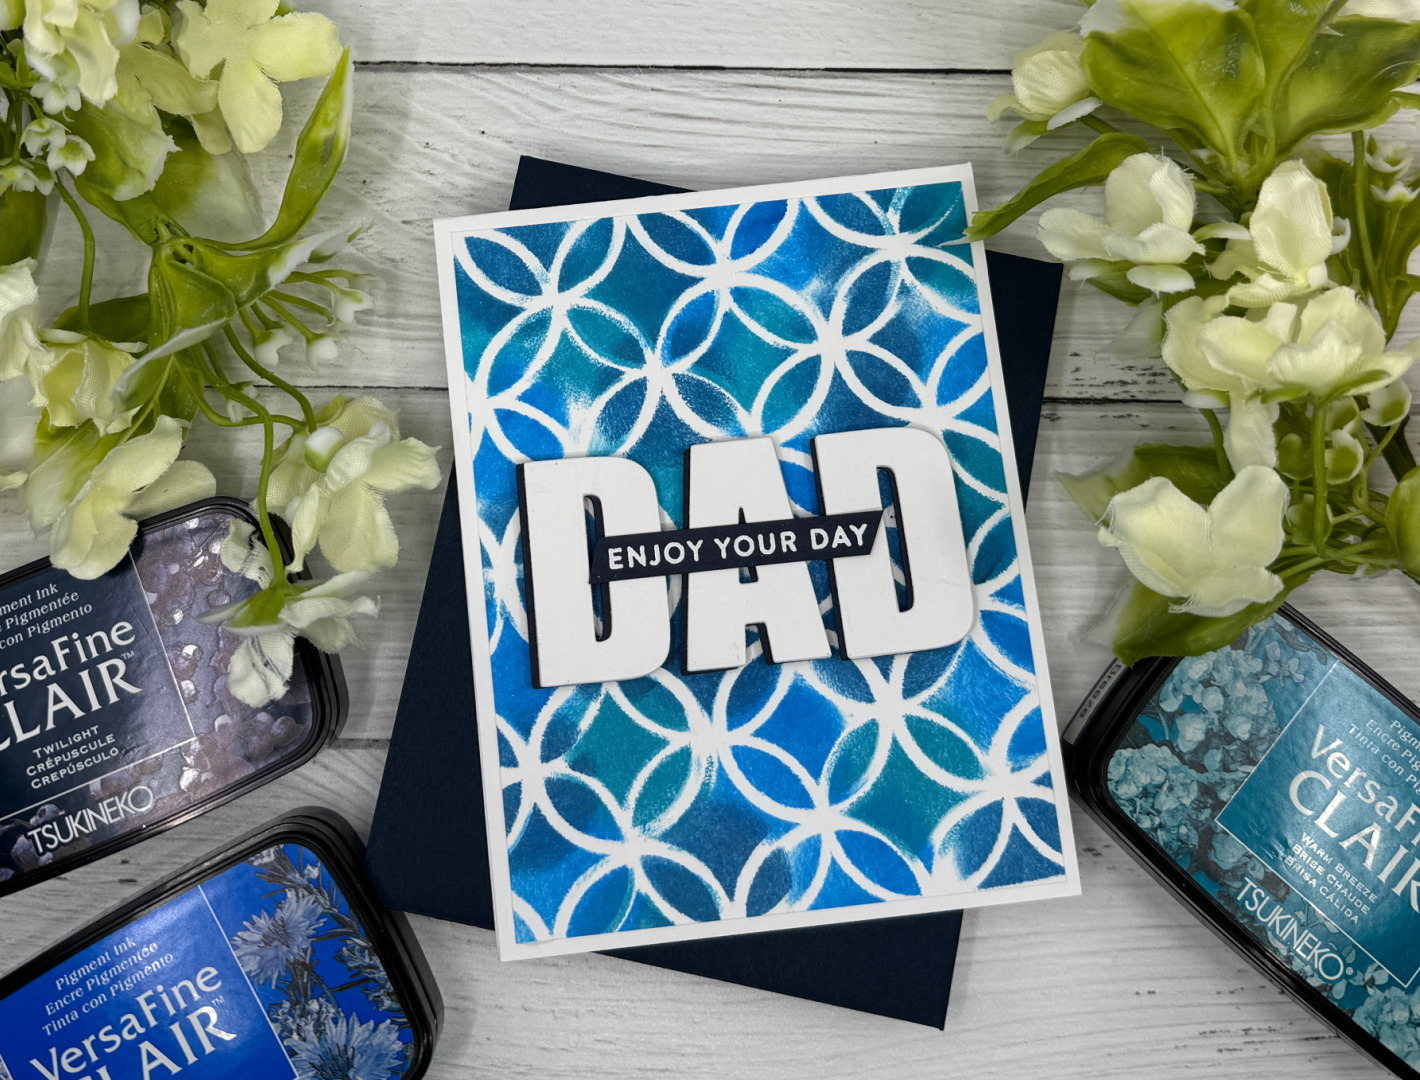
Hello crafty friends, today I am sharing a Father’s Day card using the Bokeh technique.
Skill: Beginner to Intermediate Time: 30 to 45 Minutes
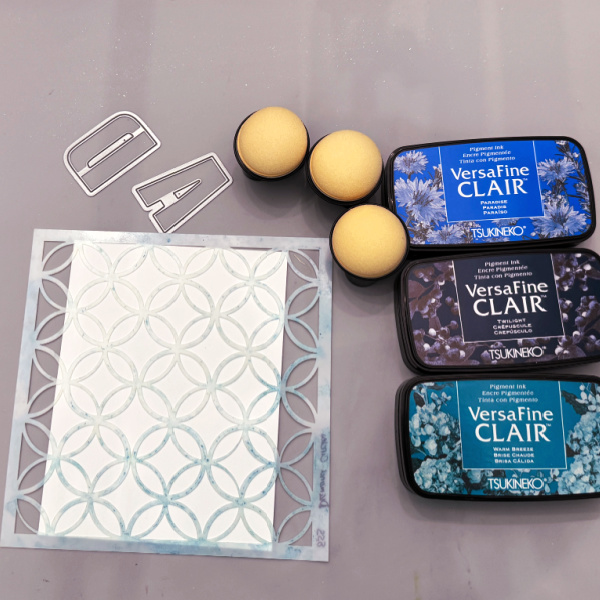
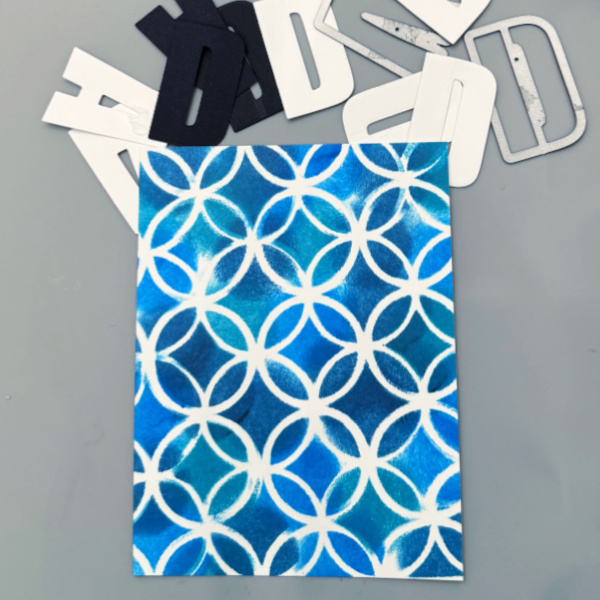
Directions: To create this card, you will need a stencil, at least three different inks that blend well together, round sponge daubers and some Alpha dies.
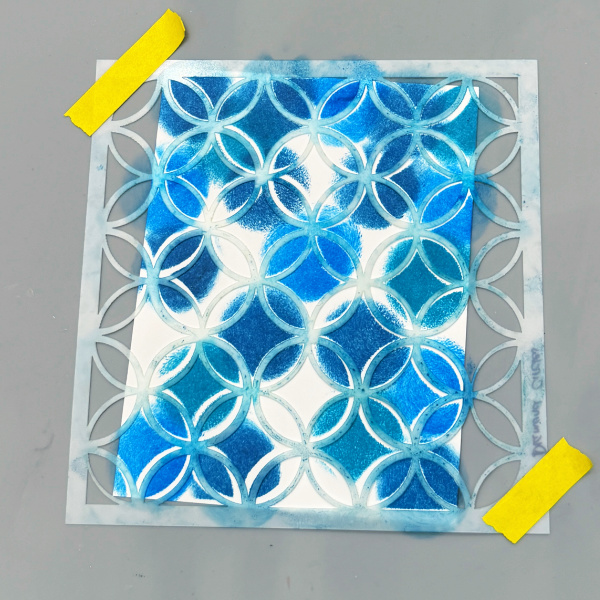
Step 1: Place the stencil over a panel of white cardstock, then ink up the sponge daubers with each color randomly placing dots of color through the stencil to cover the panel.
Step 2: Cut the letters of dad out of dark blue cardstock once and out of white cardstock twice so it will have dimension.
Step 3: Layer the letters over one another off-setting the dark blue on the bottom.
Step 4: Stamp “Enjoy Your Day” with VersaMark ink and emboss with white MBoss embossing powder.
Other Supplies: • Neenah Classic Crest Solar White 120lb • Neenah Classic Crest Solar White 80lb • Midnight Cardstock – Concord & 9th • Stencil – Simon Says Stamp • Celebrate Stamp Set – Hero Arts • Large Alpha Dies – Altenew
I love to color! I am an avid Copic marker fan and adore using watercolor on stamped images. Sometimes I like taking a more liberal rather than literal approach to coloring images. If you do not like to color this is the video and project for you! Find some simple lined floral images and use sponge daubers to daub, rub, smear or pounce color on. Versacolor inks are blendable and provide jut the right dry time to create a smooth finish to your design. I used heat embossing with white MBoss powder on white cardstock so the outline would stand out but not overpower. This created a soft feminine hue to the image. This would also look great in black ink. Give it a try!
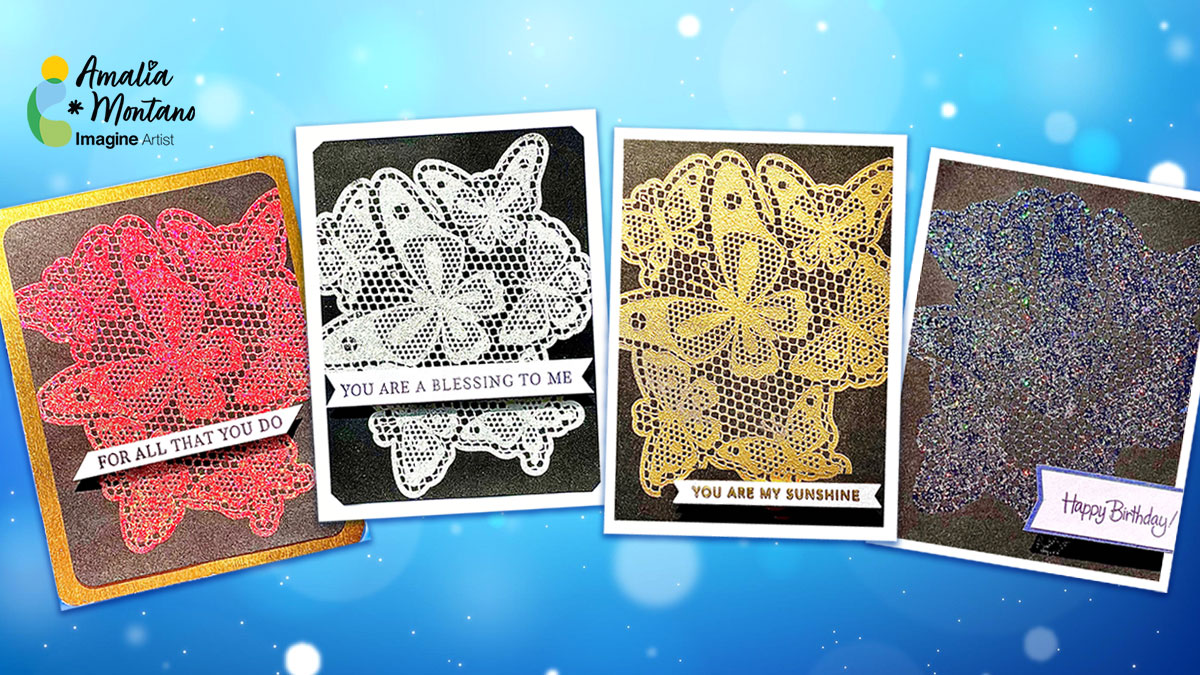
– Hi There, I am Amalia from “Cool Cakes and Crafts with Amalia” here on YouTube. Today I am heat embossing on black cardstock. There are some stunning results you want to see.The most fun you can have in carding making is with heat embossing. Seeing the powder turn solid right before your eyes is thrilling. It’s like magic!
I used one beautiful Butterfly Lace stamp with VersaMark clear embossing ink and sparkly MBoss embossing powders to create 4 spectacular cards.
A heat tool and an embossing buddy is all you need to go from nice enough to FABULOUS!
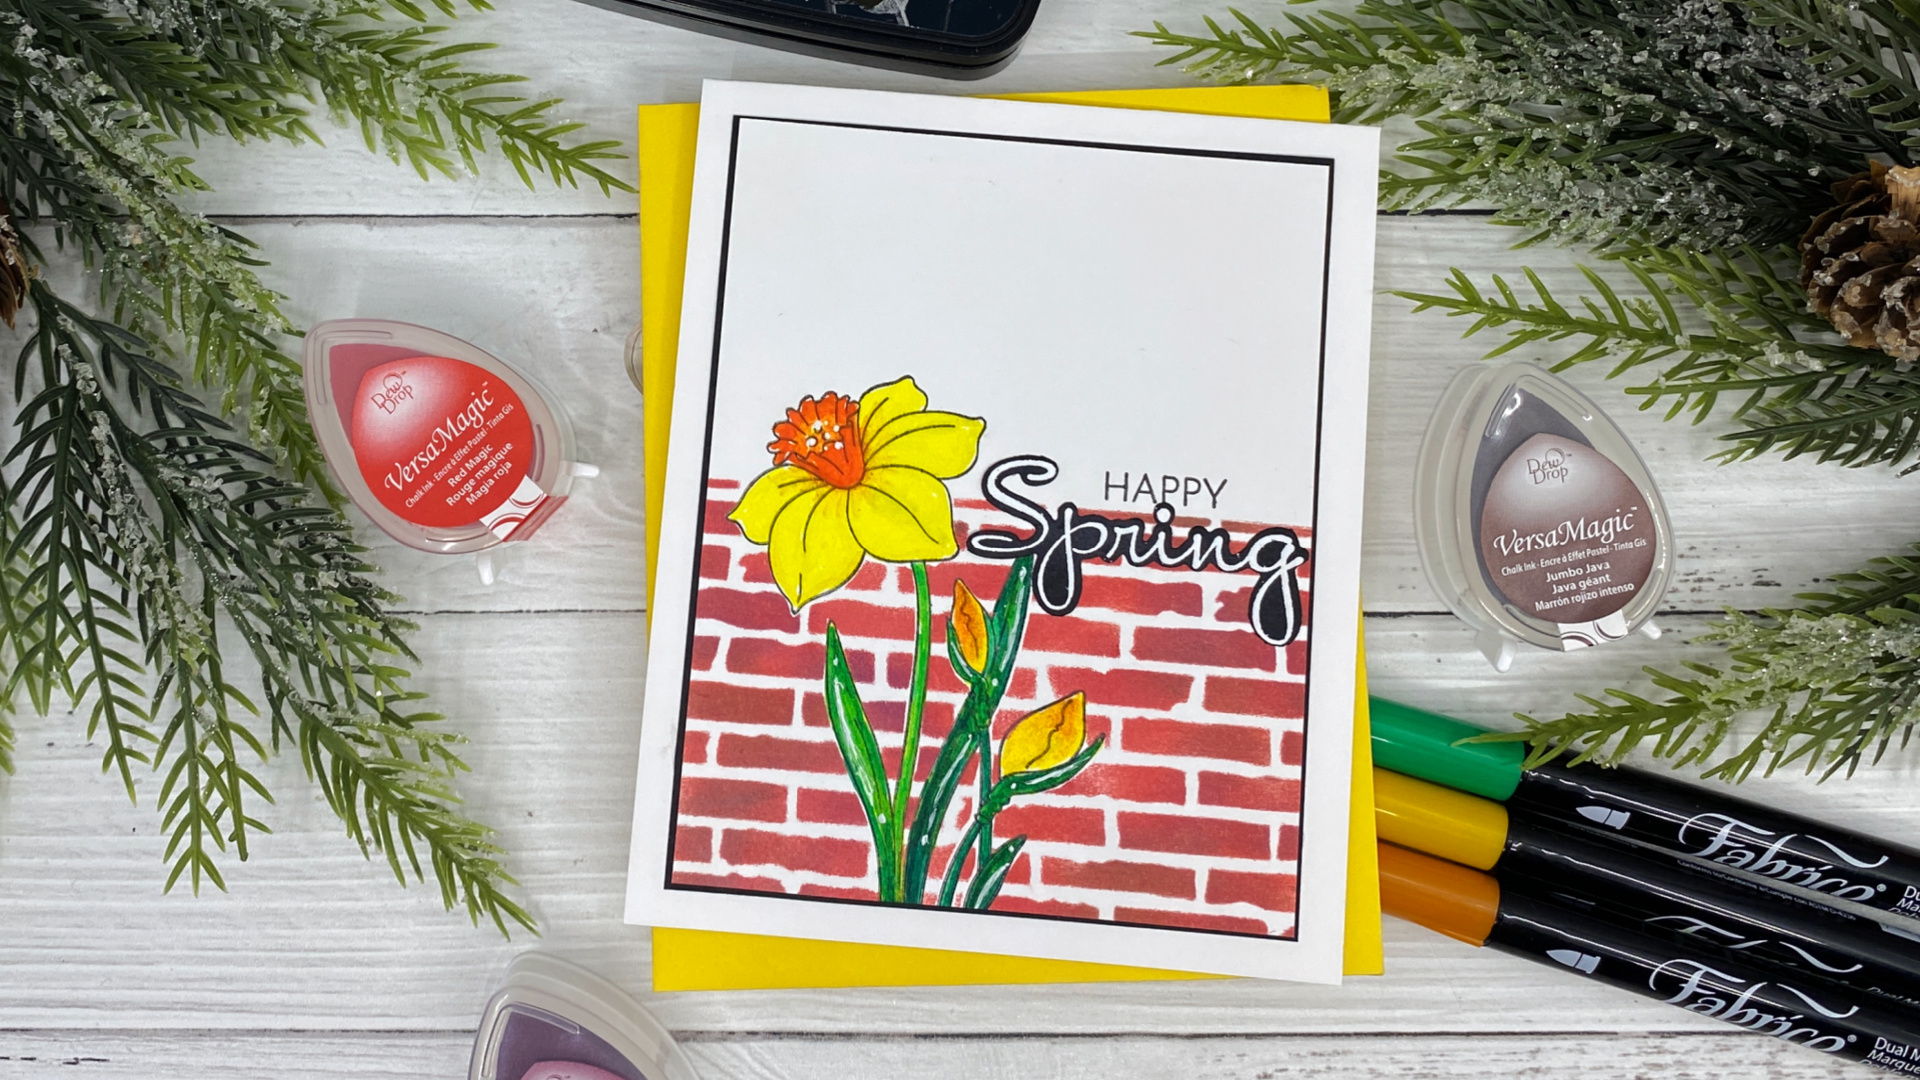
Hello crafty friends, today I am sharing a spring card using a couple of blending techniques, one with Fabrico markers and one with the VersaMagic Dew Drops. I was so happy for spring to finally arrive. I live in the mountains and even though it is officially spring, sometimes we still get snow in April.
Skill: Intermediate to Advanced Time: 45 minutes to an hour
Directions:
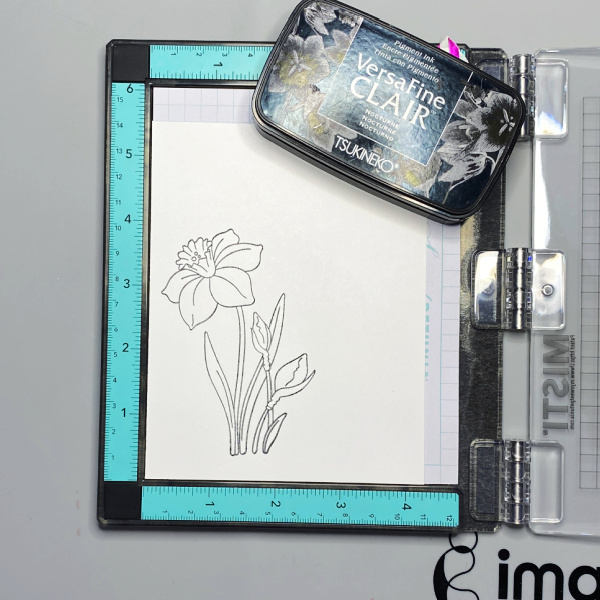
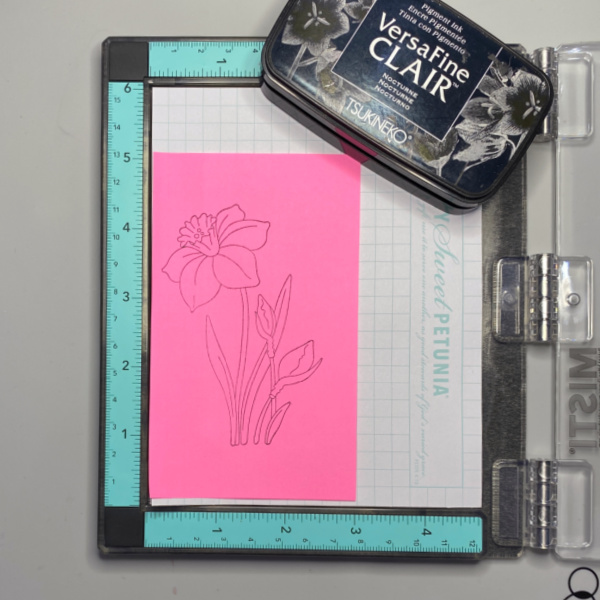
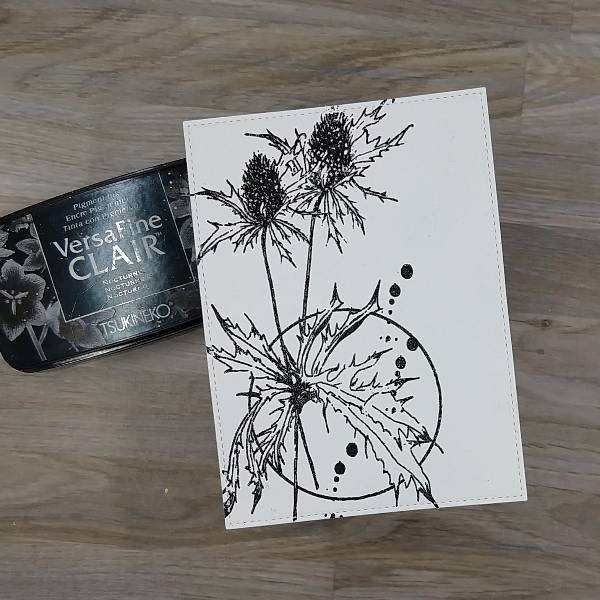
Step 1 Place a piece of white cardstock in the corner of a stamping platform and use Nocturne VersaFine Clair to add ink to the stamp.
Step 2 Stamp the image on a post-it note or masking paper using Nocturne VersaFine Claire ink, then fussy cut out the image.
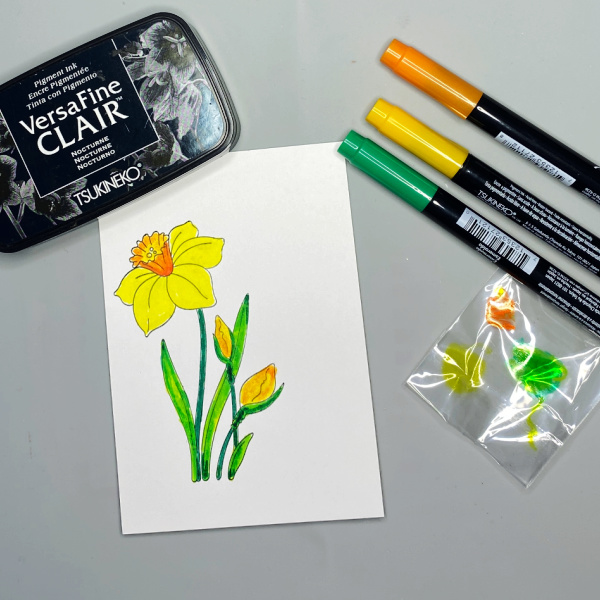
Step 3 Color the image using Fabrico markers. You can blend the colors using a piece of acetate as shown in the picture. The green marker I used is Emerald. I created a lighter green by scribbling some green on the piece of acetate and then picked it up with the yellow marker, creating a yellow green color. I also created a lighter orange by scribbling orange on the piece of acetate and then picking it up with the yellow marker. This doesn’t in any way contaminate your markers, all you do after you finish blending is scribble on a regular piece of paper until you get the true color back.
Step 4 Using the mask you created earlier, cover the daffodil image that you colored and then add the stencil over it. You will also need to mask off the top portion of your panel as well to keep it clean while you ink blend over the stencil. I used three different colors of VersaMagic Dew drops to give the bricks a more realistic look. They are listed below. I love how well the VersaMagic chalk inks blend together.
Step 5 Remove the stencil and mask from the panel and cut it down to 3.78 xX 4.78
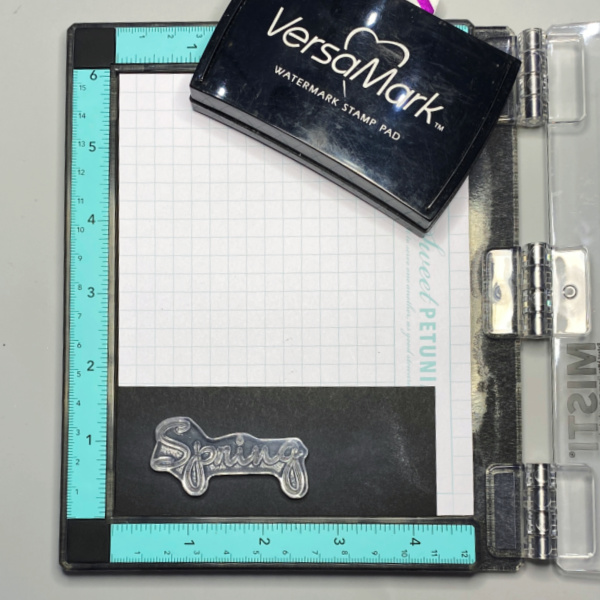
Step 6 Insert a piece of black cardstock into the corner of a stamping platform and use an anti-static tool to prep surface. Stamp the sentiment using VersaMark ink and heat emboss it with MBoss White Embossing Powder, then cut it out with the coordinating die.
Stamp the sentiment “happy” directly on the card front and add the embossed sentiment below it.
Step 7 Assemble your card by adhering the front panel to a black panel cut to 3.75 X 5 using On Point Glue and then adhering it to a card base cut to 4.25 X 11, scored at 5.5
I hop you will give these techniques a try. Thank you for stopping by our blog today. Until the next time, stay crafty!
Other Products: Daffodil Stamp Set + Dies – The Rabbit Hole Designs Back Ally Stencil – The Rabbit Hole Designs Teal Mini MISTI Hero Arts Pitch Black Cardstock Neenah Classic Solar White 120lb Cardstock – card base Neenah Classic Solar White 80lb – Cardstock panel
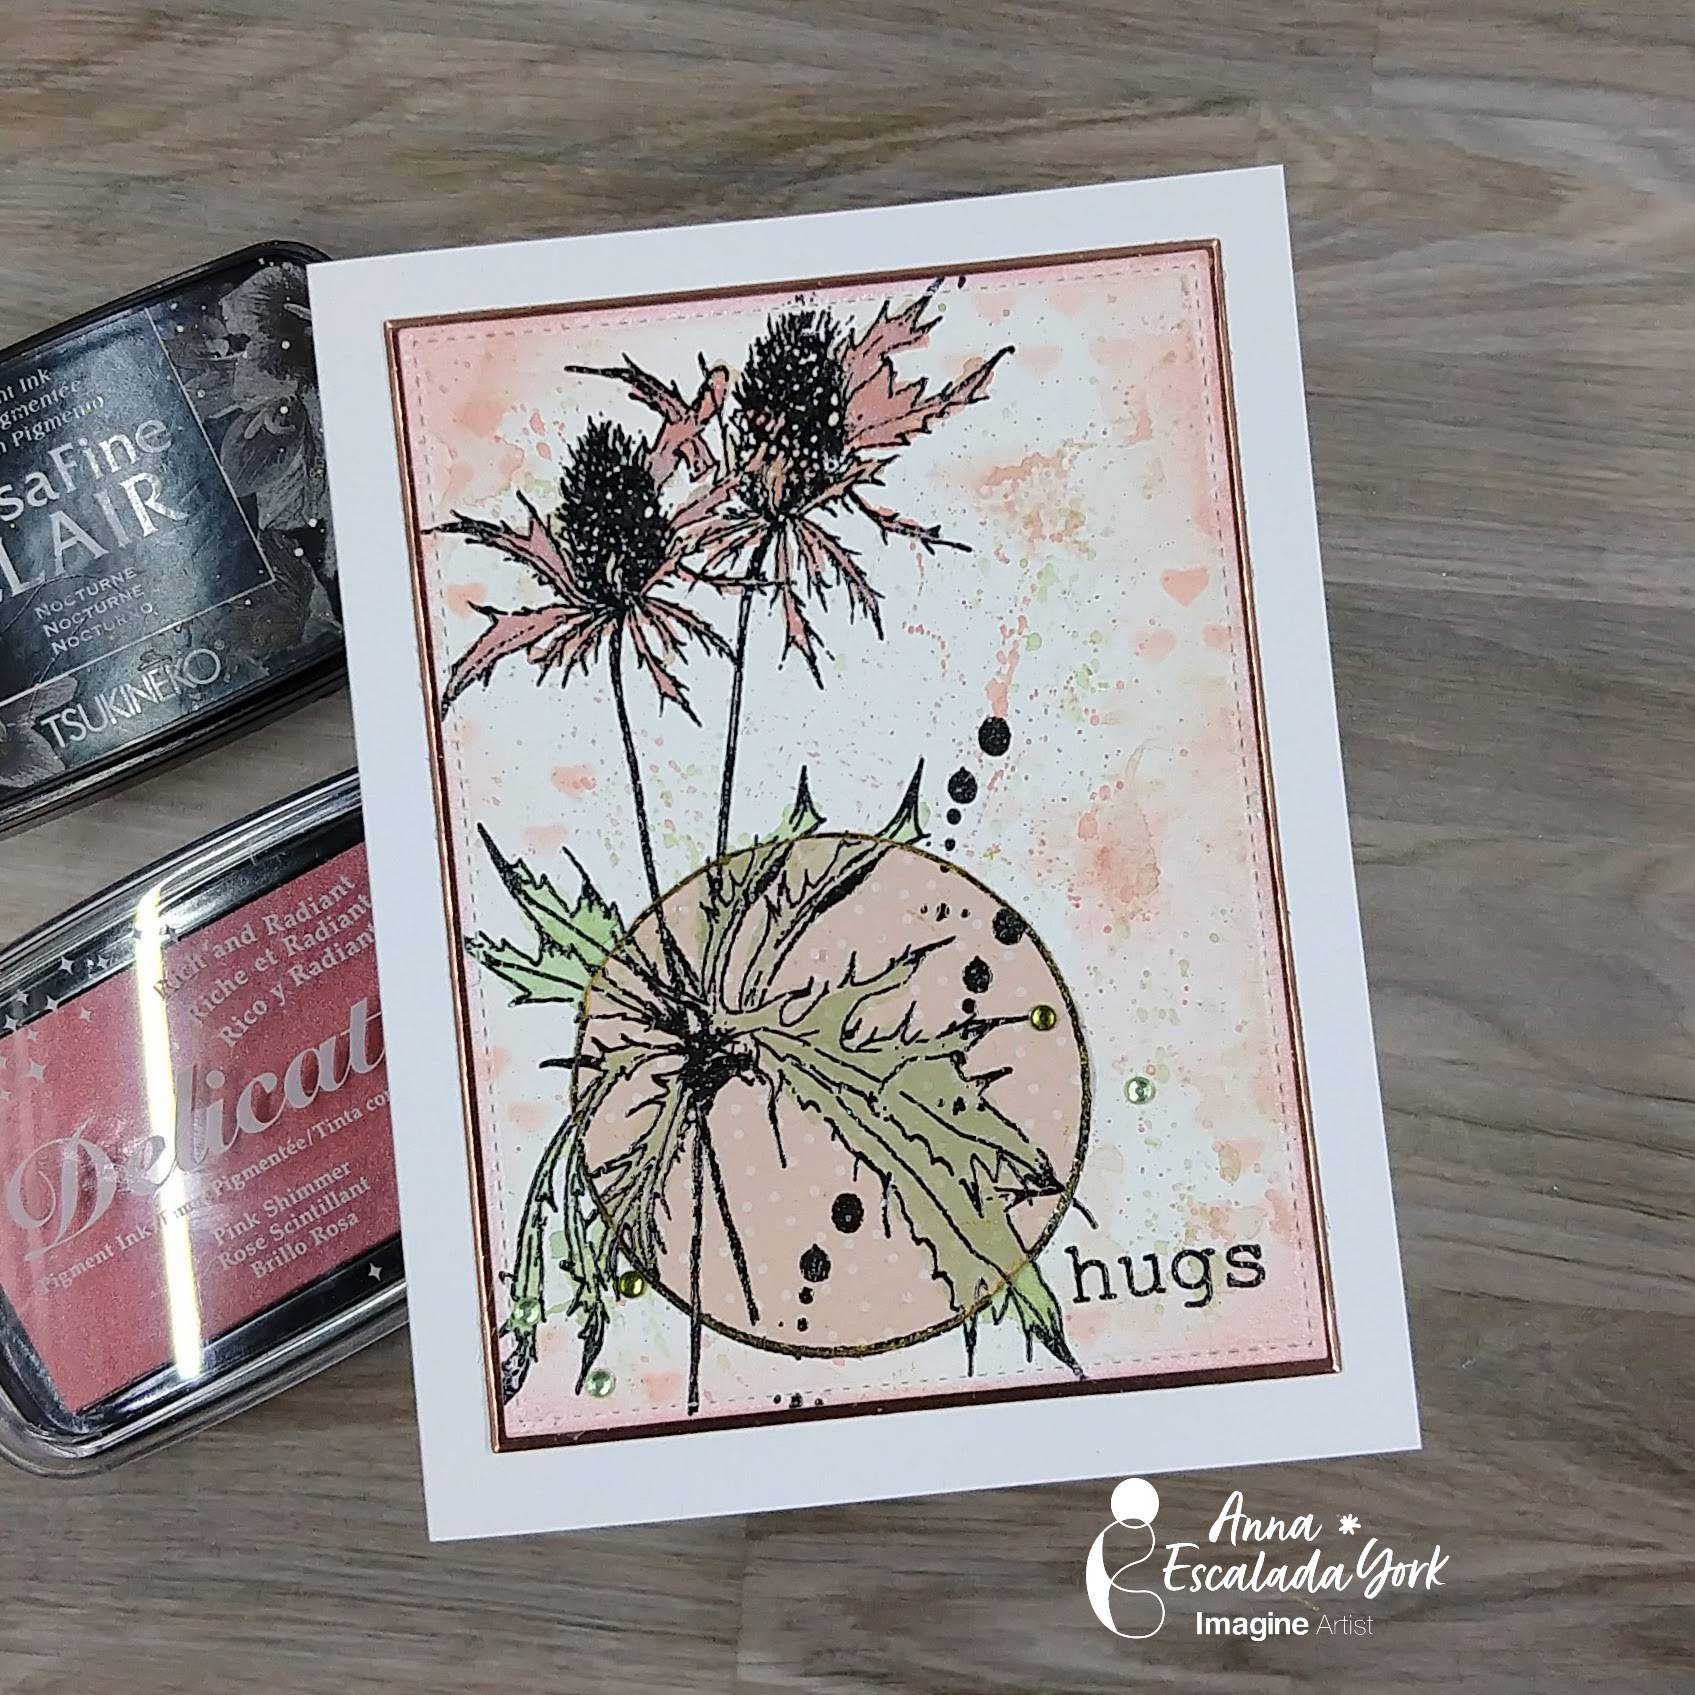
In today’s blog post, I will show you how to add some patterned paper to a card to spotlight a part of the image.
Skill: Intermediate Time: 1.5 hours
Directions:
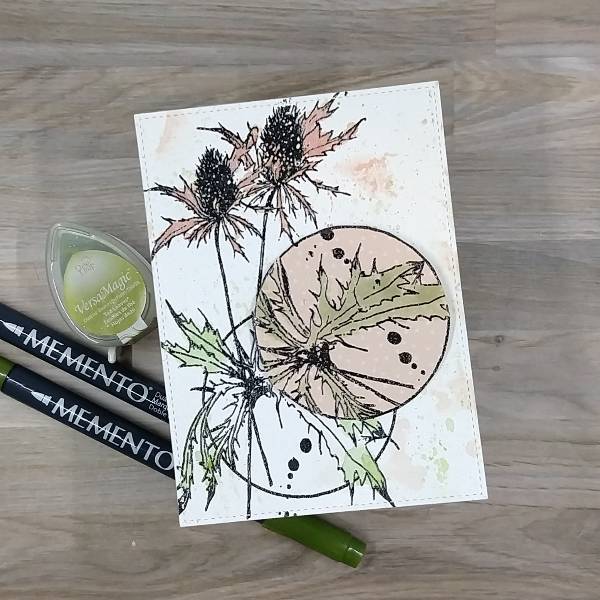
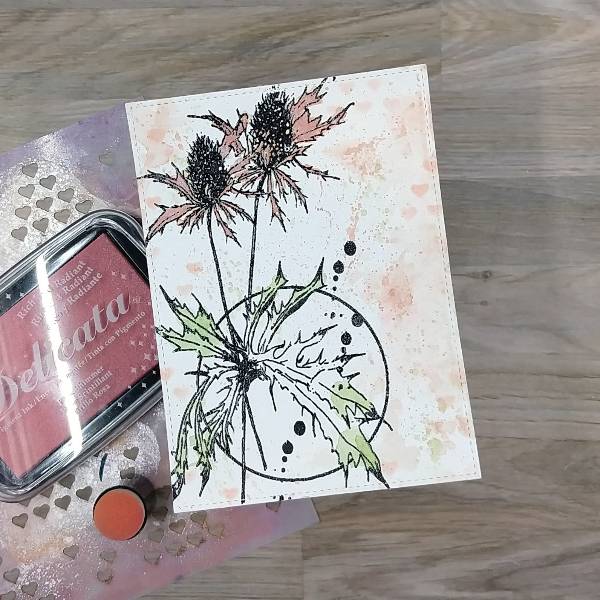
Step 1: Using a stamping platform, stamp the floral image with Nocturne VersaFine Clair ink onto a piece of watercolor paper. (I used a pre-die cut panel.) Optional step: Heat emboss with a clear embossing powder. I did this because I didn’t want to wait for the VersaFine Clair ink to dry, as well as add some subtle shine.
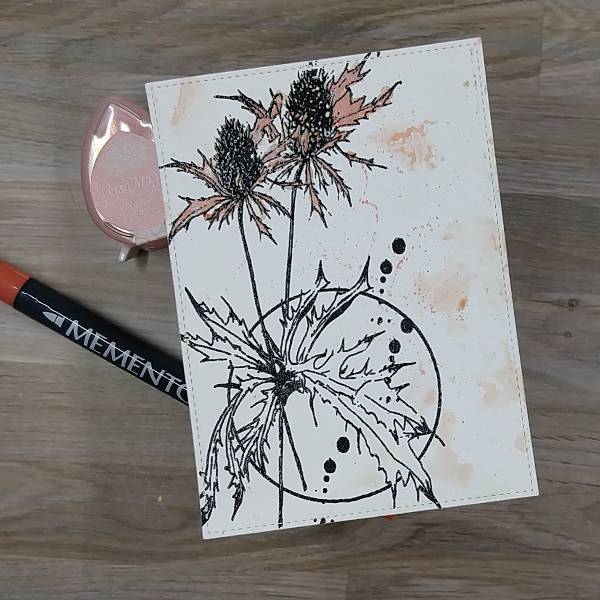
Step 2: Mix some Pink Grapefruit VersaMagic Chalk Ink with a Morocco Memento marker by pressing the ink pad and coloring a piece of scrap acetate and spraying both with water before mixing the colors to create a coral watercolor. Watercolor the petals of the floral image. Using the remainder of the watercolor to splatter the watercolor panel and smoosh the panel as well to add color around the panel. It was set aside to dry.
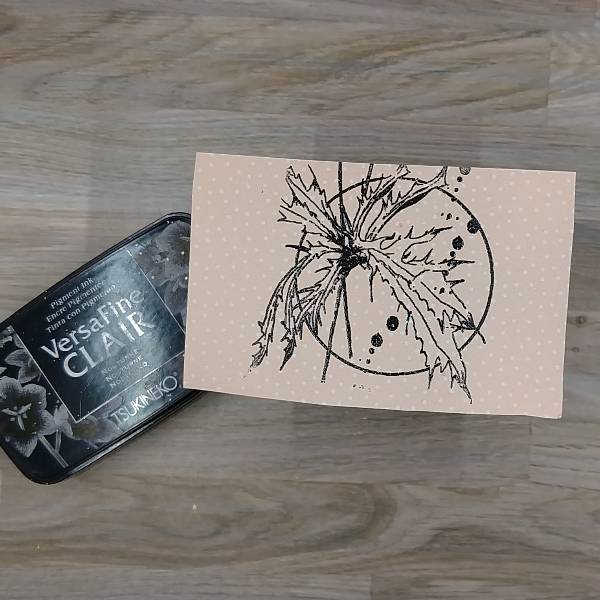
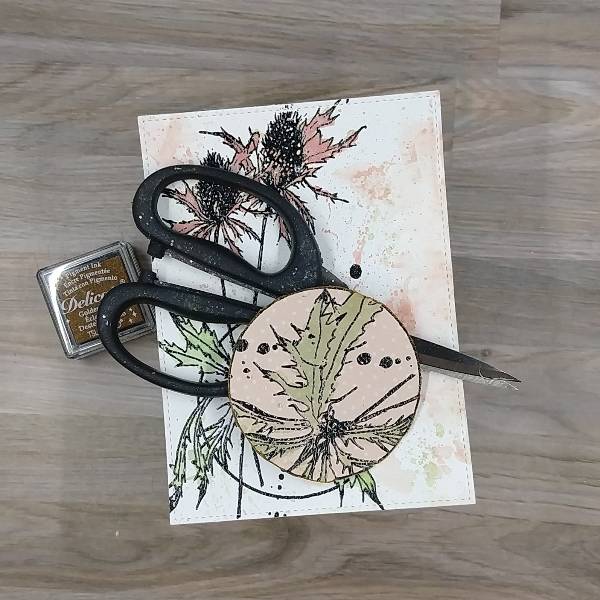
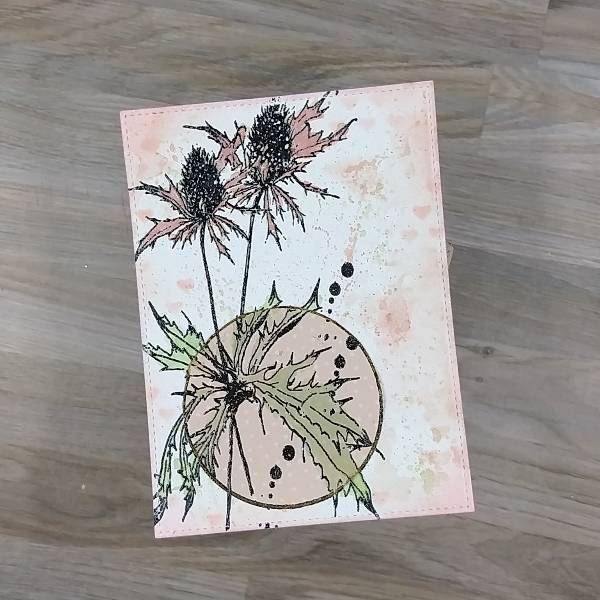
Step 3: Stamp the bottom part of the stamp onto a piece of dusty pink patterned paper with more Nocturne VersaFine Clair ink. Optional step: Heat emboss the image with more clear embossing powder.
Step 4: Cut the patterned paper image along the circular edge.
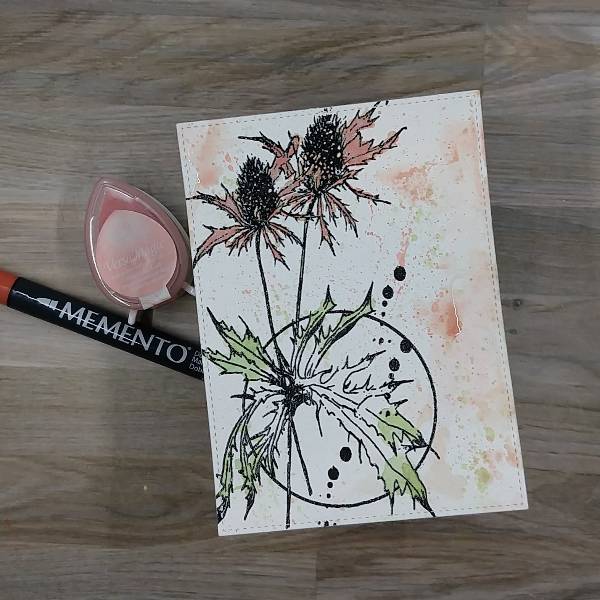
Step 5: Create green watercolor by pressing Tea Leaves VersaMagic Chalk Ink onto a piece of acetate Create green watercolor by pressing Tea Leaves VersaMagic Chalk Ink onto a piece of acetate as well as scribbling the acetate with both Cottage Ivy and Bamboo Leaves Memento marker and spraying all of the areas of color with water before mixing them together. Watercolor the edges of the leaves with the watercolor. (You won’t need to color the central parts of the leaves as they will be covered soon.) Again, splatter the card and watercolor smoosh the panel with the acetate to add green blobs around the watercolor panel. Again, set aside to dry.
Step 6: Watercolor the leaves on the patterned paper with the same mix of greens created using the Tea Leaves VersaMagic Chalk ink as well as Collage Ivy and Bamboo Leaves Memento marker mixed with water. Set this aside to dry.
Step 7: I decided to add a little more intensity to the coral colors on the petals and on the watercolor panel by adding more Pink Grapefruit VersaMagic Chalk ink and Morocco Memento marker added to the scrap of acetate and again mixed with water before painting the petals. The remaining coral-colored watercolor was again smooshed onto the watercolor panel. Set the panel aside to dry again.
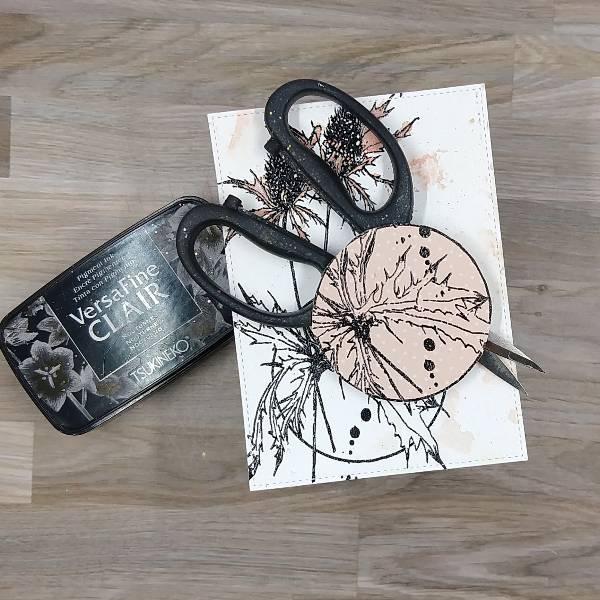
Step 8: Distress the edges of the patterned paper circle by rubbing the sharp part of a pair of scissors’ blade around the circle. Then rub the distressed edge of the circle with Golden Glitz Delicata.
Step 9: Using a sponge dauber, ink blend Pink Shimmer Delicata ink through a heart stencil in my stash on random parts of the watercolor paper. Not pictured: Ink blend the edges of the panel with more of the Pink Shimmer Delicata ink.
Step 10: Glue the patterned paper circle onto the stamped image, making sure that the patterned paper circle lines up with the rest of the stamped image.
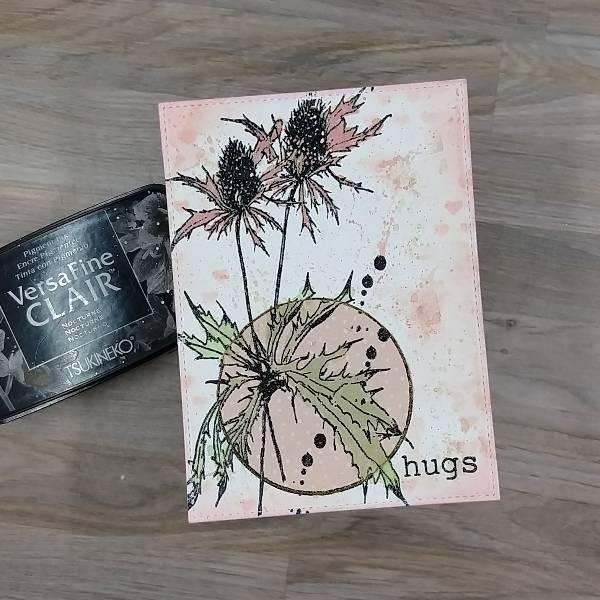
Step 11: Stamp the sentiment on the lower right corner of the watercolor panel with more Nocturne VersaFine Clair ink. Optional step: Heat emboss the image with more clear embossing powder.
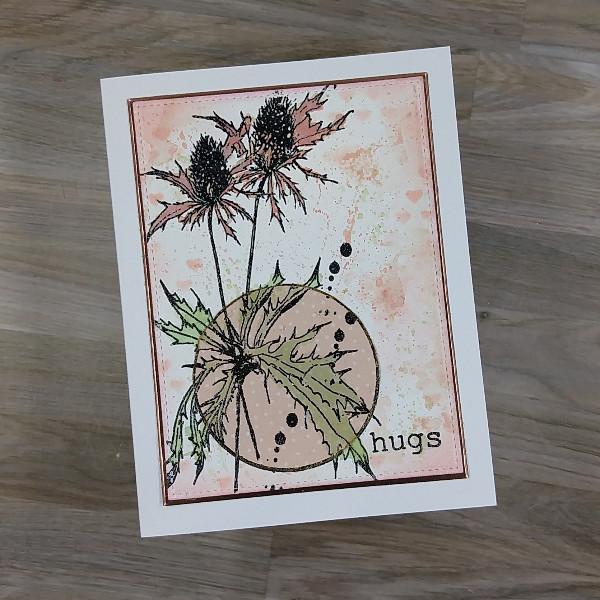
Step 12: Using a slightly larger die than the watercolor panel, die cut a piece of rose gold cardstock. Glue the two panels together, and glue both onto an A2-sized white card base.
Step 13: Add green gem stickers around the circle of patterned paper to finish the card.
Other AALL & Create – stamp set – Flower Journey Gina K Designs – dies- Master Layout 2 die set Honey Bee Stamps – gem stickers Memory Box – stamp set – Big and Little Words Sizzix- cardstock – Rose Gold Opulent cardstock Heart stencil in my stash Clear embossing powder in my stash Watercolor paper Scissors Small paint brush Stamp positioner Glue