Hello friends! This is Linh (or LV Handcrafted on all the socials). In today’s video I’m showing a really fun way to use toilet paper! Yes, you read that correctly. I’ll be showing you how to do toilet paper casting in order to use your stamps to create a beautifully textured embossed panel! Now you can turn your stamps into a embossing “folder”!
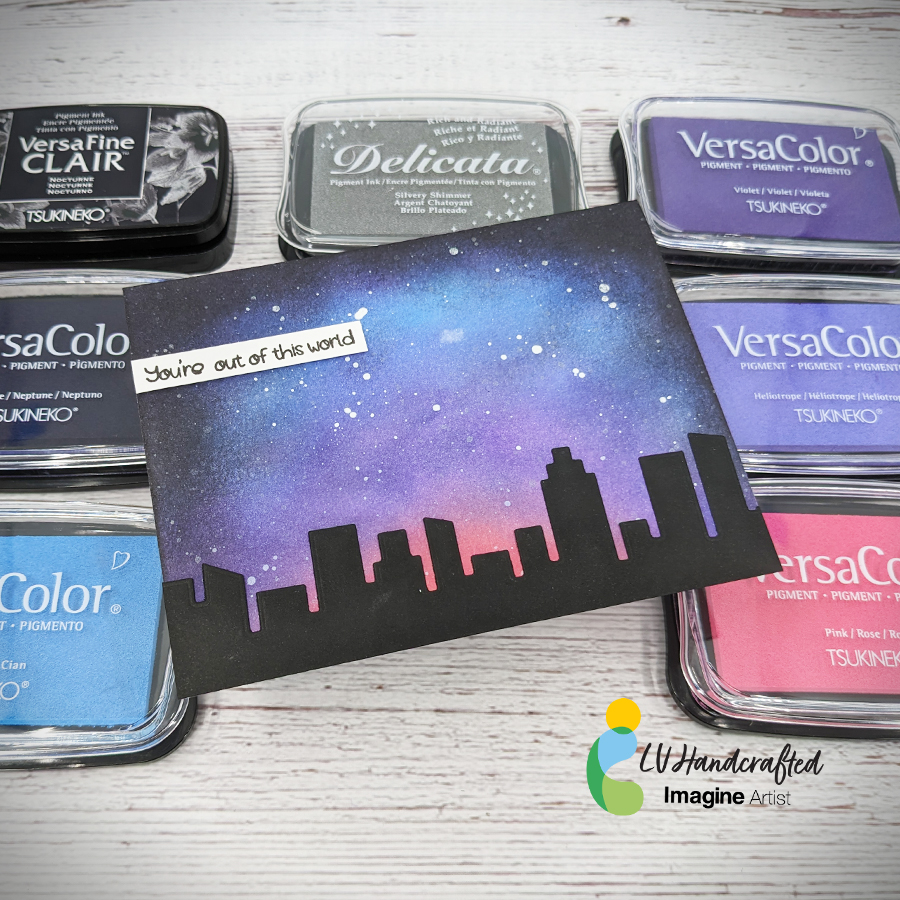
Hello friends! This is Linh (or LV Handcrafted on all the socials). In today’s video I’m showing how to create a fun galaxy with a combination of different inks! It’s so fast and easy to do!
Hello friends! This is Linh (or LV Handcrafted on all the socials). Even though I’m eager for summer, I’m starting to think ahead to the holidays. While this isn’t a holiday card, I thought it might be a fun “just because” winter themed card. In my video today, I’ll show how I made this emboss resist panel for my background.
Hello friends! This is Linh (or LV Handcrafted on all the socials). In today’s video I’m showing two techniques for creating background panels that you can either cut down or die cut from! One technique features the ever-so-popular ink “smooshing” and the other features creating monoprinting with a gel plate! These techniques are fast and easy to make multiples of if you ever need to make the same card en mass. I made a set of 6 Artist Trading Cards (ATC) using one panel for the background and the monoprint for die-cutting.
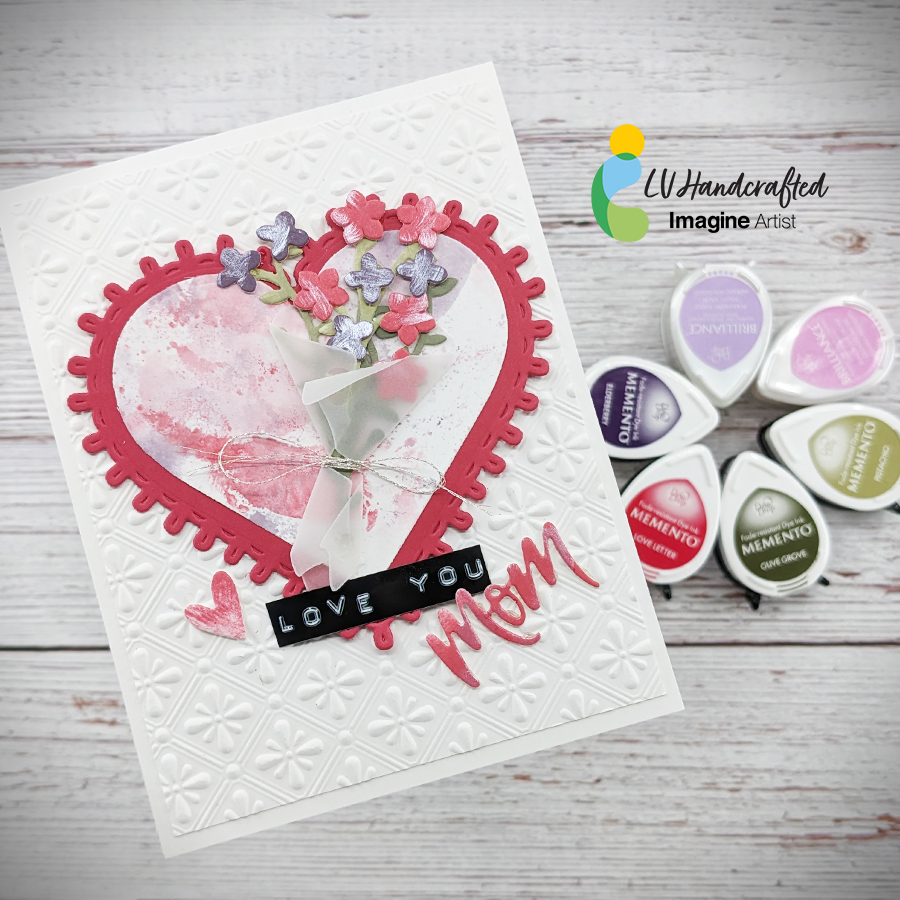
Hello friends! This is Linh (or LV Handcrafted on all the socials). Do you feel like doing something a little abstract? Try these techniques out for creating some fun backgrounds you can use as panels or die cut out of like I’ve done here. In my video, I’ll show you 3 techniques for using Imagine inks to turn plain ol’ white cardstock into beautiful, abstract papers. All the techniques are super easy but I’ll list them below in order of what I think is simplest to the most elaborate.
Technique #1 – Swipe your Memento Dew Drop ink pad directly onto your white cardstock. you can create a solid block of color or use a lighter touch to create a more stripy, imperfect effect. Instantly, you’ll have a panel of color cardstock! The benefit to making your own cardstock this way is if you use that ink pad to stamp with, you now have paper that perfectly coordinates with it.
[Note: I used this technique for the flowers — stems and flower blooms]
Technique #2 – Smear some ink onto a piece of acetate or clear plastic packaging. Spritz with water — more water will dilute the color more, less water will keep the colors strong and vibrant. Smoosh the watered down ink onto a white cardstock panel. Repeat with a single or multiple colors until you have the desired effect. Tip – if you are using plain cardstock and not watercolor paper, the more water you use, the more your paper will warp. Try less water or put your panel under a stack of books to flatten it out.
[Note: I used this technique for the inner heart die cut behind the bouquet of flowers.]
Technique #3 – Start with Technique #1 to lay down a solid block of color. Then, using a Brilliance Dew Drop in Pearlescent finish, make random swipes, swirls, streaks, etc. across your panel. Brilliance ink is a pigment ink, so it will take a little bit of time to dry, but you can also take a heat gun to the panel or cover with clear Mboss powder and melt it for a lovely shine. The result is a panel that has some lovely streaks of pearlescent shine.
[Note: I used this technique on the flower blooms to give them an abstract look. I also die cut the word “Mom” and the heart from this panel too.]
Hello friends! This is Linh (or LV Handcrafted on all the socials). This is a fun way to create your own heat embossed ombre effect. I used Delicata ink, which is a pigment ink and remains sticky for period of time to swipe across a white cardstock panel. I made a very solid swatch of ink. Before the ink dried, I covered one end (the bottom) with Mboss powder in gold. I aimed for about 25% of the way up with solid coverage. Then I tipped the panel so the letter “C” is at the bottom and the letter “S” is at the top. Then spooned more Mboss powder from one and and further tipped the panel so it runs down the panel to create that graduated, ombre effect.
When I make panels like this, I really want the panel and the effect to shine, so I like to keep the rest of the card really simple. These word dies are wonderful because they are so big, they nearly take up the entire card. And with a panel this beautiful, I save everything and made a second card using the negative effect of the word die.
NOTE: In the video, you will actually see me create a smaller panel that I decided against using. I used a Sakura glue pen to draw a design over the Delicata-inked panel and then poured Mboss powder over it. The glue pen lets you draw or write anything you want and have that lovely embossed effect.