Creating A Winter Sky with Fireworks Sprays

by Melissa Andrew

Today, I am sharing a tutorial on how I use Fireworks Sprays as a watercolor to create a smooth wash background for a snowy sky. The Fireworks Sprays create a sparkly scene that creates a frosty winter sky. In addition, I show you how to use Shimmer Spray to create snowy hills.

Skill: Intermediate/Advanced
Time: 45 minutes

Directions

Supplies

Imagine
Other

See How to Make a Tattersal Background Pattern for a Card

by Lindsay Adreon 

See How to Make a Tattersal Background Pattern for a Card

One of my favorite things to do is create patterned backgrounds. I have wanted to find a way to create a pattern that I am always seeing on men’s shirts. In my research, I found it had an actual name, Tattersall!! You could use line stamps, but I found using markers made this pattern super quick and easy!

Skill: Intermediate
Time: 1 hour +

Directions

Supplies

Imagine
Other

Simple Inking And Resist Technique

by Nadine Carlier

Autumn Card by Nadine Carlier ic

Creating a resist is easy when using Mboss Embossing Powder and inks from Imagine. Watch my video tutorial below to see exactly how to do it. Enjoy!

Skill: Intermediate
Time: 15 minutes

Supplies

Imagine
Other

Visit our YouTube Channel for more inspirational videos and subscribe. Make sure to click the bell to get updates when we post new videos.

Decorate Your Home for the Holidays with Clay Ornaments

by Kyriakos Pachadiroglou

Decorate Your Home for the Holidays with Clay Ornaments

Light-weighted, these Christmas ornaments can be hung anywhere in the house to decorate during the festive holiday season. Use any Christmas theme casting mold to make the ornaments and if you don’t have any, a flat layer of clay with some cookie cutters can work too. They are easy to make and coloring is a breeze with All-Purpose Ink and StazOn Pigment inks.

Skill: Beginner
Time: 1 hour (excluding clay dry time)

Directions


Step 1

If you are creating the clay pieces yourself then allow clay of the Christmas shapes to fully dry. If you are using premade shapes then you are ready to start. Using a paintbrush, color the surface of the ornaments with All-Purpose Ink Poppy Red and Lemon Yellow. Premix the two colors or lay first the Poppy Red and add a layer of Lemon Yellow after. Let them dry.


Step 2

Cover the embossed details of the shapes with All-Purpose White to create a distressed or antique look. The easiest way to apply the color is by using a finger and lightly tapping on the embossed areas. Let them dry.


Step 3

Press the crystals directly on the StazOn Pigment ink pad, let them sit a bit to allow the ink to dry well and repeat for a good coverage. Cover on the backside only.


Step 4

Use a hot glue gun to set ribbons on the clay shapes, add beads and crystals.

Supplies

Imagine
Other
  • Fimo casting mold – Christmas shapes
  • White clay
  • Ribbons
  • Silver color beads
  • Chandelier crystals
  • Hot glue gun

See How to Make a Fall Themed Birthday Shaker Card with VersaColor Ink

by Melissa Andrew

See How to Make a Fall Themed Birthday Shaker Card with VersaColor Ink

Today, I am showing you a wonderful property of the VersaColor pigment ink! This creamy pigment ink blends so beautifully with sponge daubers. The fall colors I used today created a smooth blend that made a perfect background for a fall card. In addition, I used Fireworks spray to help tone down the background for a gorgeous shimmer frame for a shaker card.

Skill: Advanced
Time: 1 hour

Directions

Supplies

Imagine
Other

Learn How to Create a Cute Penguin Greeting Card

by Roni Johnson

Learn How to Create a Cute Penguin Greeting Card

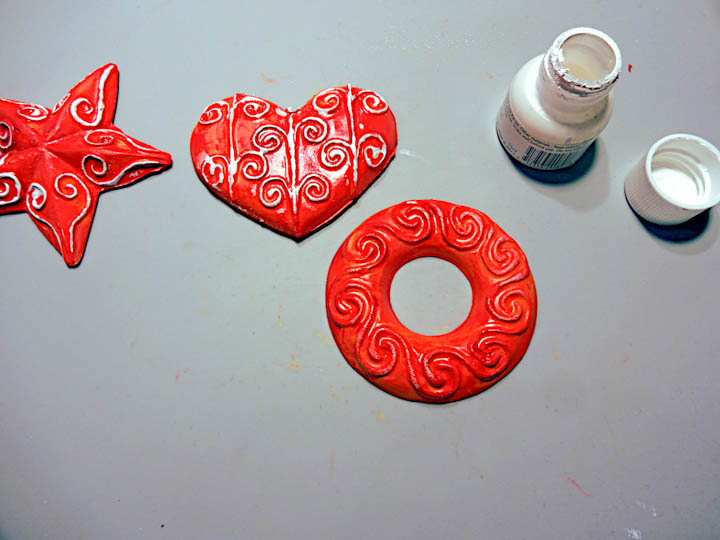
Red isn’t the first color you would normally associate with snowflakes and winter but I thought it would be fun to spice up a few Christmas cards with Imagine’s Color of the Month Chili Pepper! I did just that by combining Lady Bug Fireworks Spray and Summertime VersaFine Clair inks. Check it out!

Skill: Intermediate
Time: 30 minutes

Directions


Step 1

Cut a piece of white cardstock 4” x 5.25”. Stamp “Burst of Snowflakes” background stamp onto the card panel using VersaMark ink.


Step 2

Sprinkle the stamped image with MBoss Iridescent Opaque embossing powder. Shake off excess powder back into the pouch. Melt the powder with a heat tool and let cool.


Step 3

Spray the entire panel with Fireworks Shimmery Craft Spray in Lady Bug (red). Let the panel dry naturally or speed up drying with a heat tool.


Step 4

Once the Fireworks! spray has dried, sponge a layer of Summertime VersaFine Clair ink (orange) over the entire panel to give it that orange-red look of chili peppers. Wipe off any excess ink from the embossed areas.


Step 5

Stamp the Cuddlebug Penguin on a piece of white cardstock with VersaFine Clair Nocturne ink. Watercolor the image by scribbling the ink from Memento Dual Tip Markers directly onto the Craft Mat; blend and pick up the inks off of the mat using a waterbrush. After the image was dry I added a few details with a white gel pen.


Step 6

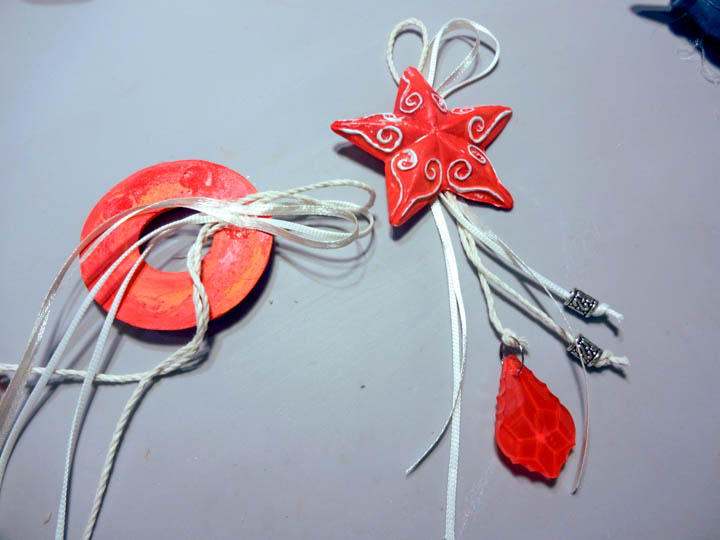
Trim both the image and the snowflake panel. Adhere the snowflake panel to a black card blank using Tear It Tape. Attach the penguin to the card using foam tape.


Step 7

Stamp the sentiment “Hello There” on a scrap of white cardstock and affix over the penguin.

Supplies

Imagine
Other
  • Unity Stamp Co – Cuddlebug Penguin, Burst of Flakes
  • Cardstock
  • Foam Tape
  • Heat Tool
  • Misti Stamping Tool or Acrylic Block