Prepare for Thanksgiving with a Cardmaking Tutorial

by Steph Ackerman

Prepare for Thanksgiving with a Cardmaking Tutorial

It’s October but before you know it you will be packing away the costumes and preparing for Thanksgiving. Why not be ready by delving into the colors, signs, and beauty of the season. Selecting 4 – 5 colors of Fireworks Shimmery Craft Sprays you can easily achieve amazing color combinations that set the stage for your projects. See how quickly and easily these Fall cards go together using backgrounds created with Fireworks Sprays.

Skill: Intermediate
Time: 1 hour

Directions


Step 1

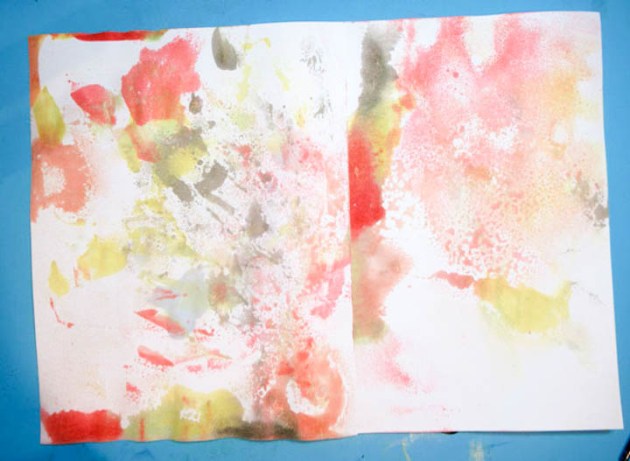
Spritz assorted colors of Fireworks! Shimmery Craft Spray on the craft mat. Be sure not to mix the colors – spritz them about the mat.

Step 2

Drag white cardstock across the craft mat. Spritz additional Fireworks on craft mat if necessary until the cardstock is covered.


Step 3

Allow the cardstock to dry, then spritz with Dandelion Fireworks adding color to the white spaces.

Step 4

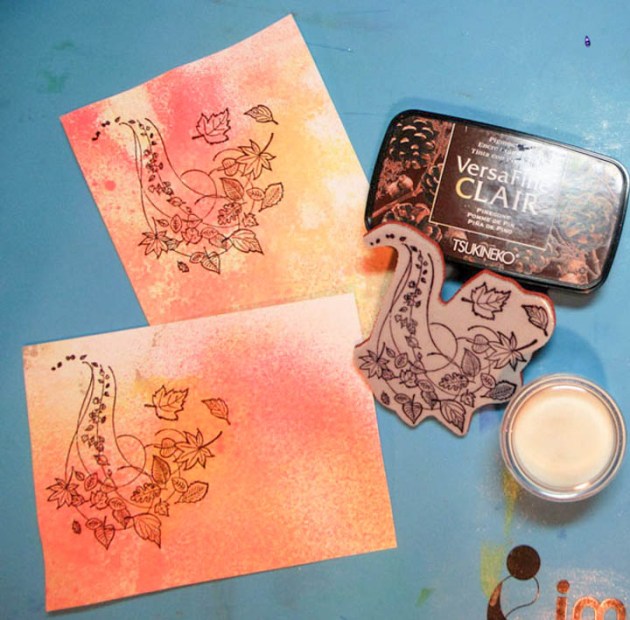
Cut cardstock into 2 panels, each 4″ x 5″. Stamp leaf flourishes on both panels with VersaFine Clair in Pinecone. Add clear embossing powder and heat set.


Step 5

Ink the edges of the panels with Brilliance Pearl Beige Ink, then mat with brown cardstock. Add the panels to the cards. Add color to some of the leaves using Memento Markers.


Step 6

Stamp Happy Thanksgiving on leftover strips of the cardstock with VersaFine Pinecone Ink. Add Clear Embossing Powder and heat set. Mat with cardstock.


Step 7

Adhere Happy Thanksgiving to the vertical card with foam adhesives. Cut apart Happy Thanksgiving for the horizontal card and adhere with foam adhesives.


Supplies

Imagine
Other
  • Stamps – So Suzy/Crackerbox Stamps
  • Cardstock – brown, white
  • Foam adhesives

October Color of the Month is Pebble Grey

The Color of the Month is Pebble Grey. We choose this color of cool grey to express the moody change of the warm Summer colors to the cool Autumn breeze. Some of the ink colors from the Tsukineko brand that perfectly express this cool grey is Memento in London Fog, VersaFine Clair in Morning Mist and StazOn Midi in Cloudy Sky.

Another fabulous art event for October is Inktober! This is an illustration and ink based challenge started by Jake Parker. Each day in October has a word that illustrators and artist respond to with a drawing! We are excited to have some of our own artists participate!

To start us out Roni Johnson has #poisonous posted today!

And as usual, we will have some great card making and crafting inspiration! Here is a sneak peak of what is coming for the month of October.

Martha Lucia Gomez creates a beautiful “Believe” card. 


Create a Mixed Media Holiday Card with Memento

by Melissa Andrew

It’s time to get ready for the holidays! Today Melissa creates a gorgeous watercolor background with Memento and VersaColor Ink. She finishes her holiday card with gorgeous gold embossing powder. This is a quick and easy holiday card that can be mass produced for sending to loved ones this season!

Skill: Advanced
Time: 1 hour

Directions

Supplies

Imagine
Other

Bring in the Fall Season with a “Blessings” Card

by Martha Lucia Gomez

Bring in the Fall Season with a "Blessings" Card with Memento in Rhubarb Stalk

The Fall Season has officially arrived and what better way to celebrate this change than to switch inks colors to rich tones and hues. In today’s card making tutorial, I am sharing a fall card created with an embossing folder, Memento ink and die cuts.

Skill: Intermediate
Time: 1 hour

Directions


Step 1

Select your favorite design of the embossing folder and ink the debossing part using Memento Ink. I am using the Leaf Swirl from Darice and Memento Ink in Desert Sand. Insert a piece of cardstock in your inked folder and pass the complete piece through your big shot or die cut machine. Open the folder and take out the inked, embossed layer. If you want to intensify the color, just re-ink the embossing folder and use the texture created on the cardstock to align the piece.


Step 2

Now take the embossed layer and rub softly with Memento Rhubarb Stalk – a fantastic color that matches perfectly. Let the ink dry.


Step 3

Resize your inked embossed piece using a die cut. I used the Stitched Rectangle Frame Die Cut from Cottage Cutz. The idea is to have a central embossed panel to decorate the top of your card.


Step 4

Using the same die cut, cut several layers of Very Vanilla cardstock. In my project, I used four layers. Paste one of the frames created over the card base. Then paste the rectangle inked panel inside of the frame and paste all the additional frames. For this step, the On Point Glue works wonderfully. Select a die-cut word (here I used “blessings” from Gina Marie Designs) and cut out as many words as you have frames. Stack the word die-cuts to match the frame height. See photo above for an example. This effect makes the card look like a box frame.

Supplies

Imagine
Other
  • Big Shot or any die cut machine
  • Darice – Embossing Folder Leaves Swirl
  • Cottage Cutz – Stitched Rectangle Frame Dies
  • Gina Marie Designs – Blessings Die
  • Stampin Up – Very Vanilla cardstock

A Halloween Card Using An Innovative Stencil Technique

by Nadine Carlier

Have you ever tried dry embossing with a stencil? In my video, I share how I created this really cool background embossing with a stencil and using Firework! Spray and VersaMagic to get the eery color.
Watch my video below to see exactly how I did it.  Enjoy!

Skill: Intermediate
Time: 20 minutes

Supplies

Imagine
Other

Visit our YouTube Channel for more inspirational videos and subscribe to get updates when we post new videos.

Learn to Make Cute Backgrounds Using VersaMagic Ink

by Arjita Sepaha Singh

Learn to Make Cute Backgrounds Using VersaMagic Ink

Today, I used a few tiny stamps from a Gina K stamp set and VersaMagic Inks to create a super cute pastel background for a Happy Fall handmade card. This papercraft project can be done using any inks you have in your collection. I used the VersaMagic since I really like the chalky soft appearance it gives.

Skill: Beginner
Time: 30 minutes

Directions

Supplies

Imagine
Other
  • Xpress It smooth card stock
  • Acrylic Blocks
  • Gina K Designs – stamp
  • Whimsy Stamps – Scallop Die
  • Die cut machine