Make a FABULOOOS Halloween Card

2022---September---Martha-Lucia-Gomez---Halloween-Card-1_700x700

By Martha Lucia Gomez –

Hello there! Todays tutorial is a quick project that you can make using your Halloween stamps and the heat embossing techniques. On this, I am combined VersaFine Clair, VersaMark and Memento Inks with our traditional Embossing Powders.

Skill Level: Beginner
Time to Complete: 30  Minutes


Directions:

2022 - September - Martha Lucia Gomez - Halloween Card Step 1

 
Step 1

Stamp a Halloween background onto your colored card stock using VersaFine Clair Nocturne. 

2022 - September - Martha Lucia Gomez - Halloween Card Step 2
Step 2:

Cover the inked area with Embossing Powder and melt it with a heat tool. On this step, you can use clear embossing powder or black embossing powder.   

2022 - September - Martha Lucia Gomez - Halloween Card Step 3
Step 3:

With an Ink Blusher or sponge apply Memento Ink Grape Jelly around the stamped background.  

TIP: You can stamp your background onto white smooth cardstock and then ink all the area with your selection of Memento Ink. 

2022 - September - Martha Lucia Gomez - Halloween Card Step 4
Step 5:

With VersaMark Ink stamp the sentiment on the center of the card and covered it with White  Embossing Powder. Melt the powder with the heat tool.

2022 - September - Martha Lucia Gomez - Halloween Card Step 6
Step 6:

Ink the center or your card using Memento Tangelo Ink.

2022 - September - Martha Lucia Gomez - Halloween Card Step 7
Step 7:

According with the stamps and colors of card stock that you used you can enhance some details using additional colors of Memento Ink. In my sample, I used purple card stock and three different colors of Memento Ink: Grape Jelly around the card, Tangelo for the Center and Paris Dusk for the corners.

2022 - September - Martha Lucia Gomez - Halloween Card Step 8
Step 8:

To embellish the card, you can use a coordinated die cut. I am using a witch die that I cut onto Silver Metallic cardstock three times. I layered pasted all the die cut images with On Point Glue to add more dimension. And as final touch, I gave an additional color to the face on the pumpkin using Memento Dual Tip Markers.

2022 - September - Martha Lucia Gomez - Halloween Card_700x700
Step 9:

Assemble your card pasting all the layers with Tear It! Tape or Crafty Foam Tape.

Art Supplies:

Imagine:

• VersaFine Clair – Nocturne

• VersaMark – Clear

• Memento – Grape Jelly, Tangelo and Paris Dusk

• Memento Dual Tip Markers

• Ink Blushers

• Tear it! Tape

• Craft Mat

Other:

  Joy Clair Designs – Spiderweb Background Clear Stamp 

  Crackerbox Stamps – Faboolous Rubber Stamp

  Die Cut Machine

  Positional Stamp Tool.

  Scrapbook Adhesives Crafty Foam.

• Heat Tool

• Brayer

How to Make a Lunar Cat Greeting Card

2021-oct-kyriakos-moon-cat-card-700-wm

By Kyriakos Pachadiroglou –

Create a dark sky background by blending MEMENTO inks on white card stock and adding details with sprinkles of All-Purpose ink White and Wisteria colors. Use the On Point glue to set little rhinestones and the Tear It! Tape to attach the background to a card base.

Skill: Beginner

Time: 1 Hour

Directions:

2021-oct-kyriakos-moon-cat-card-step1

Step 1

Cut a 4x6in piece of heavy card stock and using a jumbo Sponge Dauber heavily distress it with the MEMENTO Paris Dusk ink pad.

2021-oct-kyriakos-moon-cat-card-step2

Step 2

Repeat with the MEMENTO Grape Jelly ink pad.

2021-oct-kyriakos-moon-cat-card-step3

Step 3

Use a small Sponge Dauber to add more detail with VersaColor Indigo ink pad.

2021-oct-kyriakos-moon-cat-card-step4

Step 4

Sprinkle All-Purpose White and Wisteria inks on the card piece and let it dry.

2021-oct-kyriakos-moon-cat-card-step5
Step 5

Cut a 3 /14″ circle and color with VersaFine CLAIR Golden Meadow, while pressing the Sponge Dauber a bit on some place creating spots imitating the moon surface.

2021-oct-kyriakos-moon-cat-card-step6
Step 6

Stamp the face of the cat with the VersaFine CLAIR Nocturne.

2021-oct-kyriakos-moon-cat-card-step7

Step 7

Glue the moon on the background card using the On Point Glue and add small dots of it to set the rhinestones around.

2021-oct-kyriakos-moon-cat-card-step8

Step 8

Add some ribbon and the quote chip.

Art Supplies:

Imagine

• VersaColor – Indigo

• VersaFine CLAIR – Golden Meadow, Nocturne

• MEMENTO – Grape Jelly, Paris Dusk

• All-Purpose Ink – White, Wisteria

• Tear It! Tape

• Sponge Daubers

• On Point Glue

Other

• White Card Stock

• Cat Themed Stamps

• Orange Color Mesh Ribbon

• Orange Color Rhinestones

• Tim Holtz Ideology Quote Chips

• Hot Glue

How to Make a Spooky Card

Crow-10-600

By Alison Heikkila –

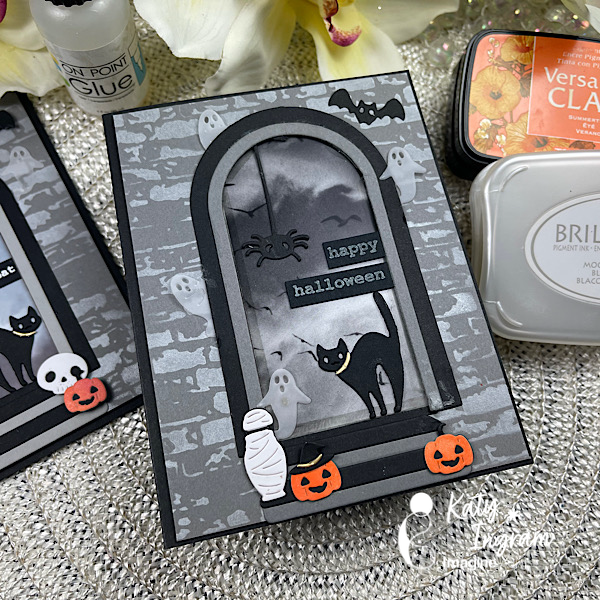
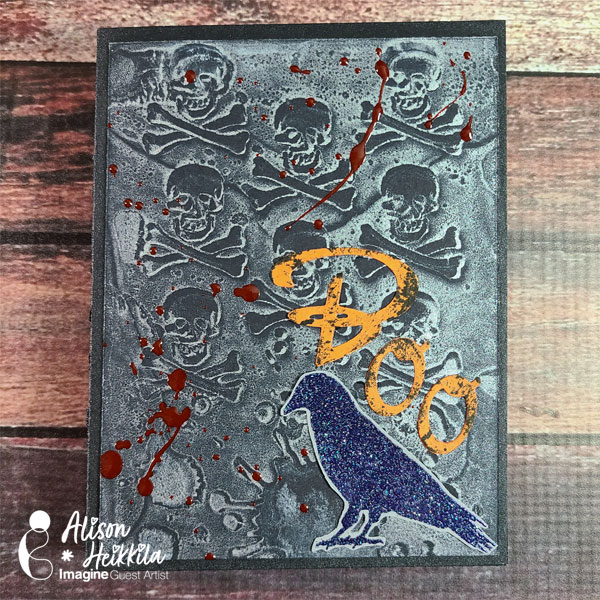
Halloween is a great time to experiment with deeper shades, interesting textures, and unique combinations. Things don’t need to be pretty or perfect…in fact, the weirder and more off-kilter they are, the better! Let’s use a variety of Imagine products to make a spooky card for Halloween.

Skill Level: Beginner to Intermediate
Time: 30 Minutes, including drying time

Directions:

Crow-1

Step 1:

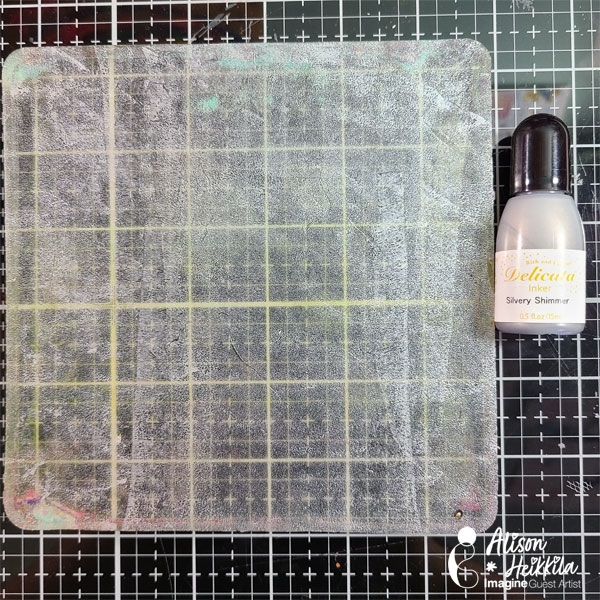
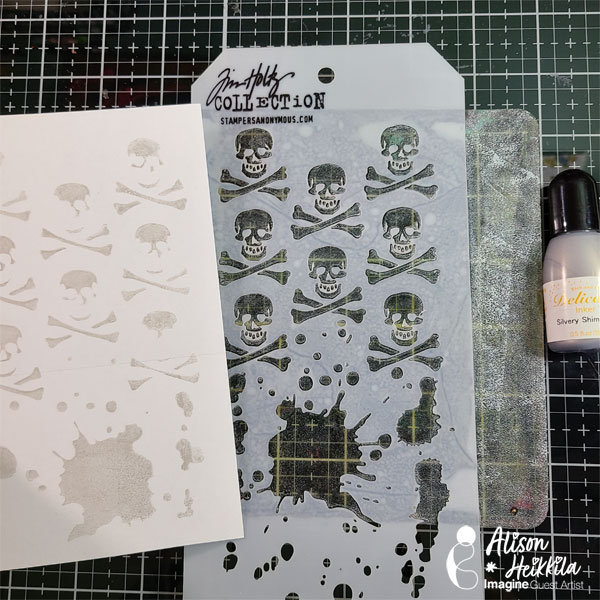
Apply Silvery Shimmer Delicata Ink Refill to a 6×6 gel printing plate and roll out with a brayer.

Crow-2

Step 2:

Lay your stencil on to the gel plate. Using a piece of scrap paper, rub the negative space areas to pick up the ink. Pull the print. You won’t be using this print for this project, but you can save it for another time.

Step 3:

Lift the stencil off of the plate.

Step 4:

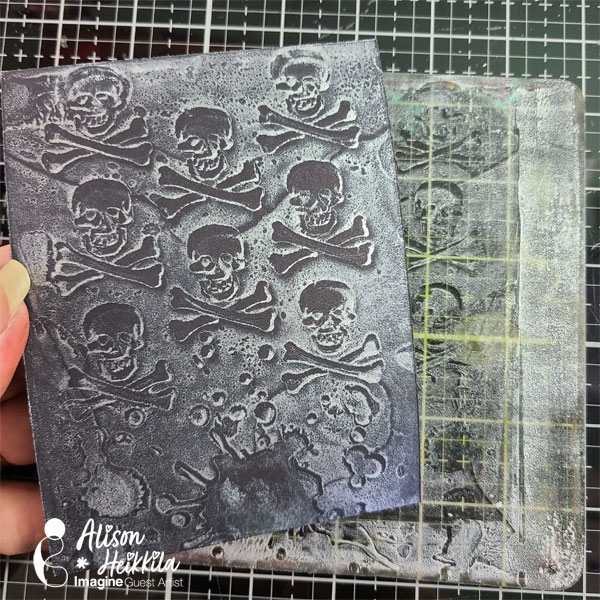
Lay a piece of 4″ x 5 1/4″ black cardstock on top of the plate, where the stenciled image is. rub the paper on to the plate firmly, making sure to rub all areas to ensure a clean pull.


Crow-3

Step 5:

Pull the print.

Crow-5

Step 6:

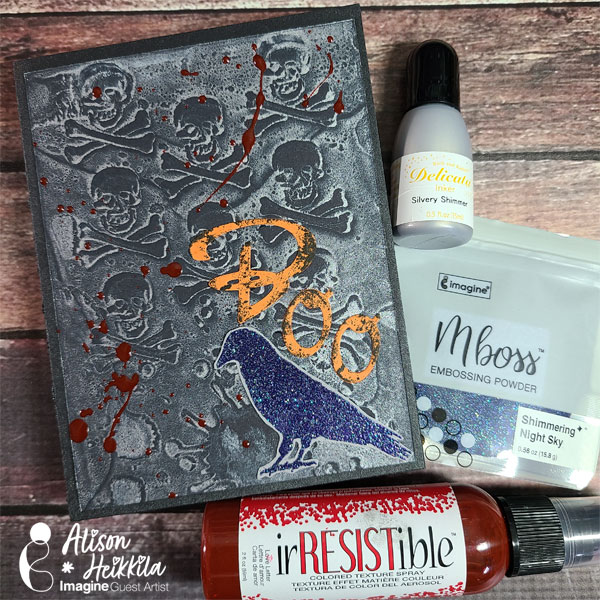
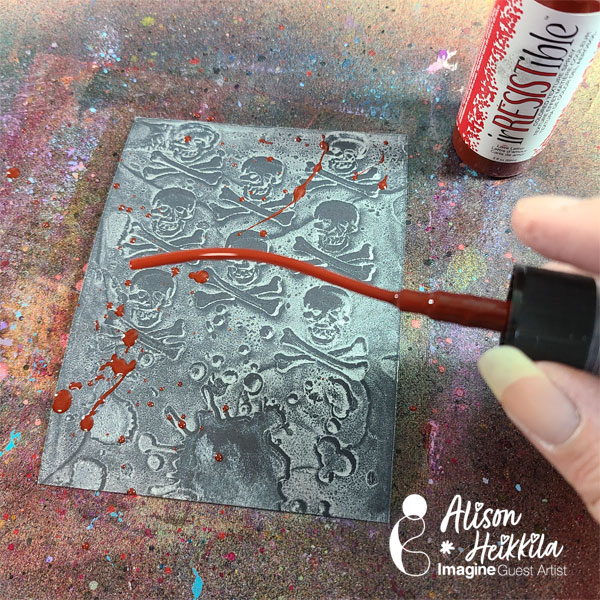
Splatter irRESISTibles Spray in Love Letter on to the gel print. I open the bottle and tap the straw to get nice, big splatters. Let dry.

Crow-4

Step 7:

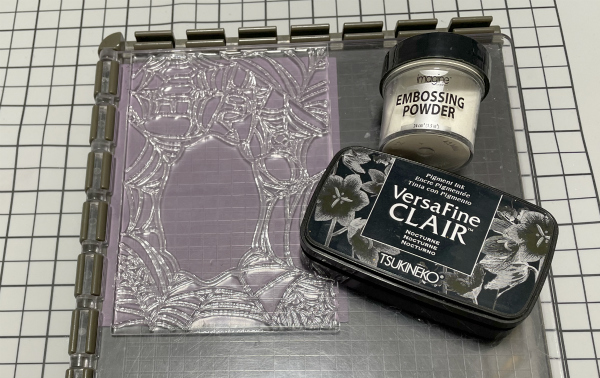
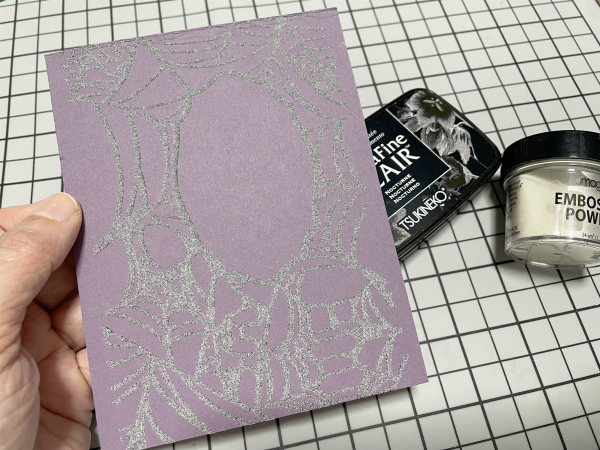
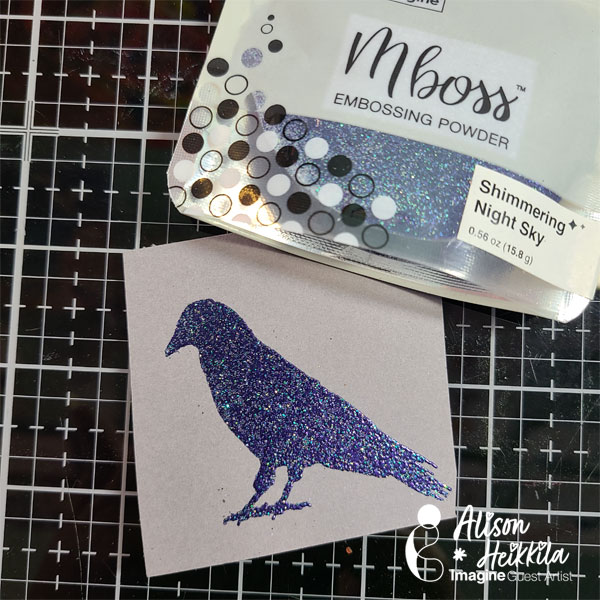
On a piece of gray cardstock, stamp a solid or silhouette image with VersaMark ink. I used a crow.


Step 8:

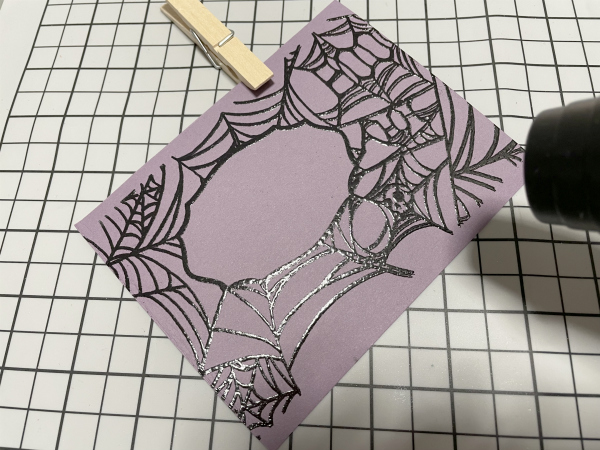
Sprinkle Shimmering Night Sky Mboss powder on to the inked image, tap off the excess, and heat set. Then, you can fussy cut the image out.

Crow-6

Step 9:

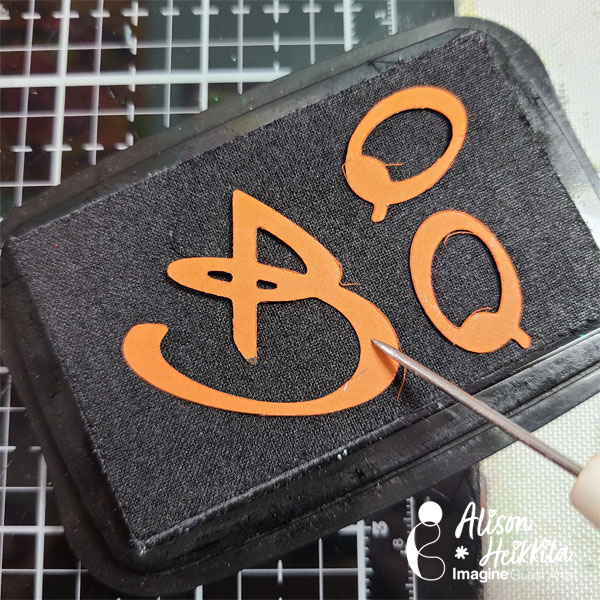
Die cut your sentiment out of a deep orange cardstock.

Step 10:

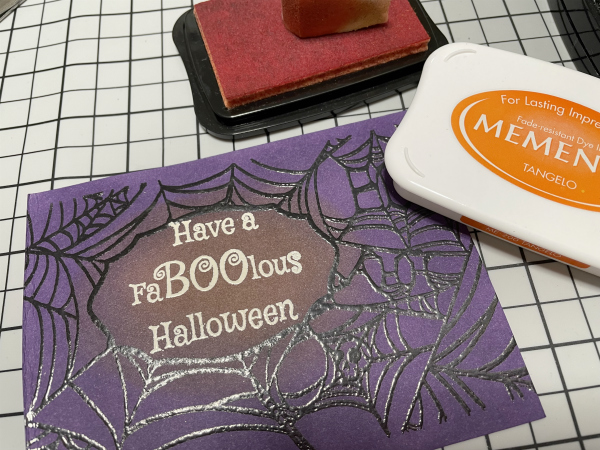
Using Tuxedo Black Memento Ink, press the front side of the letters into the pad gently. Memento ink pads have a wonderful texture, which will work perfectly with our creepy card.

Step 11:

On a black A2-sized card base, ink the edges with Black Shimmer Delicata Ink.


Step 12:

Adhere all of your elements on to the card base.


Crow-7

Art Supplies:

Imagine:

• Delicata Ink in Black Shimmer
• Delicata Reinker in Silvery Shimmer
• irRESISTible Spray in Love Letter
• VersaMark Ink
• Mboss in Shimmering Night Sky
• Memento Ink in Tuxedo Black

Other:

Black, Orange and Gray cardstock
Tim Holtz: Crossbones Stencil, Crow Stamp
6×6 Gel Printing Plate
Alphabet Dies

Make a Quick Batch of Halloween Cards with a Few Fun Techniques

2021-Oct-Neva-PumpkinCard

By Neva Cole –

In today’s tutorial I will show you how to put together a quick set of Halloween cards ready to send out.  Ink resist and coloring with Fantastix and Kaleidacolor pads makes for quick images to place on a card.  The background is another Kaleidacolor brayered onto glossy cardstock.

Skill:  Intermediate

Time:  1.5 hours

Directions:

2021-Oct-Neva-PumpkinCard2

Step 1

Stamp pumpkin images in VersaFine Clair three times each on white cardstock. VersaFine Clair is a perfect ink for this technique as there is no smear when coloring over with other dye based inks.

2021-Oct-Neva-PumpkinCard3
Step 2

Stamp pumpkin carving in Radiant Neon Electric Yellow and heat emboss with Iridescent Embossing Powder.

2021-Oct-Neva-PumpkinCard4

Step 3

Fussy cut or die cut pumpkins.  Use a Fantastix brush tip to color pumpkins using ink from Kaleidacolor Desert Heat and Cappuccino Delight.  The spectrum of colors allows a quick selection to shade different areas of the pumpkins.  Use a paper towel or soft cloth and remove ink from the embossed area so the images pop.

2021-Oct-Neva-PumpkinCard5

Step 4

Stamp sentiment on glossy cardstock in Radiant Neon Electric Yellow and heat emboss with Iridescent Embossing Powder.

2021-Oct-Neva-PumpkinCard6

Step 5

Use a soft rubber brayer to ink cardstock with Kaleidacolor in Vineyard.  Remove ink from the embossed area with a paper towel or soft cloth.

2021-Oct-Neva-PumpkinCard7

Step 6

Die cut 4 bats from black cardstock. Use Radiant Neon Amplify! in white to add big white eyes. The Amplify! was not heated.

Step 6

Die cut four fence die cuts from black cardstock.  (Not shown.)

2021-Oct-Neva-PumpkinCard8

Step 8

Adhere background to A2 grey card base with Tear It! Tape. Adhere the fence and bat die cuts with On Point Glue.  Adhere center pumpkin with Tear It! Tape.  Adhere side pumpkins with dimensional foam adhesive.

Art Supplies

Imagine
Other
  • Joy Clair Trick or Treat Stamps
  • Heidi Grace Designs Halloween Stamps
  • Echo Park Going Batty Die
  • Heartfelt Creations Lattice Flourish Gateway Die
  • Rubber Brayer
  • Dimensional Foam Adhesive
  • Brother Scan-N-Cut

A Halloween Card Using An Innovative Stencil Technique

by Nadine Carlier

Have you ever tried dry embossing with a stencil? In my video, I share how I created this really cool background embossing with a stencil and using Firework! Spray and VersaMagic to get the eery color.
Watch my video below to see exactly how I did it.  Enjoy!

Skill: Intermediate
Time: 20 minutes

Supplies

Imagine
Other

Visit our YouTube Channel for more inspirational videos and subscribe to get updates when we post new videos.

#LinksWeLike Wednesday

PicMonkey Collage

  1. You gotta be kitten me!
  2. Trick or Treat, give me something sweet to eat
  3. Embossing powder, adhesive & a heat tool – who would have thought?
  4. You are somebody’s reason to smile
  5. DIY modern art on a budget, a perfect house warming gift

Find more project inspiration at imaginecrafts.com “Make” page.