Create an Underwater Scene with Mboss Shimmering Night Sky

by Melissa Andrew

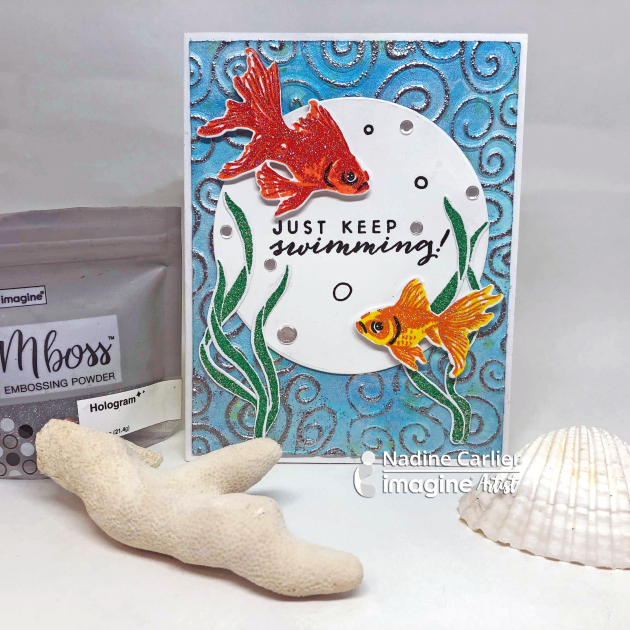
In today’s tutorial, I show you how to use your Mboss embossing powder in Shimmering Night Sky to create an underwater scene. Together with Fireworks spray and Memento ink you can create a gorgeous card straight from a mermaid’s home, complete with sea critters. I show you beginning to end how to create a sea-filled, embossed, and watercolored card.

Skill: Intermediate
Time: 45 minutes

Directions

Supplies

Imagine
Other
  • Whimsy Stamps Die – Card Builder 1
  • Picket Fence Studios – Little Coral Girl stamp set
  • Heat Tool
  • Watercolor paper
  • Copic markers
  • Cardstock – White, Blue Shimmer
  • Paper trimmer
  • 6 round paintbrush
  • Antistatic tool

Create A Unique Embossed Spiral Design On A Greeting Card

by Martha Lucia Gomez

Hello there! Today, I have a Mboss Spiral card that I made featuring the new Mboss Embossing Powder from Imagine. I had the opportunity to buy this spiral background stamp a long time ago during a vacation but I never used it. I couldn’t find exactly what project this spiral shape would fit with. Now that Imagine has released the Mboss Embossing Powder, I made decided to use it for an embossing color blend project.

Skill: Intermediate
Time: 1 hour

Directions


Step 1

I started my process using basic black card stock and the small inkpad (or cube) of the VersaMark. I placed my stamp inside of my stamping tool and applied the ink starting in the center. I stamped this part and covered with Valentine Mboss. Then I removed the card stock and melted the powder with the heat tool. I repeated the process several times using Princess Party, Birthday Party, Sparkle, and Lucky Stars. I applied VersaMark in a circular way to keep the spiral shape.


Step 2

I resized the stamped layer and added a whisper white mat before to paste over the basic black card base. I finalized the card adding a die cut flower and sentiment that I stamped with Memento Ink Lilac Posies.

Supplies

Imagine
Other
  • Cardstock – Basic Black, Whisper White
  • Spiral Background Stamp
  • Stamparatus or Misti Stamping Tool
  • Spellbinders Shapeabilities – Lovely Lilac Etched die Good Vibes
  • Double-sided foam tape

Let’s Mboss It

by Nadine Carlier

MBoss Fish Card by Nadine Carlier IC

This card is dressed with the new Mboss Embossing Powder from top to bottom.
Watch my video below to see the different techniques I used to create my card. Enjoy!

Skill: Intermediate
Time: 30 min

Supplies

Imagine
Other

Visit our YouTube Channel for more inspirational videos and subscribe. Make sure to click the bell to get updates when we post new videos.

Create A Fashion Forward Birthday Card With Mboss

by Iris Rodriguez

Create A Fashion Forward Birthday Card With Mboss

This month I had the pleasure of using Imagine’s new Mboss embossing powders for my projects. They are fine embossing powders that come in a lot of colors and glittery combinations, for instance: Valentine which is red and gold, New Year’s Eve which is black and gold, as well as special effect powders like gold metallic and new solid colors. In this project, I used glittery color combinations Valentine for the dress and New Years Eve for the background, purse, and sentiment. Check it out!

Skills: Beginner
Time 30 minutes

Directions


Step 1

Using a dress template or die cut, cut out a dress from watercolor paper.


Step 2

Place dress on foam and burnish the back side of the dress with a stylus. The dress will take on a curved shape giving it a dimensional look.


Step 3

Ink the front of the dress with the VersaMark ink.


Step 4

Apply Valentine Mboss Embossing Powder and using a heat tool, melt the powder. These new embossing powders come in a bag, in this image I added some powder onto a dish so that you can get a good view of this awesome color.


Step 5

Using the VersaMark ink, stamp a background image. Apply New Years Eve Mboss embossing powder and melt the powder with a heat tool. Do the same on the “Happy Birthday” sentiment and purse.


Step 6

Adhere a ribbon sash to the waist of the dress. Apply On Point Glue to the edges of the dress only and glue onto the card base. This will help to keep its dimension.


Step 7

Assemble the card with the dress, birthday sentiment, and matching card base.

Supplies

Imagine
Other
  • Watercolor paper
  • Scissors
  • Stylus
  • Cardstock – white, black or print of choice
  • Large Background stamp
  • Ribbon
  • Birthday sentiment stamp

Sparkle And Shine With This Jellyfish Theme Birthday Card

by Jowilna Nolte

Sparkle And Shine With This Jellyfish Theme Birthday Card

Thinking back when I did my first heat embossing, it was pure magic. That feeling of amazement and wonder hasn’t left but has been ignited once again with the amazing Mboss from Imagine. The new embossing colors are simply amazing and really are over the top beautiful! You have to get some for your stash to experience true magic! Take a look at how I used mine for a fun color-blocked effect.

Skill: Intermediate
Time: 30 minutes

Directions


Step 1

Tape off areas using washi tape on a white cardstock panel.


Step 2

Use your VersaMark inkpad and ink the taped off sections only by tapping the ink pad onto the cardstock.


Step 3

Use the Mboss packet and sprinkle the powder over the inked areas. Peel off the washi tape and then heat set the Embossing Powder using a heat gun.


Step 4

Use StazOn Pigment Piano Black and stamp Happy Birthday sentiment onto a blank area of the embossed panel.


Step 5

Stamp elements onto white cardstock and cut out. Add a little color using Memento Markers.


Step 6

Adhere the stamped elements onto the embossed panel with On Point Glue. Add diamanté and finishing touches.

Supplies

Imagine

Other

  • White cardstock
  • Washi tape
  • Joy Clair stamps
  • Diamanté and/or sequins

Create A Beautiful Hologram Flower Outline With Mboss

by Melissa Andrew

Create A Beautiful Hologram Flower Outline With Mboss

Today I am sharing the fabulous new Hologram Mboss embossing powder from Imagine. This fabulous embossing powder is fine for detailed stamping but also sparkles with colors of the rainbow. In this video, I show you how to stamp, emboss and fill in with a watercolor technique. The Memento inks are perfect for creating the peachy blended look.

Skill: Intermediate
Time: 1 hour

Directions

Supplies

Imagine
Other
  • LDRS Creative – If Friends Were Flowers stamp set
  • Whimsy Stamps – Card Builders Window die set
  • Antistatic tool
  • Paper Trimmer
  • White Card
  • Bristol Smooth cardstock
  • MISTI Stamping Platform
  • Gemini Jr. Die Cut machine
  • 6 round paintbrush
  • Spray bottle