VersaMagic and VersaFile Clair Create a Polar Bear Card

by Lori Warren

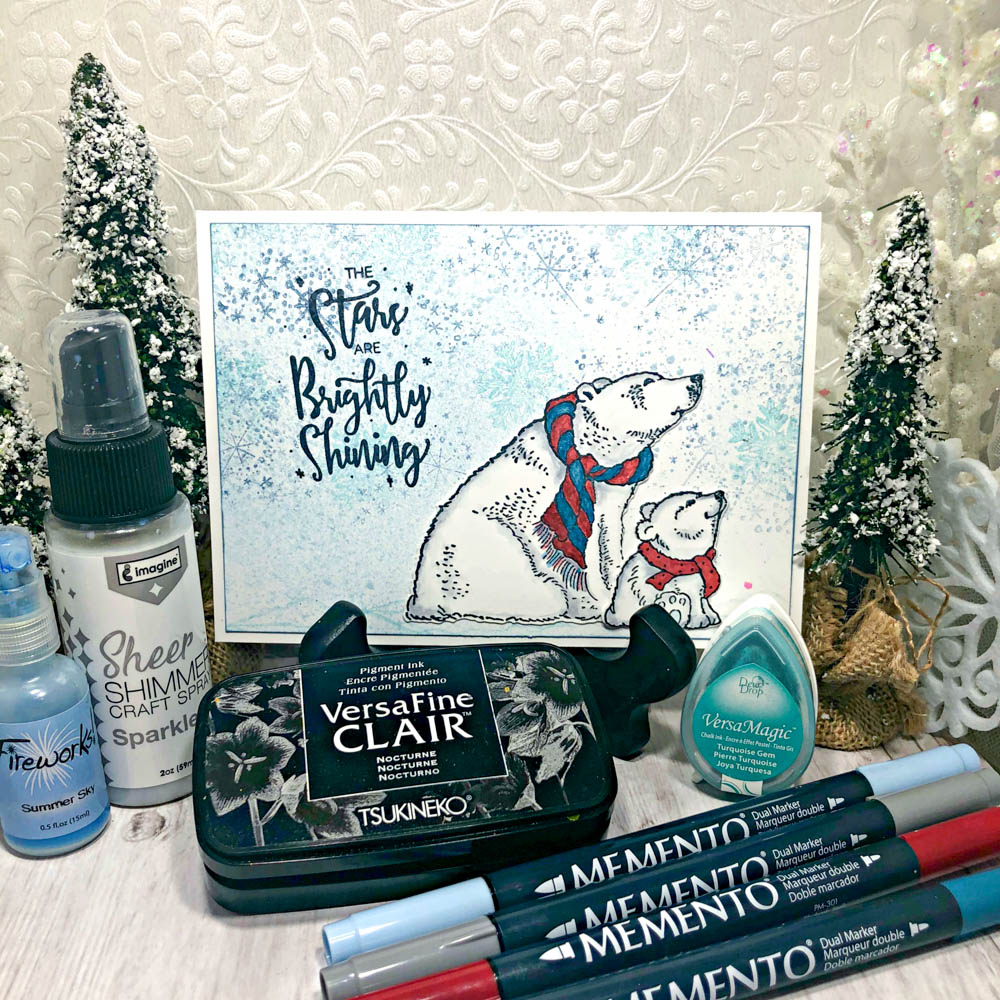
Learn how to layer colors and different inks to create this lovely Polar Bear Holiday Card.

Skill: Intermediate
Time: 30 minutes

Directions

Step 1

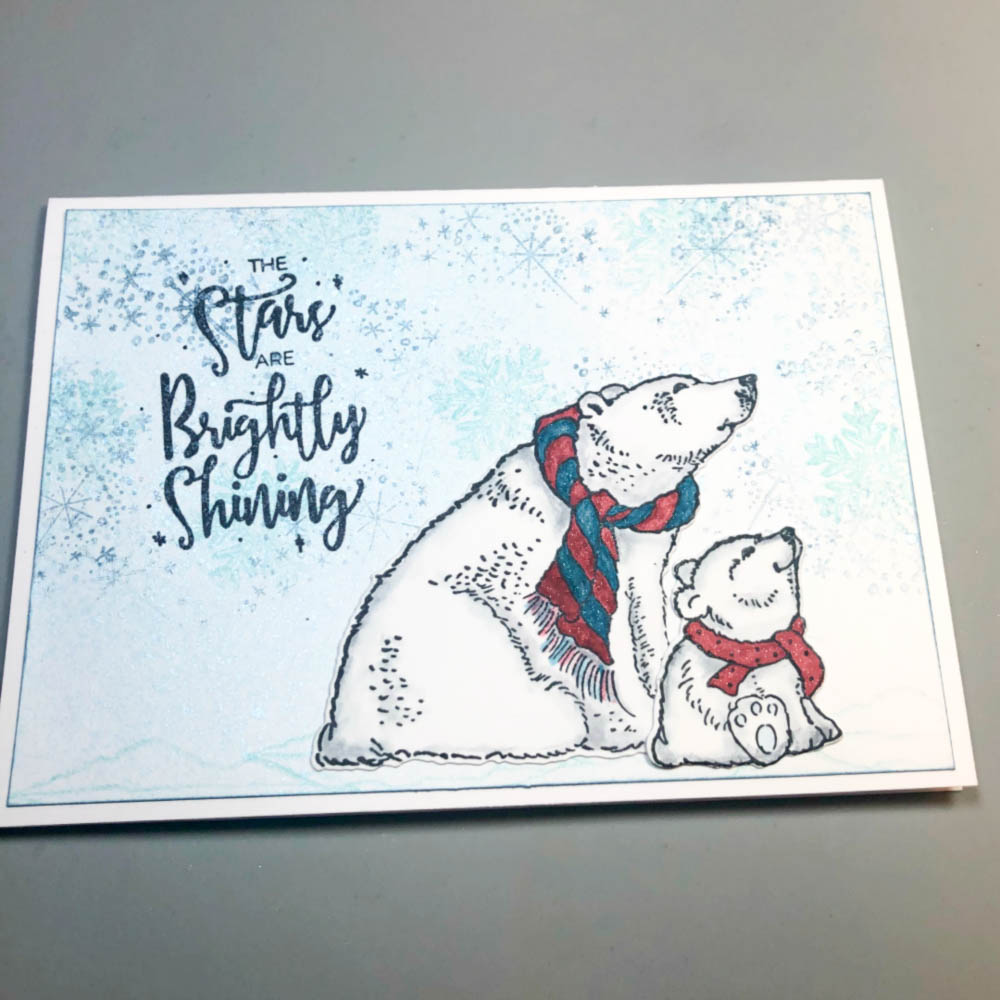
Spray Fireworks! Shimmery Craft Spray in Summer Sky onto card panel.

Step 2

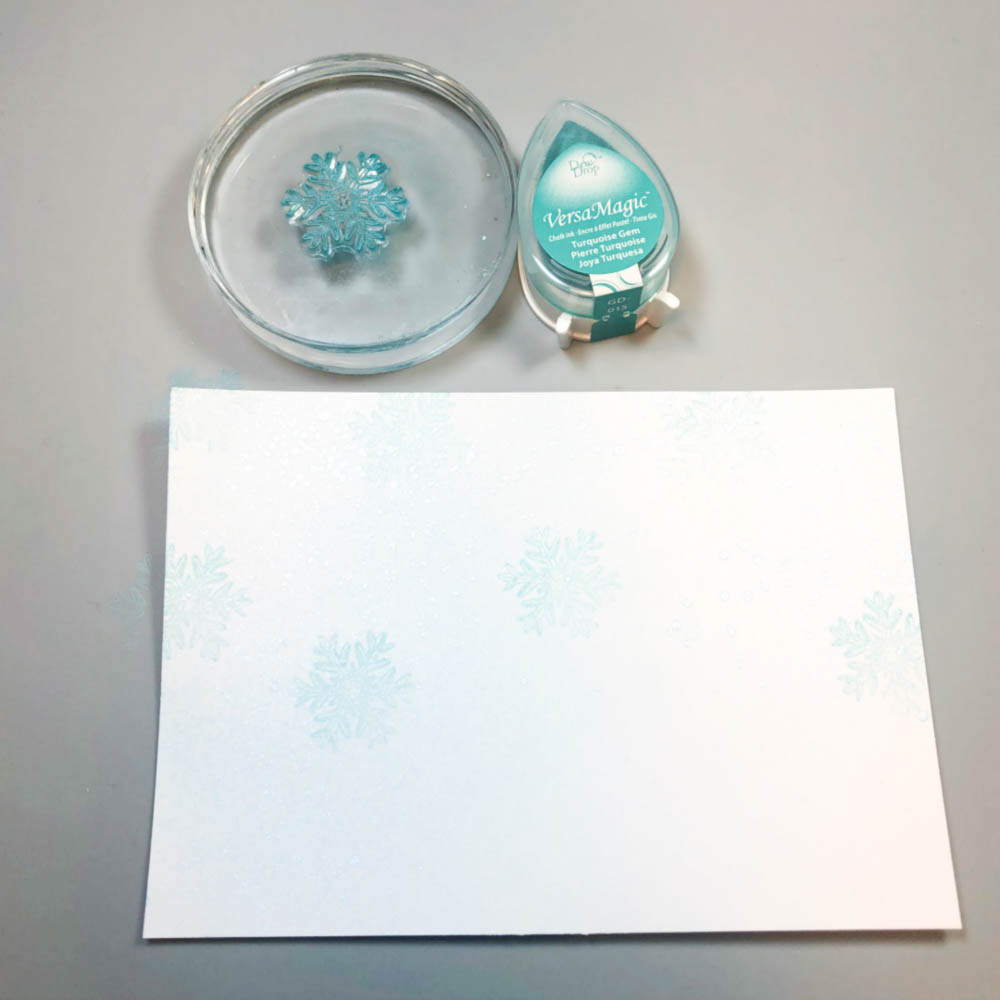
Stamp snowflakes with VersaMagic in Turquoise Gem.

Step 3

Stamp a second snowflake pattern in VersaMagic in Aegean Blue.

Step 4

Use a Large Dauber to sponge VersaMagic in Aegean Blue onto edge of card panel.

Step 5

Stamp ice pattern onto bottom of card panel with VersaMagic – Turquoise.

Step 6

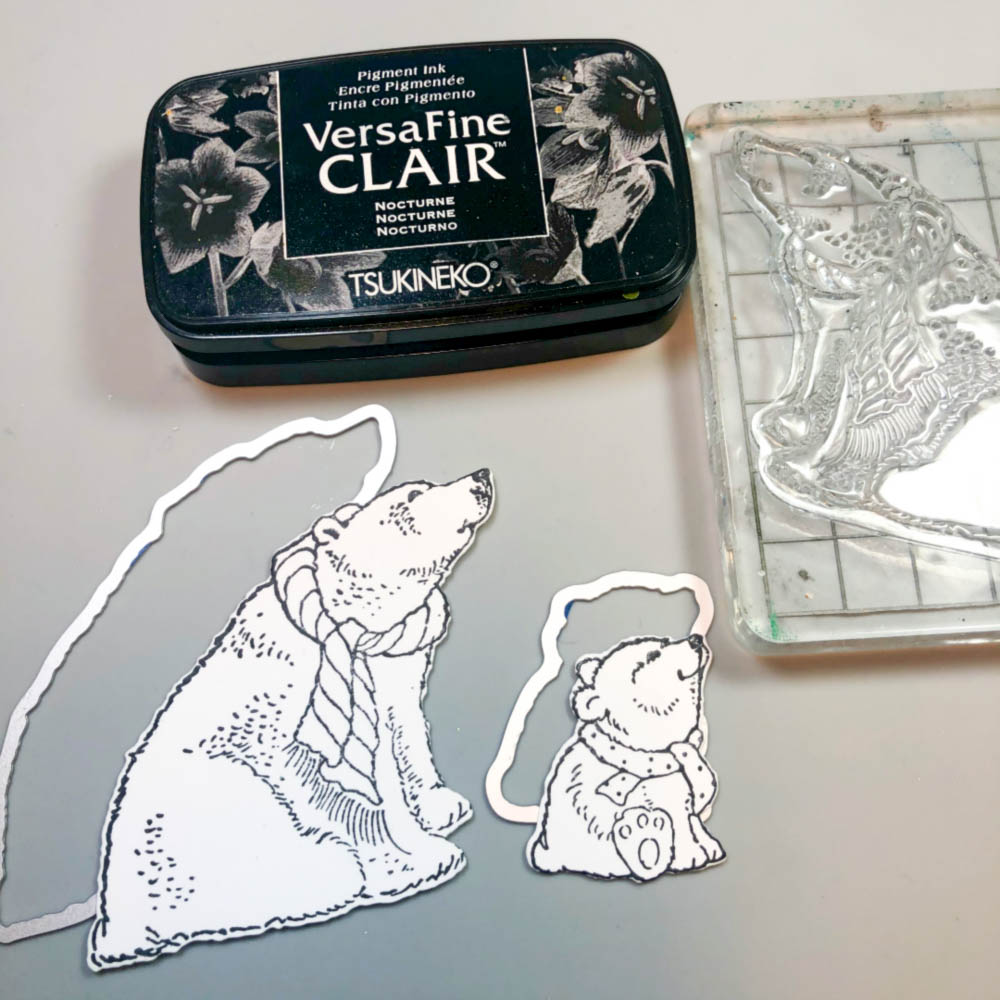
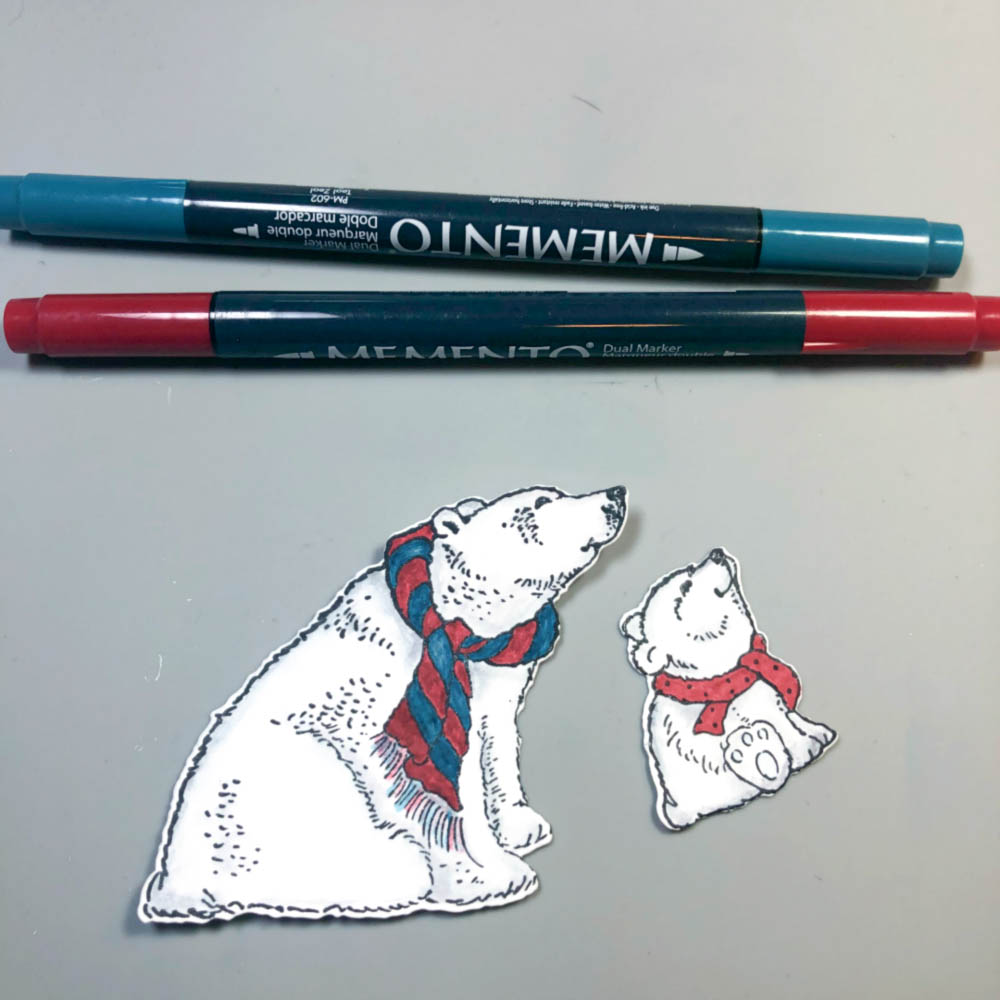
Stamp Polar bear images with VersaFine Clair – Nocturne and cut out with coordinating dies.

Step 7

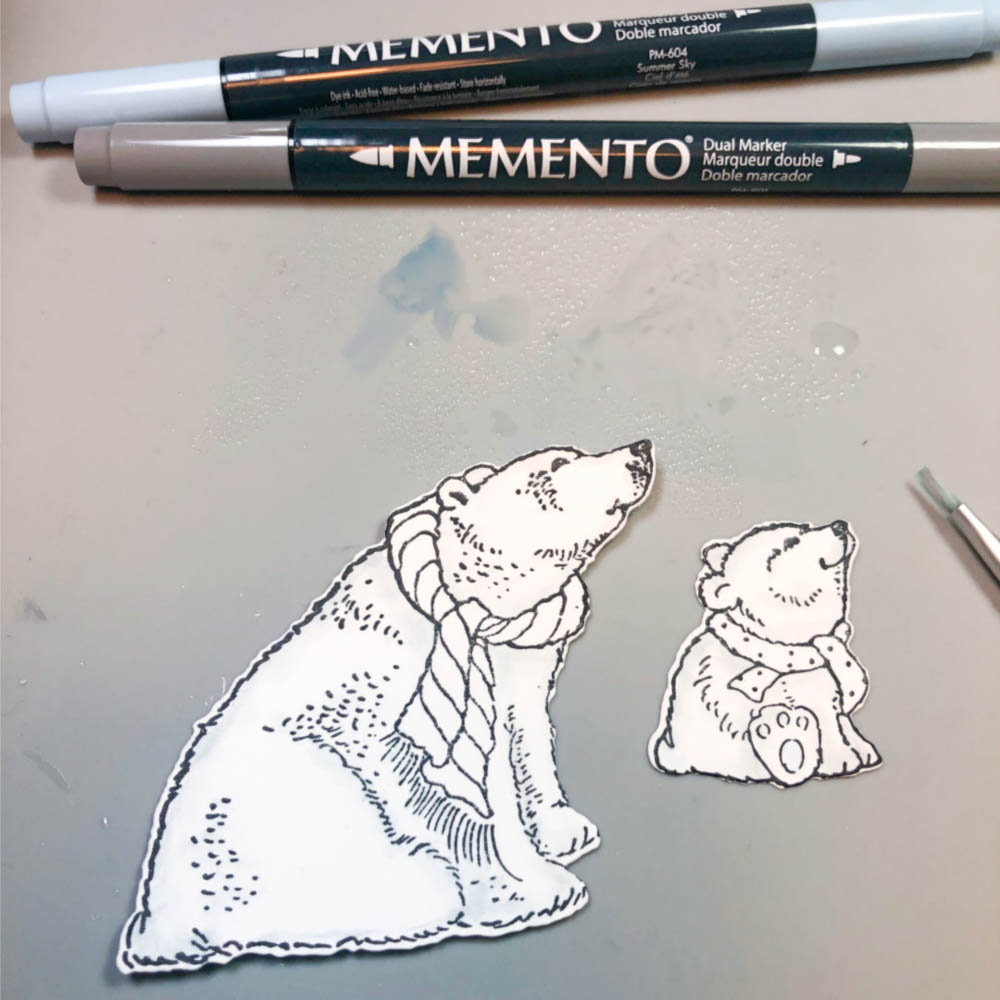
Add color to bears with Memento Dual Markers – Summer Sky, London Fog, Gray Flannel.

Step 8

Add color to scarfs with Memento Dual Makers – Rhubarb Stalk, Teal Zeal.

Step 9

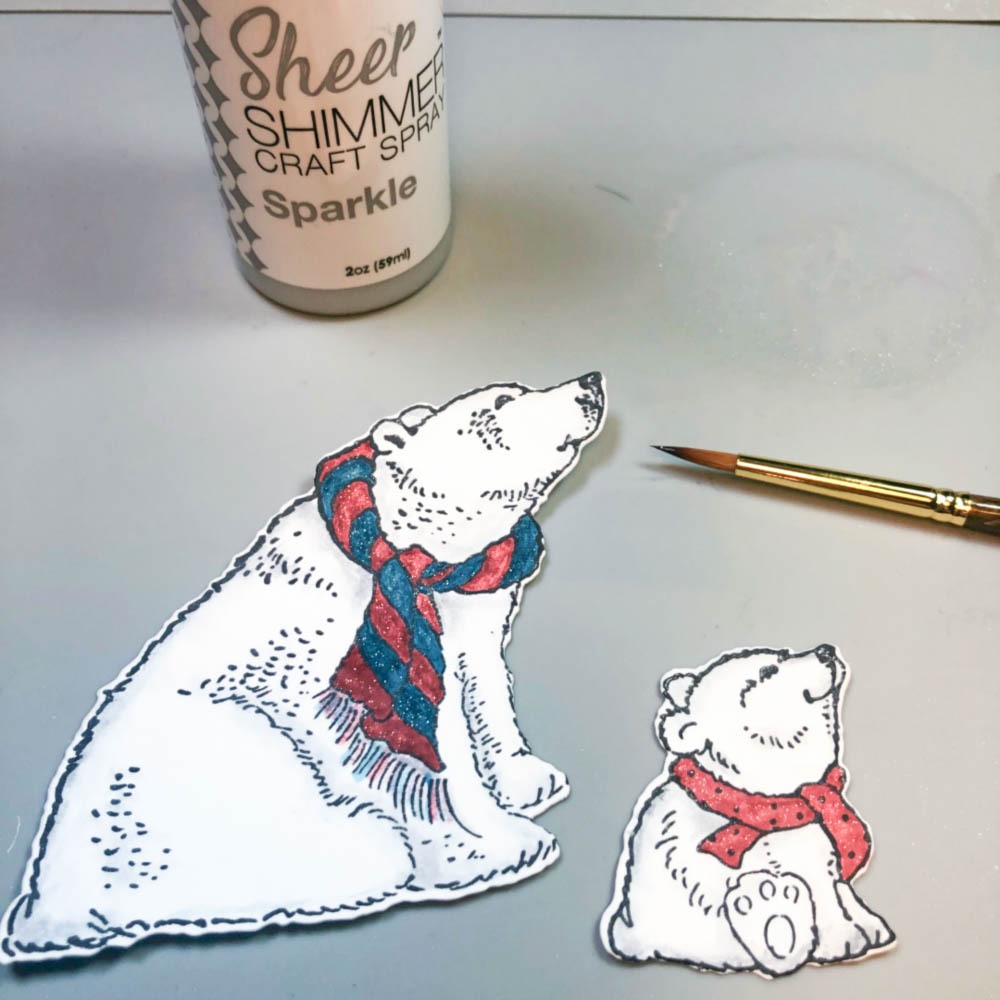
Spray Sheer SHIMMER Spray – Sparkle onto craft matte then use paint brush to apply to scarfs.

Step 10

Stamp saying onto card panel with VersaFine Clair – Nocturne.

Step 11

Adhere card panel to card base.

Step 12

Adhere die cut Polar Bears to card front.

Imagine

Supplies
Other
  • Recollections Clear Stamps – Christmas stamp & die set
  • Sizzix Big Shot
  • White Card Stock

Create a Watercolored Thanks Card with Memento Markers

by Lindsay Adreon

Create a Watercolored Thanks Card with Memento Markers

Sometimes you just need a quick card or even set of cards to give as a gift. This background is the perfect way to create those at this time of year! And all you need is cardstock, painter’s tape, and an ink pad!

Skill: Intermediate
Time: 30 minutes

Directions

Supplies

Imagine
Other
  • Painter’s Tape
  • Paper Trimmer
  • Waffle Flower Nesting Oval Die Set
  • Heffy Doodle Thanks Die

Create a Beautiful Icy Blue Holiday Card

by Kyriakos Pachadiroglou

Create a Beautiful Icy Blue Holiday Card

Although red, green and gold colors are the most representative ones of Christmas, the last couple of years, I am quite fun of blue that combines so nicely with the silver and contrasts the white. Stars are favorite shapes of this season and using Delicata Sapphire Blue on lighter shades of blue, using MEMENTO bahama blue, give more depth on the card.

Skill: Advanced
Time: 30 minutes

Directions


Step 1

Die-cut 3 different sized star shapes.


Step 2

Place the star shapes on a piece of 4×6 card stock and spray first with the Fireworks! Bahama blue and then with Ink Potion No9. Remove the stars and dry the card stock with a heat tool.


Step 3

Lightly cover areas with MEMENTO Bahama blue ink pad.


Step 4

Place the star shapes, white side up, stamp with VersaMark the swirls stamp, cover with Mboss clear embossing powder and heat set.


Step 5

Distress the stars with Delicata Sapphire Blue.


Step 6

Stamp design on the stars, cover with Mboss white embossing powder and heat set. When finished, lightly press the edges of the stars on the VersaMark watermark ink pad, and heat set Mboss silver embossing powder.


Step 7

Set the card stock piece on the card with Tear It! Tape and start placing the ribbon.


Step 8

Continue adding the stars and the rest of the embellishments

Supplies

Imagine
Other
  • Star shape dies
  • Metal stars and beads
  • Mesh ribbon
  • Heat tool
  • Hot glue gun
  • White card stock
  • Viva decor – Peacock feather stamp set

Simple Candy Cane Backgrounds with Memento Ink

by Lindsay Adreon

Sometimes you just need a quick card or even a set of cards to give as a gift. This background is the perfect way to create those at this time of year! And all you need is cardstock, painter’s tape, and an ink pad!

Skill: Intermediate
Time: 15 minutes

Directions

Supplies

Imagine
Other
  • Painter’s Tape
  • Paper Trimmer
  • Waffle Flower Nesting Oval Die Set
  • Heffy Doodle Thanks Die

Happy Holidays! Get Ready with some classic projects!

Happy Holidays everyone! We hope the Holiday and Christmas season is treating you all well. We are excited about what the holidays bring and all the crafting inspiration that comes with it. Be on the lookout for our tutorials featuring holiday cards, ornaments and wrapping paper as well as the announcement for our 2020 Design Team.

Some of the Must-Haves inks for the holidays include VersaFine Clair in Nocturne, Sheer Shimmer in Sparkle and Frost, and the color of your choice in VersaColor or Memento inks. Be sure to head over to these shop pages and check out our selection.

Since we cannot post all the cards for December right away and fast forward through the month to all the good stuff, we thought we would do a recap of some of our favorite cards and holiday crafts. See these projects on the Make section of our website. Click on Season and then on the Christmas link to browse through more!

warm winter wishes

This simple Mason Jar Holiday Card by Arjita Singh shows a lovely rustic winter effect. See more on the Make section >

Create light-up holiday houses with Jennifer Vanderbeek. See the full tutorial on Make Section >

Dress up a kraft cookie bag with a star stamp and embossing powder. See the full tutorial on the Make section >

And if you do not know where to begin then try a very easy Christmas card featuring VersaFine Clair. Beginner Guide on Make section >

Use StazOn Pigment in Snowflake to Create Christmas Gift Tags

by Elina Stromberg

Use StazOn Pigment in Snowflake to Create Christmas Gift Tags

Very soon it is the time of the year again when we start wrapping Christmas gifts for our loved ones. A handmade gift tag makes the present even more special; it delivers a heartfelt message that the receiver is important to you. These adorable Christmas penguins by Joy Clair are the perfect addition to your personalized message. Just start by punching a pile of tags from leftover cardstock pieces, and soon you will have a pile of gift tags ready to spread out the Christmas feeling to your friends and family!

Skill: Beginner/Intermediate
Time: 1 hour

Directions


Step 1

Punch or hand-cut gift tags from light blue cardstock.

Stamp a snowy hill shape on each tag using white StazOn Pigment ink.
Step 2

Cut a wave shape from fun foam. Attach to an acrylic block using double-sided tape. Stamp a snowy hill shape on each tag using white StazOn Pigment ink.

Stamp Christmas penguins on white paper with black ink
Step 3

Stamp Christmas penguins on white paper with black ink. Color with markers or color pencils. Cut around the edges. To make the fuzzy cutting quick and easy you can cut out the little details on the wings and feet; those parts will be re-stamped later on the tag background.


Step 4

Stamp the penguins on the tags using black VersaFine Clair.


Step 5

Glue the fuzzy cut images on the tags, aligning the fuzzy cut and stamped penguin images. Decorate with a white gel pen.

Supplies

Imagine

StāzOn Pigment – Snowflake
Memento – Tuxedo Black
VersaFine Clair – Nocturne
Craft Mat

Other

• Joy Clair Stamps – Christmas Penguin
• Fiskars Tag punch
• Cardstock in light blue
• Piece of fun foam
• Double-sided tape. Glue
• Acrylic markers
• White gel pen
• Acrylic block for stamping
• Scissors