Use a Stencil Background to Create Artists Trading Cards

by Elina Stromberg

Use a Stencil Background to Create Artists Trading Cards

For me, crafting is my way to unwind and to relax. Sometimes I feel that I need to start crafting, but I don’t necessarily have a specific project in mind. The solution is to create background pages for later use. For making background pages, I take out a few white blank papers, my favorite inks or paints, stencils, and stamps, and I’m good to go. There are no strict rules to follow so I often start with the light colors, move towards the darker shades, and whenever I encounter issues I drop my original idea and jump over to plan B or C. If the result is a total catastrophe I throw away the page and start all over. For me, the end result is not as important as the pleasure the creative process gives me.

Skill: Beginner
Time: 1 hour

Directions


Step 1

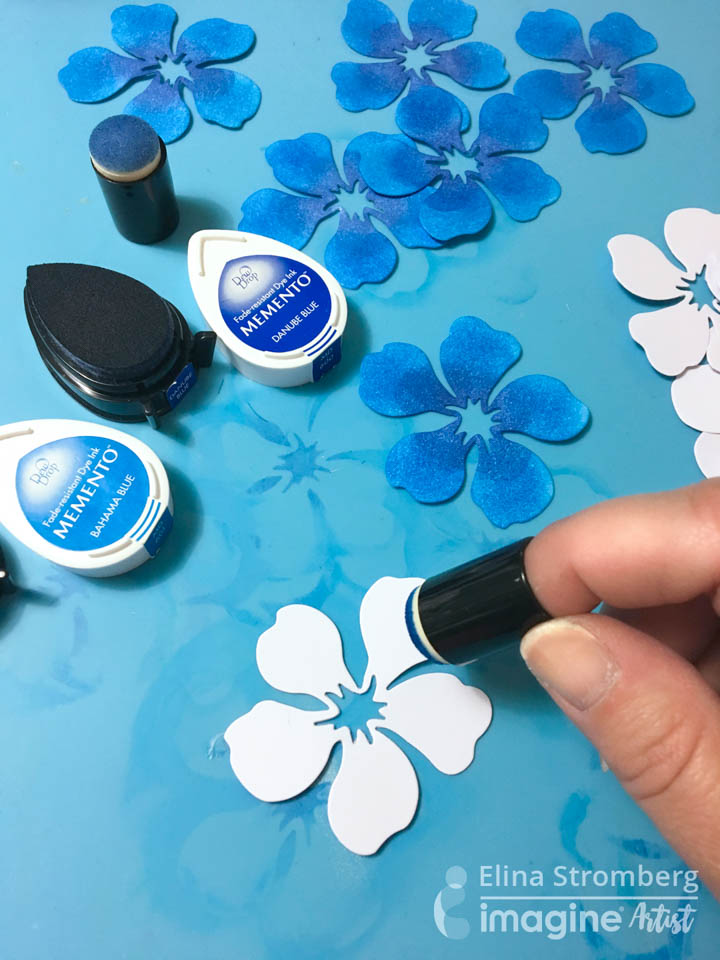
On this background page, I started with inking the white paper with a light green color of Memento in New Sprout. I applied the ink directly from the ink pad on the paper, using the Dew Drop ink pad and a soft circular motion. If I had used a larger ink pad I would have used a brayer or a Jumbo Dauber for coloring the page.


Step 2

Then I used a darker green ink color of Memento in Bamboo Leaves and a Sponge Dauber to stencil a pattern on the page. Once finished, I splashed water on the page, letting the water-soluble ink react with the water before drying the page with my heat gun. Love those splash marks!


Step 3

Then I used another stencil and a bit darker green ink and added smaller patterns on the page. Just a hint here and there will do the trick!


Step 4

Adding a hint of both white and black is always a good idea. Those will refresh the page and make the other colors pop. I stamped some black text patterns on the page and added white color with a gel pen. I think it did the trick I was looking for!


Step 4

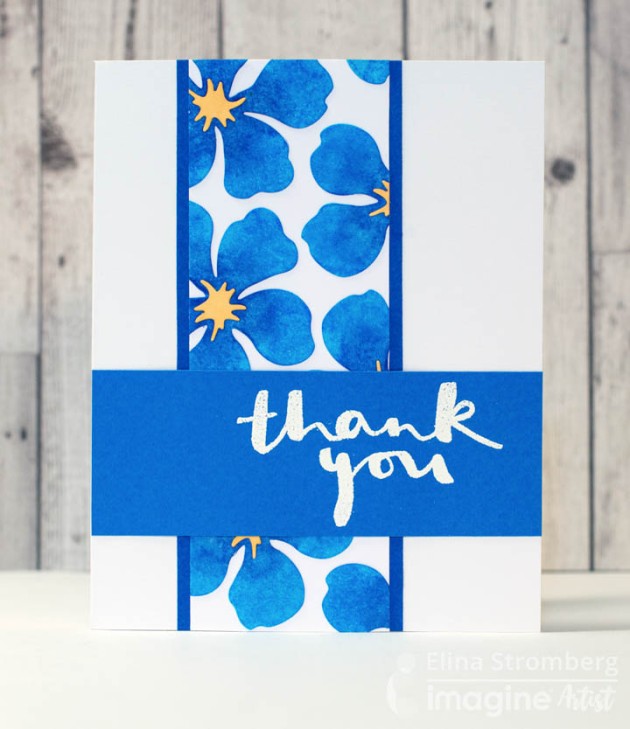
In the end, I had two almost identical decorated papers. I cut a few ATC card backgrounds and used a piece of the patterned paper for a background for a die-cut card.

I think that the stenciled backgrounds look good on my ATC’s!

Supplies

Imagine

Other

  • Mixed Media Paper – White
  • Cardstock – Green, Yellow, Orange
  • Card base – White
  • Pronty – Leaf Stencils
  • Carabelle Studio – Dots
  • 13Arts – Triangles
  • Heat gun
  • Katzelkraft – Dog stamps
  • Wycinanka – Text pattern stamp
  • Sizzix – Bird stencil, Oval stencil
  • Alcohol markers
  • Glue
  • Double-sided tape
  • Gel pen – White

Learn How to Make Quick and Easy Lavender Sachets

by Roni Johnson

Learn How to Make Quick and Easy Lavender Sachets with Fabrico Markers

Imagine’s Color of the Month for August is Lavender so I decided to create this lovely little “No-Sew” lavender sachet. This is a quick and easy project and with the help of Fabrico Markers and a bit of Tear It Tape, you can have a pile of these little goodies to use and to share.

Skill: Intermediate
Time: 30 minutes

Directions


Step 1

Cut cotton fabric to the desired size. Iron the material into a square. If desired add a flap at the top to create an “envelope”.


Step 2

Use Fabrico Markers to color directly onto the rubber stamp.


Step 3

Press the inked stamp onto the fabric. Use a hot iron to set the inks by running the iron over the stamped image 30 seconds.


Step 4

Open the fabric up and affix strips of Tear It! Tape to the edges of the fabric as shown. An extra piece was added on the flap to hold it closed as well.


Step 5

Remove the liner from the tape and carefully place a small pile of lavender in the center of the fabric. Fold the front of the sachet over and press the edges together to secure. Remove the tape from the flap and secure.

Supplies

Imagine
Other
  • Club Scrap – Lavender Stamps
  • Cotton Fabric
  • Iron

Learn to Emboss with a Stencil

by Martha Lucia Gomez

Purple and lavender Hello Friend handmade card featuring Memento Inks by Tsukineko available from Imagine.

Hello Fellow Crafters! Today, I am sharing some of my favorite stencil techniques with you! Layering stencils are trending now and we can create beautiful designs and make techniques with the different patterns. I am sharing an all textured card with a “Hello Friend” greeting. This month our challenge is stencils and the Color of the Month is Lavender.

Skill: Intermediate
Time: 30 minutes

Directions


Step 1

Select the color of cardstock and the stencils that you want to use. I am using Wisteria Wonder cardstock and the Layering Dahlia A & B Bundle Stencil from Altenew. Use the layers with different colors of ink. In my sample, I am using Memento Ink in Lulu Lavender and Grape Jelly. Apply the soft color on the stencil with more free areas and the dark color on the detailed stencil. To create the first layer of texture, place the stencil over the stenciled layer in the corresponding place.


Step 2

Create a special sandwich on your big shot to make the embossing. Remember that the pressures of cutting machines are different so you need to test and listen to your version. In my big shot the correct sandwich is:

  • Closed Platform
  • Rubber Pad
  • A piece of cardstock (shim)
  • Stenciled card layer
  • Stencil
  • Embossing Plate

Paste the ensemble sandwich easily through your die cut machine to emboss the stencil design and voila, you will have the first textured.


Step 3

Now it’s time to create the traditional embossing over your card. To make this I am using a Stencil Word from Jillibean Soup. Secure the stencil over the stenciled layer. Apply VersaMark directly with the ink pad over the “Hello”. Remove the stencil and cover the stamped word with Embossing Powder in White. Melt the powder with the heat tool. Paste the stenciled layer over a whisper white card base. Stamp a complement of the word and paste it over the card with On Point Glue.

Supplies

Imagine
Other
  • Altenew – Layering Dahlia A & B Bundle Stencil
  • Hampton Art – Hello stencil from Jillibean Soup
  • Big Shot – Rubber Mat
  • Glue Dots
  • Cardstock – Wisteria Wonder, Whisper White
  • Big Shot Die Machine
  • Masking Tape

Create Two Matching Cards with One Stencil Application

by Kassy Tousignant

Create Two Matching Cards with One Stencil Application

Stencils and Fireworks Shimmery Craft Spray are a match made in heaven! Stencils can be used in so many different ways and here I show you a cool technique to get more use out of your stencils and maybe see them in a different way. I was able to make two cards rather quickly with one ink application.

Supplies

Imagine

Fireworks Shimmery Craft Spray – Grape Jelly
GooseBumps – Sparkle
Creative Medium – Clear
Tear It! Tape
IrRESISTible Pico Embellisher -Tuxedo Black

Other

• Carabelle Studio – stencil
• Prima – Black gesso, Flowers
• Nuvo – Crystal drops
• Fine jute string
• Creative Embellishments – chipboard frames
• Glue Dots
• Cardbase

Make a Faux Batik Prints with GooseBumps Texture Spray

by Arjita Sepaha Singh

Make a Faux Batik Prints with GooseBumps Texture Spray + Fireworks Shimmery Craft Spray

Batik is a technique of wax-resist dyeing applied to whole cloth this technique originated in Indonesia. I tried to mimic the batik effect using Goose Bumps Dauber and used it to create a resist. I used a leaf stamp and dabbed it with GooseBumps and created an impression on white paper. Then I added firework sprays to get the beautiful green background. I also heat embossed some leaves on vellum and adhered them on to the card to finish it.

Supplies

Imagine
Other

Create a Bright and Fun High Contrast Card Design

by Elina Stromberg

Create a Bright and Fun High Contrast Card Design

Best summer craft projects are fun and easy to make. On a sunny summer day, you don’t want to spend time in collecting a large number of tools and materials, but rather create something beautiful quickly, using just a few basic supplies you’ll always have at hand.

Skill: Beginner
Time: 30 minutes per card

Directions


Step 1

For these flower cards, you first create your own patterned paper using repeated floral images and your favorite ink colors. Then you decorate the front of your card with a panel cut from the self-made patterned paper, add a stamped sentiment on top, and your card is ready! Isn’t that just the perfect recipe for a summer day craft project!


Step 2

Using white cardstock, die-cut, punch, or free-cut with scissors a pile of flowers. Color the flowers with your favorite ink colors. For these sample cards, I used two blue Memento inks: Bahama Blue and Danube Blue. If you want to let the ink colors mix, mist the flowers with water and let dry.


Step 3

If your flowers have separate centerpieces, color them, too. Glue the inked flowers on a piece of white cardstock. Leave some white space between the flowers. Let dry.


Step 4

Using scissors or a paper trimmer cut a panel from the decorated flower paper. Mat the panel on a piece of matching color cardstock, and glue on the card front. Stamp “Thank You” or “Hello” with VersaMark and heat emboss sentiment on a piece of solid color cardstock. Glue panel on a card front.


Supplies

Imagine

Other

  • Scissors
  • Paper trimmer
  • Glue
  • StudioCalico – ‘Thank You’ stamp
  • Sizzix – ‘Hello my Friend’ stamp, Floral die
  • Cardstock – Dark Blue, White
  • Cardbase – White