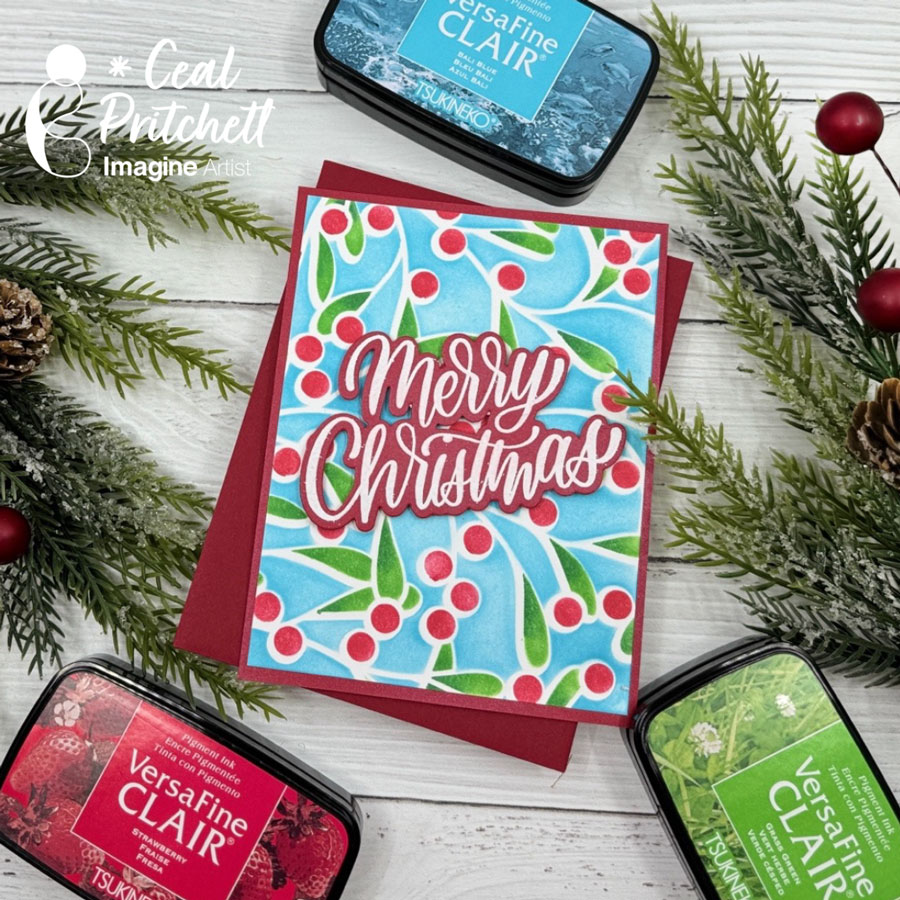
Hello crafty friends! Today I am sharing how to create this stenciled Christmas card that would be a quick and easy card to make multiples of.
Skill Level: Beginner Time: 15 to 20 minutes
Directions:
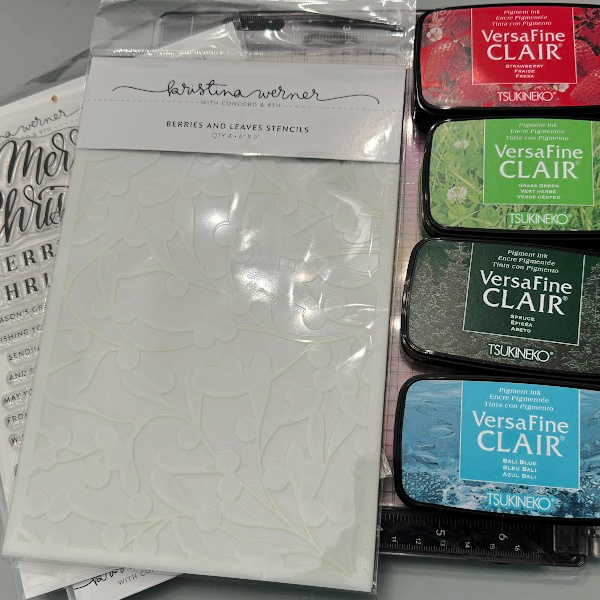
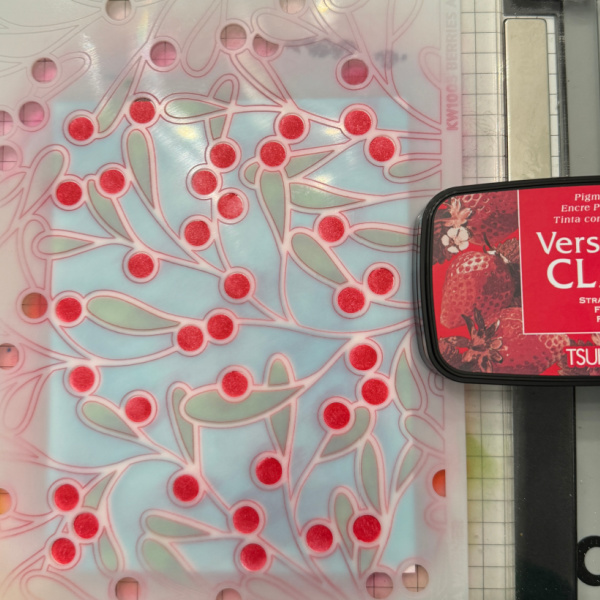
Gather your supplies. You will need several colors of ink; I used a nontraditional color along with the red and green. You will also need Layering stencils, some VersaMark ink, embossing powder and a die cut machine.
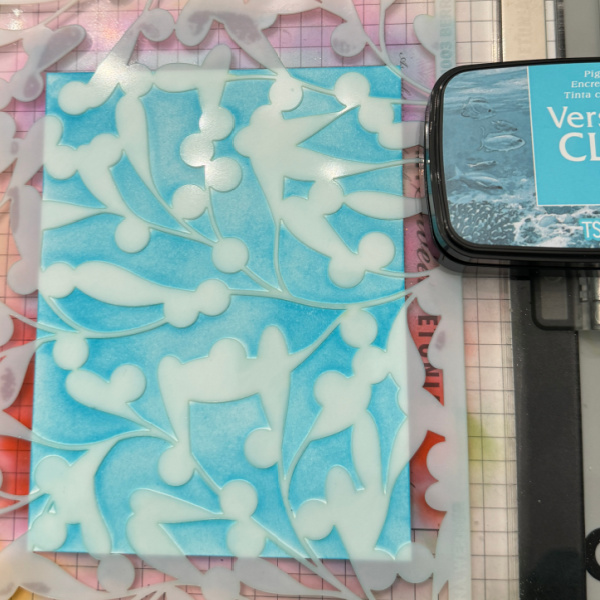
Step 1: Using a grip mat or other sticky mat to hold your panel of white cardstock. Lay you stencil over the panel and ink blend the background color.
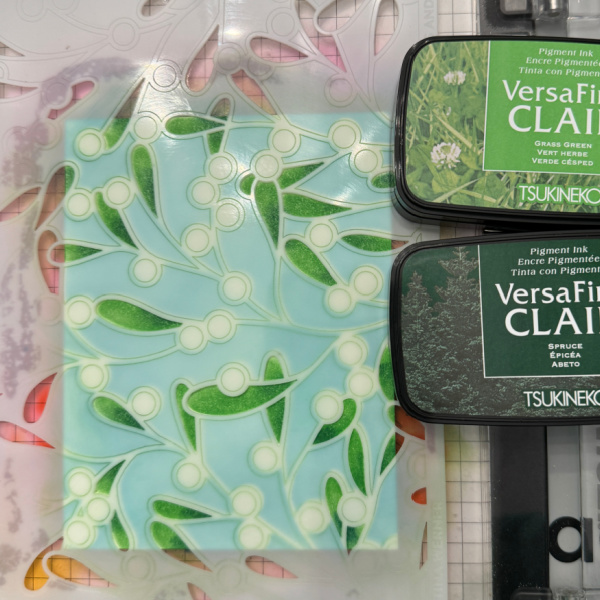
Step 2: Remove the first stencil and place the next stencil over the panel and apply the next color. Since the second stencil is leaves, I used two different colors of green.
Step 3: Remove the second stencil and lay the next stencil over your panel and apply the next color. With it being berries I used our new color strawberry with is perfect for berries.
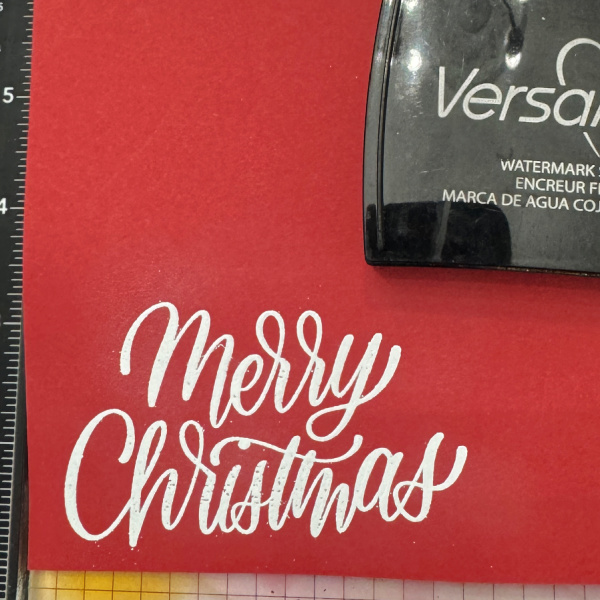
Step 4: Stamp the greeting in VersaMark ink and emboss with white powder. Die cut it out with coordinating die and assemble the card.
Other Products: Neenah Classic Crest Solar White 120lb – CutCardStock Neenah Classic Crest Solar White 80lb – CutcardStock Poppy Cardstock – PaperTrey Ink White Embossing Powder – Hero Arts Merry Christmas Stamp – Kristina Werner C9 Merry Christmas Die – Kristina Werner C9 Misti Stamping Tool – My Sweet Petunia Grip Mat – Waffle Flower crafts
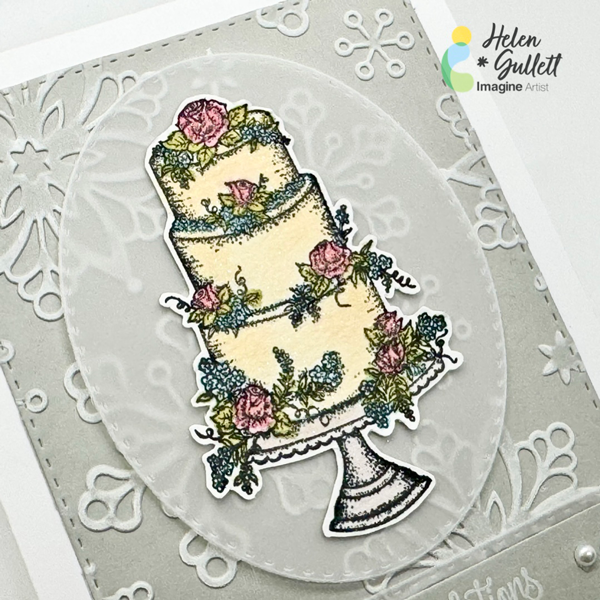
Today, I want to share with you this Winter theme wedding card that you can make to have it ready in your handmade card stash.
Skill: Intermediate Time: 15-20 minutes
Direction:
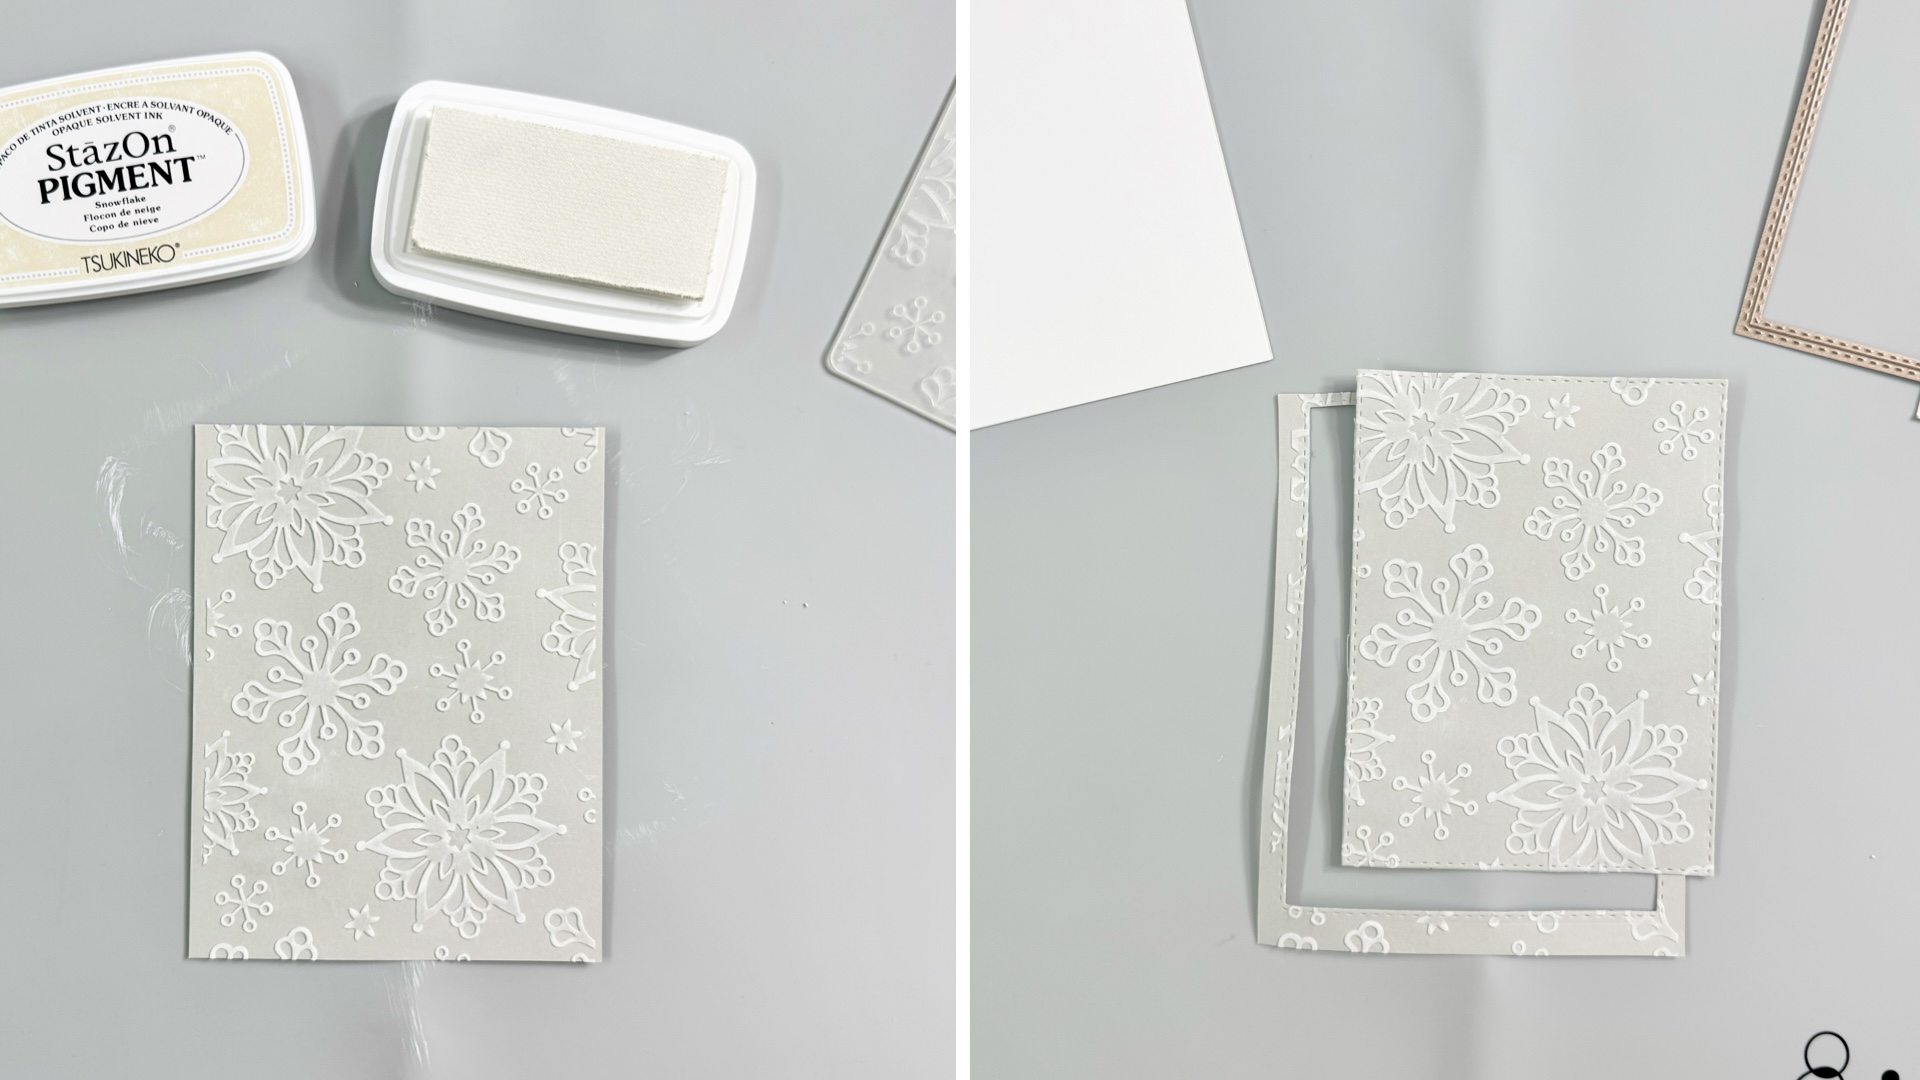
Step 1 Cut out a piece of light gray cardstock into 4.25 inch x 5.5 inch. Run it through your embossing machine with the snowflake embossing folder. Lightly rub the StazOn Pigment ink up on top of the embossed cardstock to add the white color on the snowflake. Since it is pigment ink, the ink will take a longer time to dry so you can use a craft heat gun to dry the ink. Cut it with one of the Double Stitched Rectangle Dies.
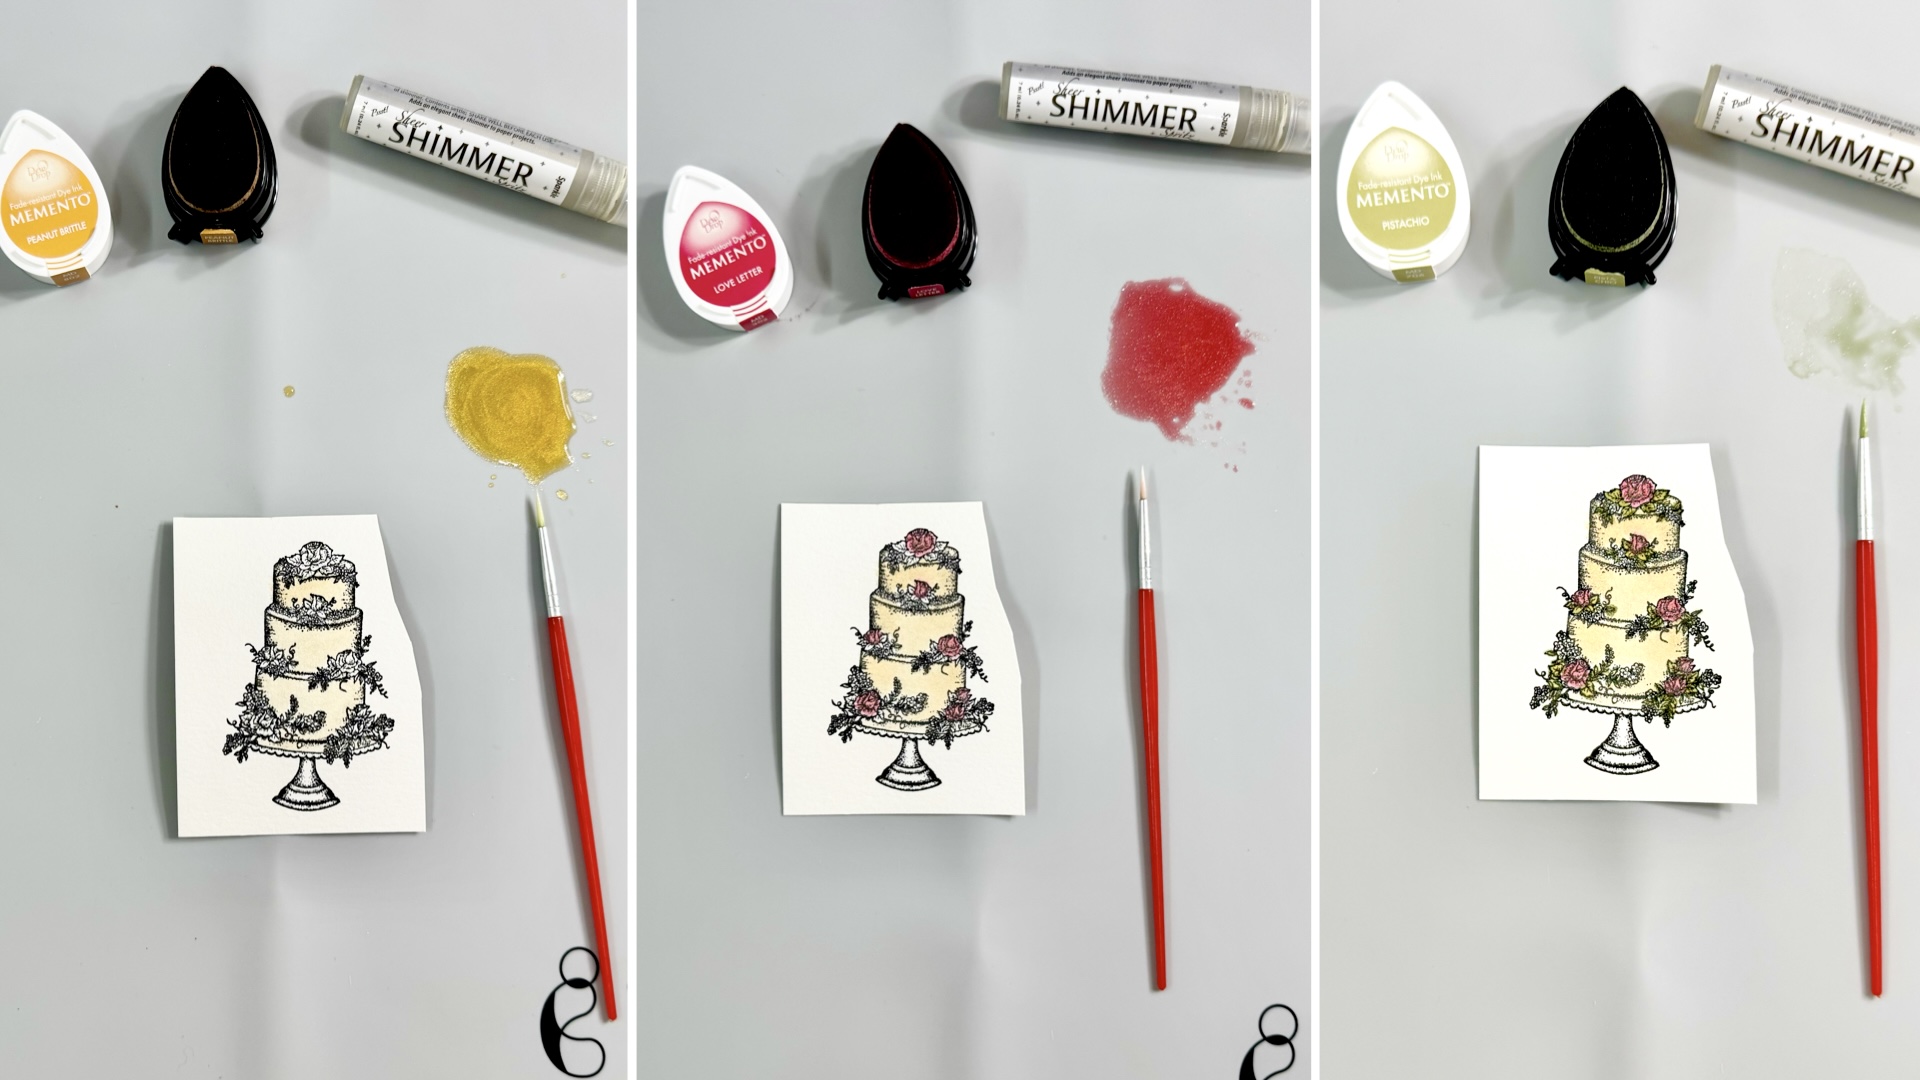
Step 2 Stamp the wedding cake image on a piece of watercolor cardstock with VersaFine Clair Nocturne ink using a stamping tool. I stamped the image twice to get a bolder print on it. Memento Dew Drop and Sheer Shimmer Sparkle to create sparkle watercolor paint. Dab the ink on the craft mat and add some of the sheer shimmer, mix together. First paint the cake with the Peanut Brittle ink. Dry the watercolor paint with a craft heat gun after painting. Next, color the flowers with the Love Letter ink. Dry the watercolor paint with a craft heat gun after painting. Then, color the leaves with the Pistachio ink. Dry the watercolor paint with a craft heat gun after painting.
Step 3 Then color the berries and other branches with the Teal Zeal ink. Dry the watercolor paint with a craft heat gun after painting. Last, color the base stand with the Gray Flannel ink. Dry the watercolor paint with a craft heat gun after painting. Fussy cut the wedding cake with micro-tip scissors.
Step 4 Cut out a piece of vellum paper with one of the double stitched oval dies and one of the double stitched pennant flag dies. Stamp the sentiment on a piece of gray cardstock with StazOn Pigment Snowflake ink pad using the stamping tool. Cut the sentiment with the smaller size of the double stitched pennant flat dies that match with the vellum.
Step 5 Add the embossed background to the card base with Tear It! Tape. Add the wedding cake on the oval vellum with some of the On Point Glue, then add them to the card with some of the Tear It! Tape. Stack the vellum pennant and sentiment pennant together using some of the Tear It! Tape and add them at the bottom of the cake with the same tape. Embellish the card with some of the white gems using the On Point Glue.
I wish I could capture the sparkle glitter watercolor paint on the cake with my camera. But I love how this Winter theme wedding card turned out, and hopefully you will like it too!
Thank you for stopping by our blog today. Have a fabulous day!
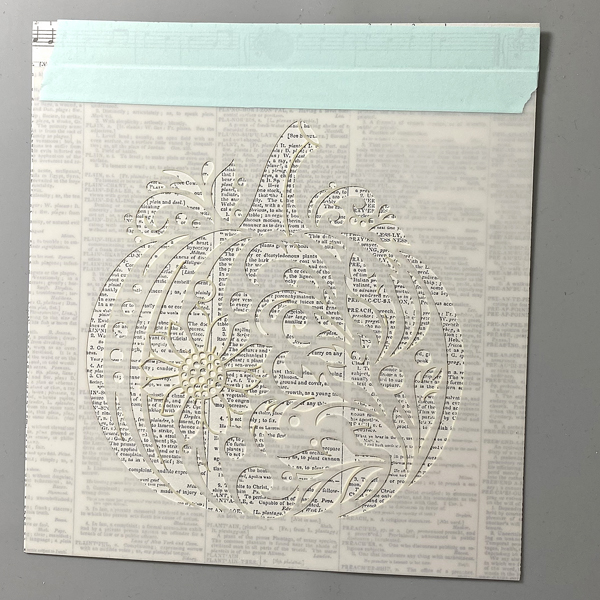
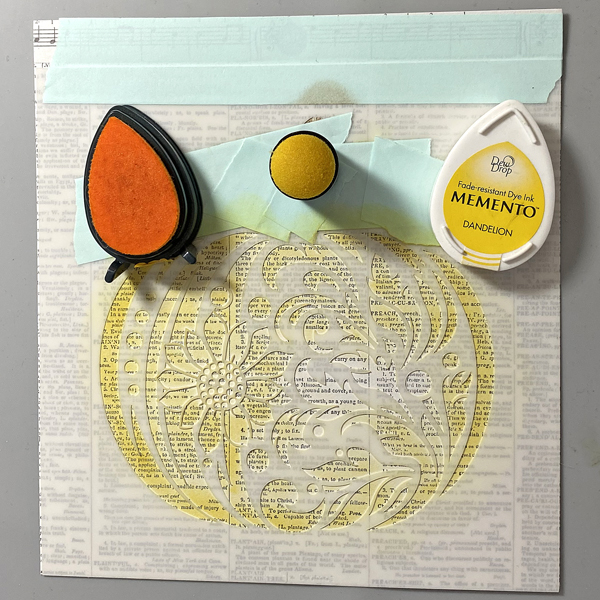
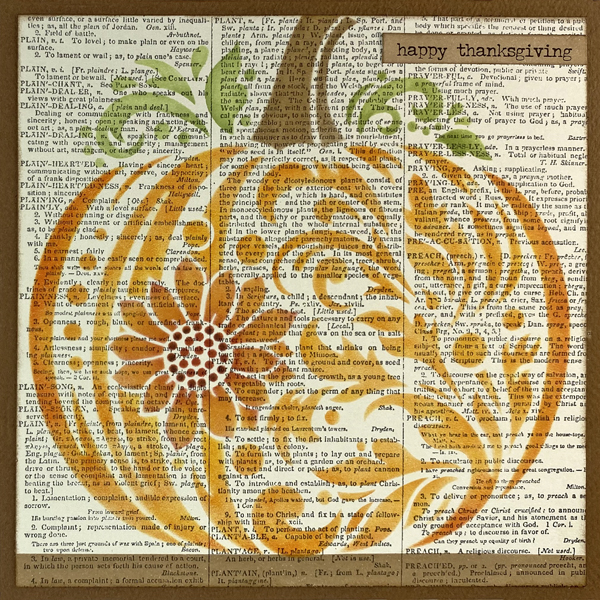
Here’s a quick and easy Thanksgiving card using a beautiful pumpkin stencil, Memento Dew Drop Inks, and a sticker!
Skill Level: Beginner Time: 45 minutes
Instructions:
Step 1: Use low-tack tape to adhere the Pumpkin Flourish stencil to the top of a piece of text cardstock and the craft mat. Run a stylus tool along the tape seam between the stencil and the cardstock to create a hinge so that you can pick up the stencil to check out ink coverage.
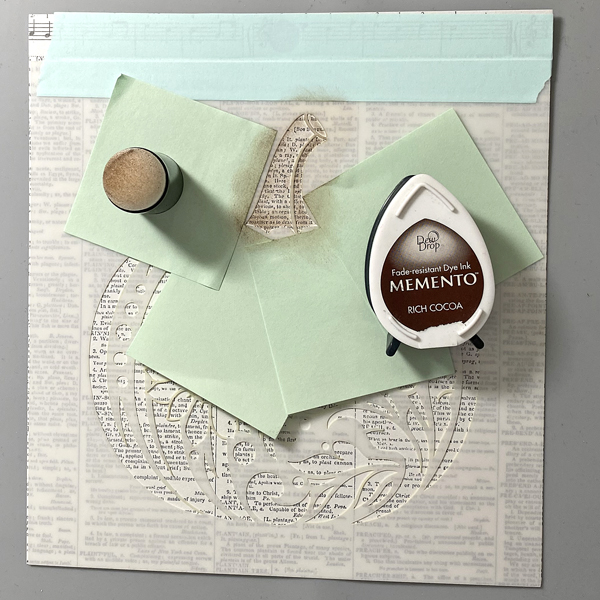
Step 2: Use Post-It Notes to cover the leaves and the pumpkin on the Pumpkin Flourish stencil. Use a Sponge Dauber to apply Rich Cocoa Memento Ink along the edges of the pumpkin’s stem onto the text paper. Use another Sponge Dauber to apply Toffee Crunch Memento Ink over the Rich Cocoa Ink and onto the rest of the stem.
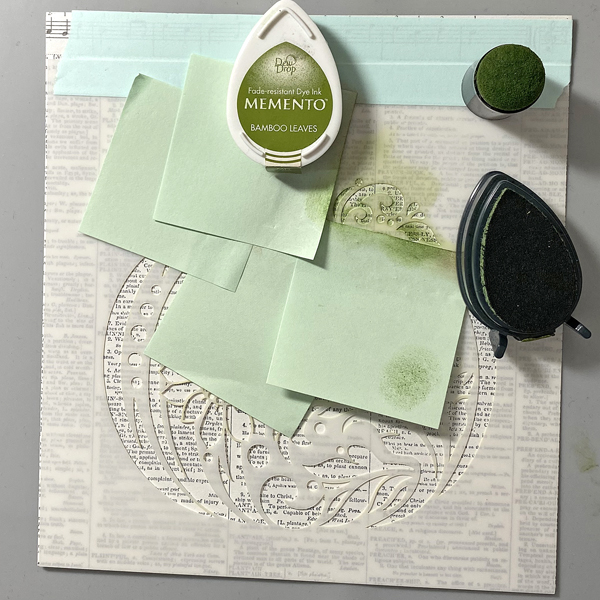
Step 3: Use Post-It Notes to cover the stem and the pumpkin on the Pumpkin Flourish stencil. Use a Sponge Dauber to apply Bamboo Leaves Memento Ink around the outside of the leaf flourishes on the stencil onto the text paper. Use another Sponge Dauber to apply New Sprout Memento Ink fill in the open areas of the leaf flourishes on the stencil.
Step 4: Use Post-It Notes to cover the stem and the stem on the Pumpkin Flourish stencil. Use a Sponge Dauber to apply Dandelion Memento Ink over the pumpkin area of the stencil onto the text paper.
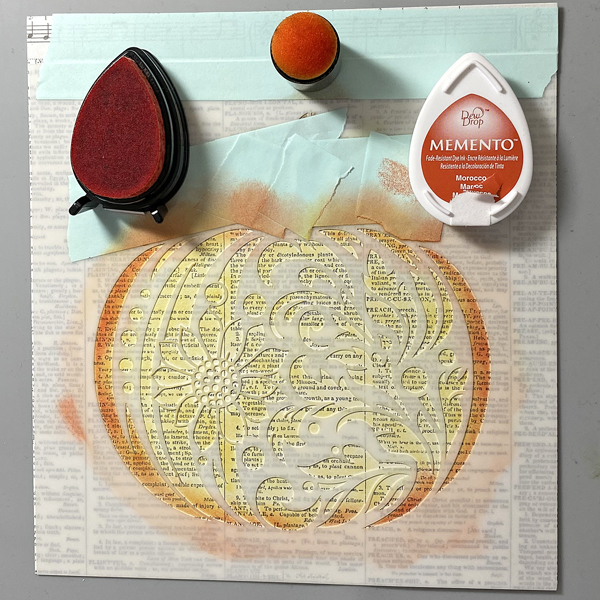
Step 5: Use a Sponge Dauber to apply Morocco Memento Ink over the outside edges of the pumpkin stencil onto the text paper. Working from the outside of the pumpkin stencil towards the center of the pumpkin stencil, use separate Sponge Daubers to apply Tangelo Memento Ink, then Canteloupe Memento Ink over the stencil onto the text paper.
Step 6: Use a Fantastix to apply Rhubarb Stalk Memento Ink over the flower on the stencil onto the text paper. Apply the ink more heavily on the outer and inner edges of the flower stencil. Apply the Rhubarb Stalk Memento Ink very heavily on the center of the flower. Use a second Fantastix to apply Elderberry Memento Ink to the outer dot circle in the center of the flower stencil.
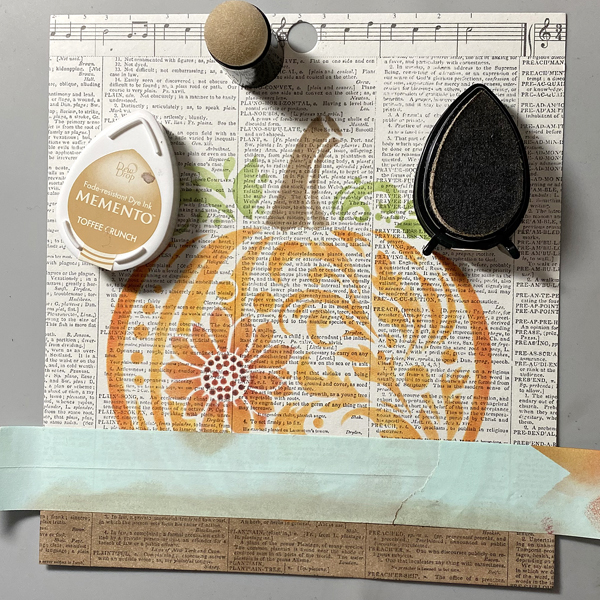
Step 7: Remove the low-tack tape and the stencil from the panel. Position a piece of low-tack tape horizontally across the bottom of the image panel right below the stenciled pumpkin. Use Sponge Daubers to apply Rich Cocoa and Toffee Crunch Memento Inks over the tape and onto the text paper.
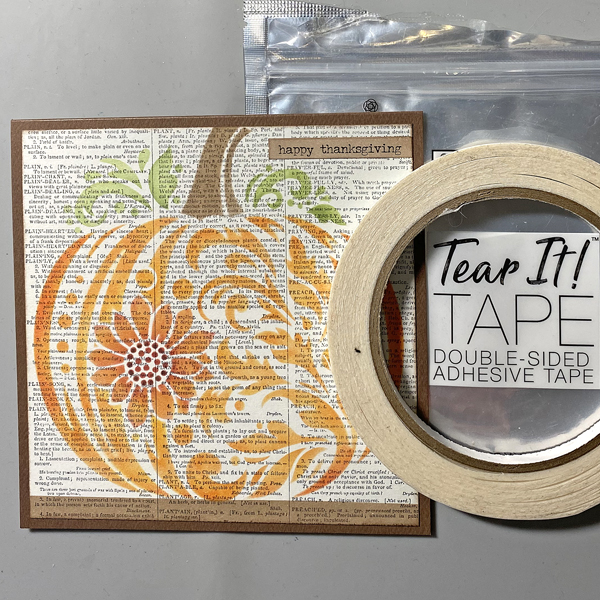
Use the Rich Cocoa Memento Ink and its Sponge Dauber to tint a “Happy Thanksgiving” Idea-ology Small Talk-Occasion sticker. Trim the image panel to 4.75” square, edge with the Rich Cocoa Memento Ink, and adhere the sentiment sticker to the upper right of the image panel.
Step 8: Use Tear It! Tape to adhere the layers of the card.
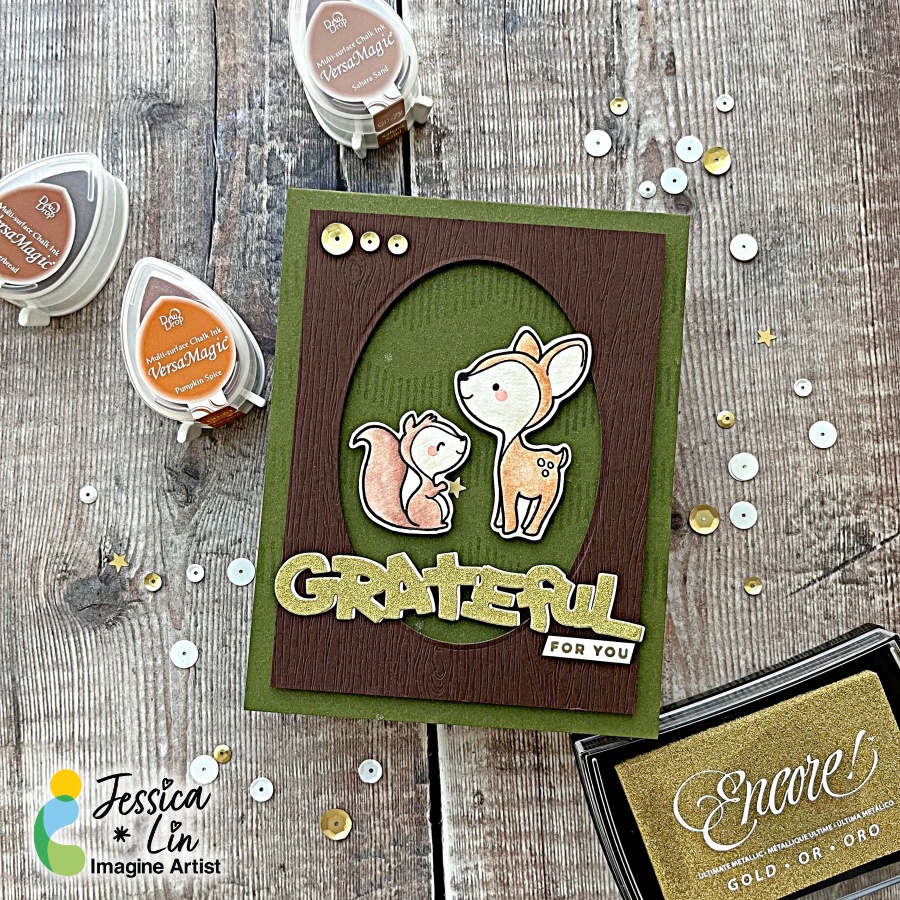
Hi everyone! It’s Jessica here and welcome back to another card tutorial. Thanksgiving is coming up and I love to make cards to express my gratitude! Today I’m also watercoloring with various ink pads from the VersaMagic, Brilliance and Delicata ink lines. Let’s begin!
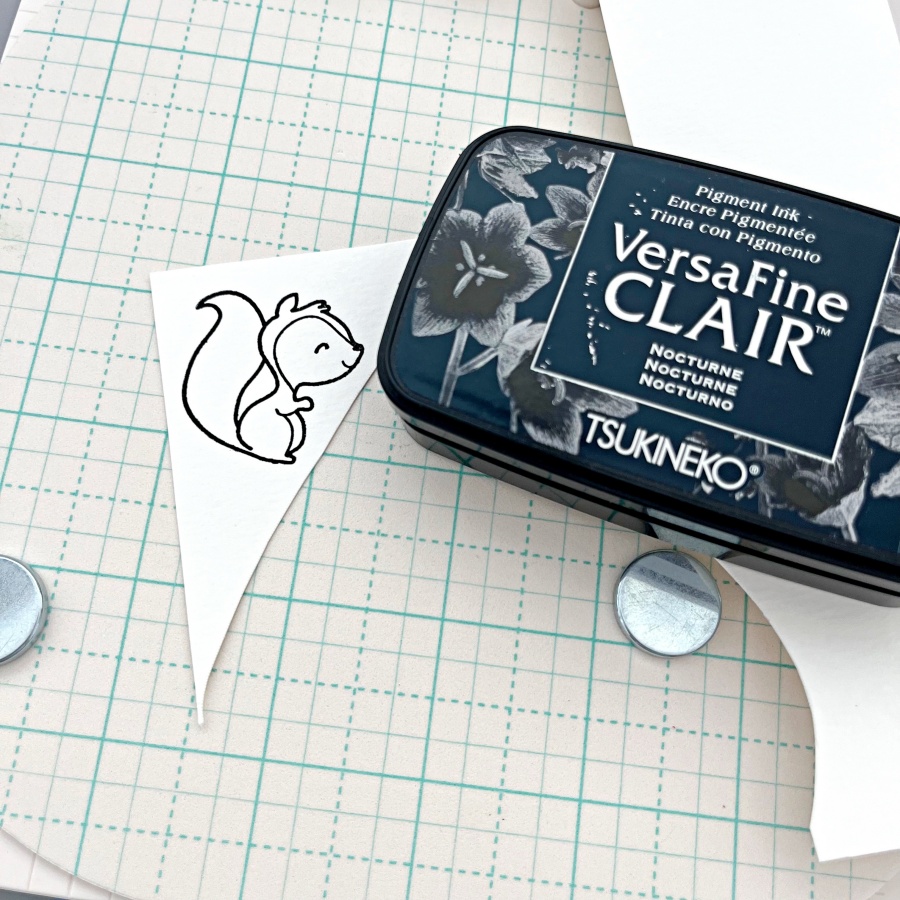
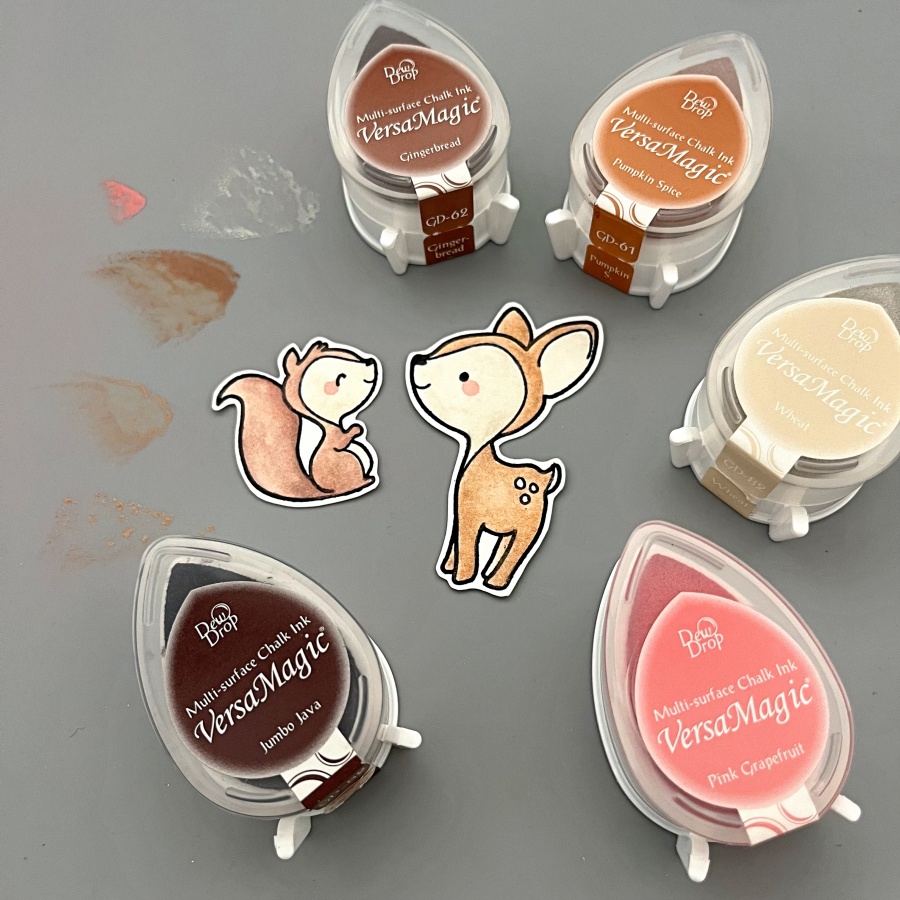
Step 1: Stamp the critter images from The Greeting Farm Wood Friends stamp set with VersaFine Clair Nocturne ink. This is my favorite black ink for stamping and it’s perfect for watercoloring.
Step 2: Color the images with VersaMagic inks. I used Gingerbread, Pumpkin Spice and Wheat for the deer, and to add some shimmer and shine, I watercolored a layer of Celestial Copper from the Delicata ink line. For the squirrel, I used Sahara Sand and Jumbo Java as the base color and added Cosmic Copper Brilliance ink as an accent. VersaMagic, Delicata, and Brilliance ink pads are all pigment inks and I love that you can mix and match the colors for maximum creativity. For the final touch, I added small amounts of Pink Grapefruit to create their rosy cheeks.
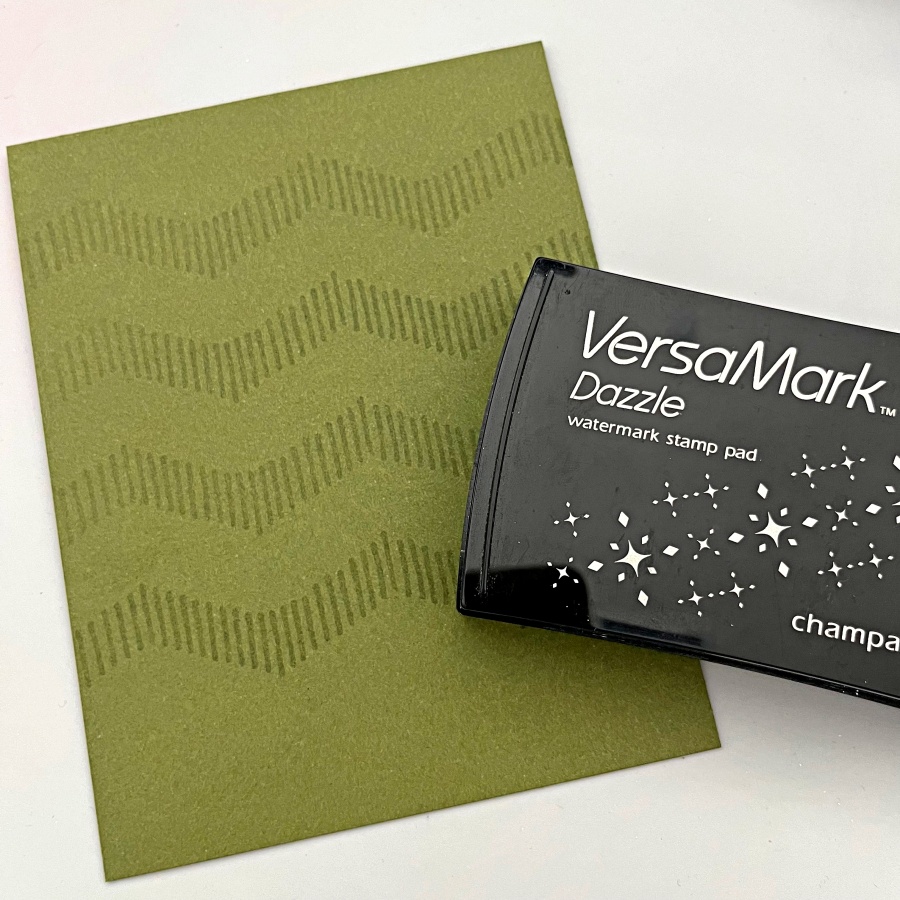
Step 3: I decided to use Stampin’ Up!’s Mossy Meadow cardstock as the cardbase since it’s a nice foresty color. I also stamped some geometric striped pattern with my VersaMark ink pad. Did you know that you could stamp with VersaMark as well? It’s known for being the best ink for heat embossing, but I also stamp with it quite often to create additional interest to the background.
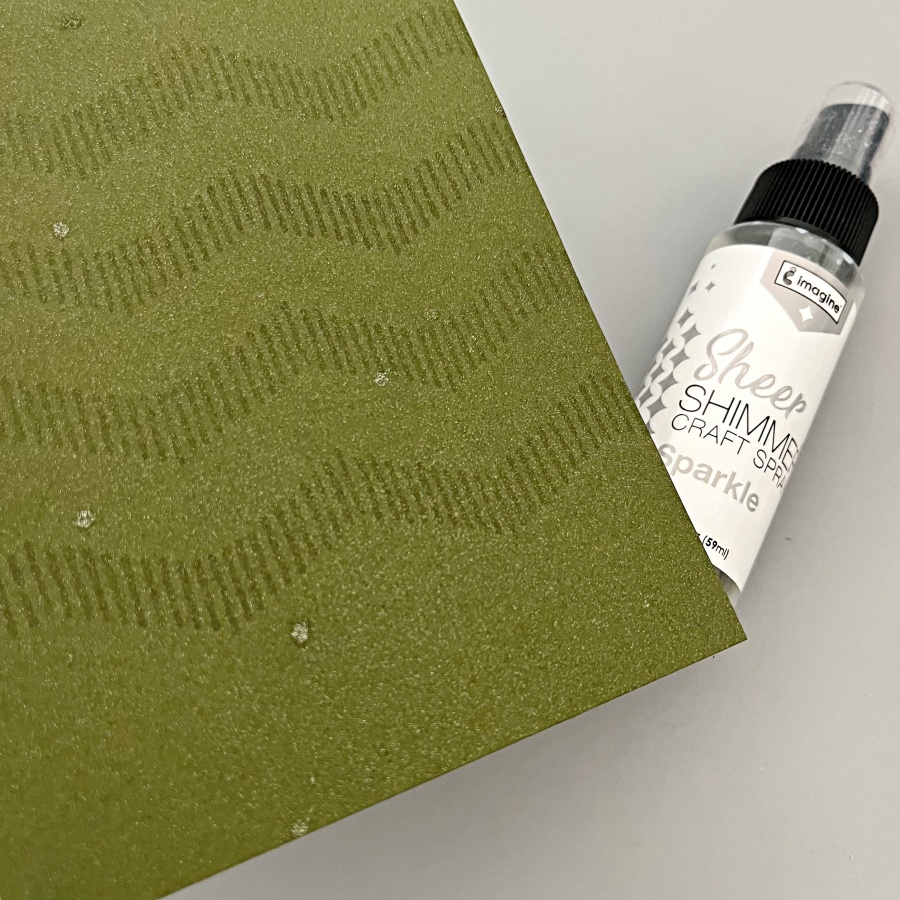
Step 4: Then I spritzed on a layer of Sheer Shimmer Spray in Sparkle. I wish you could see the shimmer in real life! The photo does not do its justice. The shimmer is just so beautiful and it truly transformed this simple card base.
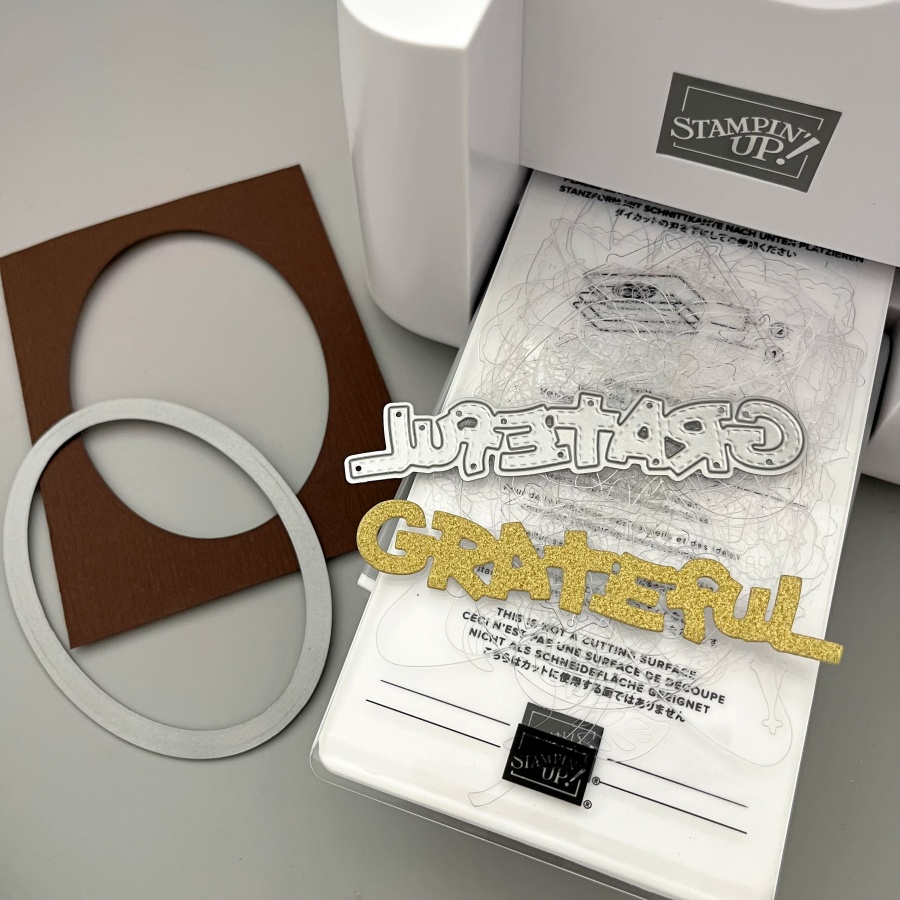
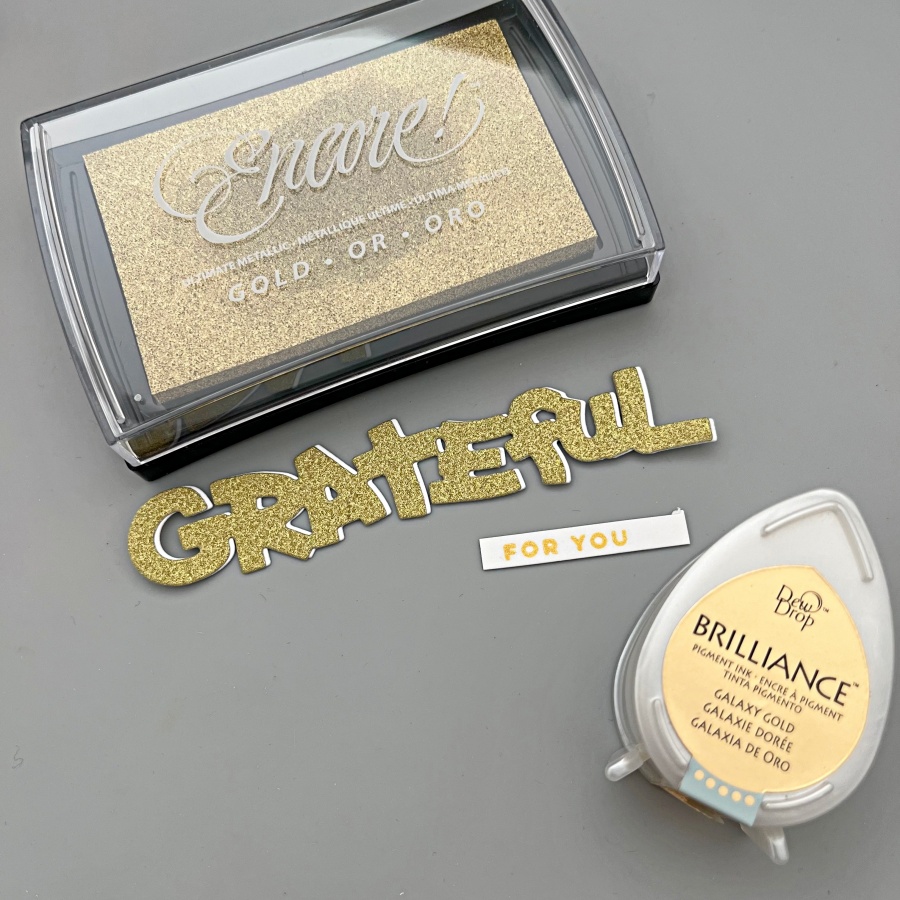
Step 5: Next, I die cut an oval panel as a frame for the little critters, and I die cut the Grateful sentiment from gold glitter cardstock as well.
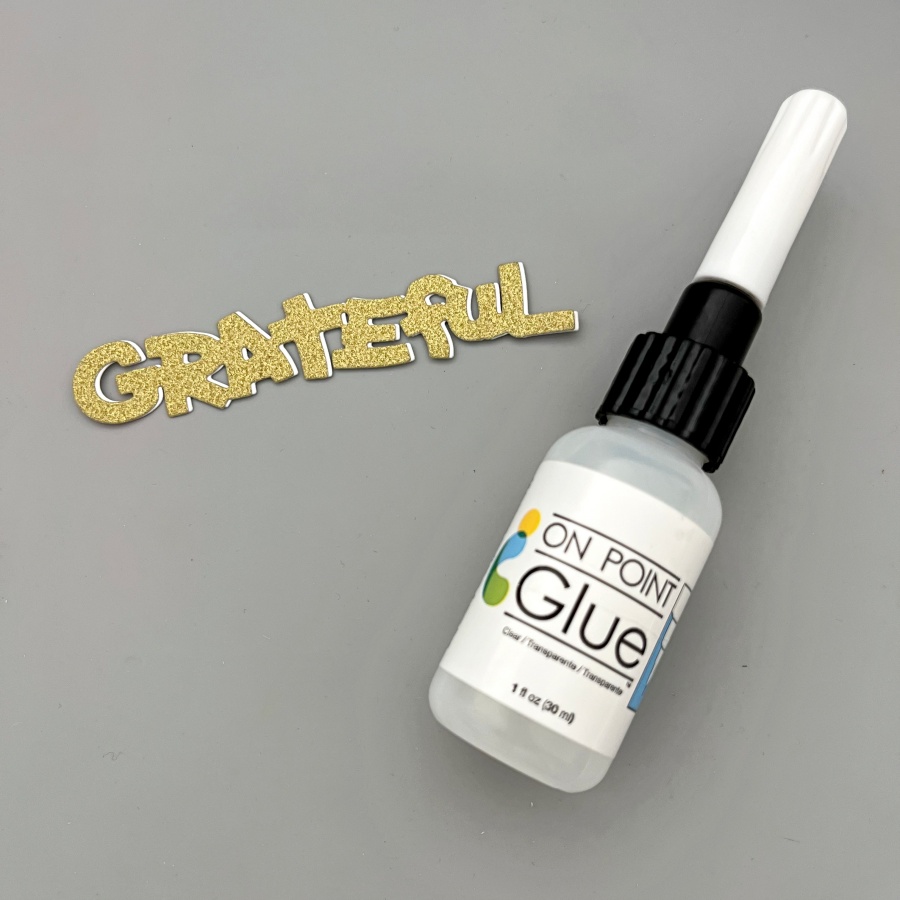
Step 6: To make the sentiment stand out a little bit more, I die cut again using white cardstock and layered it underneath the gold one. This creates a subtle shadow effect. The On Point Glue has a fine tip nozzle that makes applying small amounts of glue so easy. If you work with intricate dies all the time, I recommend having this glue in your stash!
Step 7: Finally, I stamped the “For You” stamp in gold as well to complete the sentiment. Initially I picked the Brilliance Galaxy Gold ink pad as it is my go-to gold ink, but I realized that the tone is slightly too warm compared to the gold glitter cardstock I used. So I
re-stamped with Gold Encore ink instead. I have a close-up comparison below as well.
The picture on the top used Brilliance Galaxy Gold and the one below used Encore Gold. Brilliance Galaxy Gold is a really yellow, sunny kind of gold while Encore Gold shows a cooler tone. The finish is different between the two as well! Brilliance ink pads are shimmery and the Encore line is metallic.
Hello crafty friends! Today, I would like to share how to make this clean-and-simple (CAS) Happy Thanksgiving card. It is easy and quick to make for mass-production handmade cards. Let’s get crafting!
Skill: Beginner Time: 15-20 minutes
Direction:
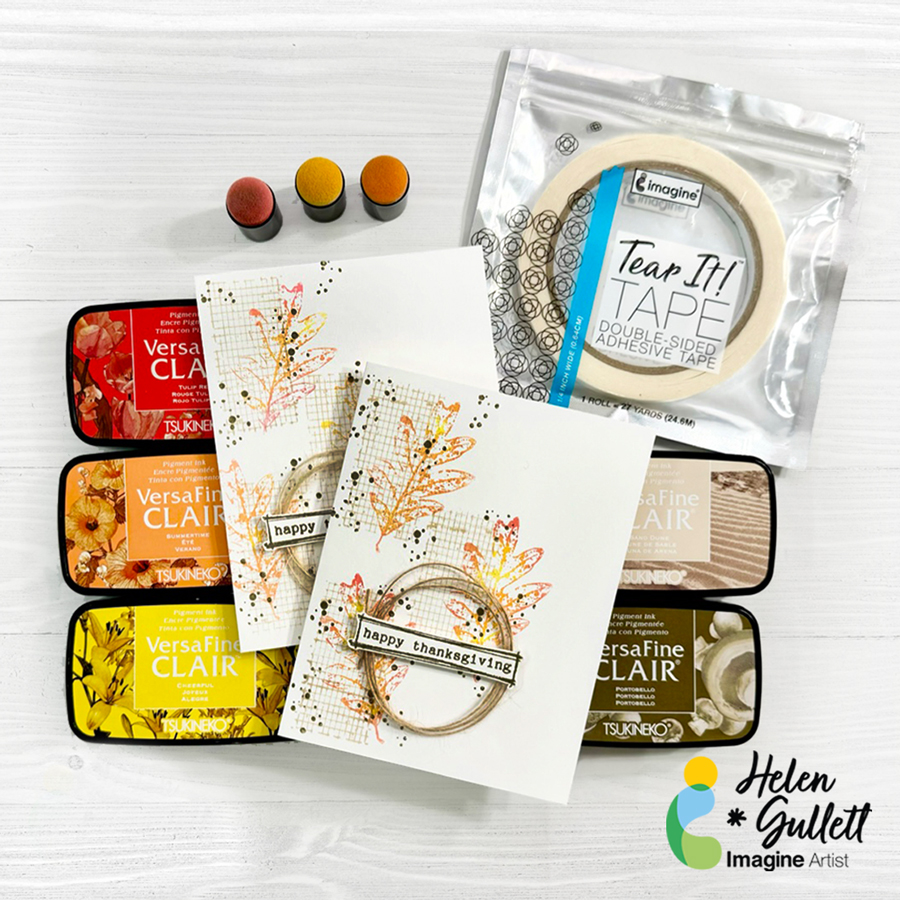
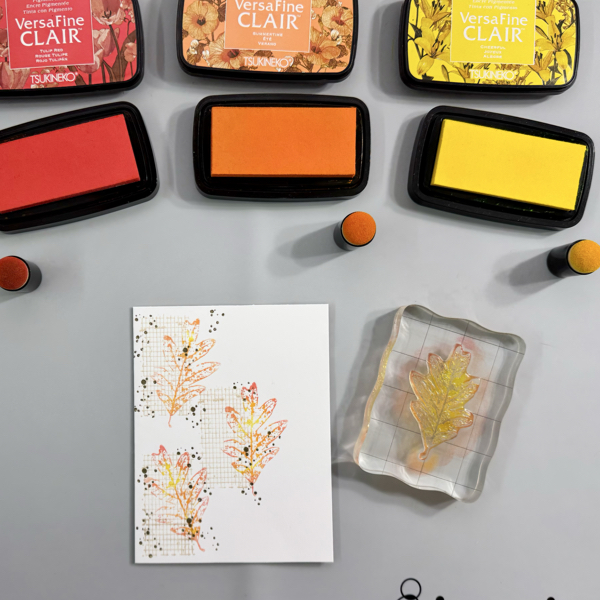
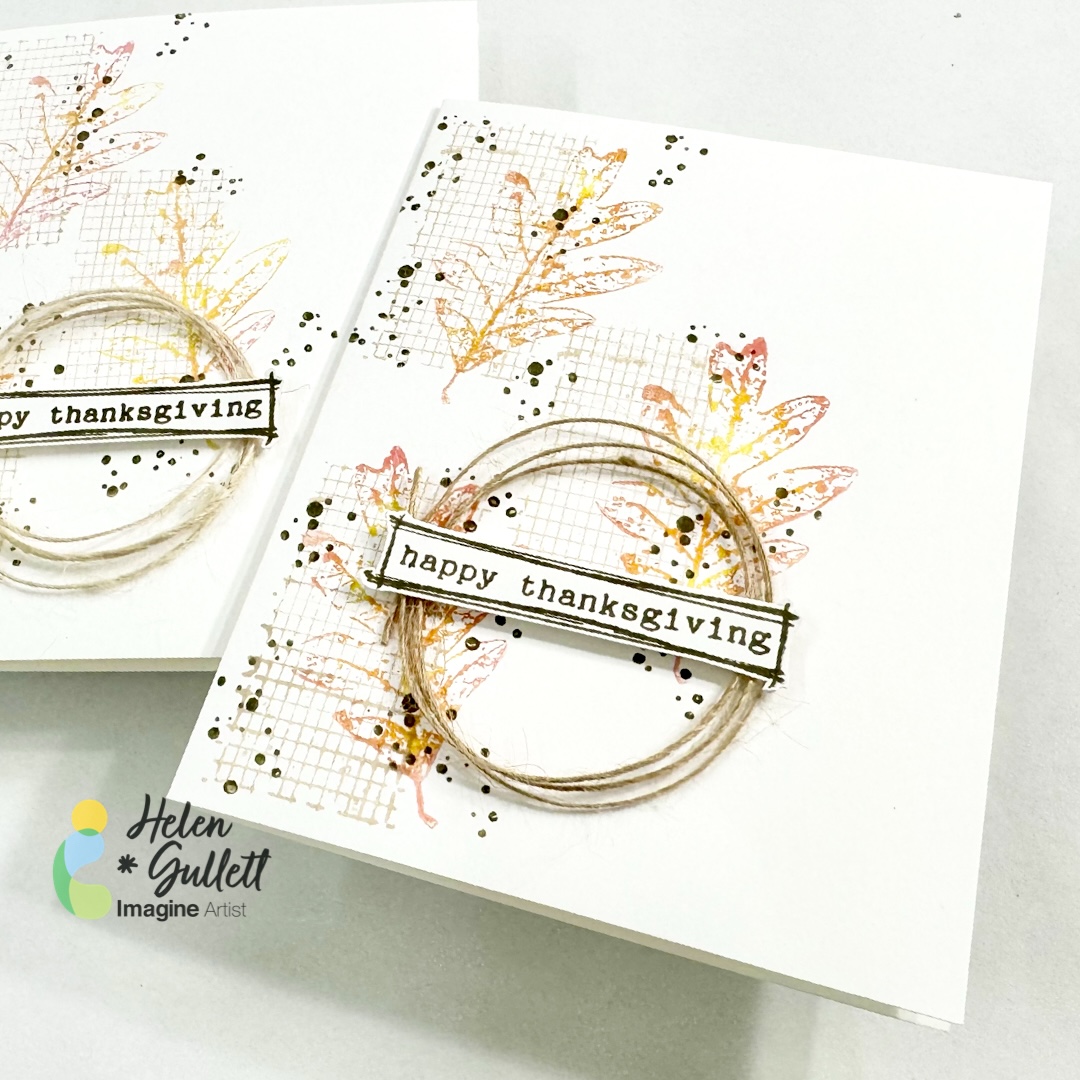
Step 1 We are going to stamp directly on top of an A2 card base (4.25 inch x 5.5 inch card). Start by stamping the texture background on the card with VersaFine Clair Sand Dune ink pad.
Step 2 Next, stamp another texture stamp (on this one I used dots) randomly on the card using VersaFine Clair Portobello ink pad.
Step 3 This step we are going to blend the ink colors on the stamp by adding lighter ink first then darker ink using sponge daubers, and then stamping it on the card.
First, add the VersFine Clair Cheerful ink randomly on the leaf stamp, then add some of the VersaFine Clair Summertime ink, and then add some of the VersaFine Clair Red Tulip ink. Using sponge daubers is the best way adding the ink that will make the ink blending well directly on the stamp.
Stamp inked leaf image on the card as soon as you are done. Using VersaFine Clair inks are great for this technique because they have longer drying time.
Step 4 On a piece of white cardstock, stamp the sentiment and frame using VersaFine Clair Portobello ink pad. Dry the stamped image with a craft heat gun. Fussy cut the stamped image with scissors around the frame.
Step 5 Add some of the Tear It! Tape on the back of the sentiment and then add some of the burlap twine on it, wrap around to make it look like a simple wreath. Press the burlap twine firmly on the tape. Add a small piece of white fun foam and then add some of the Tear It! Tape on it. Add the sentiment on the card.
Isn’t that quick and easy to make this CAS Thanksgiving card? It looks simple yet has some layers and texture on it. I hope you will give it a try.
Thank you for stopping by our blog today. Have a fabulous day!
Craft Supplies
Imagine Crafts:
VersaFine Clair (Sand Dune, Portobello, Cheerful, Summertime, Red Tulip)
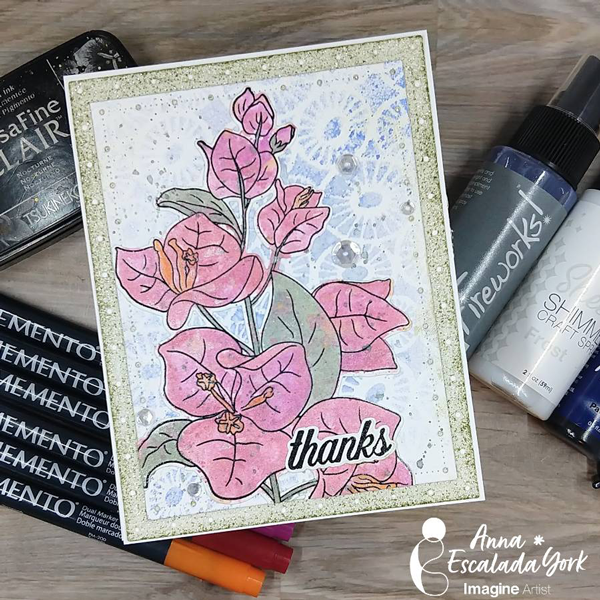
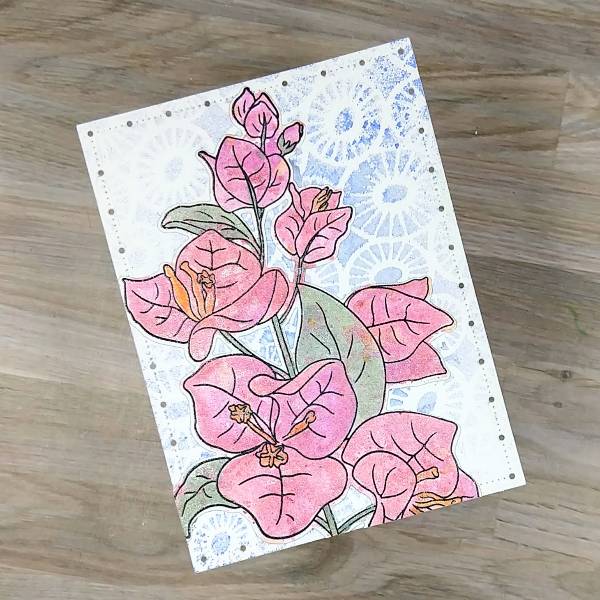
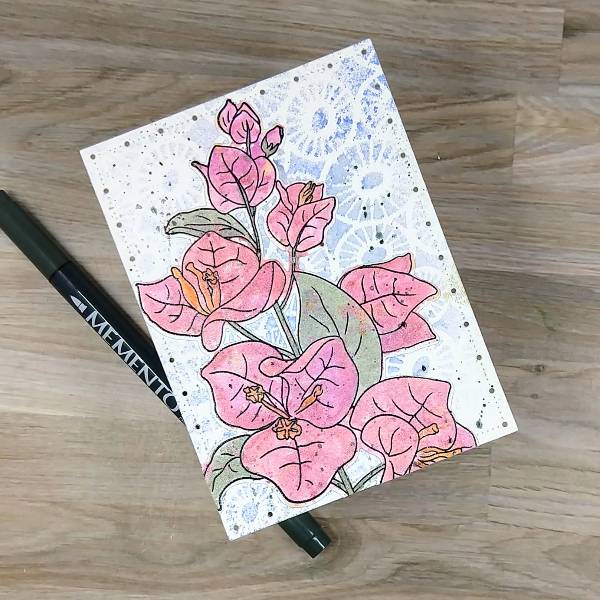
In today’s card, I made a thank you card with some new-to-me Memento markers and sprays.
Skill: Intermediate Time: 1.5 hours
Directions:
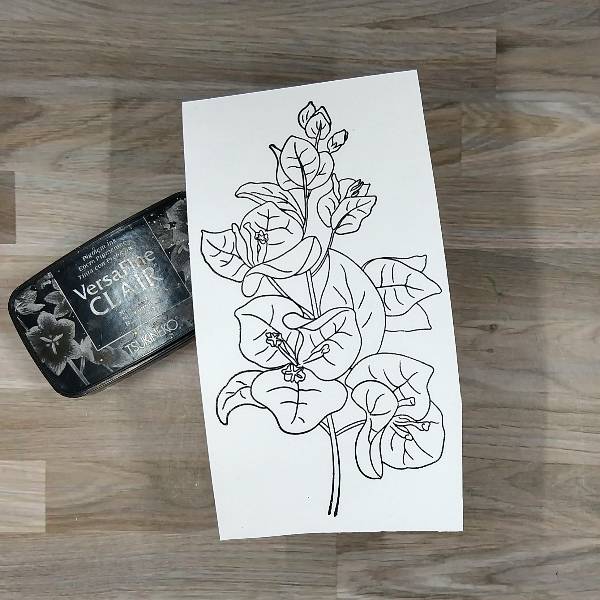
Step 1: Stamp the large floral image with Nocturne VersaFine Clair Ink on watercolor paper and then heat emboss with clear Mboss embossing powder.
Step 2: Die cut the large floral image with the corresponding die cut.
Step 3: The large floral image was colored by watercolor smooshing a variety of Frost Sheer Shimmer Craft Spray mixed with a variety of colors of Memento Dual Markers–Love Letter and Lilac Posies. After the watercolor smooshing dried, the large floral image was watercolor painted with a Northern Pine and Pistachio Memento Dual Markers mixed with more of the Frost Sheer Shimmer Craft Spray on the greenery. The flowers were colored with a mix of Rhubarb Stalk, Love Letter and Lilac Posies mixed with more of the Frost Sheer Shimmer Craft Spray. Finally, Tangelo Memento Dual Marker was mixed with more of the Frost Sheer Shimmer Craft Spray and watercolor smooshed onto the image.
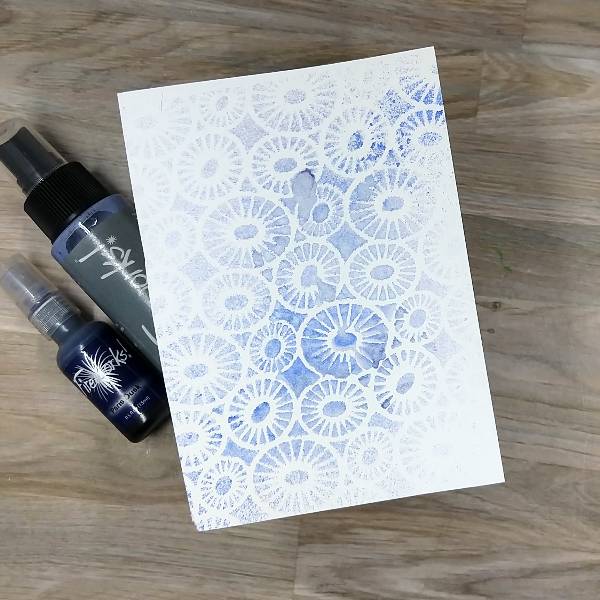
Step 4: Spray London Fog Fireworks! Shimmery Craft Spray onto another piece of watercolor panel through a stencil. Then spray Paris Dusk Fireworks! Shimmery Craft Spray on a diagonal through the same stencil through the same stencil while the ink was still wet.
Step 5: Stamp the thanks sentiment with more Nocturne VersaFine Clair Ink on watercolor paper and then heat emboss it with more of clear Mboss embossing powder. Then die cut the sentiment with the corresponding die.
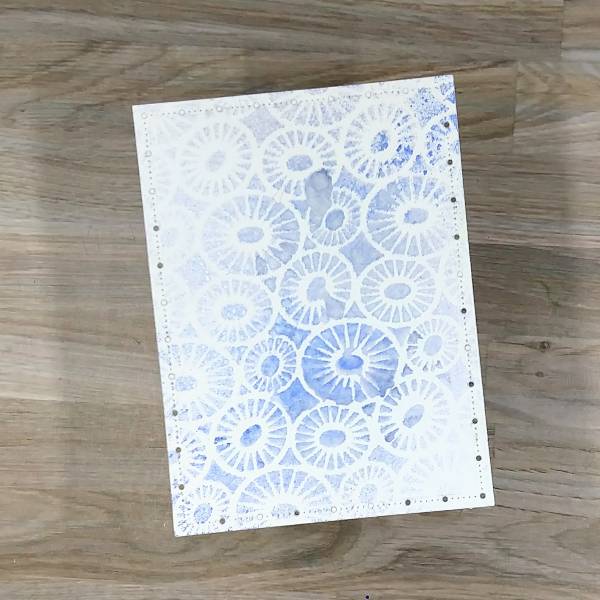
Step 6: Die cut the sprayed background panel with the second-largest die from a nested A2-sized panel die set.
Step 7: Glue the large floral die cut image onto the sprayed panel and then trim the edges of the floral die.
Step 8: Mix Northern Pine Memento Dual Marker mixed with water and splatter onto the panel and floral die cut.
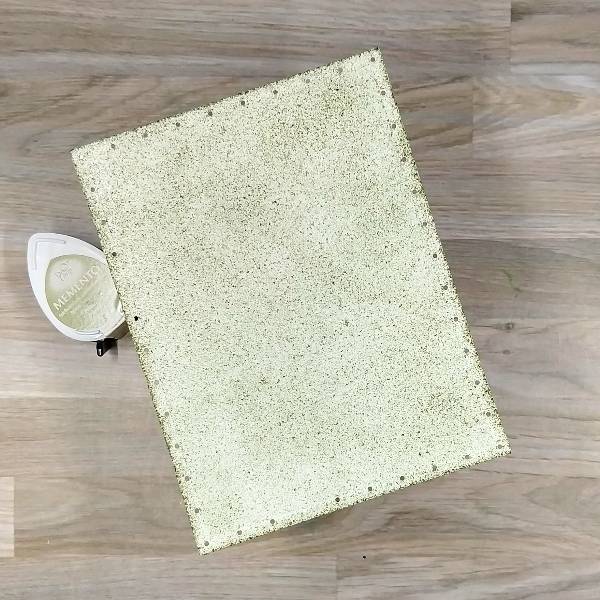
Step 9: Die cut a piece of white glitter cardstock with the largest die from the same nesting die cut set.
Step 10: Swipe Pistachio Memento Ink across the glitter cardstock to color it green.
Step 11: Glue clear sequins and the sentiment die cut onto the upper panel. Then glued the green glitter cardstock behind the focal panel. To finish the card, glue the whole thing onto an A2-sized white card base.
Other Products Altenew – die set – Bougainvillea Altenew – stamp set – Bougainvillea Catherine Pooler – sequins – Crater Lake Gina Marie Designs – Die set – Big and Little Chain Rectangle die set Ink On 3 – Stencil – Pondie 6×6 stencil Watercolor paper White glitter cardstock Die cutting machine Paper Trimmer Scissors Glue