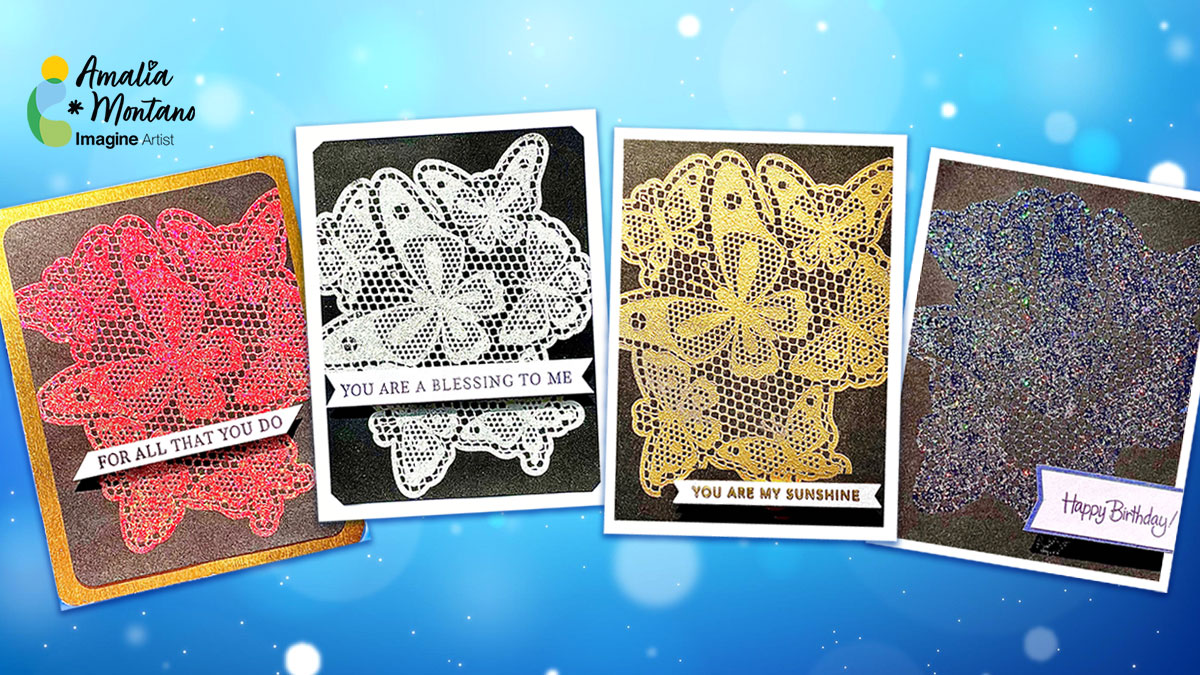
– Hi There, I am Amalia from “Cool Cakes and Crafts with Amalia” here on YouTube. Today I am heat embossing on black cardstock. There are some stunning results you want to see.The most fun you can have in carding making is with heat embossing. Seeing the powder turn solid right before your eyes is thrilling. It’s like magic!
I used one beautiful Butterfly Lace stamp with VersaMark clear embossing ink and sparkly MBoss embossing powders to create 4 spectacular cards.
A heat tool and an embossing buddy is all you need to go from nice enough to FABULOUS!
Let’s experiment with Imagine’s fabulous Walnut Ink Sprays!
Skill Level: Intermediate Time: 1 hour
Step 1: Using a stamping platform, ink the Grunge Flower stamp with Nocturne VersaFine Clair ink and stamp. Re-ink and stamp again if necessary to attain a good. Impression. Stamp a second time onto repositionable sticker paper. Fussy-cut the sticker paper version to be used as a mask later.
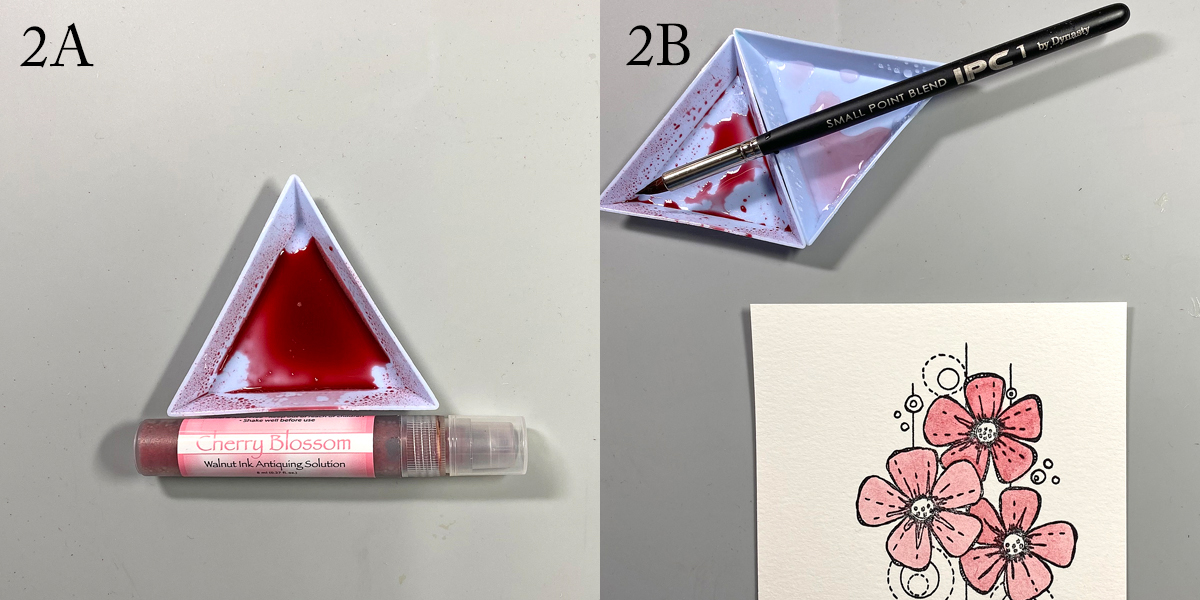
Steps 2A and 2B : Spray Cherry Blossom Walnut Ink into a small container (2A). Add water into a second container. Use a paint brush to watercolor the flowers’ petals, varying the intensity of the color by diluting the ink with water (2B). When done, wash and dry the containers.
Steps 3A and 3B: Spray Lilac Walnut Ink and water into small containers (3A). Use a paint brush to watercolor the flowers centers, varying the intensity of the color by diluting the ink with water (3B). When done, wash and dry the containers
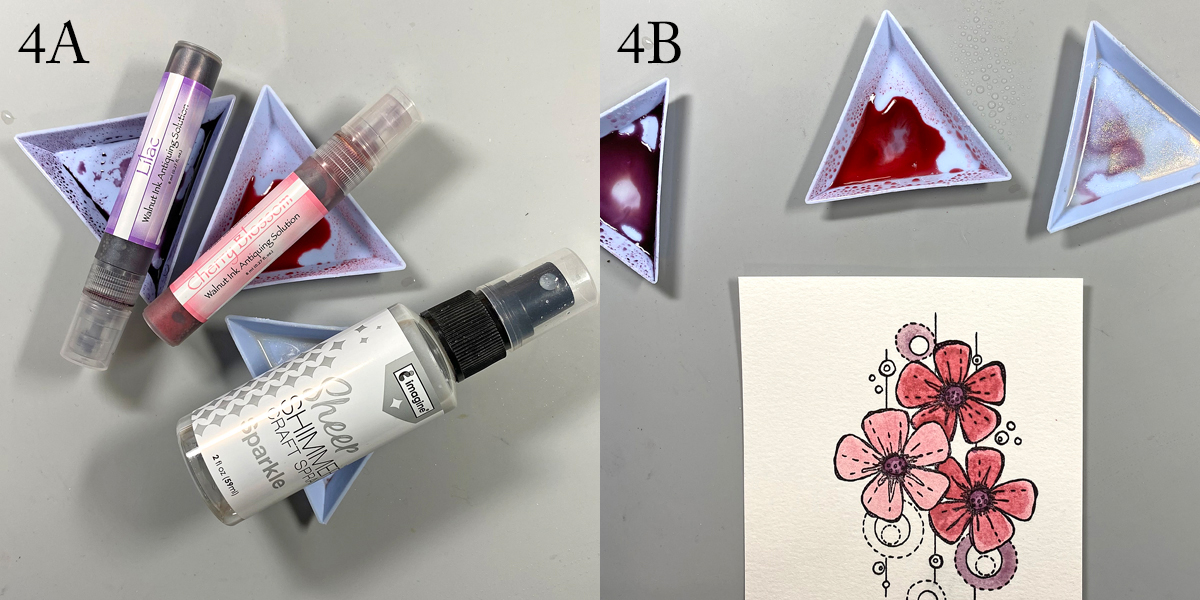
Steps 4A and 4B: Spray Cherry Blossom and Lilac Walnut Inks into separate containers. Spray a small amount of Sparkle Sheer Shimmer Craft Spray into both containers and into a third container (4A). Use paint brushes to paint the circular elements of the stamped image with sparkly Walnut inks (4B).
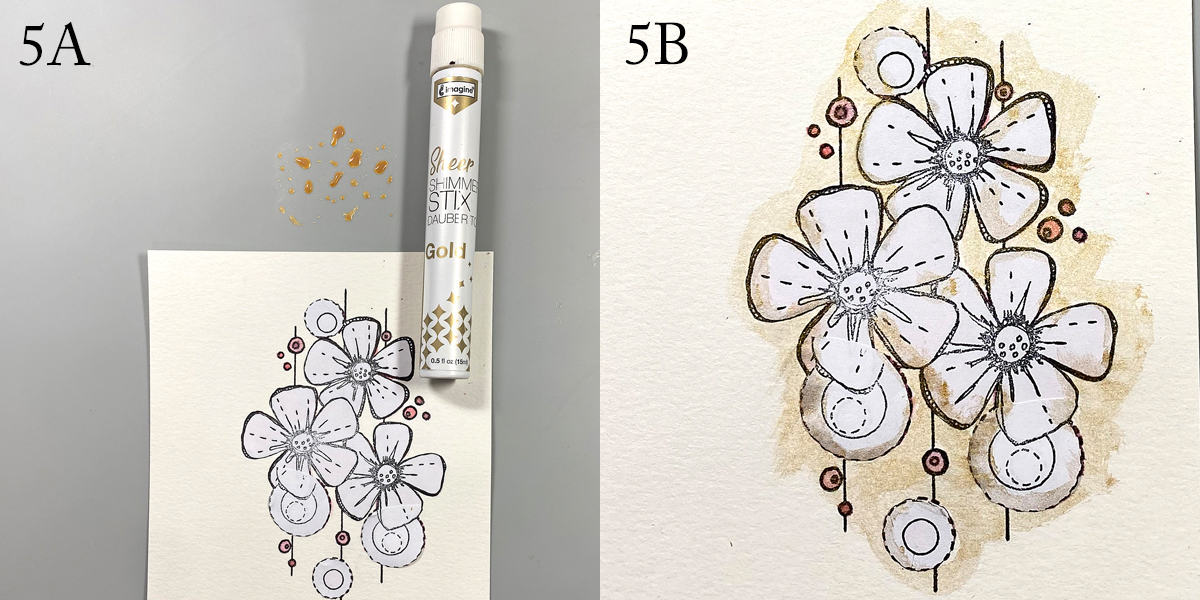
Steps 5A and 5B: Adhere the repositionable sticker masks from Step 1 atop the stamped and painted images. Smoosh Gold Sheer Shimmer Stix onto the craft mat (5A). Use a brush to apply over the masked images. Also use the applicator top to apply the shimmery gold ink directly to the image panel. Wipe the excess away with a paper towel (5B).
Steps 6A and 6B: Repeat Steps 4A and 4B to add more shimmery walnut ink to the containers (6A). Load a paint brush with the ink then tap the paint brush to splatter the image panel (6B). Repeat with the second color. I wanted more splatter, so I loaded a clean toothbrush with ink and splattered the panel even more. (No photo). Remove the masks and heat set the panel.
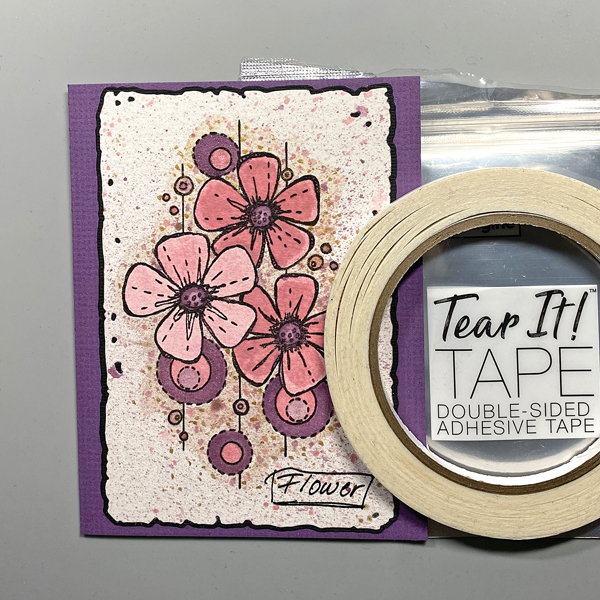
Step 7: Use the smaller die from the Frayed Frames Die Set 26 to cut the image panel. Use the larger die from the same set to cut black cardstock. Use Tear-It! Tape to mat the image panel die-cut with the black die-cut. (Sorry! No photo).
Step 8: Place the matted image panel into a stamping platform. Position the “Flower” Sentiment from the Grunge Flowers Stamp Set 2 facedown on the bottom right of the image panel. Press the platform’s lid onto the back of the stamp and lift. Ink the stamp with Nocturne VersaFine Clair Ink and stamp. Re-ink and stamp again if necessary to attain a good impression.
Step 9: Remove the impute panel from the platform and place onto paper. Sprinkle Clear MBoss powder onto the stamped sentiment. Dump the excess back into the container. Heat set the sentiment.
Step 10: Create an A2 card from purple cardstock. Use Tear-It! Tape to adhere the image panel to the card.
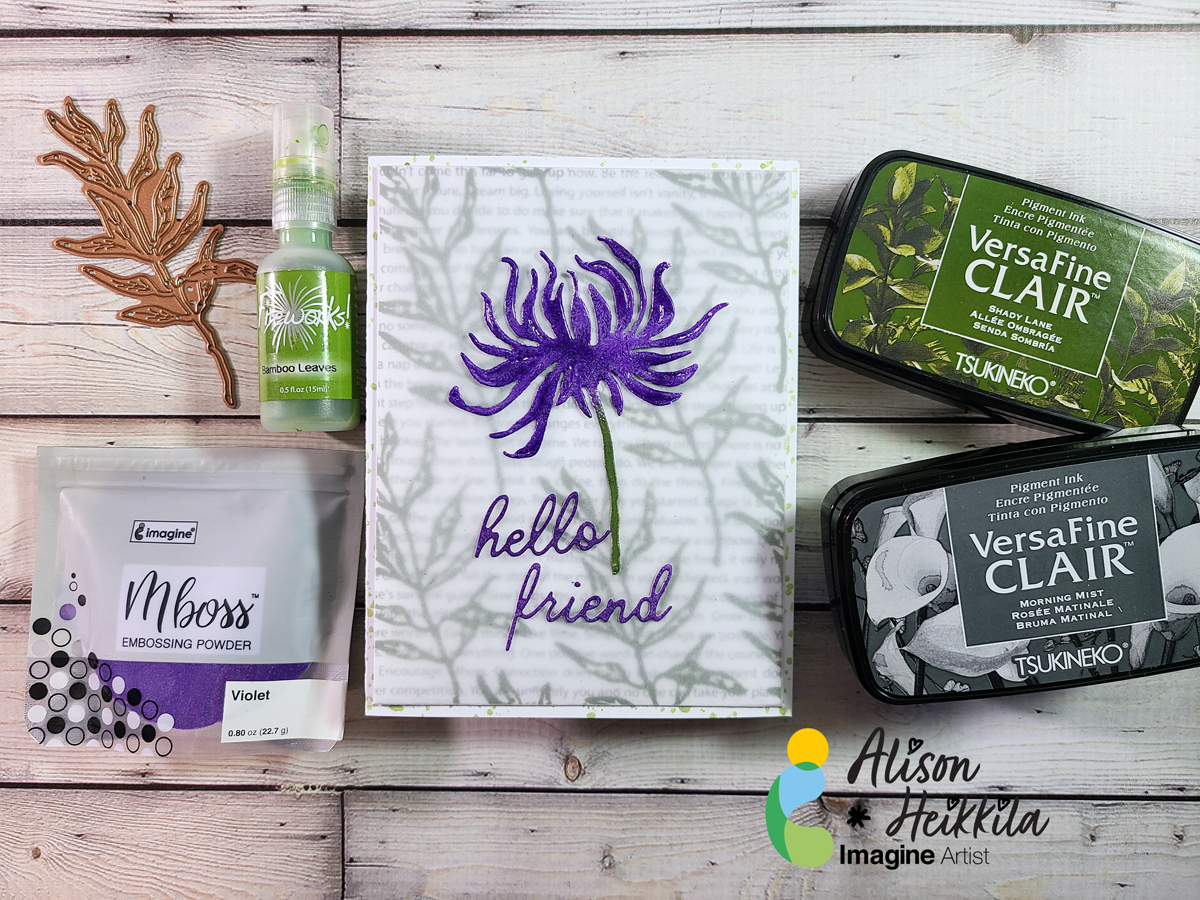
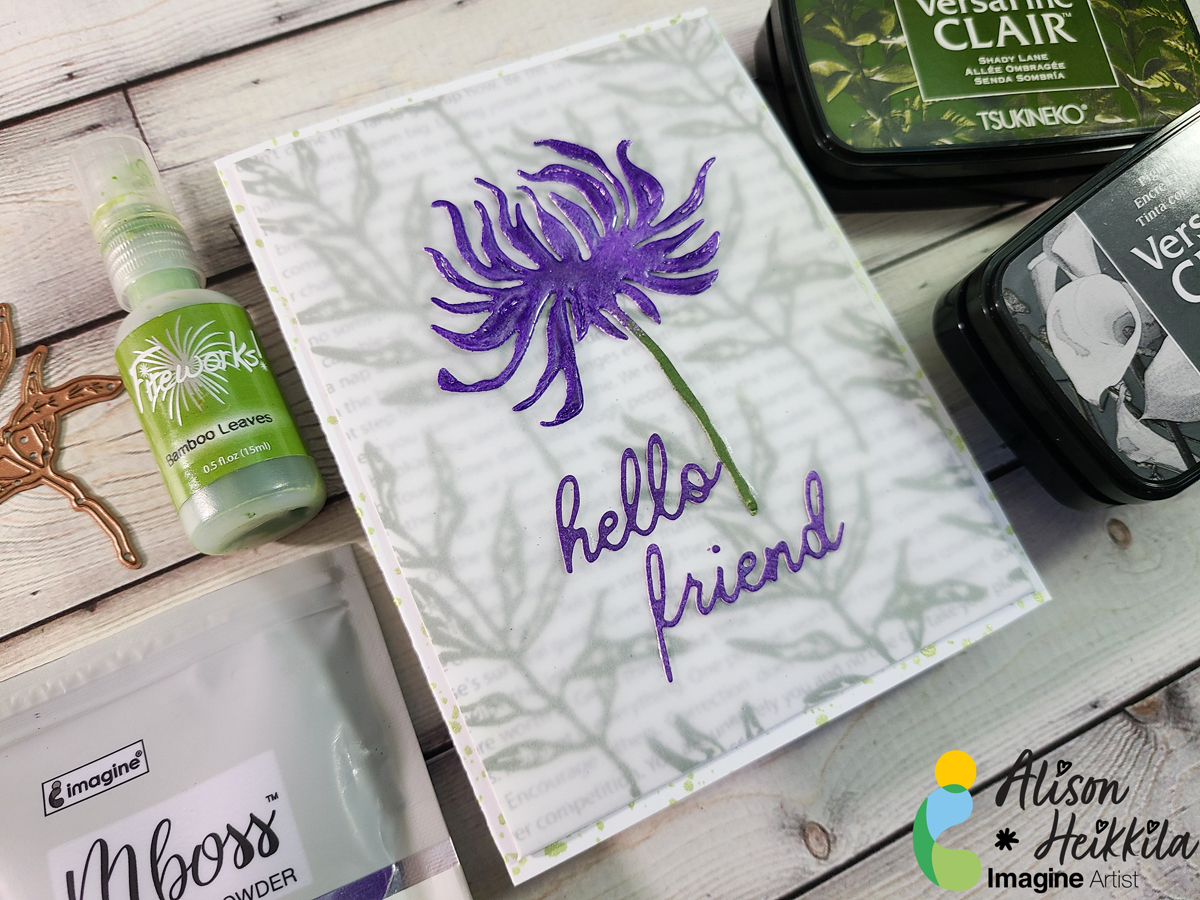
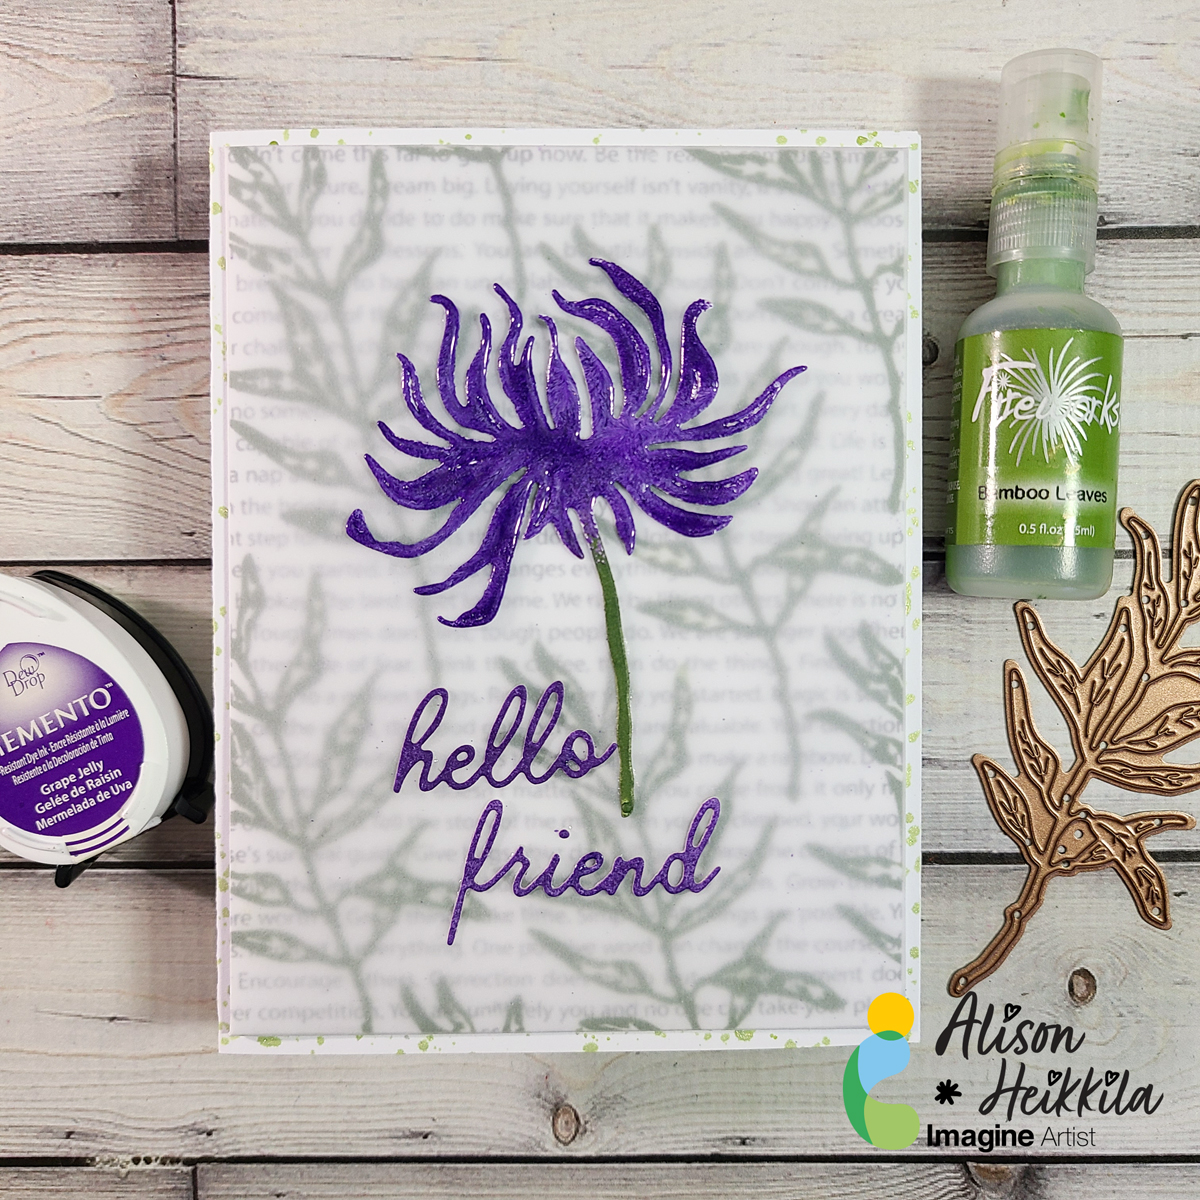
Hello! This is Alison Heikkila. My second video for Imagine this month once again focus on dies and how to use them creatively with inks. We’re making a pretty floral encouragement card, and I hope it gives you some ideas on how to use your dies and inks together.
*Some affiliate links are used in this post. That means that if you shop through these links, I may receive a small compensation, at no cost to you.
Skill Level: Intermediate Time to Complete: 20-30 minutes
I hope this inspires you to make stamps out of your dies. And don’t forget to try double-dipping into embossing powder! The effect is so pretty. Thanks so much for stopping by. Have an inspiring day!
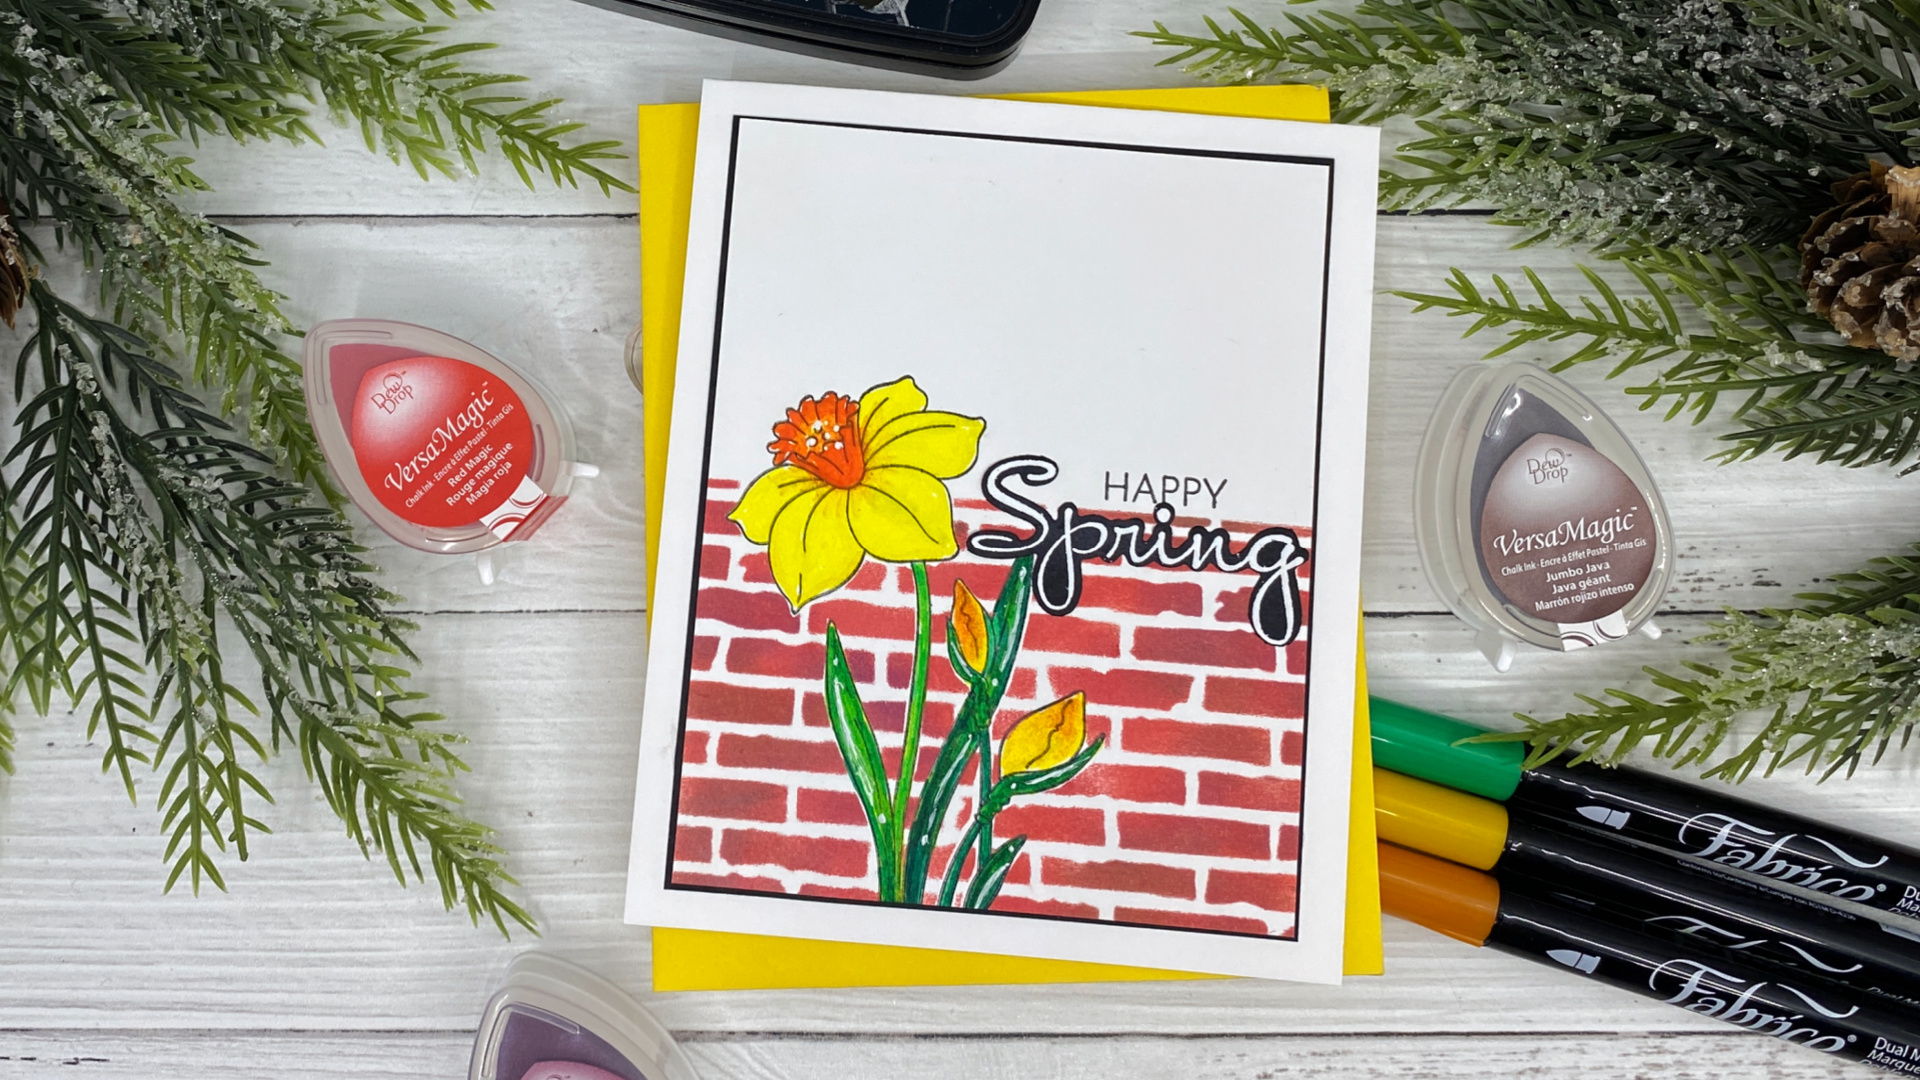
Hello crafty friends, today I am sharing a spring card using a couple of blending techniques, one with Fabrico markers and one with the VersaMagic Dew Drops. I was so happy for spring to finally arrive. I live in the mountains and even though it is officially spring, sometimes we still get snow in April.
Skill: Intermediate to Advanced Time: 45 minutes to an hour
Directions:
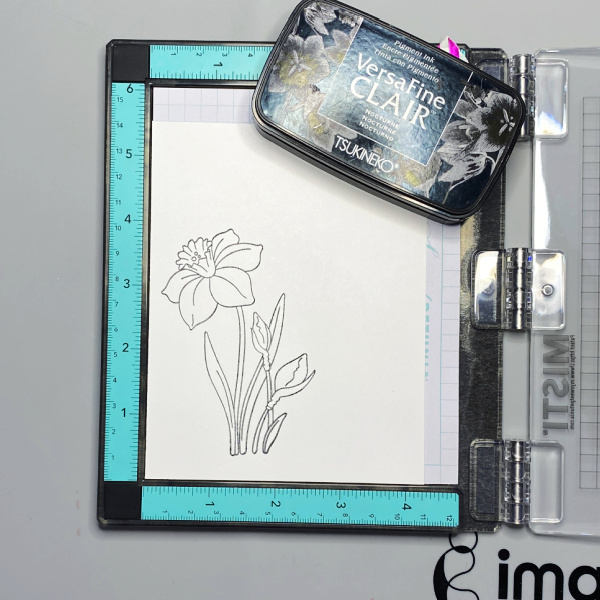
Step 1 Place a piece of white cardstock in the corner of a stamping platform and use Nocturne VersaFine Clair to add ink to the stamp.
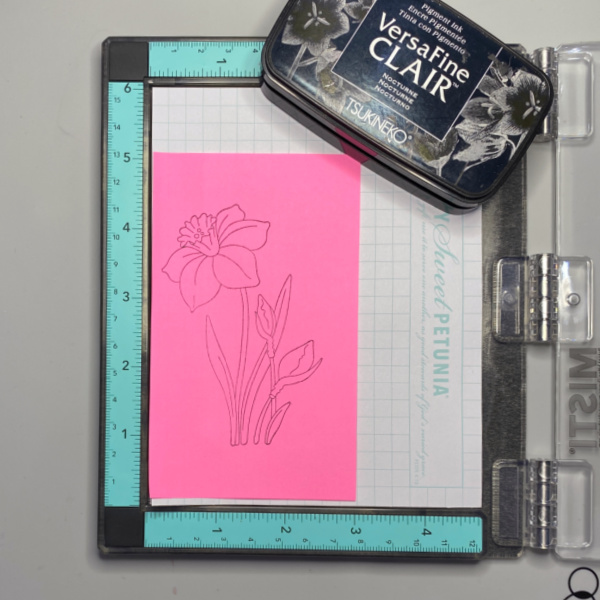
Step 2 Stamp the image on a post-it note or masking paper using Nocturne VersaFine Claire ink, then fussy cut out the image.
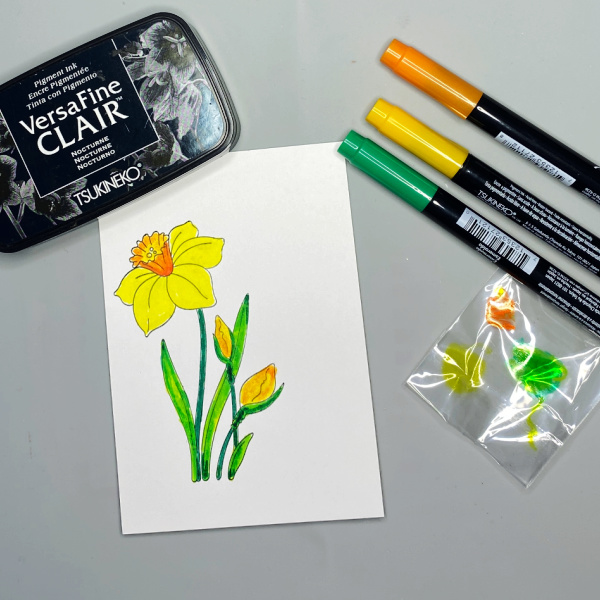
Step 3 Color the image using Fabrico markers. You can blend the colors using a piece of acetate as shown in the picture. The green marker I used is Emerald. I created a lighter green by scribbling some green on the piece of acetate and then picked it up with the yellow marker, creating a yellow green color. I also created a lighter orange by scribbling orange on the piece of acetate and then picking it up with the yellow marker. This doesn’t in any way contaminate your markers, all you do after you finish blending is scribble on a regular piece of paper until you get the true color back.
Step 4 Using the mask you created earlier, cover the daffodil image that you colored and then add the stencil over it. You will also need to mask off the top portion of your panel as well to keep it clean while you ink blend over the stencil. I used three different colors of VersaMagic Dew drops to give the bricks a more realistic look. They are listed below. I love how well the VersaMagic chalk inks blend together.
Step 5 Remove the stencil and mask from the panel and cut it down to 3.78 xX 4.78
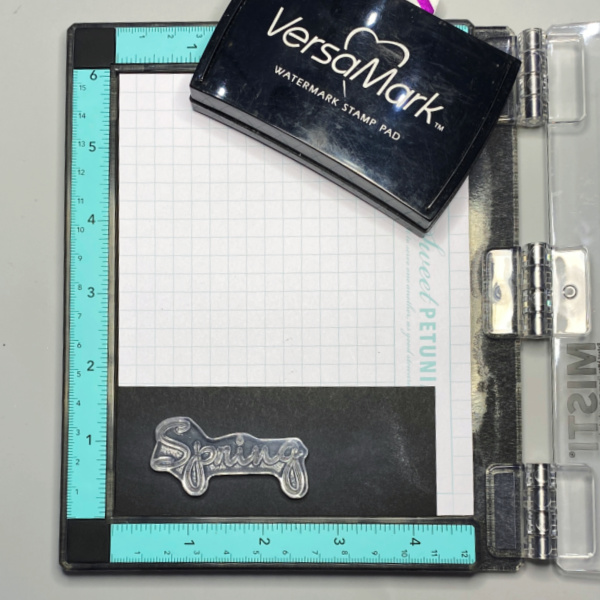
Step 6 Insert a piece of black cardstock into the corner of a stamping platform and use an anti-static tool to prep surface. Stamp the sentiment using VersaMark ink and heat emboss it with MBoss White Embossing Powder, then cut it out with the coordinating die.
Stamp the sentiment “happy” directly on the card front and add the embossed sentiment below it.
Step 7 Assemble your card by adhering the front panel to a black panel cut to 3.75 X 5 using On Point Glue and then adhering it to a card base cut to 4.25 X 11, scored at 5.5
I hop you will give these techniques a try. Thank you for stopping by our blog today. Until the next time, stay crafty!
Other Products: Daffodil Stamp Set + Dies – The Rabbit Hole Designs Back Ally Stencil – The Rabbit Hole Designs Teal Mini MISTI Hero Arts Pitch Black Cardstock Neenah Classic Solar White 120lb Cardstock – card base Neenah Classic Solar White 80lb – Cardstock panel
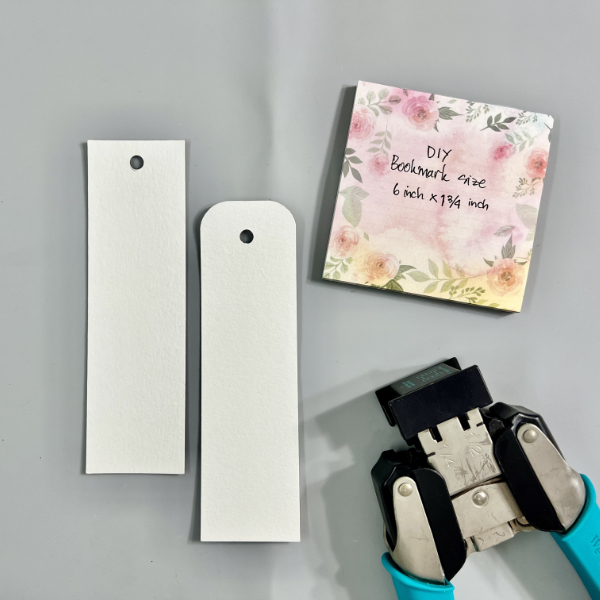
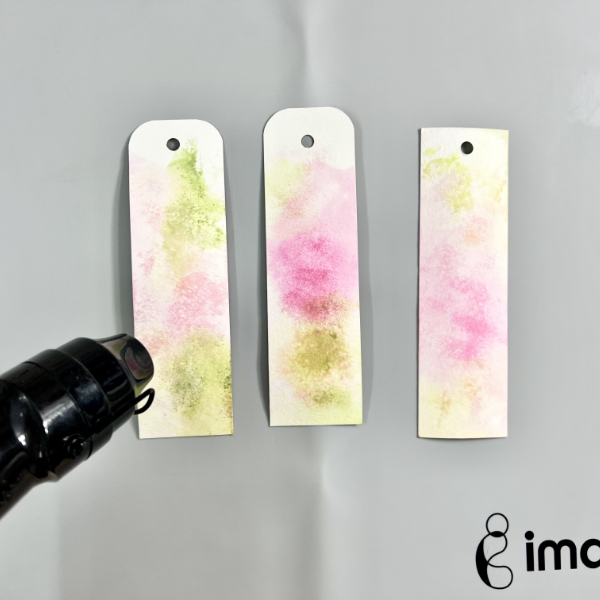
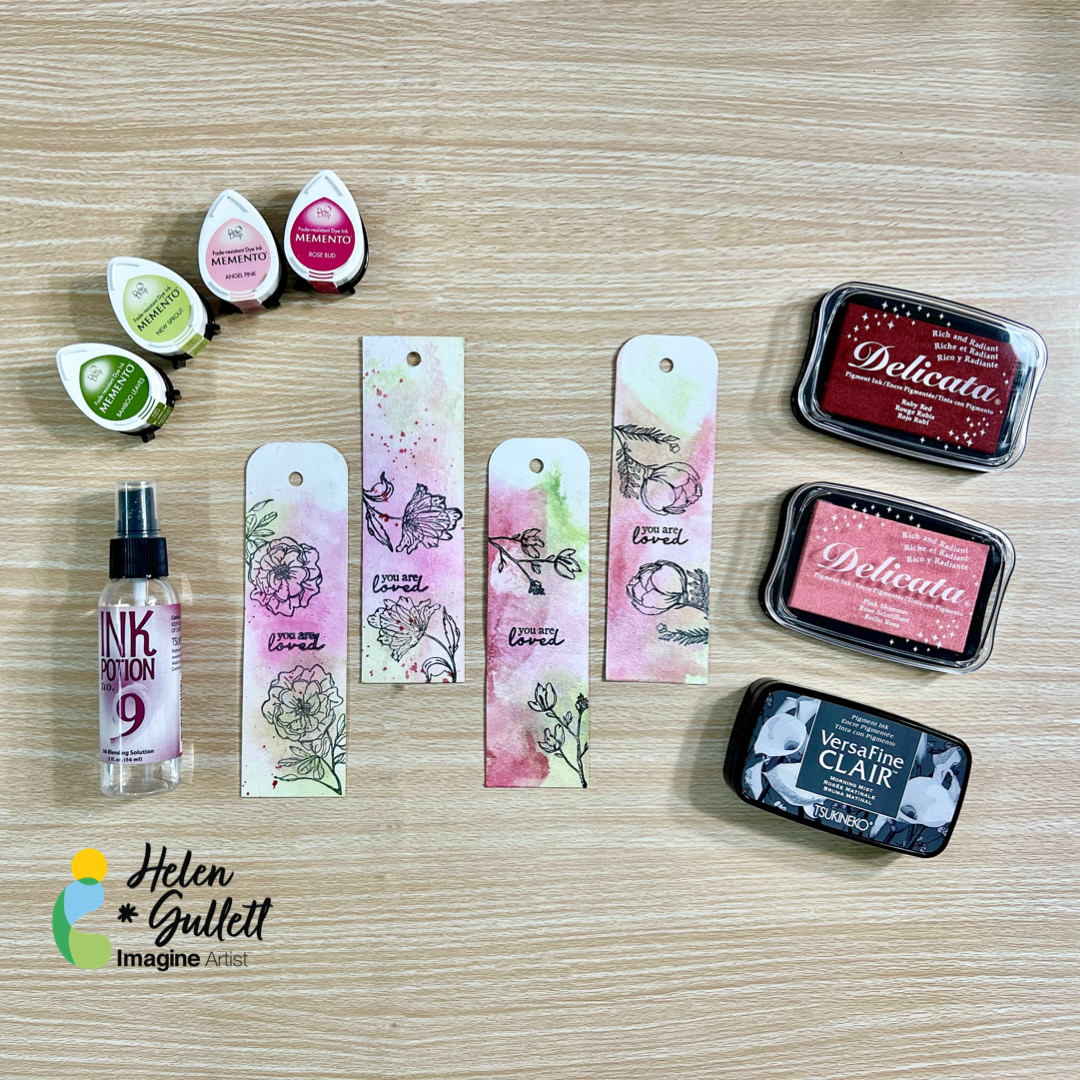
Hello crafty friends! Today, I want to share with you how to make these Spring themed bookmarks, using Imagine Crafts products and simple crafting tools. These bookmarks are a great gift for book lovers, or donating to your local library, or even just for you to use personally. You can make a batch of them in a short time!
Skill: Beginner Time: 15-30 minutes
Directions:
Step 1 I find that Canson Watercolor Paper 140lb is the best to make bookmarks. They are not only thick and sturdy, but also you can use any craft techniques with this paper – either simply stamping, or watercoloring, or even mixed media.
Cut a piece of watercolor paper into 6 inch x 1 ¾ inch size. One piece of this 9 x 12 watercolor paper, you can get 10 bookmarks.
You can leave it as a rectangle or you can round the corner with the corner rounder punch. Next, use a ¼ inch hole punch to punch a hole at the center top of the bookmark for ribbon or teasel.
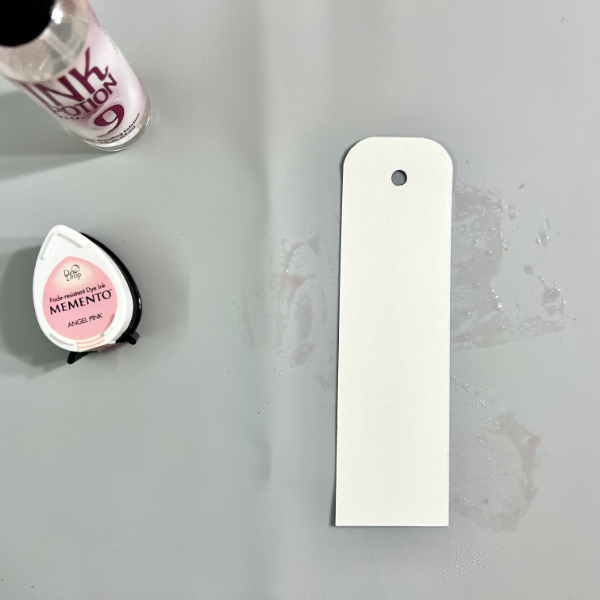
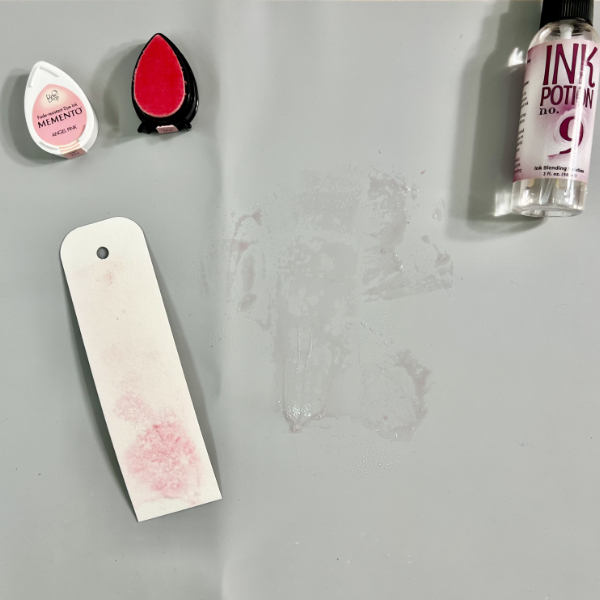
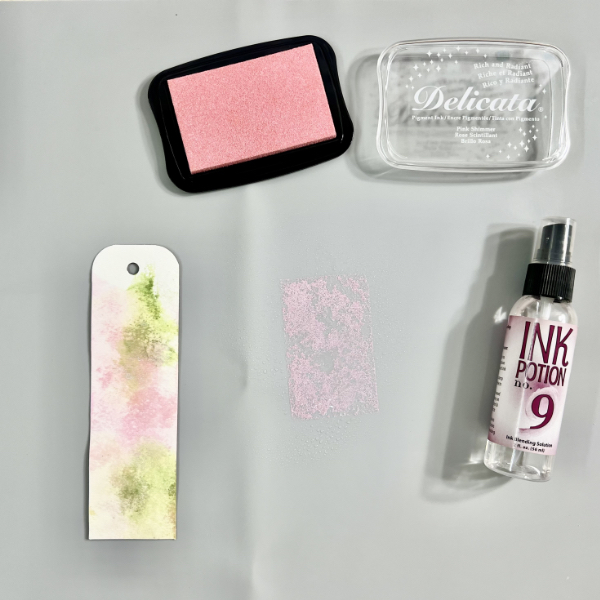
Step 2 Next step is to create the watercolor wash background using Memento DewDrop ink and Ink Potion No. 9 Spray on each of the bookmarks.
Dab the Memento ink on the craft mat and then spray with some of the Ink Potion No. 9.
Step 3 Smoosh a bookmark into the ink. Gently press to get the ink transferred to the bookmark.
Step 4 You can repeat this step as many times as you want to get the first color wash you like to get. You can spray the ink more to get lighter color, or spray the ink less to get more darker color.
And then repeat the step 2 and step 3 with different colors that you want to use on your bookmark background. For mine, I used the Memento Dew Drop Inks Angel Pink, Rose Bud, New Sprout, and Bamboo Leaves colors.
Step 5 When done with adding watercolor washes on the bookmarks, use the craft heat gun to dry them.
Option step, you can repeat step 2, step 3, and step 4, if you want to add more color to them.
Step 6 Dab some of the Delicata ink on the craft mat, spray it with the Ink Potion No. 9, and then smoosh the bookmark into the ink. Gently press it to get the ink transferred well.
You will get a shimmer look on the bookmark with this step.
Dry all the ink on the bookmark with a craft heat gun.
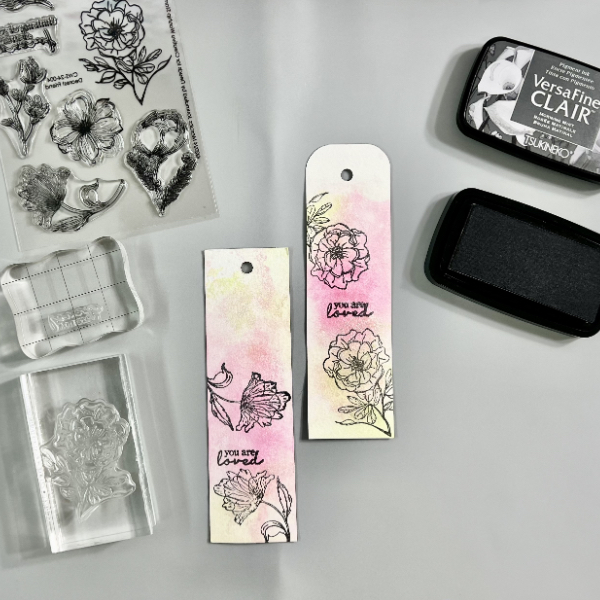
Step 7 When the bookmark background is completely dry, stamp the image and sentiment on them with VersaFine Clair ink using acrylic blocks (or stamping tool of your choice).
Use a craft heat gun to dry the stamped images and sentiments.
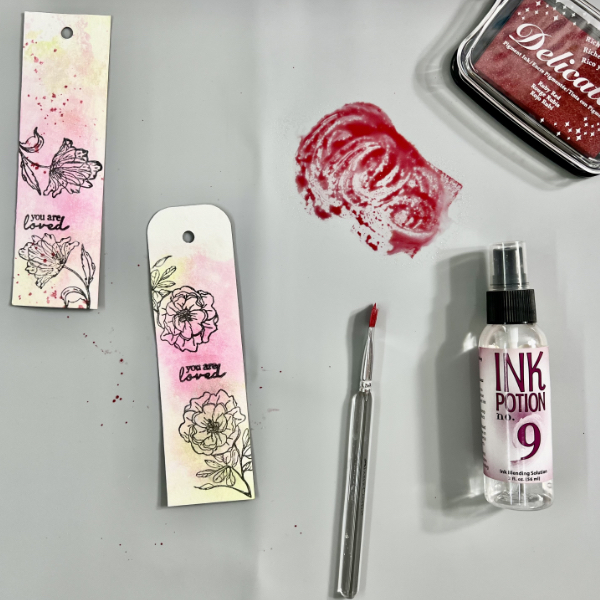
Step 8 This is optional. You can leave the bookmarks as they are, or you can add some more ink splatters to them.
To add more splatters to the bookmark, dab some of the Delicata Ruby Red ink on the craft mat, spray it with Ink Potion No. 9, and use a flat brush (or fan brush) to add the splatters.
Use a craft heat gun to dry the bookmarks.
Add some ribbon or teasel to the bookmarks.
Hope that you like this project and give it a try. Thanks so much for stopping by our blog today. Have a wonderful day!
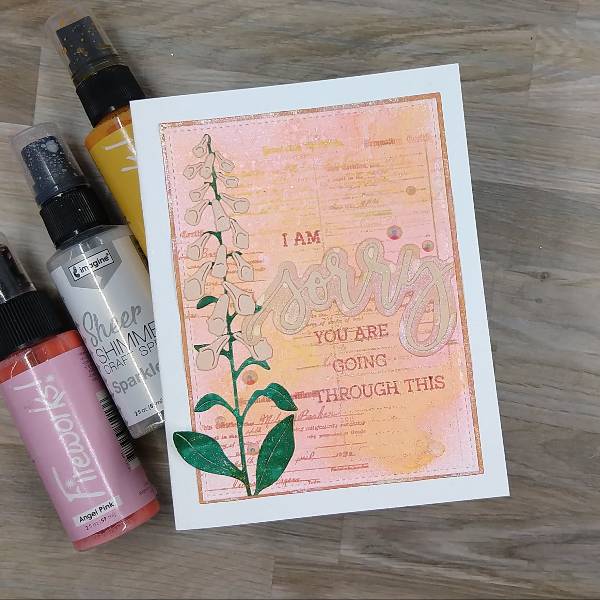
In today’s blog post, I will show you how to incorporate sprays and markers to change or enhance the color of colored cardstock to help you stretch your supplies.
Skill: Advanced Time: 2 hours
Directions:
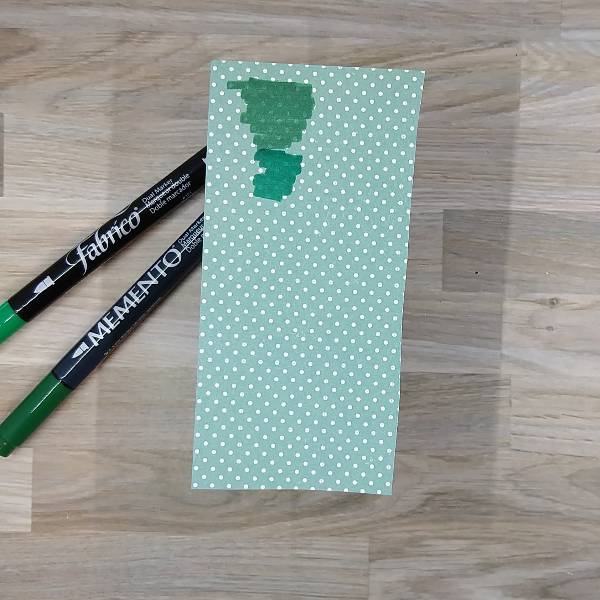
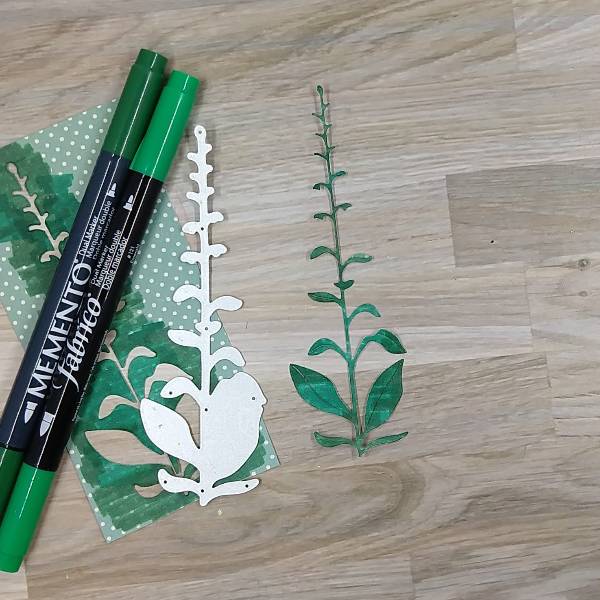
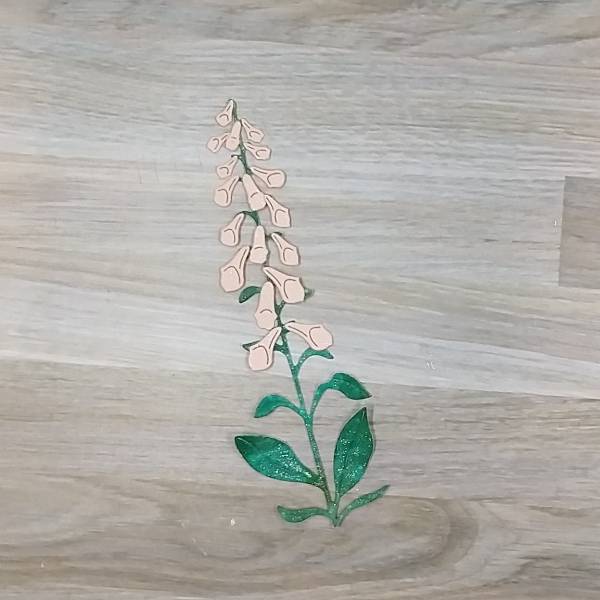
Step 1: Color a piece of teal or green patterned paper with green markers–College Ivy Memento marker and Emerald Fabrico marker.
Step 2: Die cut the colored patterned paper to form the leaves of the flower die cut. Optional step: Spray the colored patterned paper with Sparkle Shimmer Spray.
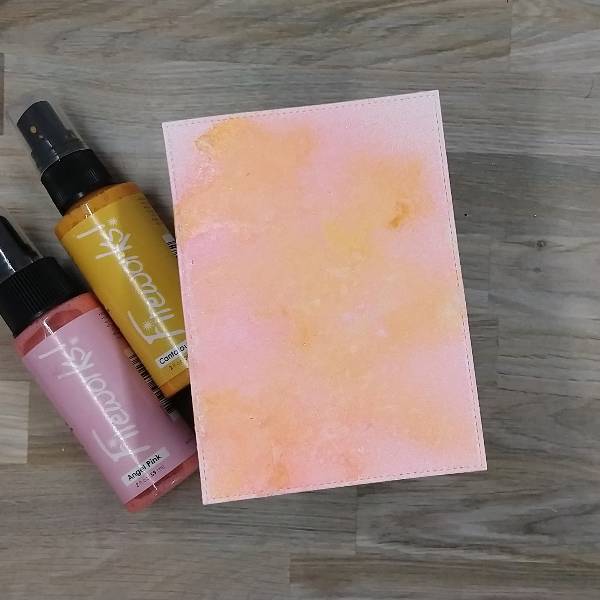
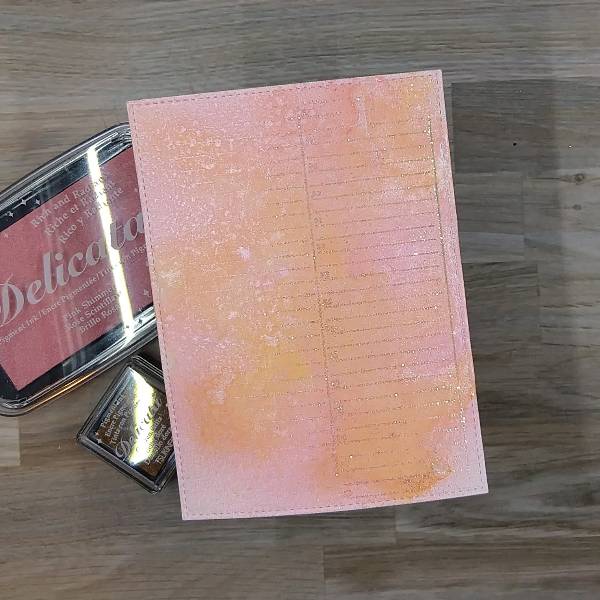
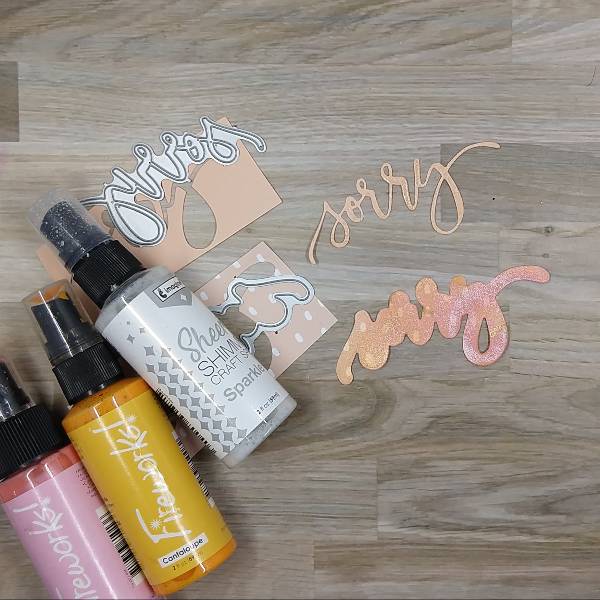
Step 3: Spray a die cut panel of watercolor paper with Angel Pink and Cantaloupe Fireworks! Sprays. After it dried, I sprayed both sprays again. This combination of the two colors almost achieved the peach fuzz color.
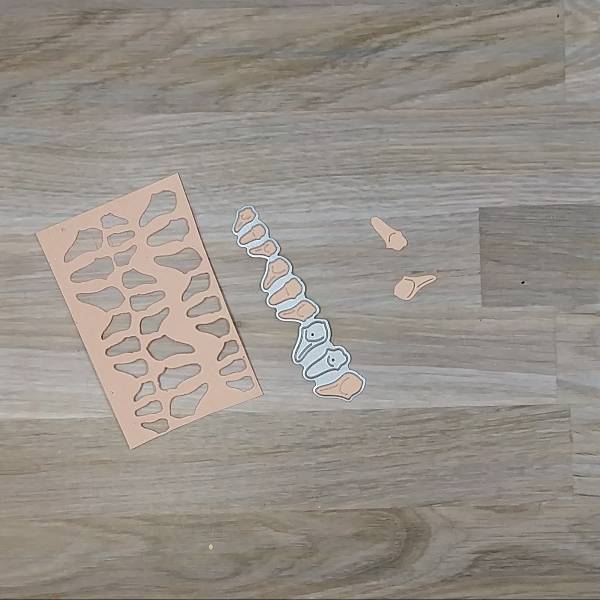
Step 4: Using a piece of peach cardstock, die cut the small flowers for the floral die cut three times.
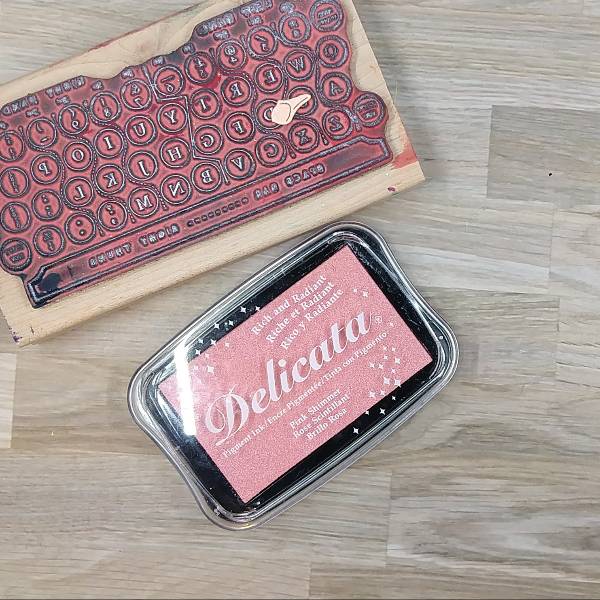
Step 5: Stamp Pink Shimmer Delicata ink onto the flowers using a stamp. (On the card, you can see a little shine on the flowers, but it ins’t visible in pictures.)
Step 6: Add Pink Shimmer and Gold Glitz Delicata Ink onto parts of a large background stamp. Make sure to leave parts of the stamp uninked (such as the lower left corner of the stamp). Optional step: Add holographic embossing powder onto the stamped image.
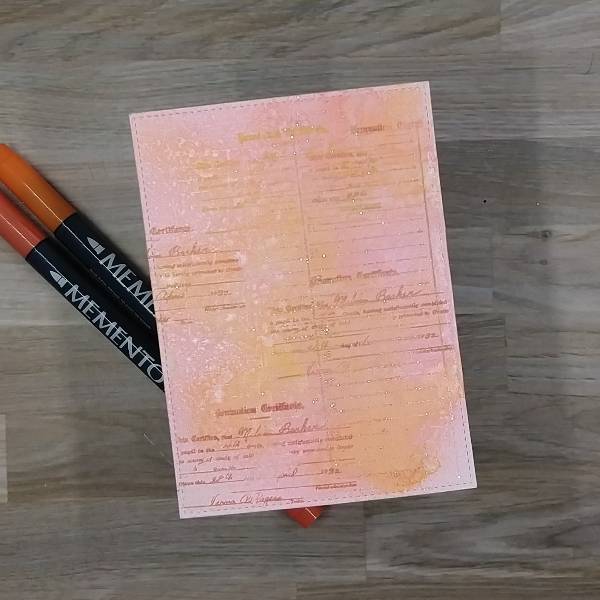
Step 7: Use Tangelo and Morocco Memento markers to color a smaller stamp and repeatedly stamp card base to add texture.
Step 8: Die cut the main sentiment out of more of the peach colored cardstock and the shadow die out of some peach patterned paper. Spray the sentiment with Sparkle Sheer Shimmer spray and the shadow paper with Cantaloupe and Angel Pink Fireworks! sprays. After the sprays dry, glue the two layers together.
Step 9: Glue the floral die cut pieces together.
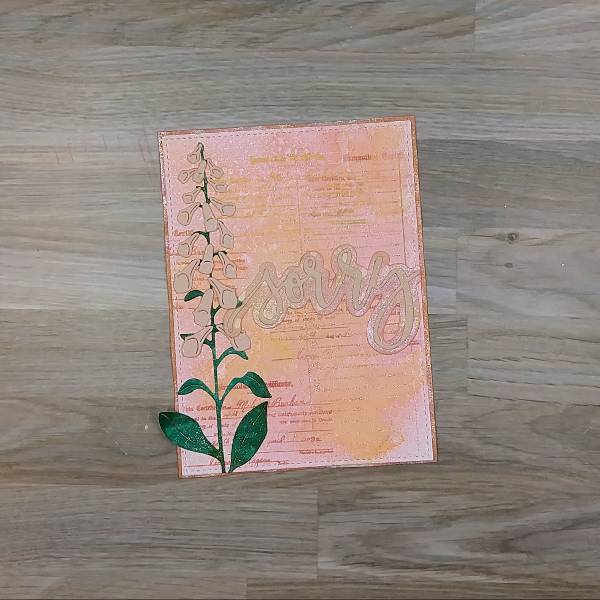
Step 10: Create the matte layer of the card by die cutting a piece of orange patterned paper and then spraying it with more of the Cantaloupe and Angel Pink Fireworks! Sprays and Sparkle Sheer Shimmer spray to mute the bold orange color.
Step 11: Glue the floral die cut and the sentiment onto the upper card base. Trim off the right edge of the sentiment so that it doesn’t overhang the upper card panel. Then glue the matte (orange) panel behind the upper panel.
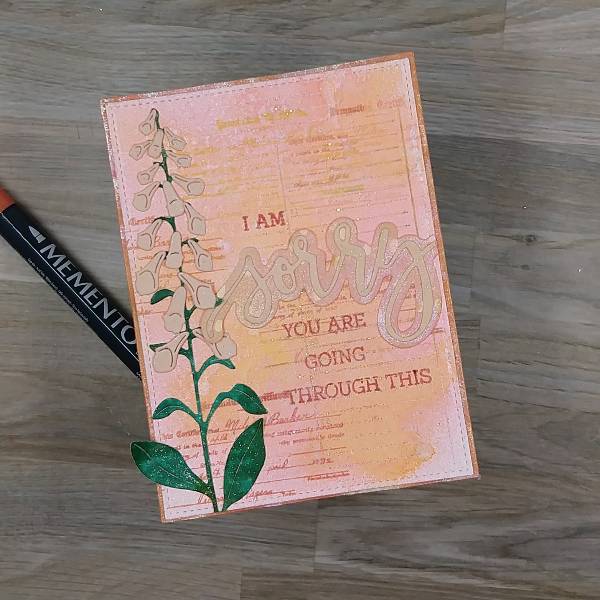
Step 12: Stamp the sub sentiments with by coloring them again with more Morocco Memento marker. (The sub sentiments came in 3 parts “I am,” “you are” and “going through this.” Since the last sentiment wouldn’t fit on the card without a little help, I performed “stamp surgery” where the stamp was cut before stamping to create two smaller stamps. If you are uncomfortable with this, you can mask part of the stamp and stamp the sentiment a couple of times if you are trying to create something similar.)
Step 13: Glue the card panel onto an A2-sized white card base and then glue a few rhinestones around the flowers and the sentiment.