Learn to Make a Back to School Card

2022_Aug_Martha-Lucia-Gomez_600x600

By Martha Lucia Gomez –

Hello there! During summer our time es limited and today I have an easy and fun Back To School Card featuring several of Imagine products, like VersaColor, Memento Ink and Markers and VersaFine. During the process you will see how all the different inks looks according to the project.

Skill Level: Beginner
Time to Complete: 30 Minutes

Directions

2022 - August - Martha Lucia Gomez - Step 1a

Step 1:

Take a piece of a dark color cardstock to create the background. On my sample, I am using dark grey, but this type of stamping looks great in additional colors like red, blue or black. Select the stamp set that you prefer to create the background.

 I selected an alphabet set of stamps but I stamped the entire sheet at once. To make it, just secure the entire sheet over the stamping tool. To create the soft look, I used VersaColor  White. It is a soft ink ideal to emboss or create shadows.  

If you are not heat embossing it, let the piece a side for a while to ink dry naturally or use a heat tool to speed the process.

2022 - August - Martha Lucia Gomez - Step 2

Step 2:

In a separate piece of white smooth cardstock, stamp the spiral image using VersaFine Onix. Let the ink dry naturally and you will obtain a crisply image. Or if you prefer, you can heat emboss the stamped image to add a shiny look. 


2022 - August - Martha Lucia Gomez - Back to School - Step 3

Step 3:

Stamp the focus image with Memento Tuxedo Black Ink.

2022 - August - Martha Lucia Gomez - Back to School - Step 4

Step 4:

Color all the details with Memento Dual Tip Markers.  

TIP: Keep in mind that you can use your Memento Dual Tip Markers with both inks, VersaFine and Memento without any coloring problem. 

2022---August---Martha-Lucia-Gomez---Step-5

Step 5:

Create the card base and resize all the layers of your card. You can paste them with Tear It! Tape or use crafty foam tape to add more dimension and interest to your card.

Art Supplies:

Imagine:

• VersaColor – White 

• Memento – Tuxedo Black 

• Memento Dual Tip Markers 

• VersaFine – Onix Black

• Tear it! Tape 

• Craft Mat 

Other:

• Joy Clair Designs – Friendly Alpha Clear Stamp Set, White Smooth Cardstock 

• Crackerbox Stamps – Spiral Side Rubber Stamp

• Precious Remembrance Shop – School Days Stamp Set

• Positional Stamp Tool.

• Scrapbook Adhesives Crafty Foam.

Let’s Make a Dazzling Friendship Card

Kathy_Aug_Main-600

By Kathy Pisupati –

Good morning!  Kathy here, creating art for Imagine Crafts!  Today I have a new tutorial for you.   I must admit I am in LOVE with the Delicata Golden Glitz pigment ink. There are several reasons:

• The color is AMAZING!

• When I don’t feel like using gold embossing powder this works fabulous (and is less messy!).

• It works fabulous with sentiments.

• It is easy to clean up.

So today I have a project for you that uses the Delicata Golden Glitz and some beautiful Tsukineko Brilliance Dew Drops. The card didn’t start out as I planned but I am happy with the finished result. Please let me know what you think in the comments! Let’s make a card. 

Skill Level: Intermediate
Time to Complete: Two hours

Directions:

image_Step1
Step 1:

You will need a top-folding card base measuring 4 1/4 x 5 1/2“. The rest of the panels we will create as we go. So, the first thing I wanted to play with was the Brilliance Dew Drops. I ink blended them all over a piece of Neenah Classic Crest Solar White 110lb card stock. I then found an embossing folder. I chose an older folder from Spellbinders. I am not sure if it is still available, but it was called the Large Medallion. I dug out my brayer, inked it up with some Delicata Golden Glitz, and rolled it over the RAISED area of the embossing folder. I put in my ink blended panel and ran it through my die-cutting machine. Here is where the plan changed. I pulled out my Gina K Designs Master Layout 2 to get the “perfect” rectangle. I taped the die to the panel. Now here is a tip when you have a panel that is loaded up with ink like mine, BEFORE you pull off the tape, heat it with your heat tool on LOW. Yeah….I didn’t do that and ripped a chunk out of the frame I was going to use. Oh well, moving right along……I used a rectangle die from GKD Master Layout 7 to cut the middle out. I WILL save this card! 


image_Step2

Step 2:

I had a lot of gold ink on my brayer, so I inked up a Swiss Dot embossing folder and ran another piece of white card stock through my machine.


image_Step_3

Step 3:

I then rolled the excess ink on a piece of white card stock measuring 4.25” x 5.5”. Isn’t it pretty? I HAD to incorporate it!


image_Step-4

Step 4:

Cut a piece of white card stock an 1/8” larger than the focal point and with your Sponge Dauber, ink the edges of the rectangle with the Golden Glitz.


Image_Step-5

Step 5:

Die-cut your sentiment and using the Golden Glitz ink, use Imagine Crafts sponge daubers to apply your ink to the sentiment. Cut a shadow from the vellum. Glue these together.  Using the Delicata Golden Glitz stamp the smaller, MY FRIEND, sentiment. Cut this sentiment to size. I also inked the edges of this sentiment.


Image_Step-6

Step 6:

Now we can assemble the card. The focal point is glued to the gold border and then adhered to the Swiss dot panel with Imagine On Point Glue. The sentiment is also adhered to the panel with glue. The MY FRIEND strip sentiment was popped up with foam tape. Then I added foam tape to the Swiss dot panel and attached it to the background panel.

Finally, I used Imagine Tear It! Tape and attached it to the card base. I added a few gems, and the card is done!


Supplies Used:

Imagine Crafts

Delicata Golden Glitz

Brilliance Dew Drops: Pearlescent Lavender, Pearlescent Sky Blue, Orchid and Pearlescent Purple

Imagine Craft Mat

Sponge Daubers

On Point Glue

Tear-It! Tape


Other

Gina K Designs Master Layout 2

Gina K Designs Master Layout 7

SCT Let’s Stamp Together Kit July 2022-Sentiment

Cuttlebug Swiss Dot Embossing Folder

Crafty Meraki Gems

Brayer

Neenah Classic Crest Solar White 110lb

Paper Trimmer

Die-Cutting Machine

Foam Tape

Simply Beautiful Collage-Style Card

Peculiar 1 600

By Alison Heikkila –

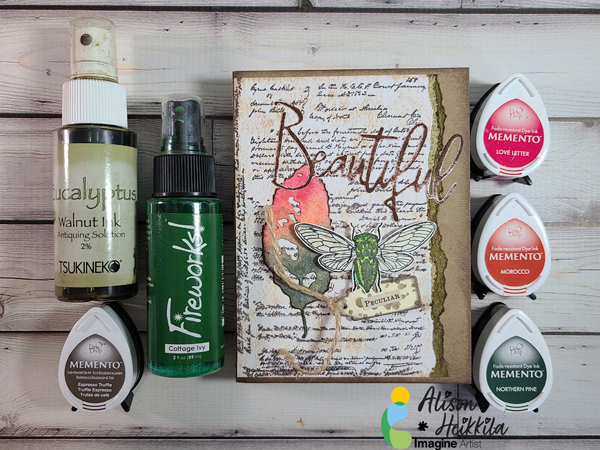
Hello! Many crafters love the look of collage-style cards, but they may be intimidated to try making them. If you throw away the idea of perfection and just enjoy the process, you can achieve this look without too much trouble. Be sure to have some text stamps on hand, as they really help achieve this look. 

Skill Level: Beginner to Intermediate
Time to Complete: 45 minutes- 1 Hour

Peculiar 2

Directions

Peculiar 3
Step 1:

On a textured cardstock, gently ink the rough surface with Desert Sand Memento Ink. Don’t push too hard…we only want to enhance the texture. 

Peculiar 4

Step 2:

With Espresso Truffle Memento Ink, apply a text background stamp to the cardstock. I didn’t use a block or stamping tool to apply this, because I wanted imperfections and blurring. 

Peculiar 5

Step 3:

Die cut a leaf out of white cardstock. Apply Northern Pine, Morocco, and Love Letter Memento Ink right next to each other on your craft mat and spritz the colors with water. Lay the leaf into the ink and let it sit for a bit to soak up the color. Lift the leaf out, and let it dry. Then, ink the edges with Warm Cocoa Memento Ink. 

Peculiar 6

Step 4:

Begin trying to decide where your pieces will go. I liked the placement of the leaf here. Now I need to choose the rest of my elements. 

Peculiar 7

Step 5:

Ink up an insect you like…I went with a cicada and used Nocturne VersaFine Clair Ink. To give the bug metallic shine, I applied New Sprout and Cottage Ivy Fireworks! Spray to the body and Sheer Shimmer Spritz in Sparkle to the wings with a brush. Let dry, then cut out. 

Peculiar 8

Step 6:

Collages always look better with imperfections, texture, and aging. To achieve all of that on this card, I first tore the right side off of my text panel. Then, I applied Eucalyptus Walnut Ink with a brush on the tear. On my Kraft colored card base, I inked the edges with Dark Brown Shimmer Delicata Ink, directly from the pad. 

Peculiar 9

Step 7:

Using the same rough cardstock I used for the focal panel, I die cut the word “beautiful.” Then I rubbed Rich Cocoa Memento Ink across in, allowing some of he white to still show through. 

Peculiar 10

Step 8:

I die cut a little tag out of cream colored cardstock, and flicked on more of the Eucalyptus Walnut Ink. Then I aged the tag with Dark Brown Shimmer Delicata Ink and added a sticker. I finished the tag off with twine. Adding many elements, especially those with texture, really add to the collage style vibe. 

Peculiar 11 600

Step 9:

Attach all of your elements. Use flat glue as well as dimensional adhesives, like foam squares to add more interest to the card. My cicada and tag are both popped up for dimension. The twine was left long and can move freely. 

Peculiar 12


Art Supplies:

Imagine:

Memento Ink: Desert Sand, Espresso Truffle, Rich Cocoa, Love Letter, Morocco, Northern Pine

Fireworks! Shimmery Craft Spray: New Sprout, Cottage Ivy

Sheer Shimmer Spritz: Sparkle

Delicata Ink: Dark Brown Shimmer

VersaFine Clair: Nocturne

Walnut Ink: Eucalyptus

Craft Mat


Other:

Sizzix & Tim Holtz: Leaf Fragments, Tag Collection

Stampers Anonymous & Tim Holtz: Entomology

Pinkfresh Studio: Classic Word Dies

Canson: Mixed Media Paper XL

Brushes

Kraft & Cream Colored Cardstock

Adhesive (flat and dimensional)


How to Make a Fun Rainbow Card with VersaColor

Kathy_July_2022_Step_1-600

By Kathy Pisupati –

Hi there, Kathy here with Imagine Crafts with a new tutorial.  My space is limited so by using VersaColor pigment inks, I can reduce the amount of colored card stock I need on hand.

VersaColor pigment inks are bright and bold and coupled with the Delicata Golden Glitz it’s a winning combination.

Skill Level: Intermediate
Time to Complete: 1 hour with drying time

Directions:

Kathy_July_22_Step-1
Step 1:

You will need a card base measuring 4 1/4 x 5 1/2“. You will also need a panel that measures 4“ x 3 1/2“. I have also used the Rainbow Builder and Rainbow Accent dies from Honey Bee Stamps. You will die-cut  the rainbow card and the rainbow stripes from the accent set. 

Kathy_July_22_Step-2
Step 2

Using VersaColor & Delicata pigment inks, use Imagine Crafts sponge daubers to apply your ink to the rainbow stripes. I used the Delicata Golden Glitz for the smallest stripes. Allow these pieces to dry. 

Kathy_July_22_Step-3
Step 3

On the smaller card panel I used a stencil from Simon Says Stamp called Interlocking Circles Good Luck Charm. It is a Layered Stencil but I only used two of the layers. I used a heavy amount of Delicata Golden Glitz on the squares and a light amount on the diamonds. I also used the Daubers to ink around the edges of this panel.  On the front of the card panel, I splattered some gold watercolor paint.  I stamped a sentiment from Pink & Main, Spring Sentiments Stamp Set onto white card stock using the Delicata Golden Glitz Ink. I used my paper trimmer to cut the sentiment to size.

Kathy_July_22_Step-4
Step 4

Next use Imagine Craft On Point glue to adhere your stripes to the rainbow card die-cut.  I used Imagine Crafts Tear-It tape to adhere the rainbow card to the stencil panel. I also used Imagine Crafts On Point glue to adhere the sentiment to the front of the rainbow. Foam tape was used on the back of the stencil panel to adhere it to the card base.

Kathy_July_2022_IG_600

Supplies Used:

Imagine Crafts

Delicata Golden Glitz

VersaColor: Pink, Turquoise and Canary

Sponge Daubers

On Point Glue

Tear-It! Tape


Other

Honey Bee Rainbow Builder

Honey Bee Rainbow Accents

Pink & Main Spring Sentiment Stamps

Neenah Classic Crest Solar White 110lb

Paper Trimmer

Die-Cutting Machine

Foam Tape

Gold Watercolor paint

Paint brush

Learn Thumping Technique using Ink Pads

2022-July-Martha-Lucia-Dandelion-Card-700

By Martha Lucia Gomez –

Hello there! In today’s crafting tutorial I want to show you how to make the traditional thumping technique but this time using ink pads and not markers! To make my card, I used the large size of Memento Inks but it can be made with the Memento Drops too or with any other type of ink. This is an easy and fun summer card for any occasion.

Skill Level: Beginner
Time to Complete: 30 Minutes

Directions:


2022-July-Martha Lucia - Dandelion Card - Step 1
Step 1:

Select the stamp set that you prefer. To make most evident this technique you can use solid stamps. Additionally, pick the colors of ink that you wanted to use. I am using two, Memento Ink Bamboo Leaves and Tangelo. 

2022-July-Martha Lucia - Dandelion Card - Step 2

Step 2:

Ink your stamp with the first color. In my case Memento Bamboo Leaves. 

2022-July-Martha Lucia - Dandelion Card - Step 3

Step 3:

Without stamp the image over the cardstock, ink the stamp partially with the second colors. Keep in mind the parts that you want to look with different shadows.

2022-July-Martha Lucia - Dandelion Card - Step 4

Step 4:

Stamp the image over a piece of cardstock.

TIP: Clean the second ink pad with a dry towel to avoid contamination of the colors.

2022-July-Martha Lucia - Dandelion Card - Step 5

Step 5:

You can repeat the above step if you want to obtain darker colors. Stamp a sentiment using a contrast color to complete your card.

2022-July-Martha-Lucia---Dandelion-Card---Step-6

Step 6:

Resize the layer with, paste the sentiment and add the decorative layer over a card base. If you want, you can use your favorite crafty foam to add more dimension to your card.


Art Supplies:

Imagine:

• Memento – Bamboo Leaves and Tangelo

• VersaFine – Onix Black

Other:

• 88 and Clear – Clear Stamp Set Kissable Dandelion

• Scrapbook.com – Clear Stamp Set Handmade Essentials

• Joy Clair Designs – White Smooth Cardstock 

• Positional Stamp Tool.

• The Greetery LLC – Crimped Frame Die

• Die Cut Machine

• Scrapbook Adhesives Crafty Foam.

Create a Shimmery Background with Fireworks!

Lion 1 600

By Alison Heikkila –

Hello! Fireworks! Spray from Imagine is a collection that coordinates with the Memento line of colors, but in a shimmery spray format. I love using the in ways that go well beyond just spritzing them, and today’s technique uses a brayer. The finished look has a glistening background that looks amazing when it catches the light. 

Skill Level: Intermediate
Time to Complete: 1 Hour

Directions:

Lion-2-600


***Let me start my saying this background took a turn in the way I was planning on making it. I adore using my Gel Press Plates, but I was getting a better result with just using a brayer, so the photo above shows how I began the process, but I wound up changing my method as I went on.

Step 1:

I spritzed my 3×5 Gel Press Plate with Lady Bug, Tangelo, and Dandelion Fireworks Spray, keeping the colors separated so I would have distinct rows. I rolled the color out with my brayer. 

Lion 3 

Step 2:

I laid my cardstock on top of the Plate and pulled my print. It was pretty splotchy, which normally I like, but I wanted it to be more solid for this card. 

Lion 4

Step 3:

I decided at this point to just spray the color directly on my Imagine Craft Mat, roll the color on to my brayer, and then take it to my cardstock. After a few layers of color, I achieved the look I was going for. Solid, shimmery color with a gradation. 

Lion 5

Here is what the panel looked like after I trimmed it down. I really love the shine. 

Lion 6

Step 4:

I laid my stencil on top of the dry panel and began to apply Morocco Memento ink on top. I spread the color with my sponge dauber. 

Lion 7

I found it to be easier to spread the color on to the stencil itself, and then use the dauber to apply it to the cardstock. 

Lion 8

Here is the completed stenciled panel. 

Lion 9

Step 5:

Time to color the lion using Memento Markers. The list of colors I used is in the supply list below. Then the colored image was die cut. 

Step 6:

I inked the edges of the white card base with Sunflower Yellow Brilliance Ink. 

Step 7:

I assembled the card and stamped my sentiment with Fallen Leaves VersaFine Clair Ink. 


Lion 10Lion 11

Art Supplies:

Imagine:

Fireworks! Shimmery Craft Spray in Lady Bug, Tangelo, and Dandelion

Memento Ink in Morocco

Memento Markers in Rich Cocoa, Toffee Crunch, Desert Sand, Love Letter, Rhubarb Stalk, Lady Bug, Morocco, Tangelo, Potter’s Clay, Peanut Brittle, Cantaloupe, Dandelion

VersaFine Clair in Fallen Leaves

Brilliance Ink in Sunflower Yellow

Sponge Dauber

Craft Mat

On Point Glue


Other:

Gel Press: 3×5 Plate

Brayer

A Colorful Life Designs: Bitty Rays Stencil

Erin Lee Creative: Brave Fierce Kind Stamps

Doodles Paper Playground: Gold (and Silver) Starburst Rhinestones

Orange Ribbon

White Cardstock