Color of the Month for August is Desert Sand

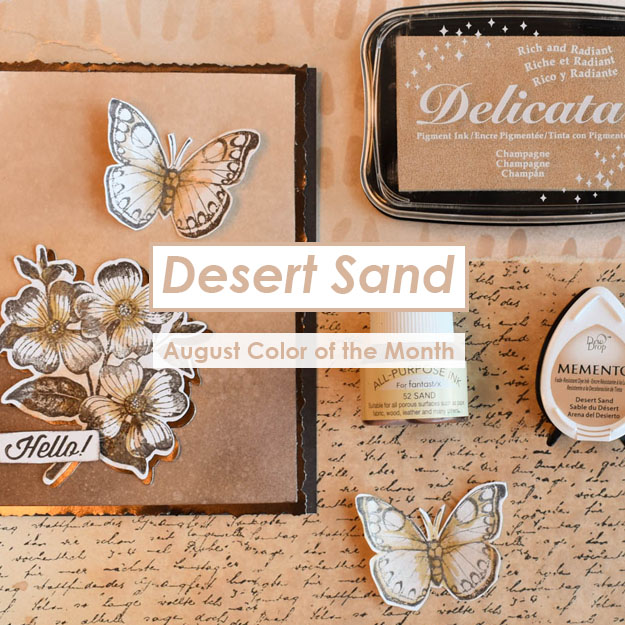
Color of the Month for August is Desert Sand. This light cream color is a beautiful way to express warm soft earthy tones. Not only is it a great compliment to chocolate browns but it looks great with a shimmery element. If you are looking for a soft shimmery gold that is not bright yellow then we highly recommend inks such as Delicata Champagne or Fireworks Shimmery Craft Spray in Desert Sand. If you are looking for a dye ink to blend with brown colors then Memento Desert Sand is also a great choice.

August also brings a collaboration with Rinea Foil Paper. Look out for how unique and versatile these foil papers are in paper crafting and jewelry making projects.

Here is a Sneak Peek of what we have to offer.

Watercolored Card by Iris Rodriguez

Espresso Card by Kyriakos Pachadiroglou

Beginner Technique by Roni Johnson

See How to Create a Sunburst with a Stenciling Technique

by Elina Stromberg

See How to Create a Sunburst with a Stenciling Technique

Fun stamped characters and bright ink colors are a joyful combination. I placed my cute dog image on a bright yellow background that was inspired by our warm July color of ‘Tuscan Sun’. I inked the background pattern directly on the folded card base: First, I stenciled a large yellow circle on the card and then inked another patterned layer on top. This double stenciling technique is super easy and using just a part of your stencil pattern makes your old stencil look cool and fresh again! If you don’t have a circle stencil you can cut it from paper or a piece of film/plastic sheet. And instead of a circle, you can use any shape you wish: an oval, a heart, a triangle, a hexagon…the possibilities are endless!

Skill: Beginner
Time: 1 hour

Directions


Step 1

Place card base folded on your craft mat. Place a circle stencil on the card, secure with masking tape. Ink the circle with yellow Cantaloupe Memento ink; dab the ink on the card with a Jumbo Dauber. Remove stencil.


Step 2

Place a pattern stencil on the inked card front and layer the circle stencil on top in its original position. Ink the circle area with orange Tangelo Memento ink. Remove both stencils. TIP: For the second inked layer, any patterned stencil can be used. For catching all the details of the stencil pattern use the smaller Sponge Dauber for inking.


Step 3

Attach a piece of masking tape on the bottom of the card. Cut a paper strip of a matching color and stamp the sentiment on it. Glue strip on the card.


Step 4

Stamp, color and cut out the main image. When coloring with alcohol markers, use Memento ink for stamping. When coloring with watercolors or watercolor pencils, use VersaFine Clair or VersaFine ink.


Step 5

Glue the main image on the card front. Decorate sentiment strip with two white gel pen dots (optional). Finished!

Supplies

Imagine

Other

  • White folded card base
  • Cardstock – Orange
  • Stencils: circle, sunray
  • Katzelkraft – Holmy
  • Ink Blog Shop – Sentiment Label Blocks
  • Alcohol markers of choice
  • White gel pen (optional)
  • Masking tape
  • Glue

Create a Wonderful Mixed Media Best Wishes Card with Lace Texture

by Lori Warren

Create a wonderful mixed media “Best Wishes” card that is full of texture, layers, and dimension. Start with a stenciled layer using Creative Medium, add a lace focal point and finish it up with a saying strip mounted with dimensional tape.

Skill: Advanced
Time: 1 hour

Directions


Step 1

Apply VersaMagic inks to the Craft Mat, spray with water, and lay cardstock into the wet ink. Trim to size.


Step 2

Mix White Neon Amplify with Iridescent Creative Medium and apply over the stencil using a palette knife. Allow to fully dry.


Step 3

Cut out a rose from a panel of lace and then apply various VersaMagic ink colors to the rose with a Brushstix.


Step 4

Spray lace rose with Shimmer Sheer Craft Spray and allow to dry.


Step 5

Once dry, apply VersaMagic ink in Cloud White to lace rose with Brushstix if you want to soften any of the tones.


Step 6

On a scrap strip of paper trimmed from panel in Step 1, stamp with a script stamp.


Step 7

On the same strip of paper, stamp flower image. Here I used VersaMagic in Mango Madness.


Step 8

Add ink splatters from VersaMagic Ink in Pink Grapefruit by rubbing ink directly to the craft mat and spraying with water. Pick up with a brush and flick onto the card.


Step 9

Edge all elements with VersaMagic in Pink Grapefruit.


Step 10

Stamp script pattern randomly onto the panel.


Step 11

Adhere lace rose to stenciled panel with On Point Glue.


Step 12

Adhere paper strip saying onto the card panel and then highlight rose with irRESISTible Pico Embellisher.

Supplies

Imagine
Other
  • White Cardstock
  • Mixed Media Paper
  • Lace
  • TCW Stencil – Damask
  • Hot off the Press Stamps

Learn How to Create a Cute Woodland Creatures Card with Masking and Watercoloring

by Arjita Singh

See how I use a simple masking technique and water coloring to create a cute and simple woodland creatures card. This stamping and coloring tutorial is a perfect activity for a Sunday afternoon of paper crafting and art-making. Enjoy!

Skill: Intermediate/Advanced
Time: 30-45 minutes

Directions

Supplies

Imagine
Other
  • Cardstock – brown
  • Watercolor paper
  • Watercolor brush
  • MISTI Stamping tool (or acrylic block)
  • White Gel Pen
  • Post-It Note
  • Waffle Flower – Be Her Stamp Set

Creating an irRESISTible Background with StazOn Pigment ink for Lavinia Stamps

by Melissa Andrew

Creating an irRESISTible Background with StazOn Pigment ink for Lavinia Stamps

Today, I share a very simple and fun technique using the irRESISTible Pico Embellisher in a new way. Importantly, I show you how to use StazOn Pigment ink over the Pico since StazOn is perfect on slick surfaces. Finally, I use a beautiful fairy stamp as a silhouette to finish our card project.

Skill: Intermediate
Time: 20 minutes

Directions

Supplies

Imagine
Other
  • Lavinia stamp – Flower Fairy
  • White Card Stock
  • Misti Stamping Platform
  • Masking Tape
  • Canson – Watercolor Paper

See How to Use these Unique Card Making Supplies

by Martha Lucia Gomez

See How to Use these Unique Card Making Supplies

Hello friends! Today, I would like to share with you a quick and easy way to create an inspiring card with clear Vertigo Sheets and VersaFine Clair.

Skill: Beginner
Time: 30 minutes

Directions


Step 1

If you are not familiar with Vertigo Sheets it is a plastic product from Imagine that adds unique depth to cards and mixed media projects. It comes in different designs and you can create visual effects with these depending on the design and colors of ink that you use. You can also stamp over the sheets, die cut and emboss it.


Step 2

To make my card, I used a strip of Vertigo Taffeta design, that is the most simple design and VersaFine Clair ink in three different colors: Verdant, Shady Lane and Green Oasis. I applied the ink over the Vertigo Piece using a sponge or dauber and let the ink dry naturally.

I stamped with VersaFine Clair Nocturne the images that I wanted over the strip and also let the strip dry well before pasting it over my card base. I used Tear It Tape to paste the decorated layer over my card and finalized it by stamping a sentiment from the Boss Babe stamp set of Joy Clair with VersaFine Clair Nocturne Ink. The photos don’t do justice to this card because of the Vertigo’s refracting. In person it is really clear and lovely!

Supplies

Imagine
Other
  • Cardstock – Whisper White
  • Joy Clair – Boss Babe set
  • Simon Says Stamp – Floral Mix Background