You Are My Lucky Star Hologram Embossed Greeting Card

by Kassy Tousignant

You Are My Lucky Star Hologram Embossed Greeting Card

Imagine has released a new, innovative design in embossing powder packaging! It is in a resealable bag! It is so easy to use and clean up after. The gusseted bottom allows it to stand independently on your surface and won’t tip over easily. The fact that you can pinch the bag while you are pouring the powder onto your project allows for greater accuracy too. I used the Hologram MBoss powder on this star card and it really makes the focal point pop!

Skill: Intermediate
Time: 30 minutes

Directions

Supplies

Imagine

VersaFine Clair in Nocturne

VersaFine Clair in Paradise

VersaFine Clair in Cheerful

Fireworks Shimmery Craft Spray in Bahama Blue

Fireworks Shimmery Craft Spray in Paris Dusk

VersaMark

Tear It Tape

Mboss Embossing Powder
Hologram

Jumbo Dauber

Other
  • Cardstock – White
  • Altenew – Stamp and die
  • Embossing buddy
  • Foam adhesive
  • Blue string
  • Watercolor paper

Learn How to Use Iridescent Blue Creative Medium to get 3 Different Looks

by Lindsay Adreon

Learn How to Use Iridescent Blue Creative Medium 3 Different Looks

When I first took a peek at the Iridescent Creative Medium I couldn’t quite figure it out. In the jar, it didn’t really have any shine and I couldn’t detect a color shift like other iridescent products. Then, I swatched it and let it dry. I could not stop staring at how beautiful it was! Moving the swatch in the light—I was mesmerized by the medium and how it would shift colors as I moved it around! It also looks different on different colors of cardstock, plus you can add color to it! I’m sharing three different ways to use the Iridescent Creative Medium. I hope you enjoy it as much as I enjoy playing around and experimenting with this fun medium!

Skill: Beginner
Time: 15 minutes + dry time

Directions

Supplies

Imagine
Other
  • The Crafter’s Workshop Stencils – Wallflowers, Distressed Lace
  • Joy Clair Stamps – Spring Stroll Stamp Set
  • Hero Arts Prayers Stamp & Die Set
  • Cardstock – black, white
  • Cardbase

Learn 1 Minute 1 Inkpad EASY Blending with Kaleidacolor

by Jessica Lin

Learn 1 Minute 1 Inkpad EASY Blending with Kaleidacolor

Today I have a super cool technique to share with you – and the best part is, it only takes one minute and an ink pad to create! Talk about minimal supplies crafting. This easy ink blending technique uses Kaleidacolor ink pads, glossy paper, and a brayer. Try it once and you’ll see how quick and easy it is compared to traditional ink blending. If you are a stamping beginner with a small stash of ink pads or a crafter who likes quick and easy cards, this video tutorial is for you.

Skill: Beginner
Time: 1 minute for ink blending, 15 minutes for card assembly

Directions

Supplies

Imagine
Other
  • Stampin’ Up Rooted in Nature Clear-Mount Stamp
  • Glossy Paper
  • Brayer
  • Neenah White Cardstock
  • Stamping Tool or Acrylic Block

Learn how to Make a Tri-fold Wedding Anniversary Invitation

by Roni Johnson

Learn how to Make a Tri-fold Wedding Anniversary Invitation

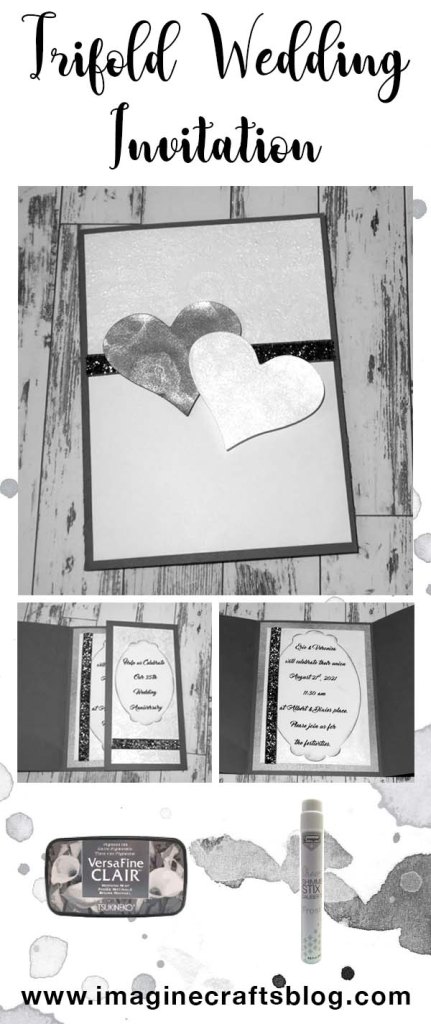
It’s approaching the traditional wedding season so I thought I would create a quick and simple wedding invitation that could also be used for weddings and for anniversary celebrations. I was inspired to switch it up a bit because my husband and I will be celebrating our 35th wedding anniversary in a couple of years. Quite the milestone these days. I love sparkle so I knew the Sheer Shimmer line was the way to go with this design.

Skill: Intermediate
Time: 1 hour

Directions


Step 1

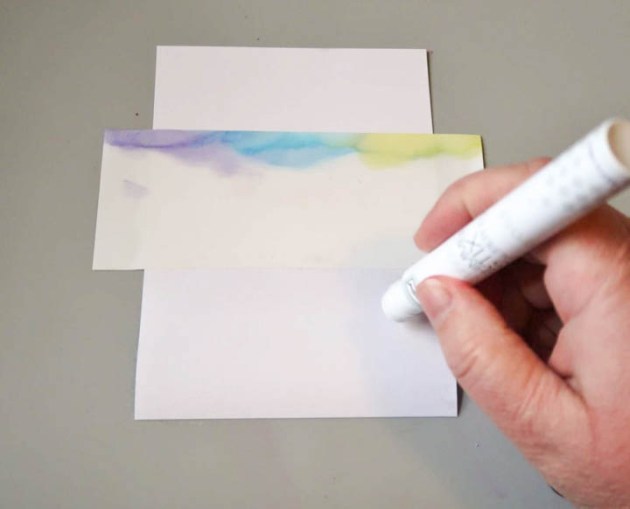
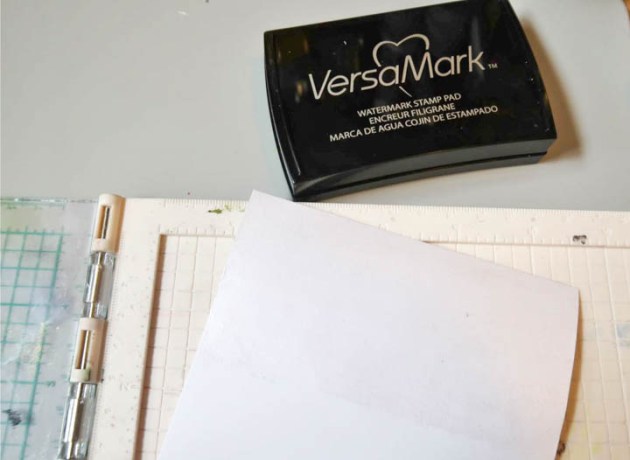
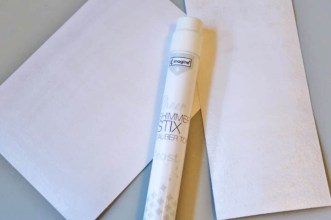
Cut a 4.25 x 6” white cardstock panel. Use tape to mask off one-third of the panel. Use Frost Sheer Shimmer Stix to apply one or two layers of sparkle to the panel. When you remove the mask the frosty shimmer will become more apparent. Let this layer dry completely.


Step 2

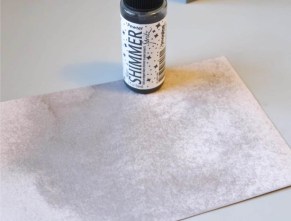
Stamp a large pattern design over the frosted area using VersaMark ink. I used a zentangle-looking swirl pattern.


Step 3

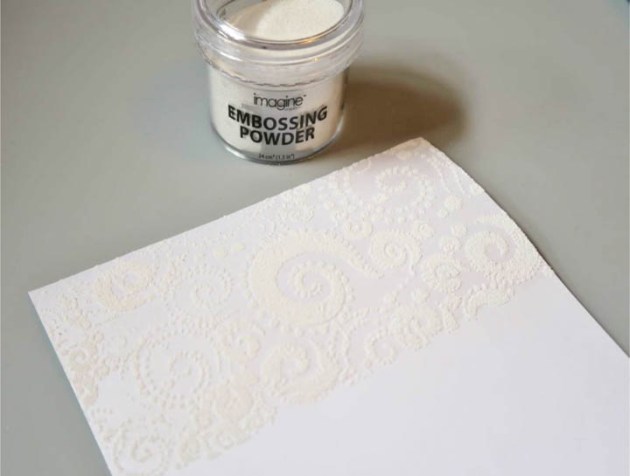
Sprinkle the pattern image with White Embossing Powder, shake off excess and return it to the jar. Heat the embossing powder to melt. You now have a lovely, shimmery white underneath the textured embossed area.


Step 4

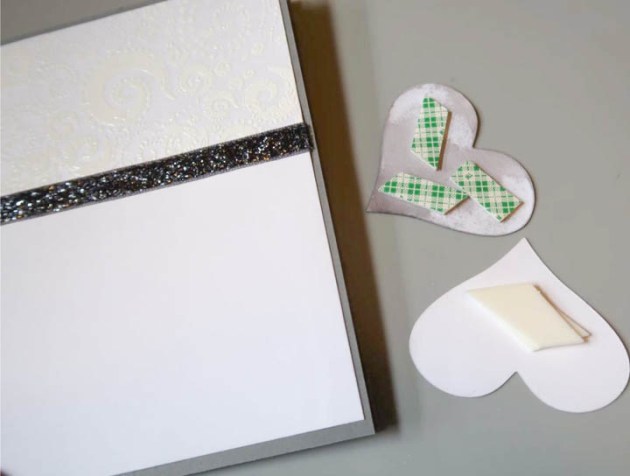
Affix grey sparkly ribbon to the bottom of the embossed design using Tear It! Tape.


Step 5

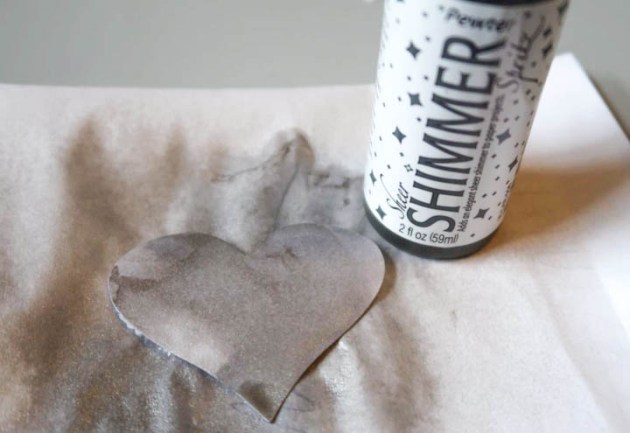
Color two hearts with Sheer Shimmer Spritz. In keeping with the simple, elegant design I used Pewter and Frost.


Step 6

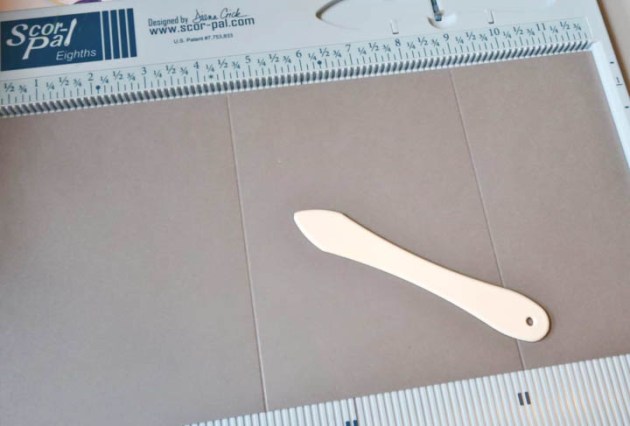
Cut a dark grey cardstock panel 6.25 x 12”; score at 4.5” and 9”. This creates the tri-fold panels.


Step 7

Use Tear It! Tape to adhere the panel to the front of the card.


Step 8

Affix the hearts to the card front using double stick foam tape.


Step 9

Prepare cardstock panels for the inside of the card using Frost and Pewter Sheer Shimmer Spritz.


Step 10

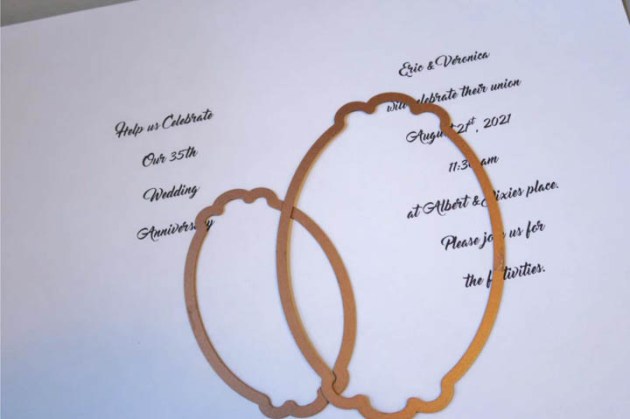
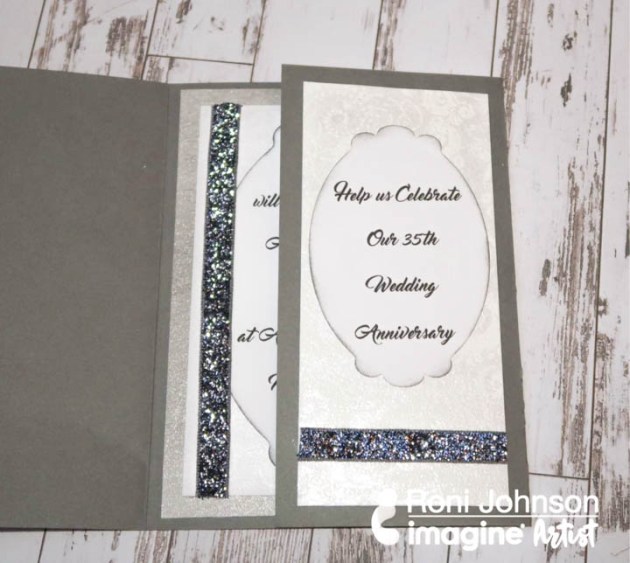
Print and die-cut information about the upcoming nuptials or other celebration as is the case in the example.
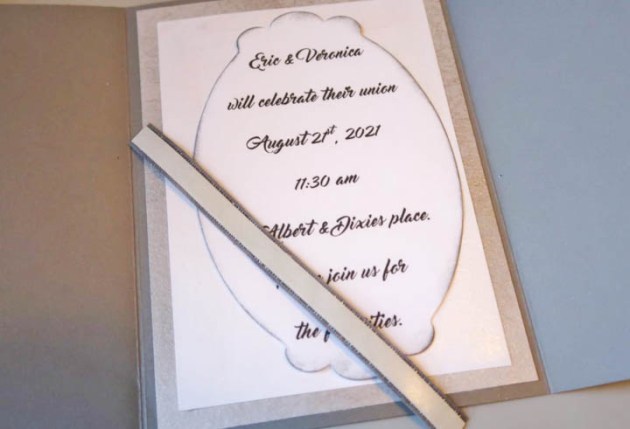

Step 11

Apply Morning Mist VersaFine Clair to the edge of each die-cut using a sponge dauber. This will give the edge some contrast. Affix the die cut information to the inside of the card.


Step 12

The outside of the card has the two hearts and the ribbon.


Step 13

Add more sparkly ribbon to the inside panels as the final touch.

Supplies

Imagine
Other
  • Cardstock – white, grey
  • Deep Red Stamps – Festive Grunge
  • May Arts – Metallic Pewter Sparkle Ribbon
  • Double-Stick Foam Tape
  • Computer Generated Text
  • Spellbinders – Die-cut Labels

See How To Make A Birthday Card With A Dynamic Look

by Elina Stromberg

See How To Make A Birthday Card With A Dynamic Look

This card project is a playful combination of two very different design elements; a simple white graphical front and a rich bright colorful background. This design idea can be used for various card projects of different sizes and shapes; this background looks as great on a large square card as on a small ATC. For the background use your favorite colors and color combinations and add additional layers with stamps and stencils. The graphical white card front will calm down even the busiest color burst background making the result look elegant and beautiful.

Skill: Beginner
Time: 2 hours + drying time

Direction


Step 1

Trim a panel from white cardstock. The size should be slightly smaller than your card base (approx. 0.25 inch smaller on all edges). Place the panel on your craft mat, backside up. Using a pencil and a ruler trace a border around the edges. Trace a few straight lines across the panel, letting the lines cross. Decide on the placement of the solid front label that will be the base for the stamped sentiment. Mark the label area clearly so that it will be left uncut.

Step 2

Place the front panel on a cutting mat. Using a craft knife and a ruler cut out the areas inside the crossing lines. Leave a thin border on both sides of the lines. Do not cut into the solid label area.


Step 3

Mist a piece of white heavy watercolor paper with water. Use your craft mat as a palette: Remove the nozzle from the Fireworks mist, pour a drop of color on the craft mat and apply color on the paper using a brush. Add drops of another matching color either with a brush or with the nozzle. Mix colors using both water and a brush, let dry before adding more layers of color.

Step 4

When finished with painting splash the paper with clear water. Let water react with the colors for a few seconds and lift off excess by pressing the paper with a paper towel. Let dry completely and trim to size of your white card front.

Step  5

Using one or two ink colors stamp the sentiment text on the card front.

Step 6

Assemble the card by first gluing the white card front on the colorful background and then attaching the entire front panel on the card base.


Extra Tip:

When coloring a card background I often use a paper slightly larger than my finished project. After trimming the panel to the final size I keep the colorful leftover pieces and use them for decorating the inside of the card. This way I’m continuing the same color and/or pattern theme on the inside of the card!

Supplies

Imagine

Other

  • White cardstock
  • White heavy watercolor paper
  • Solid color card base
  • Pencil
  • Ruler
  • Watercolor brush
  • Craft knife
  • Cutting mat
  • Paper trimmer
  • Glue
  • Double-sided tape
  • Ali Edwards – ‘Hello Birthday’ Stamp

Learn How to Create a Vellum Overlay for Wedding Invitations

by Lindsay Adreon

Learn How to Create a Vellum Overlay for Wedding Invitations

I have always loved the look of vellum overlays on wedding invitations and making them yourself is super simple! In today’s video, I’m sharing a few different designs along with different ways to attach the vellum overlays! I hope you all enjoy it!

Skill: Beginner/Intermediate
Time: 20 minutes per invitation

Directions

Supplies

Imagine
Other
  • Cardstock
  • Vellum
  • Gold Deco Foil
  • Concord & 9th – Hello Lovely Stamp Set
  • White Eyelets
  • Waffle Flower – Plaid Play Stamp Set
  • Autumn Leaves Gilding Flakes
  • Brads
  • Acrylic Block
  • Fiskars Paper Cutter
  • Laminator