– Hi everyone! It’s Jessica here. Today I am sharing a simple way to create 3D Christmas trees for your holiday cards. It is beginner friendly with minimal supplies, and I think it’s perfect to mass produce as well.
Skill: Beginner Time: 30 min
Directions:
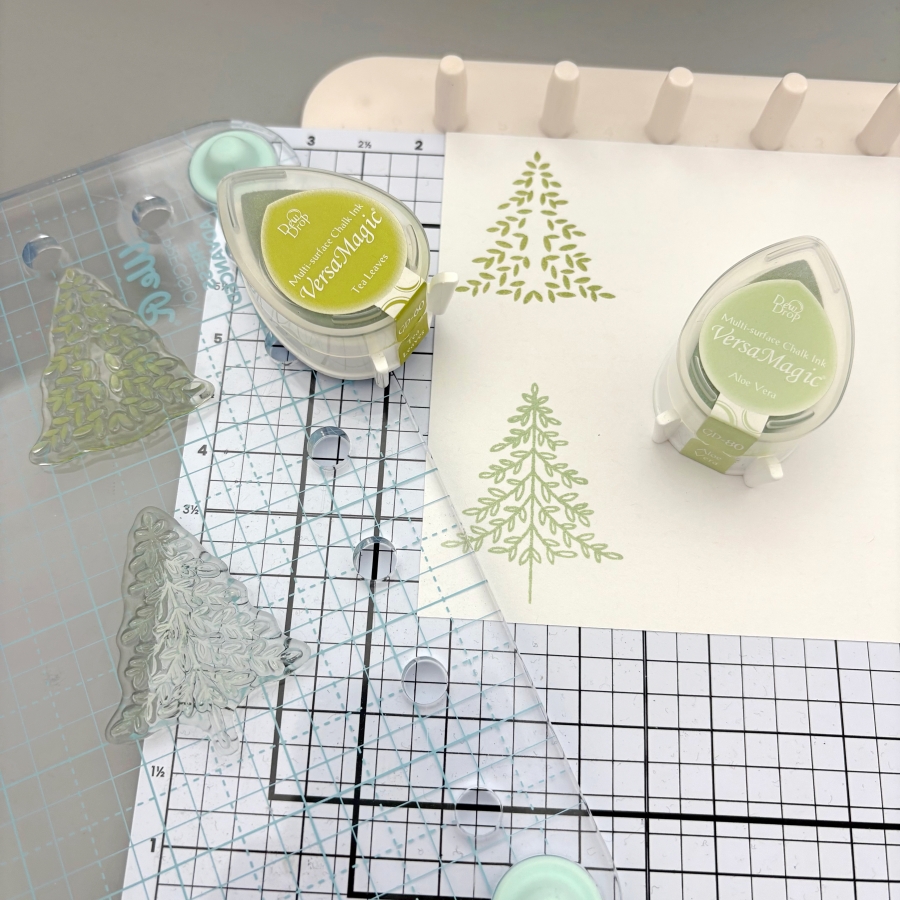
Step 1: Start by stamping Christmas tree images with VersaMagic Aloe Vera and Tea Leaves ink pads. I used stamps from Stampin’ Up’s Perfectly Plaid set, but any small Christmas tree image would work for today’s technique. For each 3D Christmas tree, you would need three layers. You could stamp each design three times for each layer, or only stamp the top layer for quick mass production of cards.
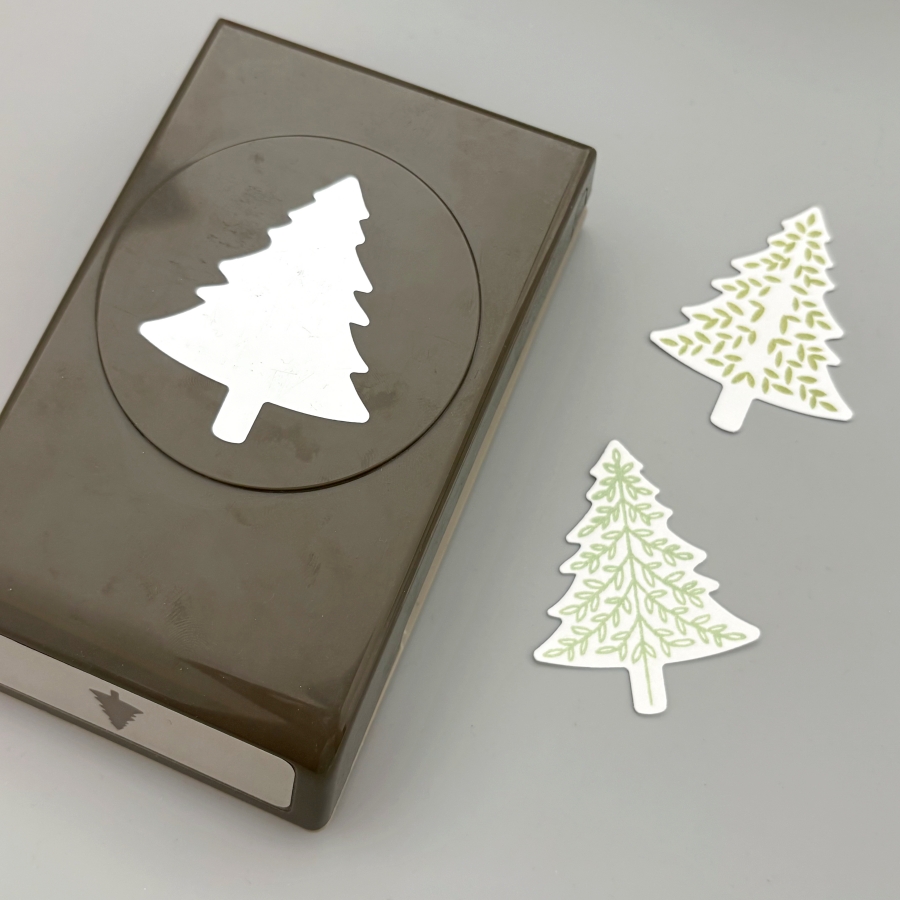
Step 2: Next, use the matching paper punch to cut out the Christmas trees. If you only stamped the top layer, be sure to punch out 2 additional cutouts with white cardstock for each 3D tree you are building. Since I am making two 3D trees today, I would need 4 more white cutouts.
Step 3: Score each Christmas tree cutout in the middle. I lined up the top and bottom of the cutout to the score guide to score.
Step 4: After scoring, fold the stamped Christmas tree cutout in half, and apply On Point Glue to the top of the folded crease. Then adhere it to a blank (or stamped) cutout. Be sure to hold the folded layer in place for about 20 seconds before the glue dries. Repeat this process to adhere the second layer to the third tree cutout.
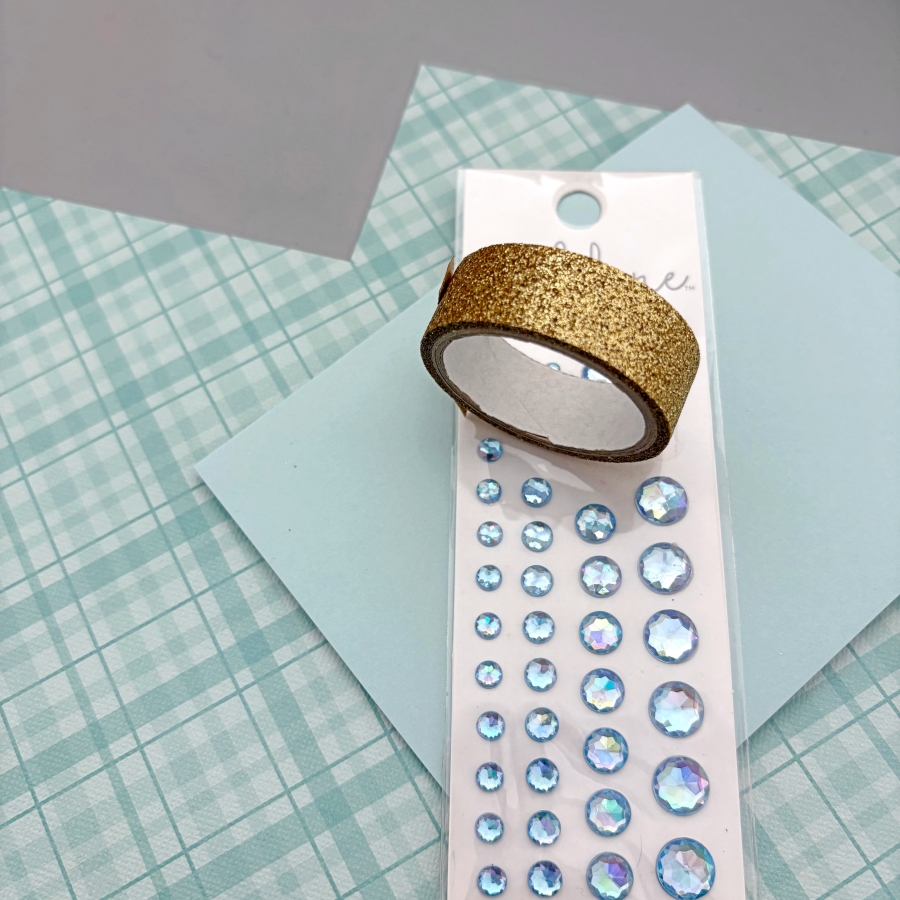
Step 5: Now that the 3D Christmas trees are made, it is time to prepare the card base. Trim a piece of patterned paper to 4 x 2 ¼ inches and a cut a 4 ¼ inch piece of gold glitter washi tape. Trim one side at an angle to create a banner shape and adhere both pieces to the card base.
Step 6: Finally, stamp the sentiment using VersaMagic Ocean Depth ink pad. Adhere the 3D Christmas trees using Tear-It! Tape and embellish the card with a few rhinestones.
Here is a finished card where I stamped all 3 layers of the 3D Christmas trees. I love how easy it is to create the 3D element, and it is mail-friendly, too! I hope this tutorial inspires you to get a headstart on making Christmas cards for this year. Thank you so much for stopping by, and I’ll see you in my next tutorial!
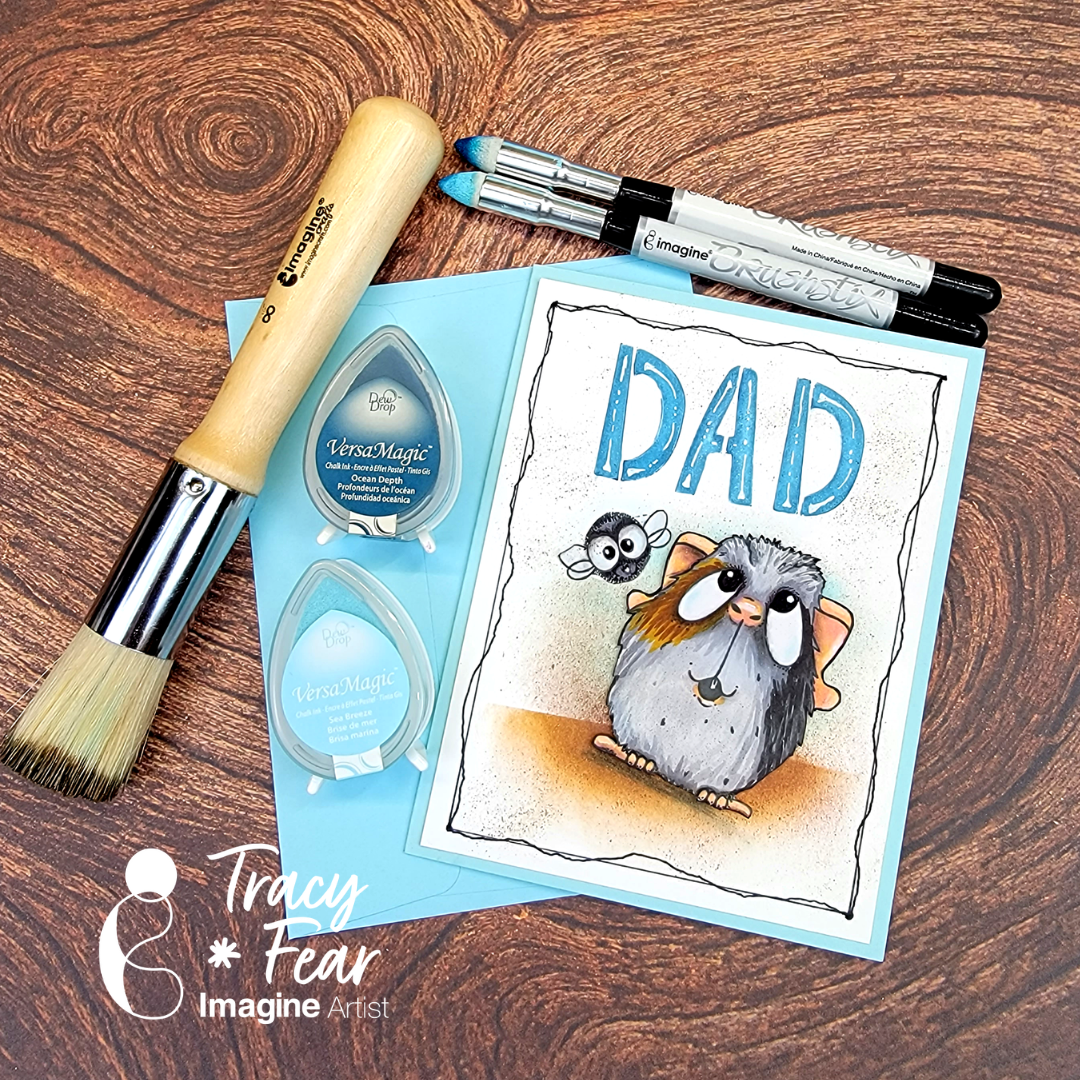
Hello Friends! Tracy here and today I am excited to share this fun and quirky little Father’s Day card created with a family funny bone element!
In today’s video tutorial I am sharing how to get dimensional effects out of your lettering stencils and how to create background noise using our #8 Stippling Brush and our Brushstix along with some of our most popular inks!
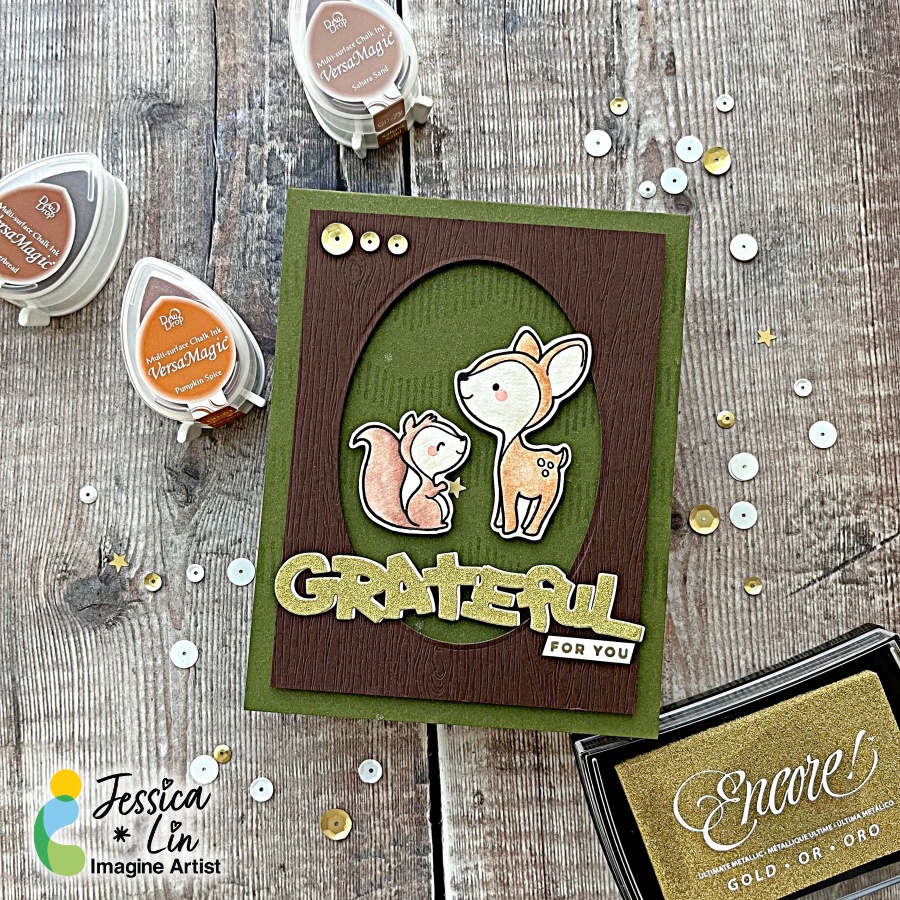
Hi everyone! It’s Jessica here and welcome back to another card tutorial. Thanksgiving is coming up and I love to make cards to express my gratitude! Today I’m also watercoloring with various ink pads from the VersaMagic, Brilliance and Delicata ink lines. Let’s begin!
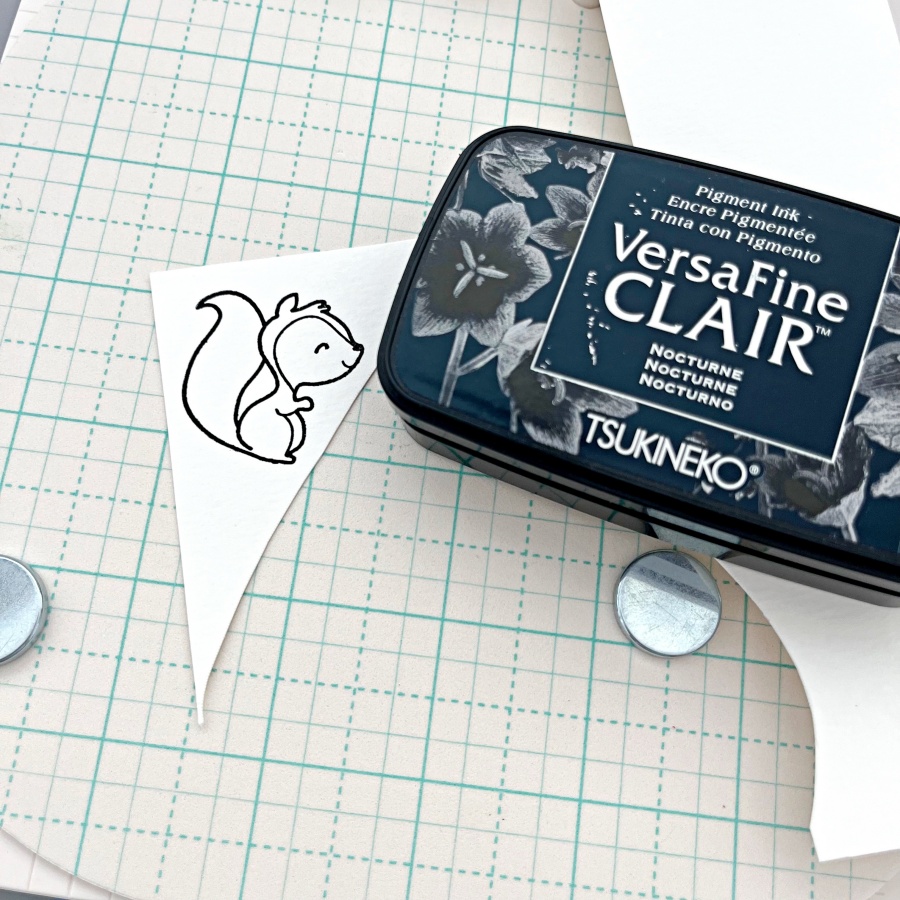
Step 1: Stamp the critter images from The Greeting Farm Wood Friends stamp set with VersaFine Clair Nocturne ink. This is my favorite black ink for stamping and it’s perfect for watercoloring.
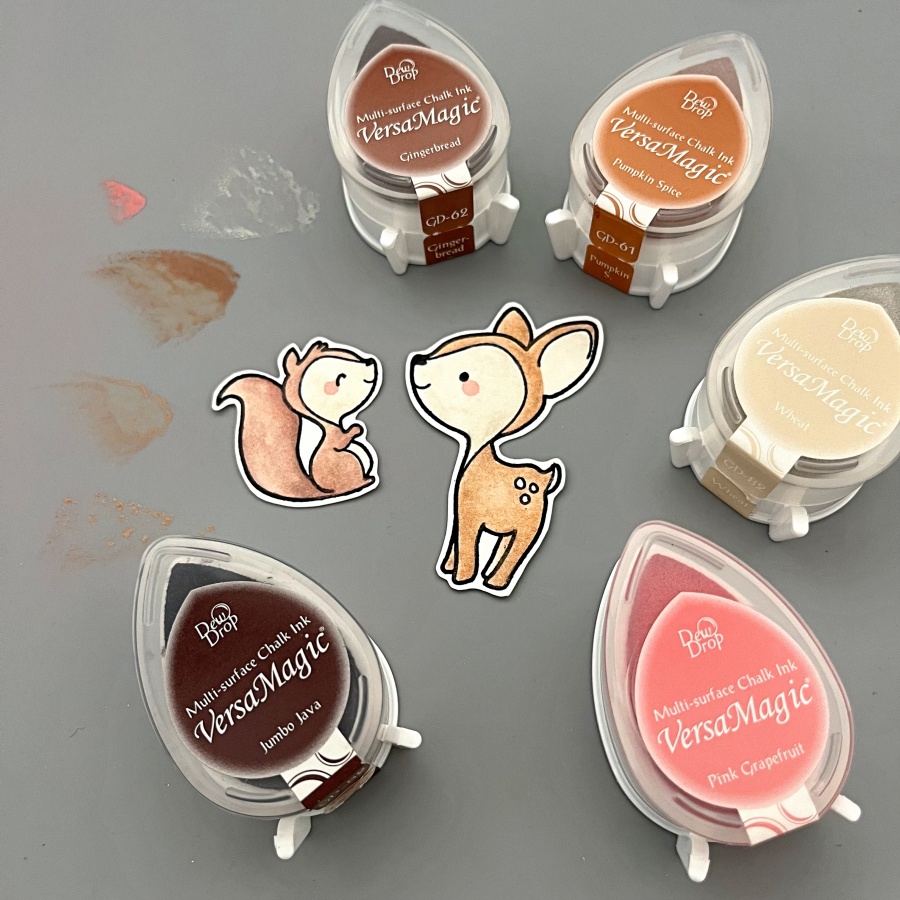
Step 2: Color the images with VersaMagic inks. I used Gingerbread, Pumpkin Spice and Wheat for the deer, and to add some shimmer and shine, I watercolored a layer of Celestial Copper from the Delicata ink line. For the squirrel, I used Sahara Sand and Jumbo Java as the base color and added Cosmic Copper Brilliance ink as an accent. VersaMagic, Delicata, and Brilliance ink pads are all pigment inks and I love that you can mix and match the colors for maximum creativity. For the final touch, I added small amounts of Pink Grapefruit to create their rosy cheeks.
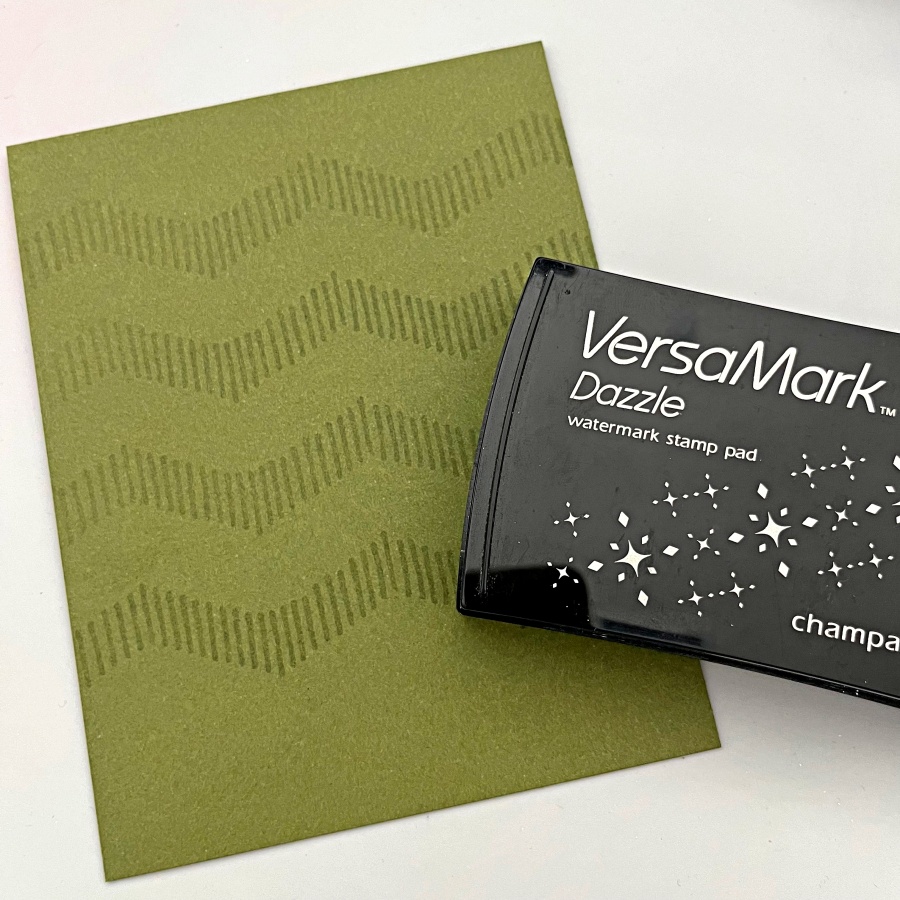
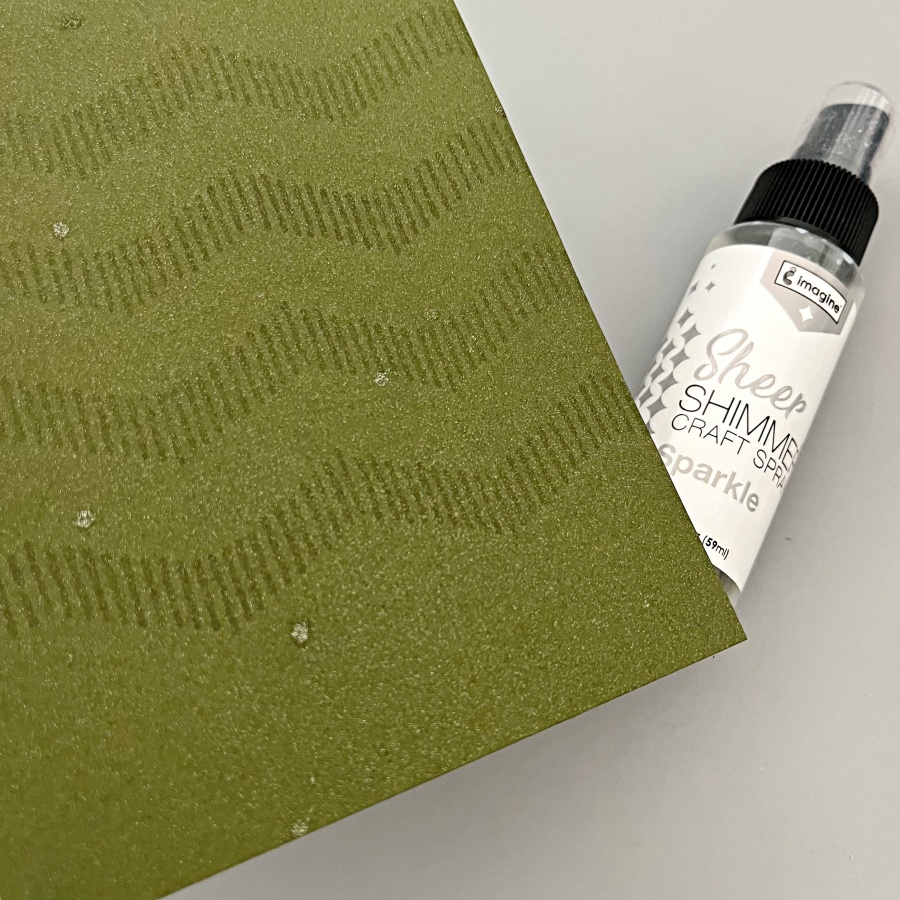
Step 3: I decided to use Stampin’ Up!’s Mossy Meadow cardstock as the cardbase since it’s a nice foresty color. I also stamped some geometric striped pattern with my VersaMark ink pad. Did you know that you could stamp with VersaMark as well? It’s known for being the best ink for heat embossing, but I also stamp with it quite often to create additional interest to the background.
Step 4: Then I spritzed on a layer of Sheer Shimmer Spray in Sparkle. I wish you could see the shimmer in real life! The photo does not do its justice. The shimmer is just so beautiful and it truly transformed this simple card base.
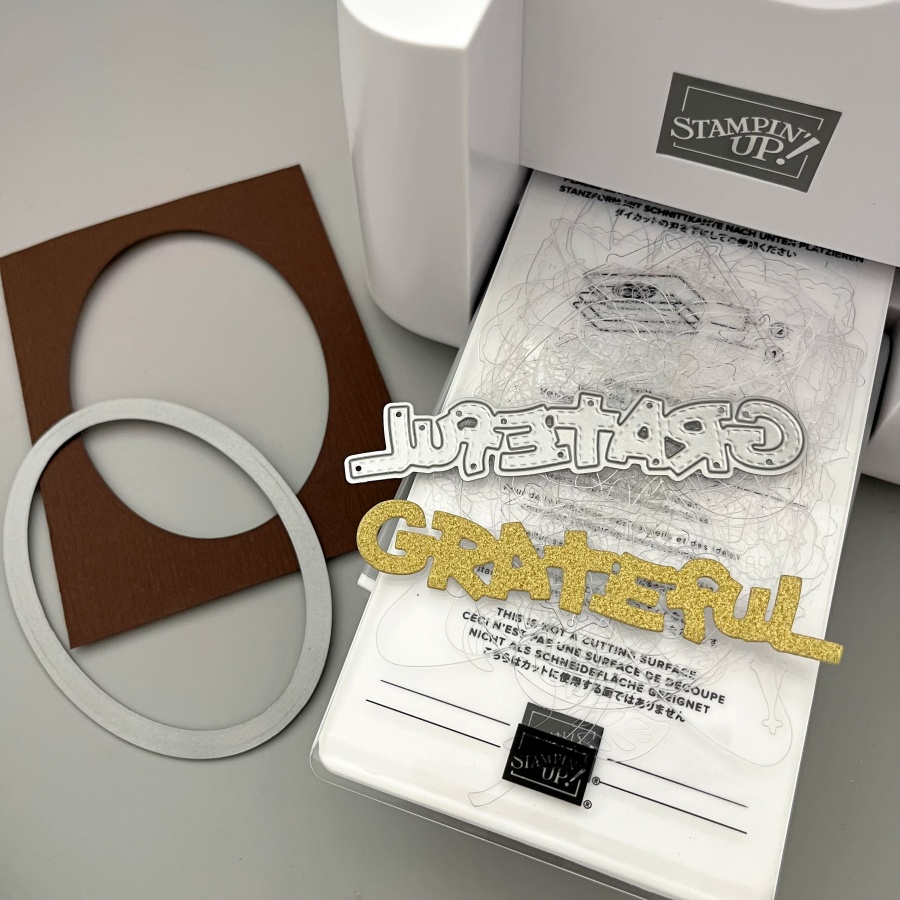
Step 5: Next, I die cut an oval panel as a frame for the little critters, and I die cut the Grateful sentiment from gold glitter cardstock as well.
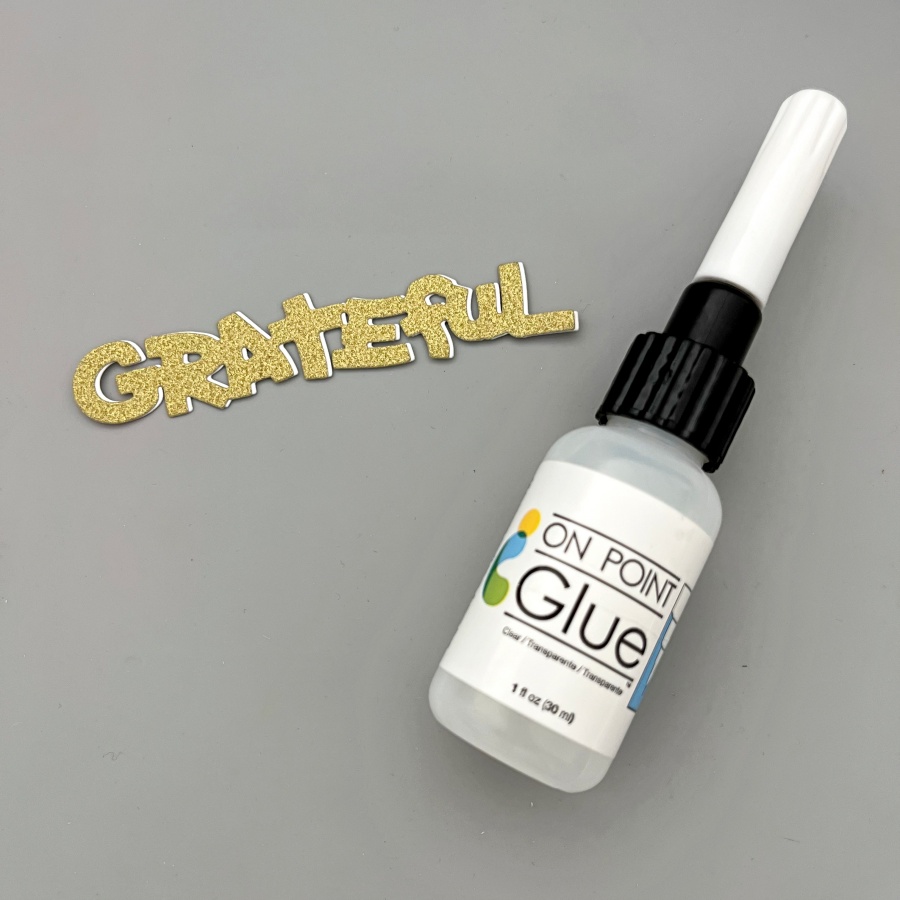
Step 6: To make the sentiment stand out a little bit more, I die cut again using white cardstock and layered it underneath the gold one. This creates a subtle shadow effect. The On Point Glue has a fine tip nozzle that makes applying small amounts of glue so easy. If you work with intricate dies all the time, I recommend having this glue in your stash!
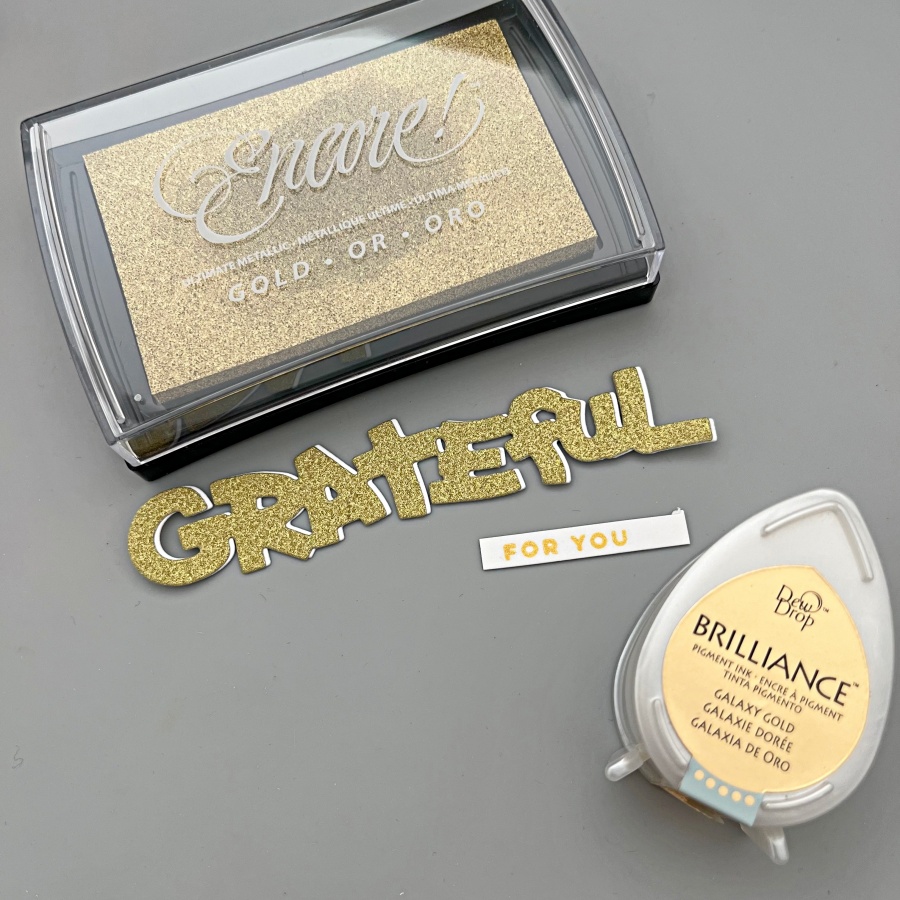
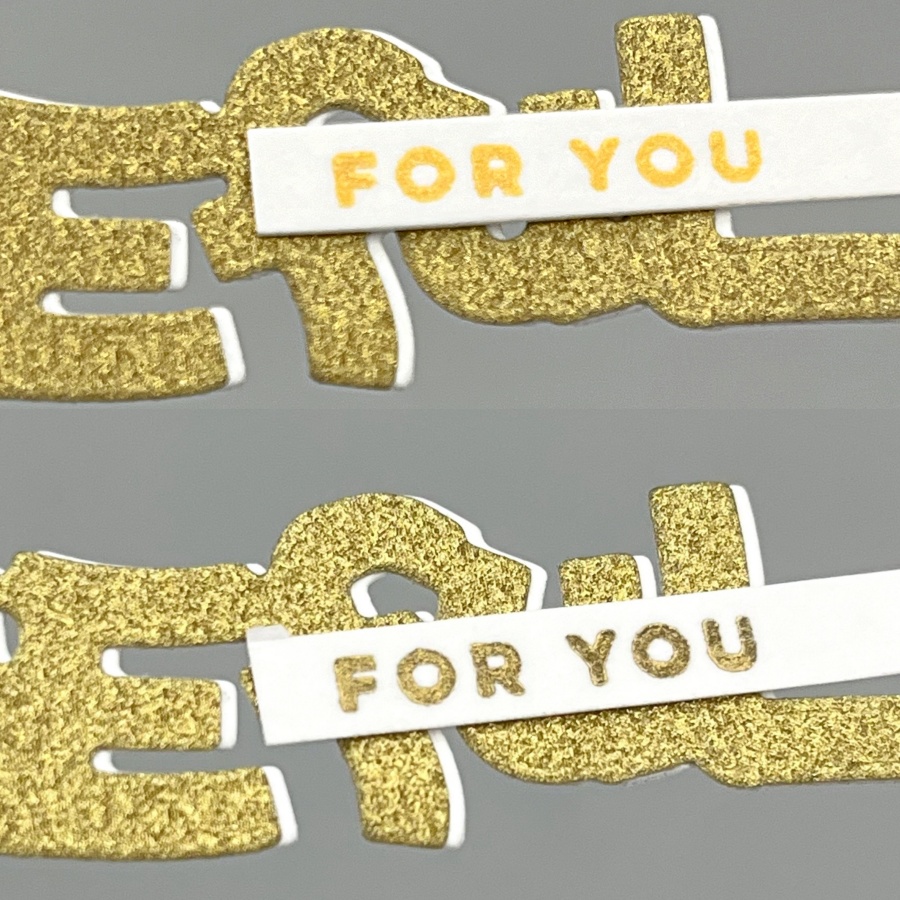
Step 7: Finally, I stamped the “For You” stamp in gold as well to complete the sentiment. Initially I picked the Brilliance Galaxy Gold ink pad as it is my go-to gold ink, but I realized that the tone is slightly too warm compared to the gold glitter cardstock I used. So I
re-stamped with Gold Encore ink instead. I have a close-up comparison below as well.
The picture on the top used Brilliance Galaxy Gold and the one below used Encore Gold. Brilliance Galaxy Gold is a really yellow, sunny kind of gold while Encore Gold shows a cooler tone. The finish is different between the two as well! Brilliance ink pads are shimmery and the Encore line is metallic.
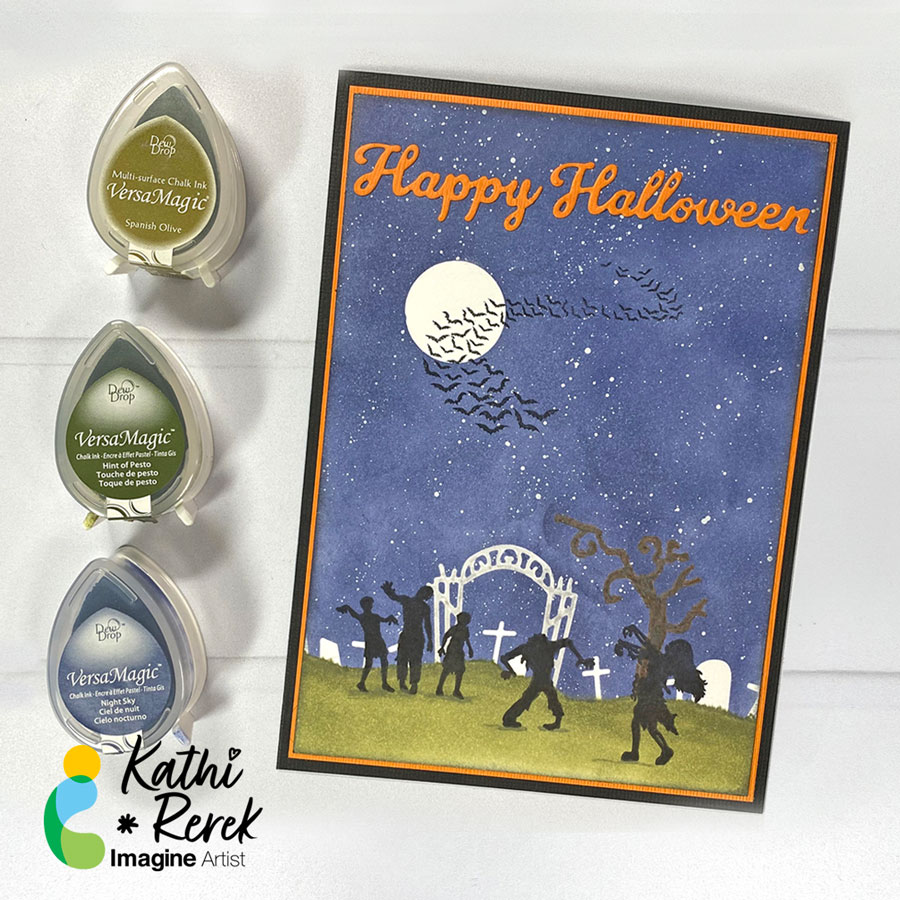
I might be an introvert, but I do love to make scenes — in card form. Here’s a Halloween card created with VersaMagic and VersaFine Clair inks, stamping, and some die-cuts.
Skill Level: Intermediate Time: 1.5 hours
Instructions:
Step 1: Cut a piece of Bristol paper to 4.75” x 6.75”. Use the Boneyard Edgers die to cut removable sticker paper and place along the bottom of the image panel. Place low tack tape below it.
Use the 1” circle punch to punch the sticker paper and adhere it to the upper left hand side as shown.
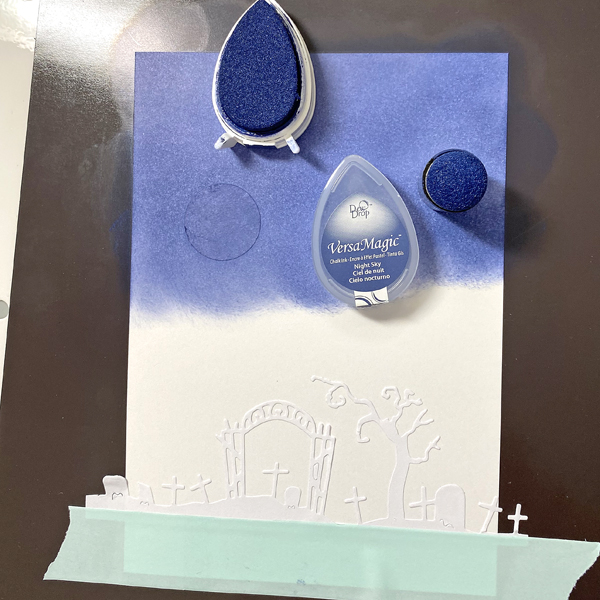
Step 2: Use a Sponge Dauber to apply Night Sky VersaMagic Ink over the masked images onto the background. Heat set.
Step 3: Spray a little water into a small container. Squeeze a few drops of Moonlight White VersaMagic Re-inker into the pot. Use a paint brush to mix the water and the ink. Tap the inky paintbrush over the night sky background to add splatter to look like stars.
Step 4: Remove the sticker masks from the moon and from the cemetery.Smoosh the Jumbo Java VersaMagic Dewdrop Inkpad onto a piece of acetate. Lightly mist with water. Use a paintbrush to paint the tree in the graveyard. Heat set. Clean and dry the acetate.
Steps 5A and 5B: Smoosh the Hint of Pesto VersaMagic Dewdrop Inkpad onto the cleaned piece of acetate. Lightly mist with water. Use a clean paintbrush to apply green ink at the top of the hill below the tombstones, crosses, gate, and tree (5A). Use a Fantastix to apply Spanish Olive VersaMagic Ink to blend this lighter ink below the ink applied in Step 5A. Continue apply the Spanish Olive Versa Magic Ink horizontally to fill in the base of the card and create the cemetery lawn. Heat set the image panel.
Step 6: Place the image panel onto the base of a stamping platform secured with magnets and low-tack tape.
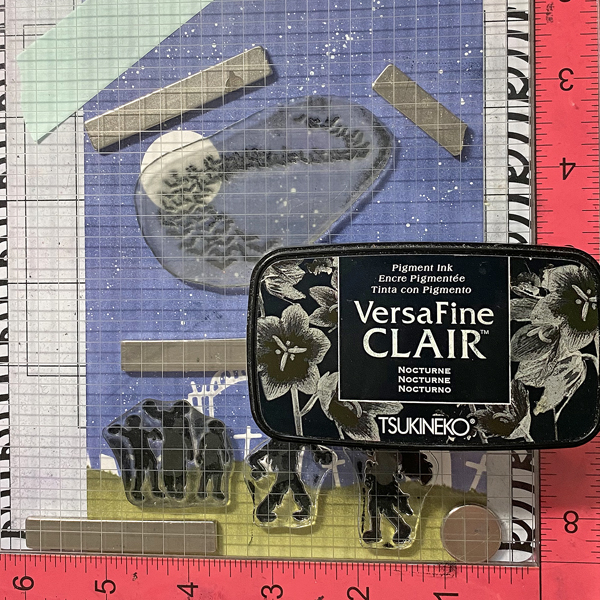
Position the clear Zombie stamps from the Zombie Party Clear Stamp Set facedown as desired on the cemetery lawn. Position the Bat Colony Clear Stamp facedown over the moon and sky.
Press the platform’s base onto the back of the stamps. Lift. Ink the stamps with Nocturne VersaFine Clair Ink and stamp. Re-ink and stamp if necessary to attain solid black images. Heat set the panel.
Step 7: Trim the image panel to 4.625” x 6.625”. Use Nocturne VersaFine Clair Ink to edge the image panel. Cut a piece of orange cardstock to 4.75” x 6.75”. Sorry that there’s no photo.
Step 8: Apply Tear It! Tape to cover the reverse of a piece of orange cardstock. Use the “Happy Halloween” sentiment dies to cut orange cardstock. Remove the tape’s backing and adhere the sentiment as shown.
Step 9: Use Tear It! Tape to adhere the layers of the card.
In today’s card, I used sprays and and ink-blending to make a Halloween card.
Skill: Intermediate Time: 1.5 hours
Directions:
Step 1: Stamp the Death’s-Head Moth stamp onto a piece of white watercolor paper with Nocturne VersaFine Clair ink. Emboss with Clear Mboss powder.
Step 2: Spray a pre-die cut panel of watercolor paper with Lilac Posies Fireworks! Shimmery Craft Spray and Rose Gold Sheer Shimmer Craft Spray. Allow the panel to dry.
Step 3: Color two corner filigree stamps–one at the top right corner and one at the lower left corner–with the Sweet Plum Memento Marker directly and then stamp the sprayed panel. Flip the panel 180 degrees (so the top is now the bottom) and repeat the process to add a stamped image to each corner.
Step 4: Ink blend Perfect Plumeria VersaMagic Chalk Ink around the border of the card panel, overlapping with the stamped decoration just added. Then ink blend the edge of the panel with Midnight Black VersaMagic Chalk Ink.
Step 5: Die cut a piece of black watercolor paper with a frame die. Then spray the die cut with Rose Gold Sheer Shimmer Craft Spray and let dry. If desired, repeat this process to add more shine and color.
Step 6: Fussy cut the Death’s-Head Moth, then use a sponge dauber to ink blend the outer part of the wings with Perfect Plumeria VersaMagic Chalk Ink.
Step 7: Spray the moth with Angel Pink Fireworks! Shimmery Craft Spray and allow to dry.
Steps 8 and 9: Stamp a border and a sentiment on a piece of watercolor paper with Nocturne VersaFine Clair ink. Heat emboss with Clear Mboss embossing powder. Then fussy cut the border. Then ink blend the edges of the sentiment with Perfect Plumeria VersaMagic Chalk ink with a sponge dauber. Then lightly spray the sentiment with Rose Gold Sheer Shimmer Craft Spray. Allow the spray to dry.
Step 10: Glue the frame, Death’s-Head Moth and sentiment onto the background panel.
Step 11: Die cut a piece of sparkly black cardstock with a larger panel die cut. Glue it behind the sprayed panel as a matte layer.
Step 12: Glue embellishments onto the panel and finish the card by gluing the whole thing onto an A2-sized card base.
Other • Crafty Meraki – Embellishments – Meraki Sparkle Gold • Erin Lee Creative – Paper – Las Vegas Sparkly Cardstock • Gina Marie Designs – Die set – Big and Little Chain Rectangle die set • Whimsy Stamps – Stamp Set – Exquisite Beauty stamp set • Whimsy Stamps – Die Set – Forever Cameo Frames die set • Watercolor paper • Paper Trimmer • Scissors • Glue
I love coffee and I love penguins. Therefore I have a large collection of penguin and/or coffee themed crafting products. Here’s a somewhat snarky card using the wonderful VersaMagic Inks.
Skill Level: Intermediate Time: 1.5 hours
Instructions:
Step 1: Use Nocturne VersaFine Clair Ink to stamp the smallest penguin from the Grumpy Penguin Red Rubber Stamp Set onto a panel of Bristol paper.
Steps 2A – 2D: 2A – Smoosh the Cantaloupe Memento Dew Drop Inkpad onto a piece of acetate packaging. Dip a paint brush into water, pick up some ink off of the acetate sheet, and paint both side sides of the penguin’s beak.
2B– Repeat the process with Dandelion Memento Ink and paint the center of the penguin’s beak, blending the two colors of ink. Clean and dry the acetate sheet.
2C – Smoosh the Tuxedo Black Memento Inkpad onto the acetate sheet. Dip a paintbrush into water, wipe off the excess water, pick up some black ink, and paint the dark parts of the penguin. Repeat the process using more diluted ink to add some greyer tones to the penguin . Clean and dry the acetate sheet.
2D – Smoosh the Angel Pink and Summer Sky Memento Dew Drop Inkpads onto the acetate sheet. Use a damp paintbrush to add some color to the penguin’s belly. Heat set.
Step 3: Fussy-cut the sticker paper version of the stamped penguin and place it over its counterpart on the image panel as a mask.
Step 4: Use low-tack tape to secure the coffee cup cutting die over the masked panel. Run through a die-cut machine..
Step 5: Place a Post-It Note horizontally .25” from the bottom of the coffee cup die-cut. Use a Sponge Dauber to apply Moonlight White Brilliance Ink over the Post-It Note onto the coffee cup die-cut. Remove the low—tack tape and the penguin’s mask. Heat set.
Step 6A- 6B Cover the base of the coffee-cut die-cut with low-tack tape. Place the coffee-cup cutting die so that the body of the coffee cup is slightly outside the coffee-cup die-cut. Use a Sponge Dauber to apply Oasis Green VersaMagic Ink fairly heavily along the outside edges of the coffee-cup die-cut (6A).
Remove the cutting die and continue to apply VersaMagic Ink to the rest of the coffee cup (6B). Heat set.
Step 7: Use a lavender chalk pencil to add detail and shading to the outside of the coffee-cup die-cut. Use the White Glaze Pen to add highlights to the coffee cup. Sorry that there are no photos.
Step 8: Use a Sponge Dauber to apply Oasis Green VersaMagic Ink over a piece of Bristol paper to create a background panel. Heat set.
Step 9: Uselow-tack tape to secure the inked panel to the back of the coffee bean stencil. Use a Sponge Dauber to apply Jumbo Java VersaMagic Ink over the stencil onto the background panel. Remove the panel from the stencil. Heat set the panel.
Step 10: Use a Sponge Dauber to apply Spring Pansy VersaMagic Ink to two strips of Bristol paper. Heat set.
Step 11: Use one of the cutting dies from the Majestic Border Die Set to cut the both strips of inked paper.
Step 12: Repeat Step 10 using Jumbo Java VersaMagic Ink, heat set, then cut with the same cutting die. (No photo)
Step 13: Use On-Point Glue adhere one of the Spring Pansy inked die-cut atop the Jumbo Java one. (No photo)
Step 14: Use the scalloped rectangle die from the Passe Partout Rectangle Die set to cut the stenciled background panel from Step 9. Edge the panel with Jumbo Java VersaMagic Ink.
Step 15: Apply Spring Pansy VersaMagic Ink with a Sponge Dauber to the outer .5” of a panel of Bristol paper. Heat set then cut the panel using the largest plain rectangle from the Passe Partout Rectangle Die set.
Step 16: Place a leftover scrap of the Spring Pansy VersaMagic inked paper onto the base of a stamping platform. Ink the stamp with Jumbo Java VersaMagic ink, then stamp onto the scrap. Remove the scrap and heat set the ink. Use a Ribbon Slide die to cut the sentiment then edge the die-cut with Jumbo Java VersaMagic Ink.
Step 17: Use a Ribbon Slide Die to cut the sentiment. Use Jumbo Java VersaMagic Ink to edge the die-cut.
Step 18: Create an A6 card from a piece of textured white cardstock. Use a sponge dauber to apply Jumbo Java VersaMagic Ink around the edges of the card as shown. Heat set.
Step 19: Thread the reserved border die from Step 11 through the sentiment die-cut. Use On Point Glue to adhere both the sentiment/border strip die-cut and the stacked die-cut to the background panel as shown.
Step 20: Use Tear It! Tape to adhere the layers of the card.