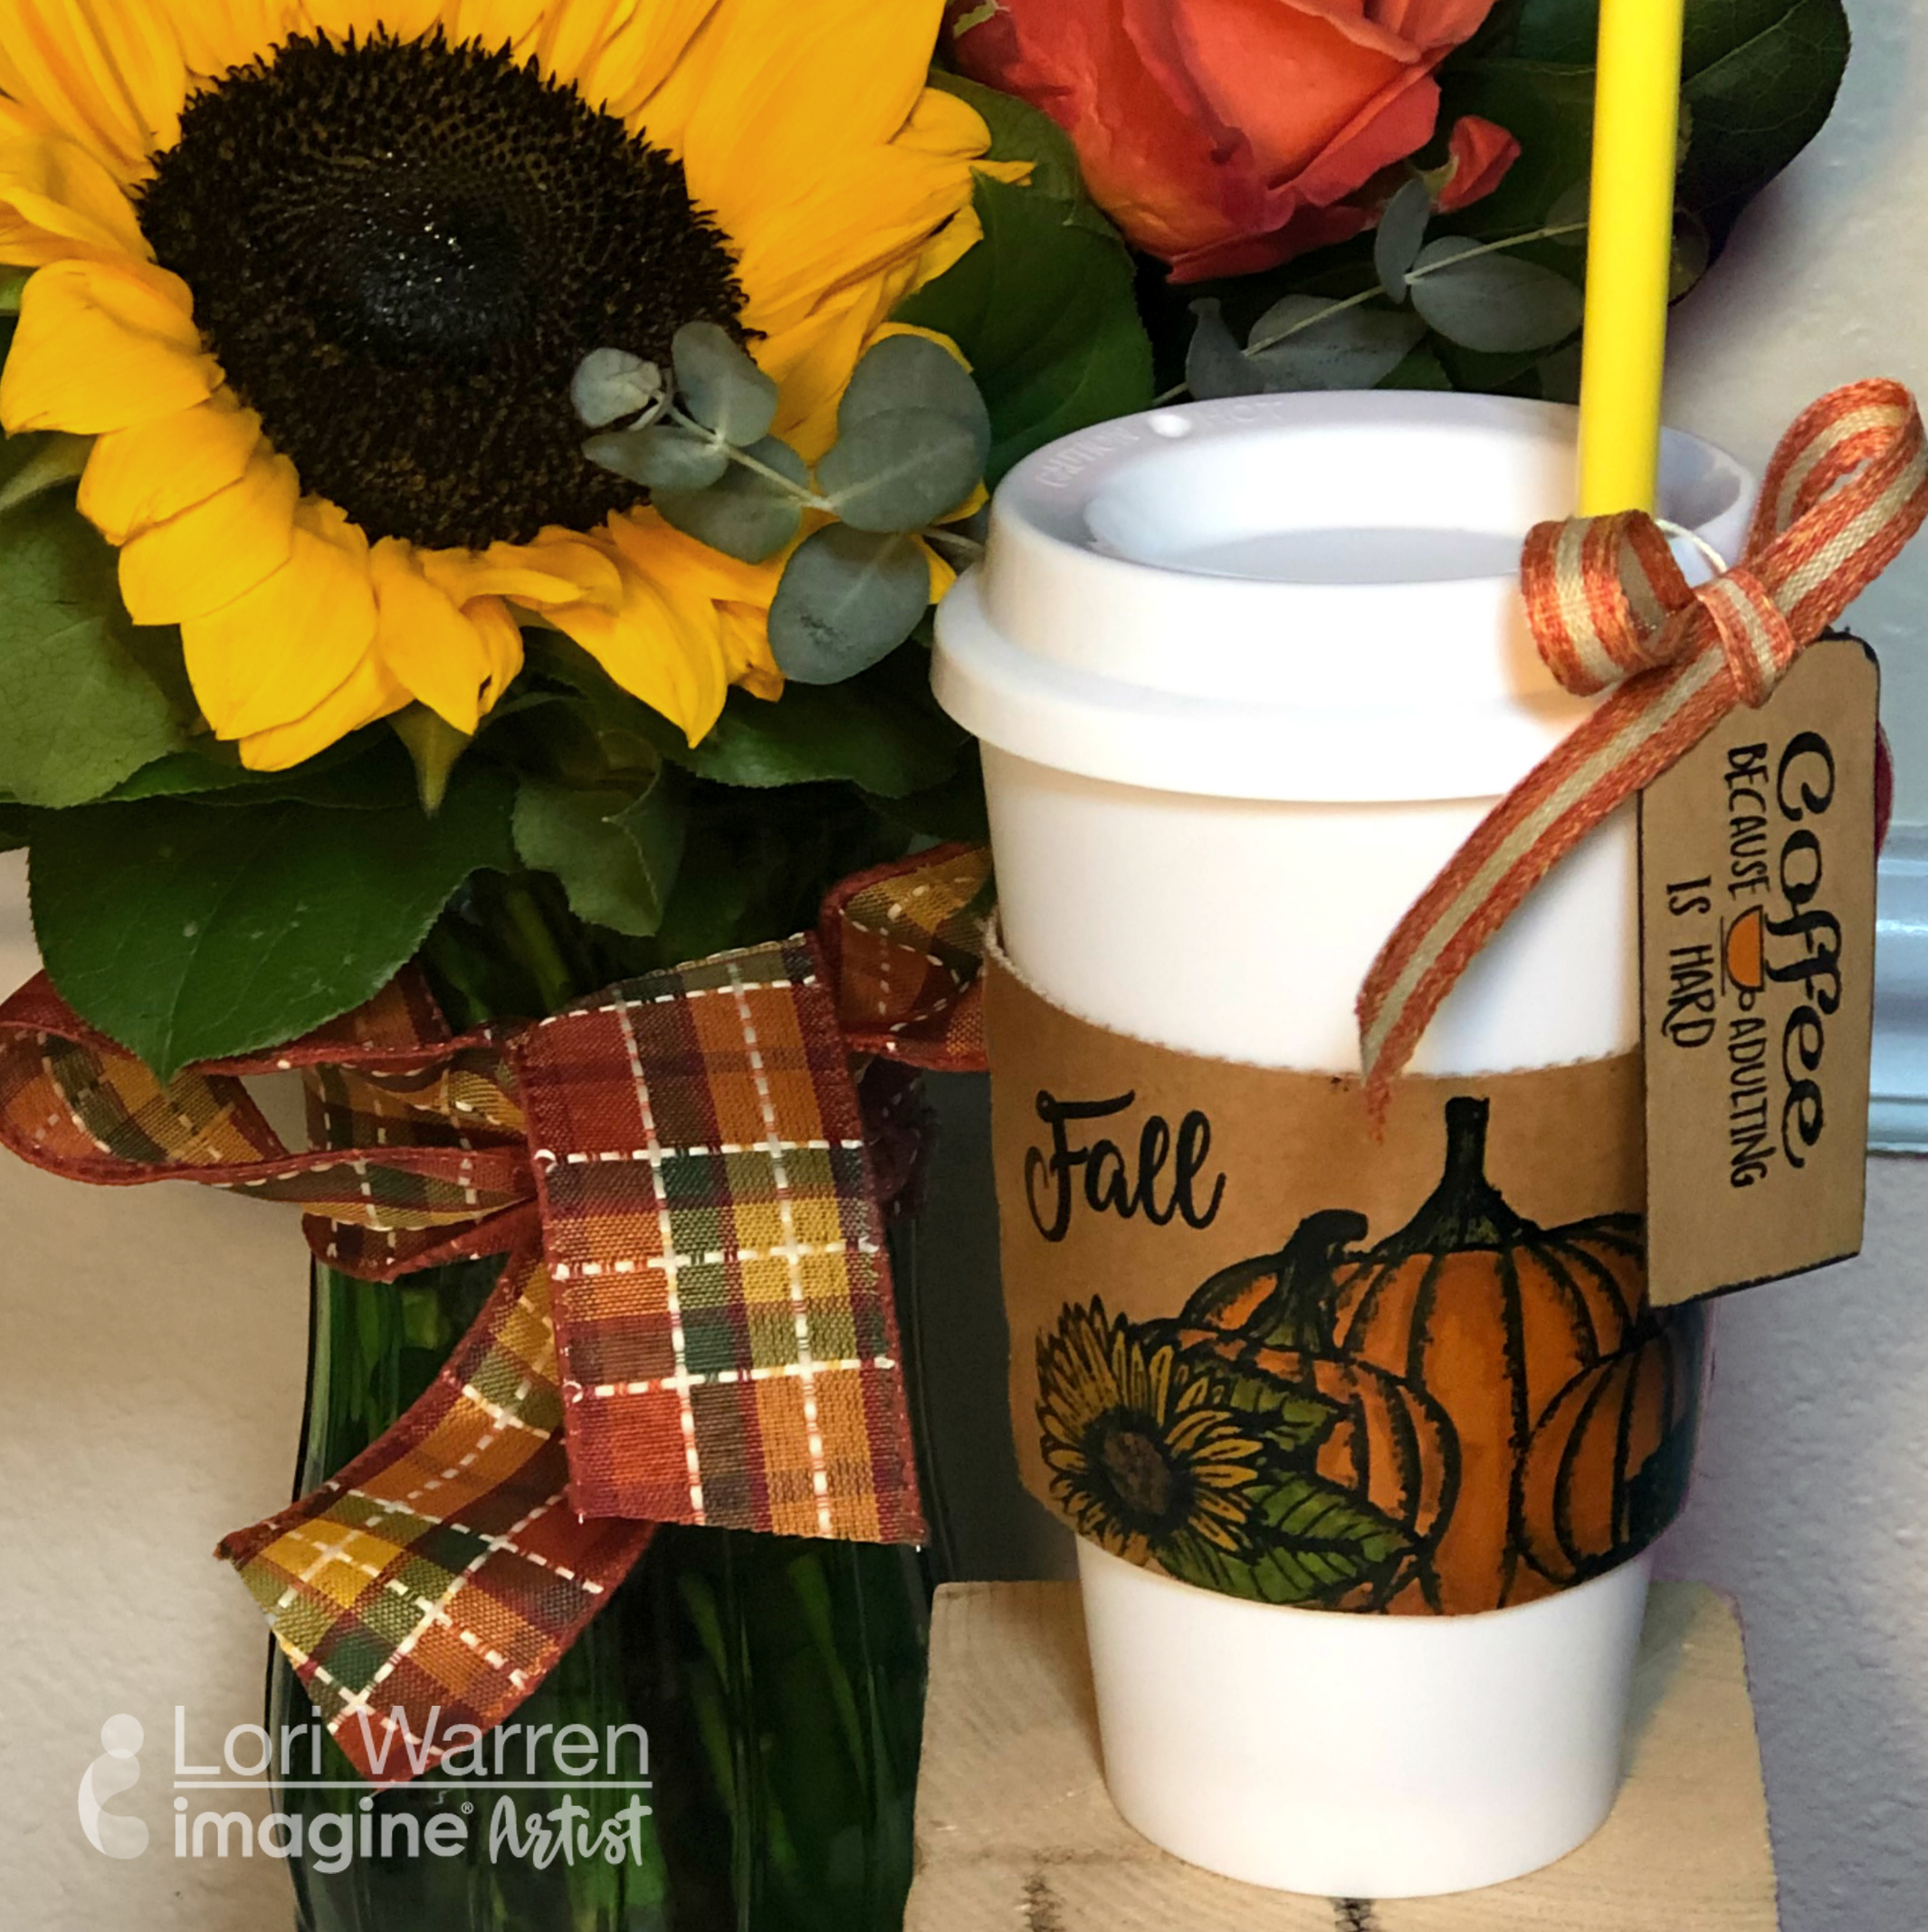
Coffee Cup Crafts – Hand Decorate Autumnal Pumpkins – Because Adulting is Hard!

by Lori Warren

See how to customize a coffee cup sleeve with a Fall Pumpkin Spice theme stamp and funny phrase, “Coffee because adulting is hard!” As the weather gets colder, it’s always nice to cozy up to a cup of coffee or hot chocolate.

In this video, Lori stamps with StazOn Pigment ink pads and colors with a variety of All-Purpose Inks. This lovely craft project is perfect for a weekend crafternoon and preparing for a pumpkin spice latte coffee date.

Skill: Beginner
Time: 10 minutes

Directions

Art Supplies

Imagine 
Other 
  • Joy Clair Designs – Hey Pumpkins, Coffee Quotes
  • DecoArt – Duraclear Matte Varnish
  • Simply autumn Décor – Ribbon
  • Coffee Sleeve
  • String
  • Corner Punch

How To Create a Fall Side Table Decoration for Thanksgiving

by LeeAnn McKinney

Hi there friends, Lee Ann here with a fun fall Thanksgiving Home Decor project. In this video, I tried StazOn Studio Glaze in several different colors and I was hoping to make the house a little fun. We do not have a lot of space (literal tiny home) and so anything I make needs to be condensed or small. I chose to pick up a 5″ x 7″ photo frame and play with the StazOn Studio Glaze with coloring in pumpkins, leaves, and other stamped images. StazOn Studio Glaze is a water-based acrylic product and oh it was fun. I plan to make more for the Christmas holidays. 

Skill: Intermediate
Time: 30 minutes

Directions

Art Supplies

Imagine
Other Items Used
  • MISTI Stamping Tool
  • Kat Scrappiness “Happy Fall Y’all” Stamp Set
  • Photo Frame, 110 lb Card Stock
  • Double-Side Tape

Beginner Guide: Learn How to Stamp on Treat Bags for DIY Halloween Project


by Card Making with Lisa Mensing 

In this video, Lisa shares her first time stamping on cotton muslin treat bags with Memento Luxe Inks and a few tips. This easy and fun stamping project is perfect for party prep, events, or goodie bags. While this project is Halloween themed, it is easy to change the theme to Christmas, Valentine’s Day, or any fun holiday you celebrate.

Skill: Beginner
Time: 5 minutes + dry time per bag

Directions

shopping list from imagine

Other Art Supplies

• NEW Fuzzy Spiders Clear Stamps | Whimsy Stamps

• Cotton Muslin Bags – Annie’s Paper Boutique

• My Sweet Petunia | NEW Original MISTI 

Wagner HT400 Precision Heat Tool-0503038 

Learn How to Water Color a Halloween Card with Fireworks Shimmery Craft Spray

by Jowilna Nolte

Hi everyone, today I am sharing a gorgeous embossed Spider Web theme background using Fireworks sprays. One of my favorite techniques with Fireworks is to remove the lid and use the ink as a watercolor. First I stamp a grungy bird with VersaFine Clair. Since VersaFine is an oil-based ink, the stamped area will not lift when water-based inks are applied. This is an important feature to understand about VersaFine.

Hope you enjoyed this quick lesson. Create your own variation to make cards, Halloween decor, Fall, and other festive holiday crafts. Combining orange, purple, and black ink with a touch of gold creates a stunning end result.

Skill: Beginner-Intermediate
Time: 20 minutes

Directions

Art Supplies

Imagine
Other
  • Sewing machine
  • Tombow Glue
  • Vellum
  • Smooth white cardstock
  • Embossing folder – Cricut
  • Cuttlebug – Cricut
  • Stamp – Stampers Anonymous
  • Paintbrush

Quick & Easy Projects: How to Make a Fall Card with One Ink Pad

by LeeAnn McKinney

Greetings crafty friends, today I am using my FAVORITE ink pad — Kaleidacolor. This 5-color water-based dye ink pad is very useful for a basic crafting project because it offers a variety of colors and the sliding palette feature gives you a lot of options. The ink pad has a lever to slide each ink pad together and then to pull apart for storing.

To create a beautiful background, just ink up the brayer, and roll it all over the card stock depositing the color down, you can keep going over it multiple times if desired to really get a great blend.

I then stamp out my sentiment and used On Point Glue to adhere falling leaves. I applied three dots of Gold Pico Embellishment to complete this project. I only use Kromekote Glossy Cardstock for this technique and it comes out perfect every time.

Skill: Beginner
Time: 15 minutes

Directions

Art Supplies

Imagine

Other
  • Happy Fall Y’all Stamp Set
  • Die Cut Leaves
  • Cardstock 
  • Kromekote Glossy Cardstock
  • Brayer

Building a Flying Witch Halloween Background with a Night Sky

by Lori Warren

Happy Halloween! Today, I will create an ink blended backgrounds with a brayer and blue, brown, and teal colors of VersaColor pigment ink for a Night Sky Halloween Flying Witch Card. It’s a quick and easy way to transform a piece of white cardstock into a blended night sky. I stamp bare tree silhouettes in the foreground to give this design the look of a fall landscape. Another optional step is to flick some white acrylic

Finally, I add a flying witch to the sky section of this card panel and assemble the card! This is an easy Halloween greeting card for friends and family.

Skill: Beginner
Time: 15 minutes

Directions

Art Supplies

Imagine
Other
  • White Cardstock
  • Crafty Individuals – Hug a tree
  • Hampton Art – Haunted
  • Stampers Anonymous, Tim Holtz Collection – Tiny Text Halloween
  • Brayer