Look at this Sweet “Sending You Smiles” Greeting Card

by Iris Rodriguez

Look at this Sweet "Sending You Smiles" Greeting Card

Smile! Why? Each time you smile, you throw a little feel-good party in your brain. So why not keep the party going and share the love by sending someone a smiley greeting card today. This fun card is made using a smiley face stamp, an alphabet set, a handmade envelope and colored with Tsukineko’s VersaFine Clair in Warm Breeze and VersaMagic ink in Mango Madness.

Skill: Advanced
Time: 1.5 hours

Directions


Step 1

Stamp a large background image onto card stock paper. Dry paper.


Step 2

Find a template from the internet that is small enough to fit on the front of the card panel. Some stamp maker companies such as Waffle Flower have die sets you can purchase. Another way to achieve this is to study or deconstruct an envelope and recreate one you like with cardstock.


Step 3

Fold the envelope and ink the opening with VersaFine CLAIR in Warm Breeze with a large ink dauber.


Step 4

Flip the envelope to the opposite side and ink the outer flaps with the VersaFine Clair in Warm Breeze.


Step 5

Scribble words on the outside of the envelope with the irRESISTible Pico Embellisher in Gold.


Step 6

Ink a sheet of cardstock with Mango Madness VersaMagic ink and let dry. Stamp the happy faces with the VersaFine Clair in Nocturne and let dry. Add a dime-sized amount of Creative Medium in Shimmer with the palette knife. Creative Medium will add dimension and shimmer to the smiley faces.


Step 7

Apply the Creative Medium with the Multi-Purpose Squeegee over the faces. This tool has a flat, even and large surface that will cover faces completely and will not leave scrape lines. Let the medium dry and fussy cut the faces.


Step 8

Create a curved banner and stamp the sentiment “Sending You Smiles,” cut out and ink the edges of the banner. Assemble card by gluing the smiley faces into the envelope, attach the envelope and sentiment to the front of the card. Ink a piece of cardstock paper with VersaFine Clair in Warm Breeze. Ensure that the paper is slightly larger than the card and only ink the outer edges. Using the Tear It Tape to adhere the card the background paper. And remember — Smiles are contagious! Pass it on.

Supplies

Imagine
Other
  • Cardstock paper
  • Smiley Face Stamp
  • Hero Arts – Large Background Stamp
  • Alphabet Stamps

Using VersaMagic On Vellum

by Nadine Carlier


Mother's Day Card by Nadine Carlier 2 ic

Did you know that VersaMagic works great on vellum? Many inks will smear even after they dry on vellum paper but not with VersaMagic. Because of its chalk-like finish, it is more opaque than other inks so you will always get nice bright colors on vellum.

Watch my video tutorial below to see how I created my Mother’s Day card using VersaMagic and vellum.

Skill: Intermediate
Time: 30 min.

Supplies

Imagine
Other

Visit our YouTube Channel for more inspirational videos and subscribe to get updates when we post new videos.

Watch A Video On Creating A Beautiful Mixed Media Tag

by Kassy Tousignant

Watch A Video On Creating A Beautiful Mixed Media Tag.

This handmade tag project uses VersaMagic DewDrop and Fireworks Shimmery Craft Spray with a mixed media style. I wanted to compare VersaMagic ink and Fireworks sprays on tags using black and white gesso surfaces. I used all of the same colors of ink to show how they turn out so differently.

Skill: Advanced
Time: 1 hour + dry time

Supplies

Imagine
Other
  • Prima – Plaster paste, St. Tropez paper, embellishments
  • DecoArt Media – Matte Medium
  • Twine
  • Brutus Monroe – Tangled Waves stencil
  • Black gesso
  • White gesso

How To Paint With Versafine Clair

by Jennifer Vanderbeek

How To Paint a Desert Scene With Versafine Clair

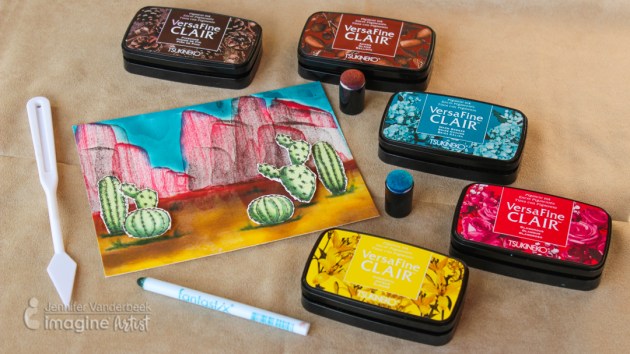
VersaFine Clair is great for using with wet mediums because it’s oil-based formula won’t interact with paints or sprays. But I also wondered what else I could do with this very versatile ink. I discovered that VersaFine Clair’s quick-drying formulation makes for a wonderful, texture-rich dry brush effect when combined with Fantastix and that, while you can’t make a fluid medium with it and water-based thinners, a little bit of added oil will work! I had a lot of fun reaching beyond traditional techniques to create my “painted desert” scene.

Skill: Intermediate
Time: 1 hour

Supplies

Imagine
Other
  • Canson – Hot Press Watercolor Paper
  • Hero Arts – Stamp Your Own Cactus
  • Acrylic Blocks
  • Fiskars – Paper Trimmer, Scissors
  • Olive Oil
  • Helmar – ZapDots

Make a Purple “Good Vibes” Shimmery Greeting Card

by Jowilna Nolte

Make a Purple "Good Vibes" Shimmery Greeting Card

Creating subtle interest on cards and other projects is easy with the amazing products from Imagine and Tsukineko. I have been experimenting and creating purple background ombre effects using VersaFine Clair and Memento Luxe ink pads as well as some older favorites like Creative Medium and All-Purpose Inks. Take a look at how to make this card.

Skill: Beginner
Time: 30 minutes

Directions


Step 1

Use a jumbo dauber and blend a pattern through a stencil using Memento Luxe Sweet Plum.


Step 2

Continue the same pattern using a darker shade of ink like Memento Luxe Elderberry.


Step 3

The blending creates a perfect ombre effect going from light to dark. Did you know that Memento Luxe has superior blending qualities? It makes for the most amazing blended effects with its creamy effortless application.


Step 4

Add a slight shimmer to the blended effect by adding Creative Medium in Shimmer over the blended pattern.


Step 5

To create a shade of purple, mix a couple of drops of All-Purpose Ink in Orchid Odyssey into the Creative Medium.


Step 6

Paint the colored Creative Medium over the pattern and leave to dry. The end result is a subtle shade of purple removing the bright white background, but also adding a beautiful shimmer to the card.


Step 7

Use VersaFine Clair Monarch and stamp the “Good Vibes” sentiment onto white cardstock and cut it out.


Step 8

Stamp the sentiment again but directly onto the stenciled background and sprinkle with glitter embossing powder. Heat set the embossing powder to give a beautiful shimmering sentiment on the shimmering background.


Step 9

Layer the stamped sentiment slightly off-set from the embossed sentiment onto the card using foam tape for added dimension. The embossed sentiment below makes the stamped sentiment really stand out and creates loads of interest. Add irRESISTible Neon Purple splats to finish off your card.

Supplies

Imagine
Other
  • Cardstock – White
  • Kaisercraft – Good Vibes stamp
  • Sewing machine
  • Jowilna Nolte – stencil
  • Embossing Powder
  • Heat Gun
  • Paintbrushes
  • Palette
  • Pipette

How to Make Fun Shapes with Radiant Neon Amplify

by Arjita Sepaha Singh

I wanted to try the Radiant Neon Amplify Texture to create fun shapes for kids and decided to use stamps as well as some free hand skills. I stamped an egg, a strawberry, the moon and others with a light colored ink and then covered the stamp with a layer of various Amplify colors. Always preheat the heat tool before applying heat to the Amplify. This puffs the pigments quickly. Always clean the nozzle and cap the bottle after use.

Skill: Intermediate
Time: 1 hour +

Supplies

Imagine
Other
  • Heat gun
  • White Card Tags
  • Acrylic Block