Create A Mixed Media Scrapbook Layout Background

by Nadine Carlier

Selfie Mixed Media Layout by Nadine Carlier IC

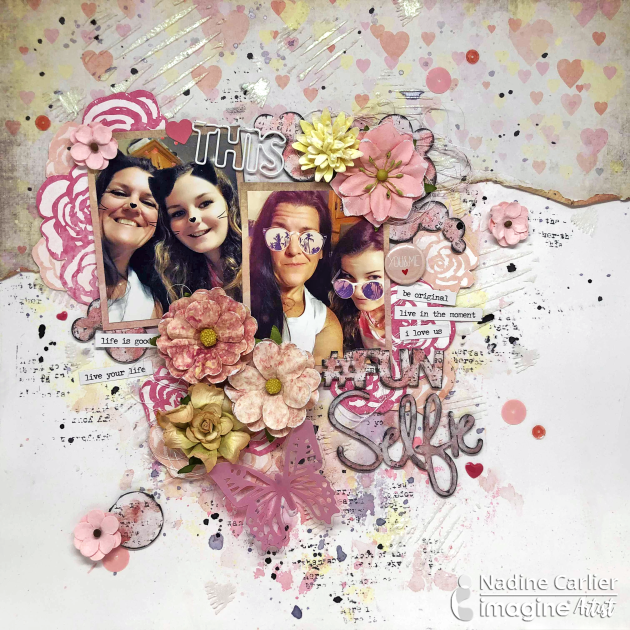
It has been such a long time since I have done a scrapbook layout. I really miss doing them!  I used several different Imagine products to create the background for my layout; Creative Medium, Fireworks, Delicata, Brilliance, VersaMagic, and StazOn Pigment Ink.
Watch my video below for details on how I created the background for my layout.

Skill: Intermediate
Time: 1 hour

Supplies

Imagine
Other
  • Chipboard by Creative Embellishments
  • Stencil by Creative Embellishments
  • Stamp by Creative Embellishments
  • Gesso – Clear, White
  • Prima Flowers
  • Paper by 13Arts

Visit our YouTube Channel for more inspirational videos and subscribe. Make sure to click the bell to get updates when we post new videos.

Learn How to Use Iridescent Blue Creative Medium to get 3 Different Looks

by Lindsay Adreon

Learn How to Use Iridescent Blue Creative Medium 3 Different Looks

When I first took a peek at the Iridescent Creative Medium I couldn’t quite figure it out. In the jar, it didn’t really have any shine and I couldn’t detect a color shift like other iridescent products. Then, I swatched it and let it dry. I could not stop staring at how beautiful it was! Moving the swatch in the light—I was mesmerized by the medium and how it would shift colors as I moved it around! It also looks different on different colors of cardstock, plus you can add color to it! I’m sharing three different ways to use the Iridescent Creative Medium. I hope you enjoy it as much as I enjoy playing around and experimenting with this fun medium!

Skill: Beginner
Time: 15 minutes + dry time

Directions

Supplies

Imagine
Other
  • The Crafter’s Workshop Stencils – Wallflowers, Distressed Lace
  • Joy Clair Stamps – Spring Stroll Stamp Set
  • Hero Arts Prayers Stamp & Die Set
  • Cardstock – black, white
  • Cardbase

Learn 1 Minute 1 Inkpad EASY Blending with Kaleidacolor

by Jessica Lin

Learn 1 Minute 1 Inkpad EASY Blending with Kaleidacolor

Today I have a super cool technique to share with you – and the best part is, it only takes one minute and an ink pad to create! Talk about minimal supplies crafting. This easy ink blending technique uses Kaleidacolor ink pads, glossy paper, and a brayer. Try it once and you’ll see how quick and easy it is compared to traditional ink blending. If you are a stamping beginner with a small stash of ink pads or a crafter who likes quick and easy cards, this video tutorial is for you.

Skill: Beginner
Time: 1 minute for ink blending, 15 minutes for card assembly

Directions

Supplies

Imagine
Other
  • Stampin’ Up Rooted in Nature Clear-Mount Stamp
  • Glossy Paper
  • Brayer
  • Neenah White Cardstock
  • Stamping Tool or Acrylic Block

DIY Wedding Favor Gift Boxes

by Nadine Carlier

DIY Wedding Favor Gift Boxes with silver embossing

Sometimes you want to leave your guests a little something as a thank you for attending your wedding. These DIY wedding favor gift boxes are super easy to make. They can be made in many different sizes and colors to fit your style and needs. They would also be great for party favors for a baby shower too.
Watch my video below for details on how to make these cute little boxes.

Skill: Intermediate
Time: 10 minutes

Supplies

Imagine
Other

Visit our YouTube Channel for more inspirational videos and subscribe. Make sure to click the bell to get updates when we post new videos.

Create an Easy Mixed Media Inspired Wedding Card

by Lori Warren

Create an Easy Mixed Media Inspired Wedding Card

‘Tis the season to send that special couple an elegant handmade card wishing them a Happily Ever After.  This quick and easy card was made with Delicata Silvery Shimmer ink, a stencil and some pretty trimmings.  It came together quickly but should leave a lasting impression on the pair of lovebirds!

Skill: Beginner/Intermediate
Time: 30 minutes

Directions


Step 1

On a panel of cardstock, apply Delicata Silvery Shimmer ink over a stencil with a sponge dauber.


Step 2

Spray panel with Sheer Shimmer Craft Spray in Sparkle.


Step 3

Stamp a script stamp (partial impressions) in Koala Gray StazOn Pigment ink.


Step 4

Water down Versa Magic in Aegean Blue on mat and apply ink splatters to panel with a fan brush.


Step 5

Print saying and trim to size.


Step 6

Apply double-sided foam mounting tape to back of saying.


Step 7

Embellish with lace, trim and mounted saying.


Step 8

Adhere panel to card base with Tear It Tape.

Supplies

Imagine
Other
  • Hampton Art – Script Stamp
  • TCW Stencil – Repeat Tile Remnant
  • Lace
  • Beaded trim
  • Cardstock – White
  • Double-sided dimensional tape
  • Printed saying
  • Fan brush
  • Paper trimmer or scissors

Quick & Easy Wedding Invitation Tutorial using Shimmer and Vellum Cardstock

by Kassy Tousignant

Quick & Easy Wedding Invitation Tutorial using Shimmer and Vellum Cardstock

With minimal supplies, I made an elegant and simple wedding card. If you are looking to make your own wedding invitations, you could make loads of these in a single afternoon. The On Point Glue works beautifully to adhere the vellum without leaving any adhesive marks.

Skill: Intermediate
Time: 20 minutes

Directions

Supplies

Imagine

StazOn Pigment Inkpad – Snowflake
Sheer Shimmer Stix – Sparkle
On Point Glue
IrRESISTible Pico Embellisher – Sparkle

Other

• Silver sequins
• Sizzix – Big shot
• Vellum Cardstock
• Crafter’s Companion – silver mirror cardstock, embossing folder, love die, pearl white cardstock