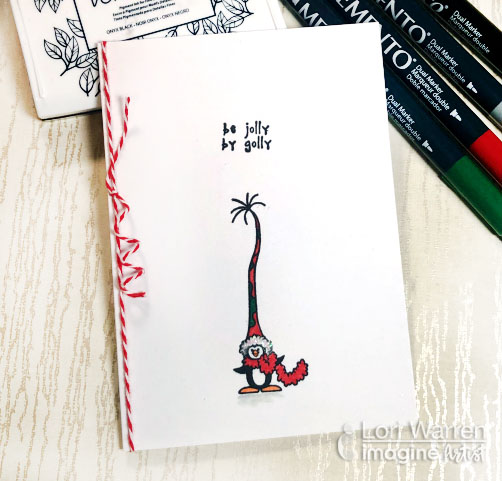
Create a Mixed Media Holiday Card with Memento

by Melissa Andrew

It’s time to get ready for the holidays! Today Melissa creates a gorgeous watercolor background with Memento and VersaColor Ink. She finishes her holiday card with gorgeous gold embossing powder. This is a quick and easy holiday card that can be mass produced for sending to loved ones this season!

Skill: Advanced
Time: 1 hour

Directions

Supplies

Imagine
Other

Use a Plaid Stencil for a Mixed Media Christmas Card

by Kassy Tousignant 

Use a Plaid Stencil for a Mixed Media Christmas Card

It’s never too early to start making Christmas cards! How about making them mixed media style?! Imagine makes so many wondering mixed media products that work great on canvas layouts and cards alike. In this project, I use Fireworks Craft Spray and a plaid stencil to create multiple Holiday backgrounds at once.

Skill: Advanced
Time: 1 hour

Directions

Supplies

Imagine
Other
  • Liquitex – Flexible modeling paste
  • Prima – Heavy body gel, flower
  • Cardstock – white
  • Gold thread
  • 49 & Market – flower
  • My Minds Eye – brads and embellishments
  • Christmas patterned paper
  • Echo Park – plaid stencil
  • Stampin Up – dimensionals

Create a “Warm & Cozy Wishes” Holiday Flip Card

by Neva Cole

Create a Warm & Cozy Wishes Holiday Card

Delicata is the perfect ink to create a Let It Snow Flip card, or in my case Warm & Cozy Wishes while surrounded by snowflakes! In order to make this card, you will need the Sizzix Framelits Flip Its 660022 or one similar to it from Sizzix. There are several video tutorials on how to use this die and once you have a handle on how to construct the card then the rest is easy!

The mittens and cuffs are stamped and heat embossed with clear embossing powder and die cut, then placed over the stamped mitten image. The snowflake background is created by stamping with Delicata White Shimmer and heat embossing with clear embossing powder. Delicata Sapphire Blue is applied over the entire area with an Ink Blusher then the ink is buffed off the images with a paper towel.

The background behind the mittens and the small snowflake die cuts are simply stamped in Delicata, the shimmer of the ink does the rest! Ink blusher applies ink around the edges of the card in Delicata Silvery Shimmer, and behind the circle in Delicata Sapphire Blue.

By using just three Delicata inks, a bright and beautiful coordinated flip card is fun to create. I hope your holidays are warm and cozy!

Supplies

Imagine
Other
  • The Stamps of Life — Mittens 2 stamp and die set, Patterns 4 mittens
  • Sizzix — Framelits Flip Its 660022
  • Cardstock
  • Diecut Machine
  • Heat tool
  • Paper towel

Make a Cute Farm Animal Themed Christmas Card

by Roni Johnson

Make a Cute Farm Animal Themed Christmas Card using Delicata Emerald Green

Living in a rural community all my life it has amazed me that nobody has come out with a line of farm (or farmer) cards for the holidays. Well this year I decided to fix that and make a country Christmas tree using the iconic stacked farm animals and shimmery Delicata ink. Using a 4.5 x 6.5 piece of kraft cardstock, I stamped a cow using Emerald Green Delicata ink as the “base” of the tree. Now the rest is a matter of masking. Stamp the second cow image on scrap paper, trim and place it over the first. Stamp the sheep centered over the cow’s back and slightly overlapping using the same ink. Repeat this process of stamping and masking with the pig and rooster images.

I embellished the livestock images with holiday motifs such as reindeer antlers and a shining red nose. There is no right or wrong answer to this part! Get creative! I used a die-cut a star, ink with Delicata Golden Glitz and mount on top of my farm animal tree. I also used a sponge dauber to rub Delicata Dark Brown Shimmer to ground the tree shape. Using a 4.75” x 6.75” piece of cream cardstock, I alternately stamped the sentiment and poinsettias around the edge using Delicata in Emerald Green and Ruby Red. Center and mount the livestock Christmas tree panel over the cream cardstock panel. Affix the stamped panels to a 5 x 7 green card blank. And you are ready to delight someone with this fun farm inspired Christmas card design!

Supplies

Imagine
Other
  • Stampers Anonymous – Livestock
  • JoyClair Stamps – Antlers, Hat
  • My Favorite Things – “Merry Christmas” Sentiment
  • Rubber Stamp Tapestry – Poinsettia, Holly Leaf
  • Red Glitter
  • Cardstock – Cream, Kraft
  • Card base – Dark Green

Do you like Shimmery Holiday Wreaths?

by Alison Heikkila

the card with a simple "Christmas Wishes" sentiment from Lawn Fawn stamped in Delicata Emerald Green and by adding "ornaments" with Silver Irresistible Pico Embellisher

I sure do! Hello, this month the Imagine Artists in Residence are featuring the color Evergreen. I decided to create a shimmery evergreen wreath as a centerpiece to this “Christmas Wishes” holiday card and I am going to show you how.

Skill: Intermediate
Time: 30 minutes + dry time

Directions


Step 1

I started off with a piece of Mixed Media White Paper and covered it with Emerald Green Delicata ink. You can see the pretty shimmer this ink has. Although this is a pigment ink, it does dry quickly. But if you’re a little impatient, you can use a heat tool to speed up the process.


Step 2

Using the “Build A Wreath” die set from Stampendous, I die cut several evergreen boughs from the inked paper. I also die cut the largest circle from the set with a colored piece of green cardstock.


Step 3

Using a deep shade of green colored cardstock, I tapped the surface with Golden Glitz Delicata ink to give it some sparkle and depth. I then die cut the evergreen boughs out of this color too.


Step 4

I was satisfied with how these two layers looked, but it definitely needed some embellishing. There is a trio of berries in the die set, so I colored another piece of Mixed Media White Paper with Ruby Red Delicata. Then I die cut the berries. The berries looked good, but I love bows on wreaths. So I repeated the ink to paper process again with Golden Glitz Delicata and cut the pretty bow.


Step 5

Now it’s time to move on to the card base. I used Neenah Desert Storm for my base, cut to 4 1/4″ x 11.” Then I sprayed it with Sheer Shimmer Spritz in Gold. This gold works perfectly with the Golden Glitz Delicata.


Step 6

Now it’s time to assemble the wreath. I glued down the wreath base first. I used On Point Glue for all of the assembly. This adhesive is perfect for these small, detailed pieces. I started with the darker, colored green cardstock pieces. As I glued each piece down, I placed a heavy acrylic block on top to weigh the pieces down as the glue dried.


Step 7

Next, I moved on to the Emerald Green colored pieces and repeated the same process with the glue and the block. Then I added the berries and the bow. I completed the card with a simple “Christmas Wishes” sentiment from Lawn Fawn stamped in Emerald Green and by adding “ornaments” with Silver Irresistible Pico Embellisher. I love the additional texture the ornaments added.

Here’s the completed card. It’s fun to create your own colored paper using inks. I hope you’ll give it a try! Thanks for stopping by. Have an inspiring day!

Supplies

Imagine
Other
  • Stampendous – Build a Wreath Die Set
  • Mixed Media White Paper
  • Cardstock
  • Lawn Fawn – “Sprinkled with Joy”


Learn to Make a Beautiful Winter Wonderland Card

by Kyriakos Pachadiroglou

Create the feeling of a snow globe on a Christmas greeting card with a shaker bubble front and a lot of snow. This Christmas card has less color in the background in order to enhance the centerpiece. The snow both in the bubble front and on the top of the card is created with the Amplify White, a must have craft supply for Christmas and winter!

Skill: Intermediate
Time: 1 hour


Steps 1

Blend the Brilliance and VersaColor blues on the watercolor paper and cut a circle in diameter slightly larger than then bubble front.


Step 2

Die cut the village shape from the watercolor paper and make light shades using the VersaColor Pinecone and a Brushstix.


Step 3

Die cut 3 more village shapes and glue on top of each other to make a thick one. This will add dimension (depth) on the design and act as an obstacle to the beads inside the bubble.


Step 4

Glue the village die cutting on the watercolor paper and cover the bottom of it with Amplify White and heat to activate it and make it fluffy.


Step 5

Make tiny dots of snow above the village using the irRESISTible Pico Embellisher Wedding Dress color.


Step 6

Add rhinestones with the help of On Point Glue.


Step 7

Cut from a 4 x 6 piece of the corrugated paper, a round center, large enough to for the bubble front. Distress with Brilliance Pearlescent Sky Blue, VersaColor Pinecone and spray with Sheer Shimmer Sparkle and Silver.


Step 8

Remove the excess of the shaker bubble front and add Tear It Tape, all around it.


Step 9

Glue the watercolor paper circle on the card, add beads in the center before covering with the bubble front. Continue by placing the corrugated paper and the twine.


Step 10

Use Amplify! White on top of the corrugated paper piece to make snow effect.


Step 11

Add the rest of the embellishments using On Point Glue and your hot glue gun (for ribbon elements).

Thank you for stopping by the Imagine blog and if you enjoyed this tutorial then please comment below or share on social media!

Supplies

Imagine
Other
  • Cardbase 5 x 7 inches
  • Watercolor paper
  • Corrugated white paper
  • Shaker bubble front
  • Marianne Design –  Village die LT0173
  • Baker twine – red and white
  • MayArts – chevron ribbon
  • Rhinestones and metallic charms
  • Die cutting machine
  • Hot glue gun