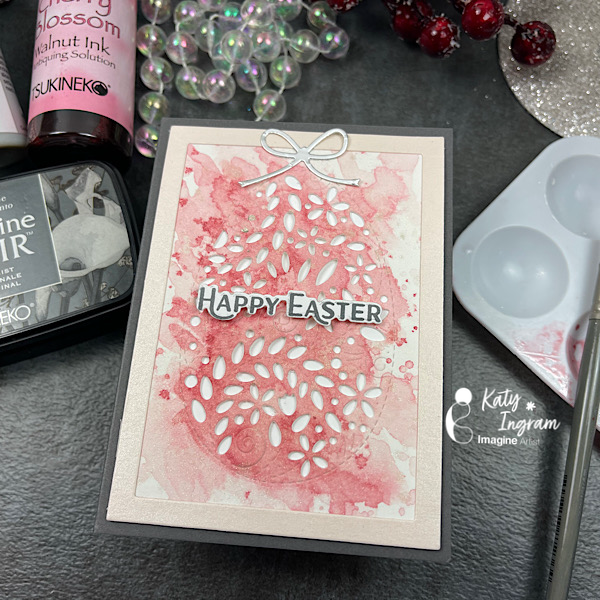
Let’s Make A Winter Wonderland Thank You Card

by LeeAnn McKinney

Hey there friends and fellow crafters. I’m here today making a fun quick paper crafting project — Thank You card with a Winter Theme! In this project, I create this card with a stencil, shimmery ink sprays, stamping, and heat embossing. Change the theme to make a thank you card for any holiday year-round.

Sending a handmade card is a thoughtful practice. Give someone a Thank You when they have invited you to a special party, gathering or gave a special gift.

Skill: Intermediate
Time: 15 minutes

Directions

Art Supplies Used

Imagine
Other
  • Echo Park Snowflake Stencil
  • Vellum
  • LetterIt Stamp Set
  • Recollections 110lb card stock

Make Beautiful Holiday Cards with Watercolor Effects Using Memento Luxe Inkers

Make Beautiful Holiday Cards with Watercolor Effects Using Memento Luxe Inkers

by Jowilna Nolte

How to create the best watercolor effects using Memento Luxe pigment inkers in pink and green tones. In this tutorial, I show you how to make 2 card designs with modern backgrounds. These easy-to-use inks create vivid colors that are perfect for Christmas ad the festive season ahead.

Skill: Intermediate
Time: 20 minutes

Directions

Art Supplies

Imagine 
Other
  • Double-sided tape
  • Enamel dots
  • Diamante
  • Stamps – Kaisercraft

Create Jewel Tones for Fall Color Blend for a Mazel Tov Wedding Greeting Card

by Nicole Watt

wedding mazel tov good luck greeting card for weddings

In this cardmaking tutorial, Nicole shares one of her favorite fall color combos using VersaColor inks. Nicole swatches out jewel-tone colors in dark pink with a rich true blue mixed in with a light warm splatter with Delicata. Pigment inks are a perfect ink for blending a colorful gradient from two different color ranges.

This DIY Mazel Tov greeting card (or Good Luck greeting card) is topped with a gold heat embossed vellum layer. This beautiful style is a perfect card for a newlywed couple. Enjoy!

Skill: Intermediate – Advanced
Time: 30 minutes

Directions

Art Supplies

Imagine
Other
  • Waffle Flower Stamps – Color Combos
  • Picket Fence To the Lovely Couple 
  • Altenew sequins 
  • Cardstock
  • Misti Stamping Tool
  • Vellum
  • Heat Tool
  • Waterbrush or paintbrush


Quick and Easy Projects: Stamp and Color Rainbows, Pineapples and Donuts on a School Folder


by Annie Collins

Hello Friends! In this video, I teach you how to create a fun custom school folder that you and your kids can make together.

Skill: Beginner
Time: 20 minutes

Directions

Other
  • File Folder
  • Various Stamps

Helpful Tips and Tricks: How to Take Amazing Photos of Craft Projects

by Martha Lucia Gomez

Helpful Tips and Tricks: How to Take Amazing Photos of Craft Projects

With the ever-growing popularity of social media platforms, particularly Instagram, crafters have been talking about how to take better photos of our projects. Since not all of us are professional photographers, and we don’t all have “the perfect tools”, I would like to talk about how to take great photos of your work without having to be a pro-photographer.

Style your photos creatively

These are important elements to focus on when taking a photo of a project:

  • the backdrop or background
  • main focus – which is always your project
  • props or supporting elements to make the focus shine
  • the camera

Backgrounds

With clear and simple photos you need to have a neutral base or background, like white, grey, ecru, cream or even brown tones like wood. Since most of us don’t have professional lighting, set your background up where it is in natural light, and make sure it is a large enough base to place your card or project. Try using dark colors in the background to help the project colors pop.

You can set up your background so that your project can be laid flat or standing up. I find that I can capture more details by taking photos of my cards flat on a surface with the camera located directly above it. Also, if you have a small space to take your photos, this option is perfect because it requires less space and can make it easier to incorporate other elements.

With flat photos, remember your backdrop is the most important part. If you are creative you don’t need to buy expensive elements, you can use everyday household items and surfaces as the background. The most important thing is to keep in mind the colors and textures. A brightly colored element next to your project can round out the scene and support the focal point, but being able to use it as the background will be trickier, tho can work on occasion.

You can use wood surfaces, floor boards, ceramic tiles or designer textured papers, as well as other supplies to add some depth to the photos. You can also use elements like designed plates, which can be easily found in home decor stores. My favorite is HomeGoods because I can buy just one plate, placemat or napkin. Neutral colored fat quarters found at the fabric store is another cheap option.

Supplies or Photo Props

With staging photos, it is nice to add a few elements alongside your card or project—but these cannot compete with the main focus object i.e. your crafting project. You can use many items as photo props. I use a lot of flowers and greenery, my favorites are made of silicone because the fabric flowers don’t look real to me. But definitely, my favorites photo props are the craft supplies. Supplies like inks, stamps, stencils, color pencils or markers, and die cuts are perfect elements to support your project. Extra embellishments like buttons, sequins, washi tape and twines are also great, but always be careful with the color combinations. My suggestion is to start with the neutral items first that won’t compete with your project. If you still aren’t finding what you like, just look around your home and you might find gorgeous elements that you can borrow for a few minutes as part of your photo.

Camera

With today’s technology, you really don’t need to have a professional camera. Cell phones like the iPhone or Samsung make it possible to take amazing photos. To make them work best, use natural light source and keep an eye out for any shadows across your photo. Also, think about a good angle to take the photo. Always start by making your lens parallel to the project front, and then play with the angle from there. My last helpful hint is very simple but important: always clean the lens of your camera or phone before taking the photos. Because we touch our phones so often it is easy for the lens to become dirty.

I hope you found these tips useful. Just remember to stay open to learning new ideas and most importantly have fun! Thank you for stopping by the Imagine blog and don’t forget to share!

Imagine Tips: See How to Fix Stamping Mistakes

by Melissa Andrew

Imagine Tips: See How to Fix Stamping Mistakes

Ever have mistakes in your stamping and you can’t figure out how to fix them?! Try Fantastix to ink over your stamping mistakes. Simply set the Fantastix on the inkpad you used to stamp, and lightly color in your mistakes.


Supplies

Imagine
Other
  • Whimsy Stamps – Penguin’s Winter Adventure stamp set, Whimsy Wonderland Word die Set
  • Doodlebug Designs Milk and Cookies paper
  • Cardstock – pink, white
  • Chipboard Snowflakes