Color of the Month is Tuscan Sun. We were thinking of blended burnt orange and yellow sunset when we choose this hot summer color. Some of the inks that easily reflect this color choice are Memento Luxe in Morocco, Memento in Tangelo and VersaMagic in Pumpkin Spice.
For the Month of July August, we are also doing a special feature of Rinea Foil Paper. This beautiful paper foil comes in a variety of colors and patterns and we challenged our artists to use them in their tutorials and projects, so be on the lookout for awesomeness!!! ******Correction: the exchange with Rinea is in August!
Why buy a decorative frame when you can create your own! I love using Brilliance and VersaMagic ink with the watercolor technique to really stylize and customize my own frames and home decor pieces. I walk you through each step in creating this frame in the video below.
This cardmaking project is all about using layers of ink to create a collage background with stamps and stencils. It’s a great way to build a cool background in order to feature that perfect focal image, like a Vertigo, die cut dragonfly.
Skill: Intermediate Time: 30 minutes
Directions
Step 1
Apply VersaMagic DewDrops to a Craft Mat and add water.
Step 2
Lay 8.5” x 11” piece of cardstock down into the wet ink. Repeat as needed.
Step 3
Apply VersaMagic through the diamond shape stencil with a sponge dauber.
Step 4
Stamp script stamp with StazOn Pigment Ink.
Step 5
Apply water and blot with a paper towel, pulling some ink away.
Step 6
Spray panel with Walnut Ink, blot and dry. This gives the paper a vintage or antique look.
Step 7
With a different stencil apply a different color of VersaMagic. This creates a beautiful layered effect.
Step 8
Using the same stencil, apply White VersaMagic to make a bit of a frosty ghost effect.
Step 9
Cut cardstock panel to multiple 2.5” x 3.5” ATCs or Artist Trading Cards.
Step 10
Stamp a vintage postcard image with VersaFine Clair.
Step 11
Edge ATCs with brown and black inks to continue the antique look.
Step 12
Tie string around each card a couple times to give the ATCs to give extra flair.
Step 13
Die cut dragonfly image from Vertigo Prism, color with VersaMagic.
Step 14
Prepare dragonfly with double-sided dimensional tape. This will give each dragonfly the effect of flying.
Step 15
Adhere dragonfly die cut to ATCs.
Step 16
Enhance dragonfly with a white pen and embellish with tag and sticky gems.
It has been such a long time since I have done a scrapbook layout. I really miss doing them! I used several different Imagine products to create the background for my layout; Creative Medium, Fireworks, Delicata, Brilliance, VersaMagic, and StazOn Pigment Ink.
Watch my video below for details on how I created the background for my layout.
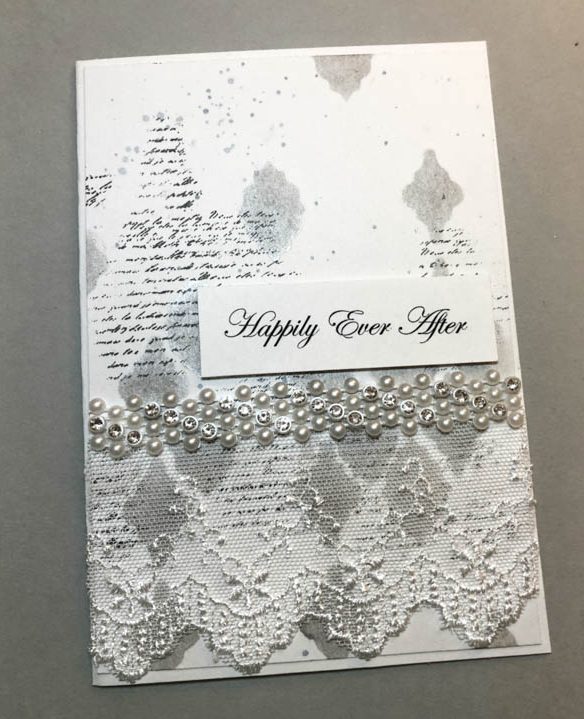
‘Tis the season to send that special couple an elegant handmade card wishing them a Happily Ever After. This quick and easy card was made with Delicata Silvery Shimmer ink, a stencil and some pretty trimmings. It came together quickly but should leave a lasting impression on the pair of lovebirds!
Skill: Beginner/Intermediate Time: 30 minutes
Directions
Step 1
On a panel of cardstock, apply Delicata Silvery Shimmer ink over a stencil with a sponge dauber.
Step 2
Spray panel with Sheer Shimmer Craft Spray in Sparkle.
Step 3
Stamp a script stamp (partial impressions) in Koala Gray StazOn Pigment ink.
Step 4
Water down Versa Magic in Aegean Blue on mat and apply ink splatters to panel with a fan brush.
Step 5
Print saying and trim to size.
Step 6
Apply double-sided foam mounting tape to back of saying.
Graduation season is upon us. As much as it a joyous time in anyone’s life, you feel the pressure of the final exams, think about that next phase of your life and probably make a big move. Don’t forget the grad in your life, and make him/her a fun, grungy card. I will show you how you can create a simple, yet layered background with fun ruler embellishments and matching sentiment.
Skill: Beginner Time: 30 minutes
Directions
Step 1
Smoosh the Turquoise Gem VersaMagic ink onto the Imagine Craft Mat.
Step 2
Spray water over the ink. Smoosh the watercolor paper and create a random background. Dry the paper.
Step 3
Stencil the gears with the Vintage Sepia VersaFine ink and Inkblusher.
Step 4
Using the palette knife and modeling paste, stencil another image.
Step 5
Spray some Walnut Ink, then brush the ink with a wet brush. Dry paper.
Step 6
Stamp the ruler stamps with the Piano Black StazOn Pigment ink.
Step 7
Cut out the rulers and ink the edges with the Piano Black StazOn Pigment ink.
Step 8
Assemble card. Glue on the rulers and add a sentiment.