With Love Is The Sentiment Today

by Jowilna Nolte

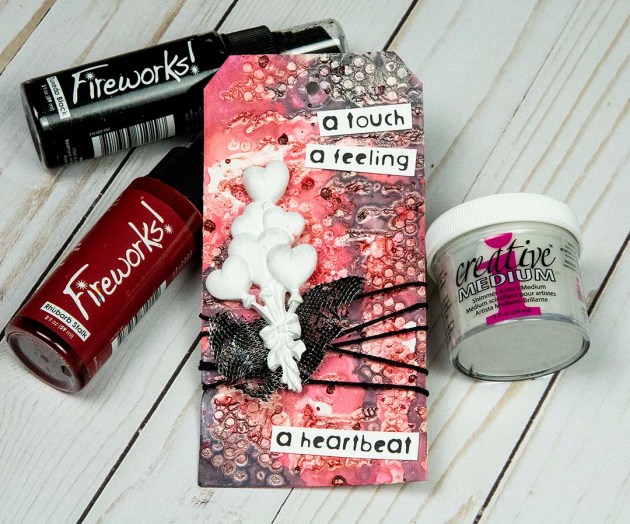
Make your colors pop and become more vibrant by using layers of ink on top of each other and add a magical spray of Ink Potion to it. A quick resist effect and stenciling adds to this fun love inspired Valentine’s Day card in shades of red.

Skill: Intermediate
Time: 30 minutes

Directions


Step 1

Adhere a stencil (brick design) to a piece of white cardstock. Use Sweet Plum and Love Letter Memento Luxe ink pads and blend color through the stencil.


Step 2

Leave the stencil in place for this step. Use an ink blusher and a small amount of gloss texture paste and swipe it over the stencil. Using a small amount at a time will prevent the paste from seeping underneath the stencil. Carefully remove the stencil and leave to dry. Wash your stencil immediately.


Step 3

Trim your stenciled panel smaller to fit onto the front of a card. Use a heart stencil and modeling paste to add a stenciled design to your background. Leave the paste to dry.


Step 4

Once the paste is dry, spray Lady Bug Fireworks over the right side of the panel to add color. Mist the entire panel with Ink Potion no.9 and see how all the colors pop. The resist from the glossy paste leaves the design clear only letting the ink sit inside the open spaces adding more color in selected areas.


Step 5

Use VersaFine Clair Glamorous and stamp onto white cardstock using a background design. Die-cut small and large hearts out of the stamped piece.


Step 6

Ink the panel around the edges using Memento Rich Cocoa to highlight the color even more. Adhere the hearts using foam tape for dimension. Emboss a sentiment and adhere to the large heart. Add ink splats in red, white, brown and black. Finish off your card with diamante.

Supplies

Imagine 

Other

  • Modeling Paste
  • Heart Stencil
  • Brick stencil
  • Kaisercraft – Sentiment
  • Heart die-cuts
  • Carabelle Studio – background stamp
  • Watercolor paint
  • Palette knife
  • Heat gun
  • Anna Griffin – Glossy Paste
  • Foam tape

How To Create A Beautiful Embossed And Watercolor Thank You Card

by Elina Stromberg

create a thank you card using memento inks and versamagic

Our lovely color of the month is ‘Passion Red’. What a perfect choice for a bright blooming flower card! I wanted to create a soft water-color painted look on my card, and all I needed was my water-soluble Memento and VersaMagic stamping inks and my Craft Mat as my palette.

Tsukineko ink pads come in several beautiful red colors, so I chose a few of my favorite reds and used them both for coloring the card background and for painting the beautiful Penny Black flower image. The trick was to stamp the main image twice and to layer the fuzzy-cut image on top of the stamped background; by using this technique the main image on the finished card has a beautiful, crispy edge, and while painting you don’t need to worry about the wet color running over the stamped lines!

Skill: Intermediate
Time: 1.5 hours

Directions


Step 1

Stamp flower image with VersaFine ink on white watercolor or mixed media paper. Apply ‘Red Magic’ VersaMagic ink on the Craft Mat. Using a hint of water pick up the rich, creamy color with a brush and color the background. Apply more red pigment on the bottom, and mix the color with water to create a lighter color for the top of the card. Do not mind painting over the stamped image; it will be covered with a second image layer later. Let air dry or dry with a heat gun.


Step 2

Add texture to the painted background. Stamp random patterns here and there using red ‘Lady Bug’ Memento color. Keep the stamp in your hand (do not attach to an acrylic stamping block) and bend it while stamping.


Step 3

Re-stamp the main flower image on another sheet of white mixed media paper. Color the image using a water brush and a few hues of red ink. I used Memento ‘Lady Bug’, bit darker red ‘Rhubarb Stalk’, dark purple ‘Sweet Plum’, and VersaMagic ‘Red Magic’ for coloring the background. Use the Craft Mat as your palette and apply more ink if needed. Once dry, cut out the image.


Step 4

Glue the fussy cut image on the background. Trim the background to size.


Step 5 

Color the letters for the sentiment word. Press each chipboard letter on clear VersaMark ink. Pick up the letter with a tweezer, dab into copper embossing powder, and heat-set the powder by heating the chipboard on the Craft Mat. Glue letters on a strip of vellum. Fold ends of the vellum strips on the card background and secure them with double-sided tape. This will keep the strip in place; there’s no need to glue it on the card front.


Step 6

Mat card front on striped patterned paper and attach on the card base. Done!

Supplies
Imagine

VersaMagic DewDrop in Red Magic

Imagine Craft Mat

Memento DewDrop in Lady Bug

Memento DewDrop in Rhubarb Stalk

Memento DewDrop in Sweet Plum

VersaMark

VersaFine Clair in Nocturne

Embossing Powder in Copper

Other
  • White mixed media paper
  • Brush
  • Water brush
  • Penny Black Stamps – Awaken
  • Background pattern stamp
  • White vellum
  • Chipboard letters
  • Scissors
  • Tweezers
  • Heat gun
  • Glue
  • Striped patterned paper
  • White card base

How To Create An Eclectic Valentine’s Day Card

by Nadine Carlier

I have always considered myself as an eclectic type crafter and this card is the perfect representation of my style. It has a little bit of modern, vintage and grunge mixed together using several different techniques and products. Watch my video below to see how I did it. Enjoy!

Skill: Intermediate
Time: 20 minutes

Supplies

Imagine
Other

Visit our YouTube Channel for more inspirational videos and subscribe to get updates when we post new videos.

Create a London Night Sky Birthday Card

by Melissa Andrew

Create a London Night Sky Birthday Card

Today, I share with you how to create a Galaxy or night sky using VersaMagic Ink, Brilliance Ink, and MementoLuxe. These creamy inks blend so smoothly and seamlessly that anyone can create a gorgeous night sky. The addition of Sheer Shimmer Spray and white acrylic paint finish this creation. Please join me as I teach you how to create a wonderful Galaxy card.

Skill: Intermediate
Time: 30 – 45 minutes

Directions

Supplies

Imagine

• VersaMagic Chalk Ink – Night Sky, Concord Grape, Pretty Petunia, White Cloud
• Memento Luxe – Tuxedo Black
• Brilliance Ink – Pearlescent Orchid
• Sheer Shimmer Spray – Sparkle
• VersaFine Clair – Nocturne
• Pico irRESISTible – Gold
• Sponge Dauber – Large, Small
• Tear It! Tape
• On Point Glue 

Other

• SugarPea Designs Stamp Set – Simply Fabulous
• SugarPea Designs Die – LondonScape
• White Acrylic Paint
• Paint Brush
• Acrylic Block
• Circle Die
• Stamping Platform – Misti
• Sequence
• Paper Trimmer
• White Card Stock
• Black Card Stock

Learn How to Make a Mixed Media Tag for Valentines

by Kassy Tousignant

I’m always looking for different textures to include in my paper crafting projects. It’s a fun challenge for me and this tag really brought some interesting textures together in a great way! I can always count on Imagine to have just the right product to bring gorgeous color to these textures. Fireworks spray really shines when used over a stencil textured background. You will see in this video, I add a little water and the shimmer and pigment will settle in between the shapes, giving great depth to this tag. I also really love that I can layer different colors of Fireworks spray over the top of each other. I used irRESISTible Pico Embellisher on the wire mesh texture to give it a little bit of color.  It’s just thick enough to fill the holes and looks fantastic! I wanted the resin hearts to be stark white and stand out so I used All-Purpose Ink in White, which provided great coverage and opacity. Watch my video today and like and share if you enjoy it!

Skill: Advanced
Time: 1 hour

Directions

Supplies

Imagine
Other
  • Gesso
  • Heavy body gel
  • Stamps
  • Resin hearts
  • Wire mesh
  • Stencil
  • Black string
  • Manila tag

Create a Valentines Card with a Paper Airplane Theme

by Martha Lucia Gomez

Create a Valentines Card with a Paper Airplane Theme

Hello everyone! Today, I have a fun and creative stamping technique that you can use with all your clear stamps with symmetric form. This month we have prepared Valentine’s projects and of course, we are using the red color to enhance our passion for the inks.

Skill: Intermediate
Time: 1 hour

Directions


Step 1

To create this project, I am using the Pink Shimmer Delicata inkpad and Glamorous VersaFine Clair in combination with both sides of one single stamp from the stamp set Life’s a Breeze from Joy Clair. Yes, you read well – to create my card I used both sides of the stamp. Let me share it with you.


Step 2

First, I positioned the paper airplane stamp over the acrylic block. I adhered the stamping side over the block and let the backside be inked with the Delicata ink in Pink Shimmer. Then I stamped randomly the image over a piece of whisper white card stock, cleaned the stamp thoroughly and let the ink dry naturally. I love to use the Pink Shimmer Delicata Ink – the color is soft and shiny at the same time.


Step 3

When the ink was totally dry I turned the same paper airplane stamp in the normal way and inked it with VersaFine Clair Glamorous Ink. Like I used a symmetric image, stamp the image in the normal way was easy.


Step 4

After stamping all the comets, I covered the entire layer with Clear Embossing Powder and melted with the heat tool. Then I resized the layer and pasted over the red card base using dimensional or double-sided foam tape. To resize the image, I used a stitched rectangle die cut from Gina Marie Designs. Set the entire piece aside for a while.


Step 5

To decorate the background, take a piece of cardstock in any color and ink it directly with VersaFine Clair Glamorous inkpad. Cover the entire piece with Clear Embossing Powder and activate the powder with the heat tool.


Step 6

Take the embossed piece and cut with the dies that you want to use. On this card, I am using the new I Love You Shadow dies from Kat Scrappiness. These dies come with a mat and I cut them from a pink piece of card stock, pasted the layer with On Point Glue and then paste the letters over the decorated card base using dimensional or double-sided foam tape. This is a creative technique that you can explore with different types of stamps. The result is always different and if you mix and match the colors of ink you will love the effect.

Supplies

Imagine
Other
  • Cardstock: Real Red, Whisper White, Powder Pink
  • Acrylic Block
  • Die Cuts – Gina Marie Designs & Kat Scrappiness
  • Stamps – Life’s a Breeze by Joy Clair Stamps
  • Dimensionals or Double-sided foam tape