Check Out This Fun Mixed Media Door Hanger Project

by Steph Ackerman

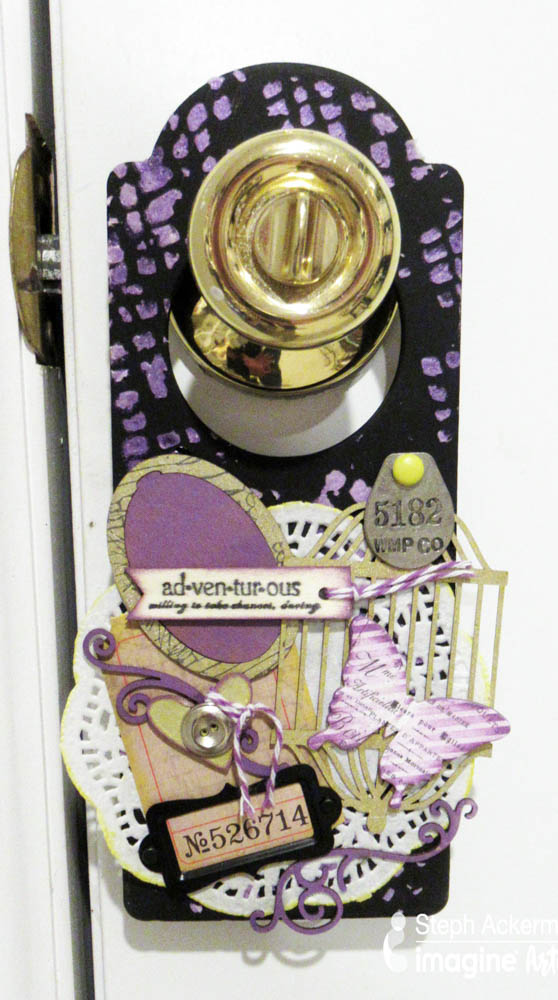
Mixed media projects consist of a variety of projects in all shapes and sizes. Mixed media means you can mix an assortment of products to create a one of a kind piece of artwork. So decide on your base, grab some items from your stash, several colors of ink, a stencil and let your imagination flow. Create with no expectations and see what happens. In today’s tutorial, I put together a beautiful door hanger in a lavender and dandelion color scheme.

Skill: Intermediate
Time: 1 hour + drying time

Directions


Step 1

Paint door hanger with black gesso; alternatively use a black door hanger. Place stencil on top. Use Creative Medium with a palette knife randomly about the door hanger. Allow to dry thoroughly.


Step 2

Ink assorted chipboard elements with VersaMagic in Purple Hydrangea and Brilliance in Sunflower Yellow, or choose the ink colors that speak to you.


Step 3

Add shimmer by spritzing several chipboard elements with Fireworks Shimmery Craft Spray in Dandelion.


Step 4

Stamp a phrase using VersaFine Clair in Nocturne on a wood sign. Ink a portion of the image stamp with VersaFine Clair in Nocturne and stamp around the oval chipboard element.


Step 5

Using the doily as the base, determine the position of each element. Use On Point Glue to adhere the elements. Glue doily to door hanger. Wrap twine around the heart and adhere. Add twine to the stamped tag and adhere.

Supplies

Imagine
Other
  • Door Hanger
  • The Crafter’s Workshop – Stencil
  • Unity Stamp Co. – Stamp
  • Paper Doily
  • Metal, chipboard elements
  • Black Gesso
  • Twine

Make Embellishments Using Creative Medium

by Nadine Carlier

Creative Medium Butterfly main

Create a pretty iridescent embellishment using Creative Medium that is perfect for cards, scrapbook layouts and much more. Once your embellishment is created you can then the negative space from the die cut to use as a stencil to make a fun background.
Watch my video below to see how easy it is.  Enjoy!

Skill: Intermediate
Time: 30 minutes

Supplies

Imagine
Other

Visit our YouTube Channel for more inspirational videos and subscribe to get updates when we post new videos.

Create Your Own Textured Backgrounds for Card Making

by Melissa Andrew

Creating a textured background for your creations is all the rage! Instead of purchasing a rubber stamp, try creating your own. In today’s video I show you how to do this with Memento ink and an acrylic block; simple and easy with a beautiful effect.

Supplies

Imagine
Other
  • SugarPea Designs – Stuck on You
  • Acrylic Block
  • Cardstock – white, kraft
  • Foam Dots
  • Watercolor Brush

Make a Birthday Card with Walnut Ink and VersaFine

by Arjita Sepaha Singh

Make a Birthday Card with Walnut Ink and VersaFine

It is so easy to create a quick and beautiful background with Walnut Ink! I used Walnut Ink sprays to create a blended background in this super quick birthday card. I love the muted tones of the Walnut Ink, but these steps can be done with Fireworks as well for a shimmery and bright look. I used a few silhouette stamps of flowers and stems with VersaFine Ink and finished the card with a sentiment stamped on a kraft card strip. This is a super quick card using very little supplies and can be mass-produced with ease.

Skill: Intermediate
Time: 30 minutes


Supplies

Imagine
Other
  • Watercolor paper
  • Cardstock – black, kraft
  • MISTI Stamping Tool
  • Penny Black – stamps
  • Stencil

Learn How to Make Quick and Easy Lavender Sachets

by Roni Johnson

Learn How to Make Quick and Easy Lavender Sachets with Fabrico Markers

Imagine’s Color of the Month for August is Lavender so I decided to create this lovely little “No-Sew” lavender sachet. This is a quick and easy project and with the help of Fabrico Markers and a bit of Tear It Tape, you can have a pile of these little goodies to use and to share.

Skill: Intermediate
Time: 30 minutes

Directions


Step 1

Cut cotton fabric to the desired size. Iron the material into a square. If desired add a flap at the top to create an “envelope”.


Step 2

Use Fabrico Markers to color directly onto the rubber stamp.


Step 3

Press the inked stamp onto the fabric. Use a hot iron to set the inks by running the iron over the stamped image 30 seconds.


Step 4

Open the fabric up and affix strips of Tear It! Tape to the edges of the fabric as shown. An extra piece was added on the flap to hold it closed as well.


Step 5

Remove the liner from the tape and carefully place a small pile of lavender in the center of the fabric. Fold the front of the sachet over and press the edges together to secure. Remove the tape from the flap and secure.

Supplies

Imagine
Other
  • Club Scrap – Lavender Stamps
  • Cotton Fabric
  • Iron

Double Stencil Technique On A CAS Card

by Nadine Carlier

CAS Card by Nadine Carlier IC

Layering stencils is an easy and fun way to create a background on your cards and still have a clean and simple look. Watch my video below to see how easy it is.  Enjoy!

Skill: Intermediate
Time: 30 minutes

Supplies

Imagine
Other

Visit our YouTube Channel for more inspirational videos and subscribe to get updates when we post new videos.