This card is dressed with the new Mboss Embossing Powder from top to bottom.
Watch my video below to see the different techniques I used to create my card. Enjoy!
There is nothing better than using your crafting skills to create a gift for someone. That is what I did for this mum, or chrysanthemum, flower project—a gift for my mom. (Get it – a mum for mom?!) Crucial to achieving this fun look, I used Vertigo in Prism and Mboss Embossing Powder in Hologram. I created a 5”x 5” framed Mixed Media piece full of color and texture. See the video slideshow or my instructions below to see how I get some extra dimension with the Vertigo sheet!
Skill: Advanced Time: 30 minutes
Directions
Step 1
Cut Vertigo into 5” x 5” panel.
Step 2
Stamp the Mum flower onto the center of Vertigo panel with StazOn Pigment Piano Black.
Step 3
On the opposite side of the stamped image, color the mum with VersaMagic ink and Fantastix applicators. Simply touch the tips of the Fantastix to the inkpad to pick up the color and use like a marker.
Step 4
Die-cut the mum with coordinating die.
Step 5
On white cardstock, sponge VersaMagic ink to add color.
Step 6
Stamp script stamp with StazOn Pigment.
Step 7
Add texture to Vertigo panel with Hologram Mboss Embossing Powder. To do this, swipe the front of your Vertigo Panel with VersaMark inkpad. Apply powder sparingly and shake off excess. If you want a more sparse texture, you can always use a dry brush to knock off more before heat setting.
Step 8
Add black paint splatters.
Step 9
Add Tear It Tape to the back side of the Vertigo panel.
Step 10
Adhere tulle between the cardstock and Vertigo panels, then adhere to piece of prepared cardstock.
Step 11
Embellish with sequins.
Step 12
Tie a white string around the panel.
Step 13
Add double sided dimensional tape to the tulle.
Step 14
Spray the Mum Die cut element with GooseBumps for extra shine.
Step 15
Once dry, adhere the mum to the panel.
Step 16
Adhere sticker saying “let life surprise you” sentiment. Add any additional finishing touches and insert into the picture frame.
This month I had the pleasure of using Imagine’s new Mboss embossing powders for my projects. They are fine embossing powders that come in a lot of colors and glittery combinations, for instance: Valentine which is red and gold, New Year’s Eve which is black and gold, as well as special effect powders like gold metallic and new solid colors. In this project, I used glittery color combinations Valentine for the dress and New Years Eve for the background, purse, and sentiment. Check it out!
Skills: Beginner Time 30 minutes
Directions
Step 1
Using a dress template or die cut, cut out a dress from watercolor paper.
Step 2
Place dress on foam and burnish the back side of the dress with a stylus. The dress will take on a curved shape giving it a dimensional look.
Step 3
Ink the front of the dress with the VersaMark ink.
Step 4
Apply Valentine Mboss Embossing Powder and using a heat tool, melt the powder. These new embossing powders come in a bag, in this image I added some powder onto a dish so that you can get a good view of this awesome color.
Step 5
Using the VersaMark ink, stamp a background image. Apply New Years Eve Mboss embossing powder and melt the powder with a heat tool. Do the same on the “Happy Birthday” sentiment and purse.
Step 6
Adhere a ribbon sash to the waist of the dress. Apply On Point Glue to the edges of the dress only and glue onto the card base. This will help to keep its dimension.
Step 7
Assemble the card with the dress, birthday sentiment, and matching card base.
Imagine has released a new, innovative design in embossing powder packaging! It is in a resealable bag! It is so easy to use and clean up after. The gusseted bottom allows it to stand independently on your surface and won’t tip over easily. The fact that you can pinch the bag while you are pouring the powder onto your project allows for greater accuracy too. I used the Hologram MBoss powder on this star card and it really makes the focal point pop!
Thinking back when I did my first heat embossing, it was pure magic. That feeling of amazement and wonder hasn’t left but has been ignited once again with the amazing Mboss from Imagine. The new embossing colors are simply amazing and really are over the top beautiful! You have to get some for your stash to experience true magic! Take a look at how I used mine for a fun color-blocked effect.
Skill: Intermediate Time: 30 minutes
Directions
Step 1
Tape off areas using washi tape on a white cardstock panel.
Step 2
Use your VersaMark inkpad and ink the taped off sections only by tapping the ink pad onto the cardstock.
Step 3
Use the Mboss packet and sprinkle the powder over the inked areas. Peel off the washi tape and then heat set the Embossing Powder using a heat gun.
Step 4
Use StazOn Pigment Piano Black and stamp Happy Birthday sentiment onto a blank area of the embossed panel.
Step 5
Stamp elements onto white cardstock and cut out. Add a little color using Memento Markers.
Step 6
Adhere the stamped elements onto the embossed panel with On Point Glue. Add diamanté and finishing touches.
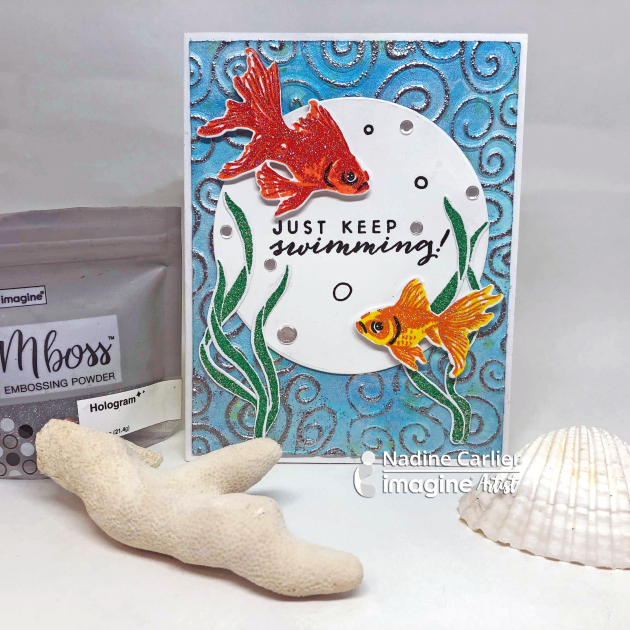
Today I am sharing the fabulous new Hologram Mboss embossing powder from Imagine. This fabulous embossing powder is fine for detailed stamping but also sparkles with colors of the rainbow. In this video, I show you how to stamp, emboss and fill in with a watercolor technique. The Memento inks are perfect for creating the peachy blended look.