DIY Wall Decor with a Sassy Twist

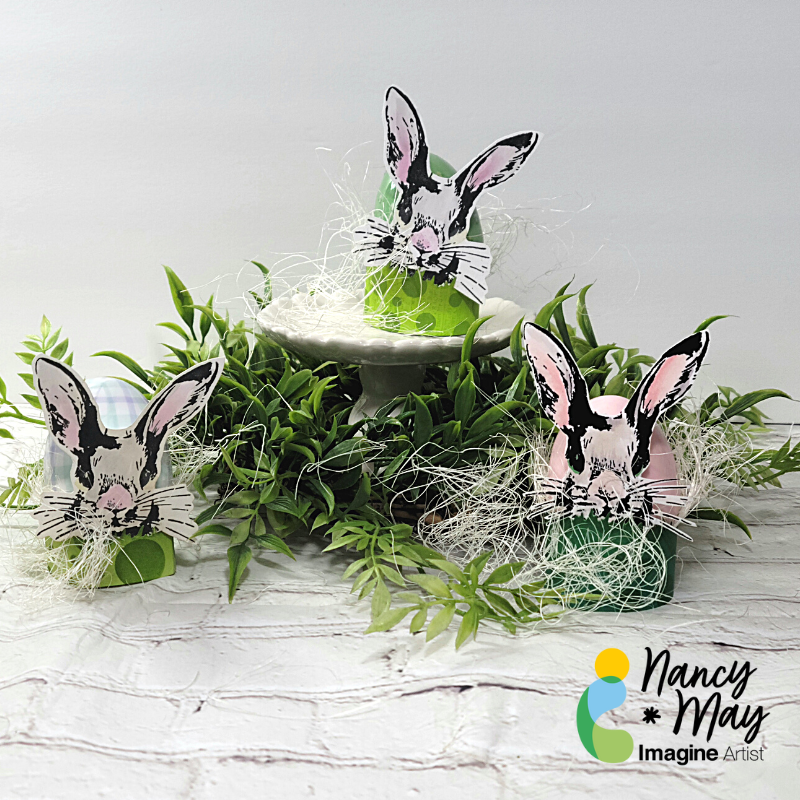
By Anna Escalada-York

As a mom of a teen and tween, I wanted to make a snarky piece of home decor that would make them smile. So I decided to make a pretty piece of art that I was going to put up in our dining room. 

Skill: Intermediate 
Time: 3 hours 

Directions: 

Step 1: 
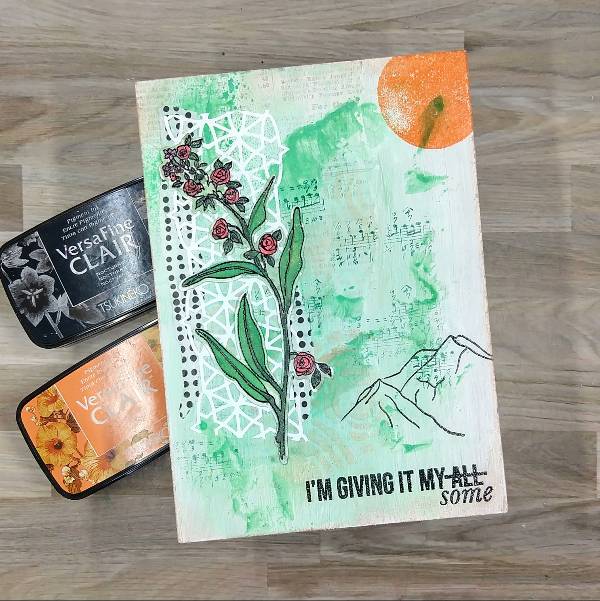
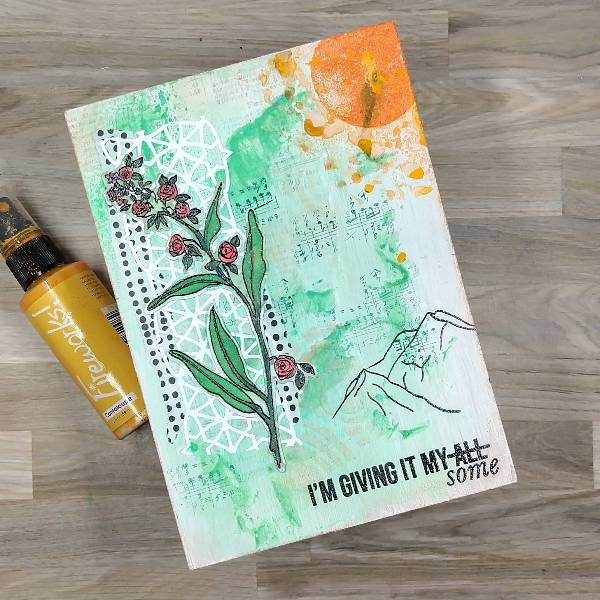
Paint a thin layer of white gesso onto a 5” by 7” medium density fiberboard (MDF) panel. 
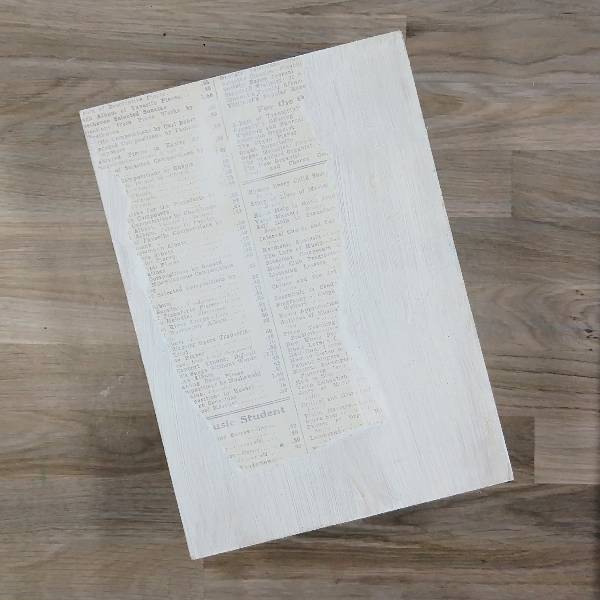
Step 2: 
Glue a ripped piece of text-based patterned paper onto the left side of the panel, making sure that the paper doesn’t go off the side of the fiberboard panel. Then paint over the whole panel again with more white gesso. 
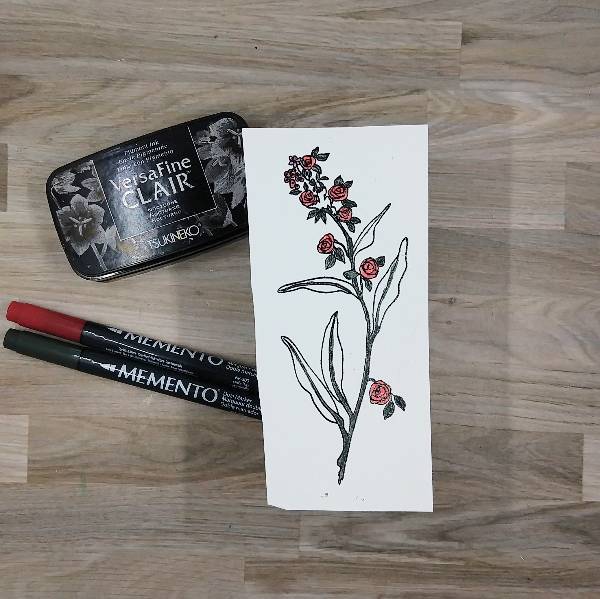
Step 3: 
Stamp a long, floral image onto white watercolor paper with Nocturne VersaFine Clair ink and then heat emboss it with clear embossing powder. Then color the main branch and ribs of the leaves with Northern Pine Memento Dual Marker and the flowers with Lady Bug Memento Dual Marker. 
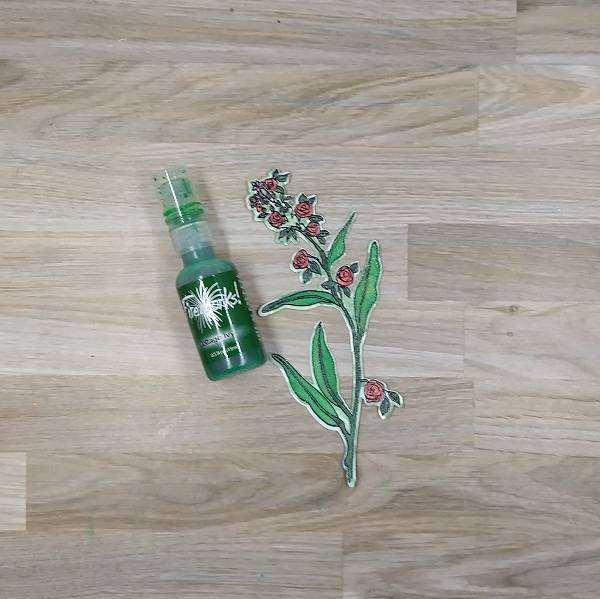
Step 4: 
Die cut the long, floral image. Spray Cottage Ivy Fireworks! Shimmery Craft Spray onto a piece of scrap acetate packaging and watercolor paint the leaves and edges of the floral image green, making sure to blend the darker marker color with the lighter spray. Set aside to dry. 
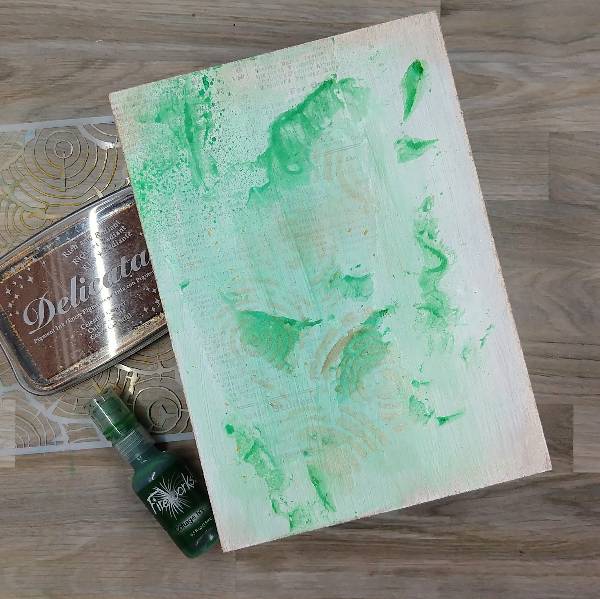
Step 5
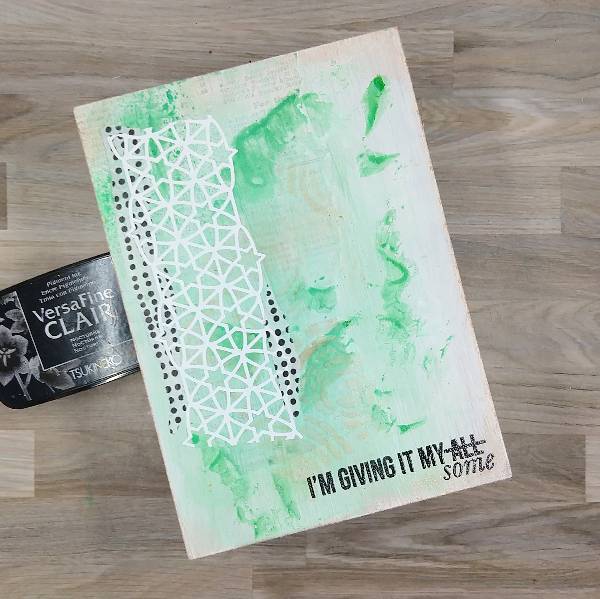
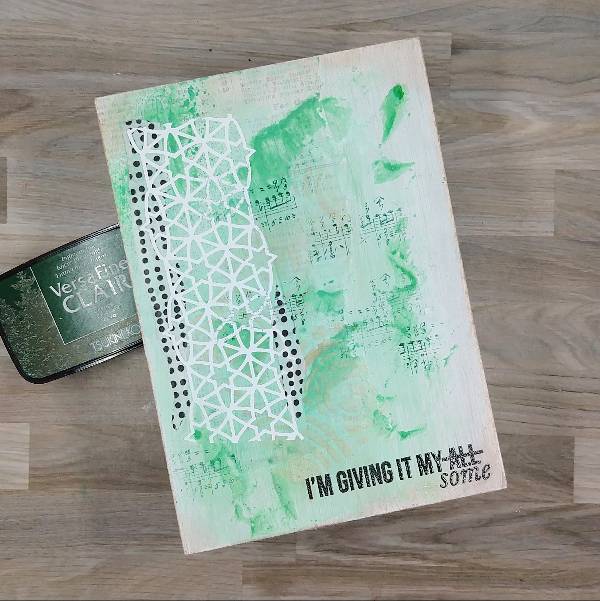
Add texture to the fireboard panel. Use some of the remaining Cottage Ivy Fireworks! Shimmery Craft Spray mixed with more white gesso to create a light green paint. Paint the center part of the fireboard panel with the light green paint. Then watercolor smoosh more of the Cottage Ivy Fireworks! Shimmery Craft Spray (without any gesso) onto the panel to add texture. After the spray and paint have dried, press Celestial Copper Delicata Ink through a circular stencil overlapping the patterned paper. Then press the Celestial Copper Delicata Ink pad around the edges of the panel. 

Step 6: 
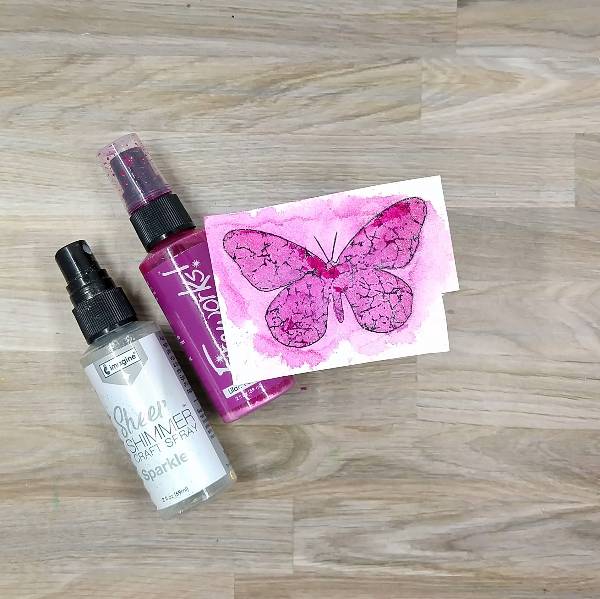
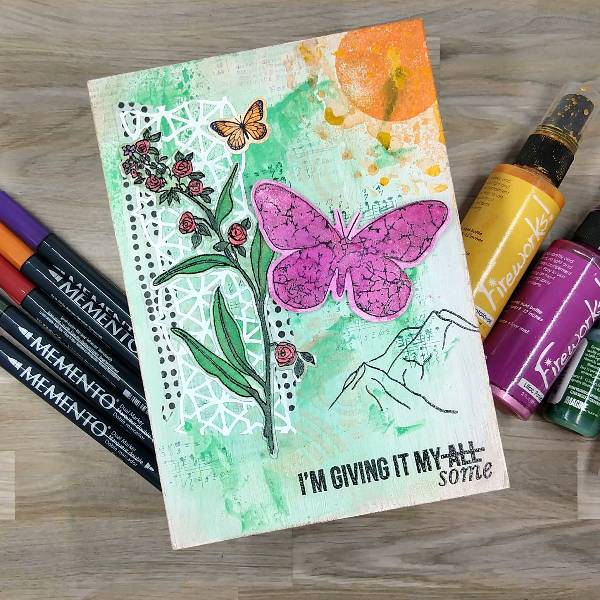
Stamp a large butterfly on another piece of watercolor paper using Nocturne VersaFine Clair ink and heat emboss with more clear embossing powder. Then spray Lilac Posies Fireworks! Shimmery Craft Spray onto more scrap acetate packaging and watercolor spray the butterfly. Spray the whole thing with Sparkle Sheer Shimmer Craft Spray, which forces the Lilac Posies spray to diffuse outside of the butterfly’s outline. After the spray dried, die cut the butterfly with the corresponding die. Finally, paint the butterfly a second time with more of the Lilac Posies Fireworks! Shimmery Craft Spray to deepen the color. Set aside to dry. 

Step 7: 
Return to the background panel. Attach two types of washi tape to the left side of the panel–small pieces of black and white dotted washi tape and a white piece of washi tape that comes die cut in a lacy geometric pattern. 

Then stamp a sentiment on the lower right part of the panel with more Nocturne VersaFine Clair in and heat emboss with more clear embossing powder. 

Step 8: 
Using a small musical note stamp, partially stamp the panel multiple times with Spuce VersaFine Clair ink. 

Step 9: 
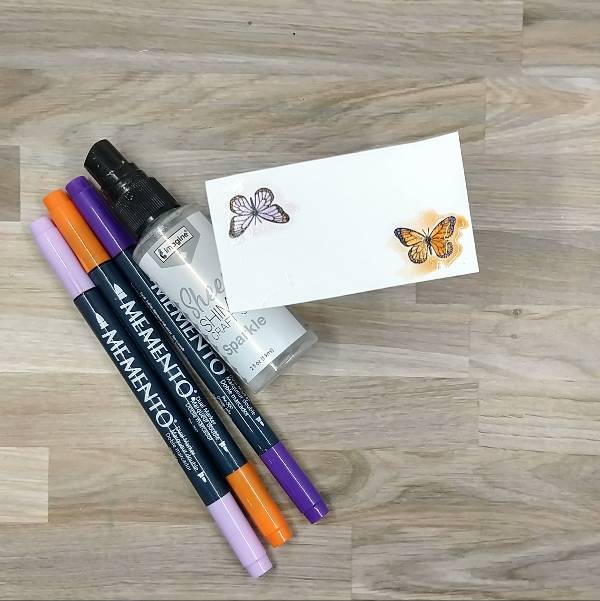
Stamp the smaller butterfly twice with more Nocturne VersaFine Clair ink and heat emboss them with clear embossing powder. Then color them in with Lulu Lavender and Tangelo Memento Dual Markers (orange butterfly) and with Tangelo and Grape Jelly Memento Dual Markers (purple butterfly). Then spray both butterflies with Sparkle Sheer Shimmer Craft Spray. Once the spray had dried, die cut the butterflies with their corresponding die. 

(In the final piece, only the orange butterfly colored with Tangelo and Lulu Lavender Memento Dual Markers was used.) 

Step 10: 
Stamp part of the mountain outline stamp on the lower right part of the panel with more Nocturne VersaFine Clair ink and heat emboss with clear embossing powder. Then stamp part of the sun stamp with Summertime VersaFine Clair Ink. 

Step 11: 
Spray around the sun with Cantaloupe Fireworks! Shimmery Craft Spray. Use a paintbrush or your finger to move dots of the Cantaloupe spray to make the spray less uniform and more organic. 

Step 12: 
Glue the flowers and small butterfly onto the panel. Attach the larger butterfly to the panel with foam tape. If desired, the outer tips of the top wings can be given additional dimension with two layers of foam tape, forcing them to curve. 

Art Supplies 

Imagine 
Delicata Ink – Celestial Copper 
Fireworks! Shimmery Craft Spray – Cantaloupe 
Fireworks! Shimmery Craft Spray – Cottage Iv
Fireworks! Shimmery Craft Spray – Lilac Posies 
Memento Dual Marker – Lady Bug 
Memento Dual Marker – Northern Pine 
Sheer Shimmer Shimmer Craft Spray – Sparkle 
VersaFine Clair ink – Nocturne 
VersaFine Clair ink – Summertime 
VersaFine Clair ink – Spruce 

Other 
Altenew – die set – All Things Orange 
Altenew – stamp set – All Things Orange 
Altenew – foam tape – Instant Dimension Foam Tape 
Altenew – washi tape – Many Dots 
Art Alternatives – MDF Panel (5” x 7”) 
Golden – Gesso Semi-Opaque Acrylic Primer 
Ink Road Stamps – stamp set – Roadies 8 (sentiment stamp) 
Visible Image – die set – Antisocial Butterfly 
Visible Image – stamp set – Antisocial Butterfly 
Circular stencil 
Die cut washi tape 
Watercolor paper 
Vellum 
Pencil 
Paintbrush 
Die cutting machine 
Paint brush 
Scissors 
Glue 
Text-based patterned paper 
Clear embossing powder 

Easy Easter Egg Holders for Sweet Easter Displays

By Nancy May

Hey y’all.  I am going to share how you can create simple Easter egg holder rings that you can use to create an Easter display to match your style, your décor, etc. The sky is the limit! Let get to it!

~Nancy

==============

Skill: Beginner (but adaptable to more advanced learners)

Time: 30-ish minutes

Art Supplies

Imagine

• VersaFine Clair Ink Pad: Nocturn, Shady Lane, Verdant

• VersaColor Dew Drops: Magic Black, Tea Leaves

• Brilliance Dew Drop: Pearlescent Orchid

• On-Point Glue

Other

•  Simon Says Stamp – Clear Stamps – Tim Holtz/Stampers Anonymous Hipster Bunny 

• Whimsy Stamps – Dies – Grass and Cloud Edger Dies 

• Whimsy Stamps – Supplies – Large Blender Brush

• Lavinia Stamps – Stencils – White Orbs

• Scrapbook.com – Supplies – Reverse Tweezers

Let’s Make a Shaker Ornament

By Martha Lucia Gomez

Hello there! Today’s tutorial is a shaker ornament created with embossing powders and using different colors in a single piece. To make this, I used the MBoss in Blue Icicle, Sapphire and White. To create this type of embellishments or ornaments for your cards, gifts or Christmas Trees, you can also use our traditional Embossing Powders in any color.  

Skill Level: Medium

Time to Complete: 45 minutes

Directions:

Step 1:

Apply a layer of ink to your Shaker Base or Chipboard piece directly with the ink pad of VersaMark. You can also use the small size or cube of VersaMark Ink if you are using a small piece of shaker card or chipboard. Make the emphasis on the center if it has the designed part. 

Step 2:

Cover the center of your ornament with the light color of MBoss or embossing powder. In my sample, I am using the Blue Icicle.

Step 3:

Melt the MBoss or Embossing Powder with the heat tool. Don’t worry if the powder covered some parts of the border.

Step 4:

Repeat steps 2 and 3 if you want a thick effect or want better coverage.

Step 5:

Ink the border or the chipboard ornament or shaker piece with the VersaMark Ink Pad, taking care not to cover the center of the piece. 

Step 6:

Cover the inked area with the dark color of MBoss. I am using the Sapphire.

Step 7:

Melt the powder with the heat tool. Then, add some touches of MBoss White to create more dimension over it. Melt the MBoss White or White Embossing Powder with the heat tool. 

Step 8:

Assemble your shaker card or finish the ornament by adding some sprinkles or small sequins and adding a piece of ribbon to tie it.

Voila! Our ornament is finished and can be used to decorate a card, a gift or to be handled on a Christmas Tree.

Remember that you can use this idea for any type of chipboard piece or for any occasion, not only for Christmas. 

Art Supplies:

Imagine:

• Mboss Sapphire, Blue Icicle and White

• Tear it! Tape

• Craft Mat

• VersaMark

Other:

• Shaker Dimension Set or Chipboard Piece. 

• Heat Tool

• Sequins

Learn to Make a Welcome Home Wood Sign

By Neva Cole –

In today’s tutorial you will learn to create a super easy wood sign using the ever versatile VersaFine Clair inks.  The VersaFine Clair worked beautifully for this project that took just under and hour from design concept to completion!  The ink pads are nice and juicy, so the first stamp image was perfect every time, which is helpful when free hand stamping with out a stamp platform.

Skill:  Beginner

Time:  1 Hour

Directions:

Step 1:

Remove twine from the sign so it will lay flat on your work surface.  With lines on the sign already in place it was easy to line up the sentiment and acrylic stamp block.  Once the stamps are aligned, place a large acrylic block over the stamps lining up the edges to allow perfect positioning.

Step 2:

Stamp the sentiment in VersaFine Clair Pinecone and heat emboss with clear Embossing Powder.  Gives the sentiment a bit of shine and keeps it from smearing!

Step 3:

Using and ink blusher ink the edges of the sign with VersaFine Clair Cheerful.  Start from the outside edge and blend toward the center to create a slight ombre look.

Step 4:

Using and ink blusher ink the edges of the sign with VersaFine Clair Summertime.  Start from the outside edge and blend toward the center but not as far as the Cheerful layer.

Step 5:

The leaf images are stamped using a very old stamp that features Fall leaves. The Oak leaf is stamped in VersaFine Clair Acorn, the Aspen leaf in Summertime, and the Maple leaf in Tulip Red.  The sign can be heated with a heat gun, or set aside until the ink dries.

Step 6:

Replace twine through holes in the sign and display! 

Art Supplies

Imagine:

Versa Fine Clair–Pinecone, Acorn, Cheerful, Summertime, Tulip Red

Embossing Powder–Clear

Ink Blusher

Other Products:

Square 7” x 7” Wood Sign

Recollections Clear stamps sentiments from 2020

Judi-kins Fall Leaves Cube 

Neva Cole

http://snippetscrafter.blogspot.com/

n.cole@windward-performance.com

Let’s Make a Fun Inspirational Card

Lee_Ann_Aug_600x600

By LeeAnn McKinney –

Hey there friends and fellow crafters, LeeAnn here with a fun Inspirational Card I made using my absolute favorite technique, and those of you that have been here for a while know I love Kaleidacolors.

Skill level: Beginner

Time: 30 minutes


Art Supplies

Imagine:

• Imagine Craft Mat

• On Point Glue

• Tear It! Tape

• StazOn Stamp Cleaner

Desert Heat Kaleidacolor Dye Ink

• VersaFine Clair Nocturne

Other Products:

• Accent Opaque 120lb Cardstock 

• Kromecote Paper Marco’s Paper

• Stampers Anonymous Motivational 2 Stamps

“Hello Sunshine” Wooden Photo Frame

Jul22_LeeAnn_Feature

By LeeAnn McKinney

– Hi there friends and fellow crafters, today I am sharing a fun project with you that I have made for my oldest granddaughter. I saw this photo frame and it made think of her immediately. 

Skill level: Beginner

Time: 30 minutes


Art Supplies

Imagine:

• Fireworks! Shimmery Craft Spray – Dandelion

• Radiant Neon Electric Yellow

• Radiant Neon Electric Orange

• VersaMark

• Mboss Embossing Powder – Clear

• Imagine Craft Mat

Other Products

• Sun Frame

• Blender Brushes 

• Heat Tool