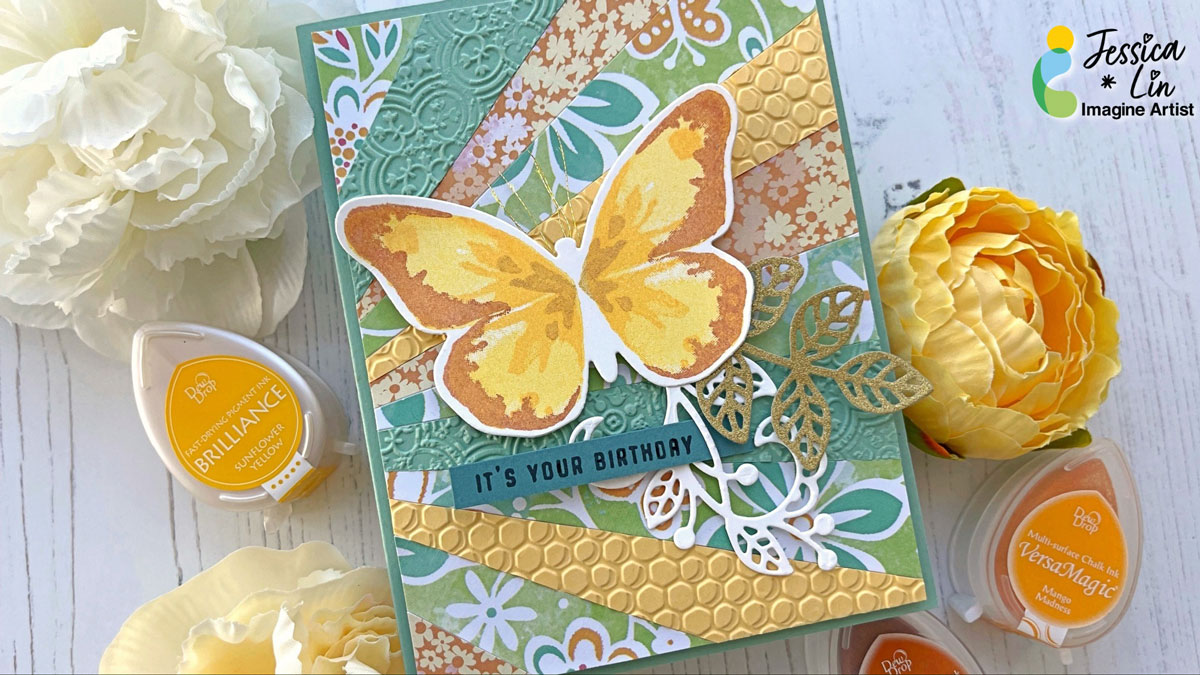
Create a Monochrome White & Gold Winter Wedding Card

By Jessica Lin

Skill: Intermediate
Time: 30 minutes

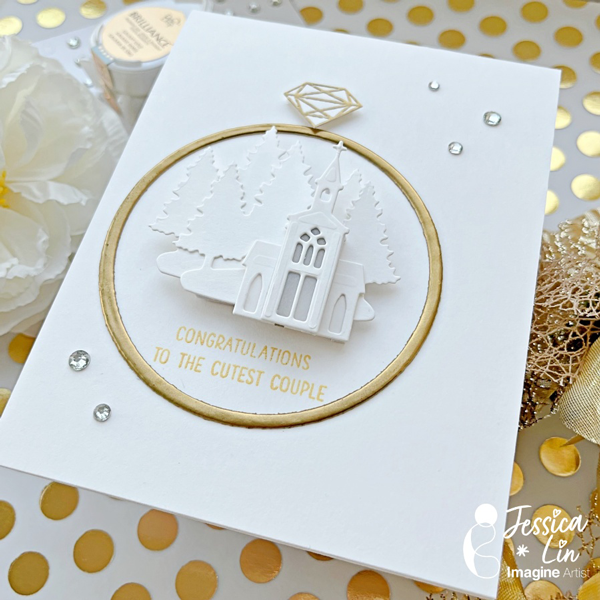
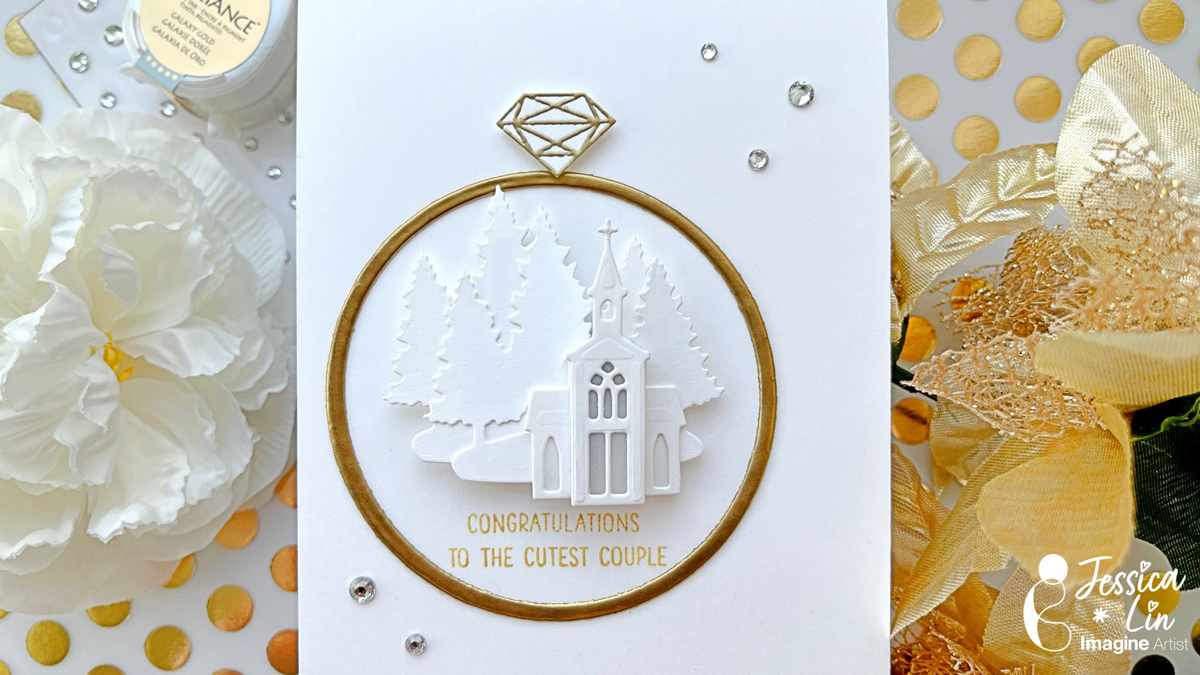
Hi everyone! It’s Jessica here and I’m excited to share this elegant winter wedding card with you today. If you enjoy simple, monochromatic cards, this is the perfect card for you!

Step 1:
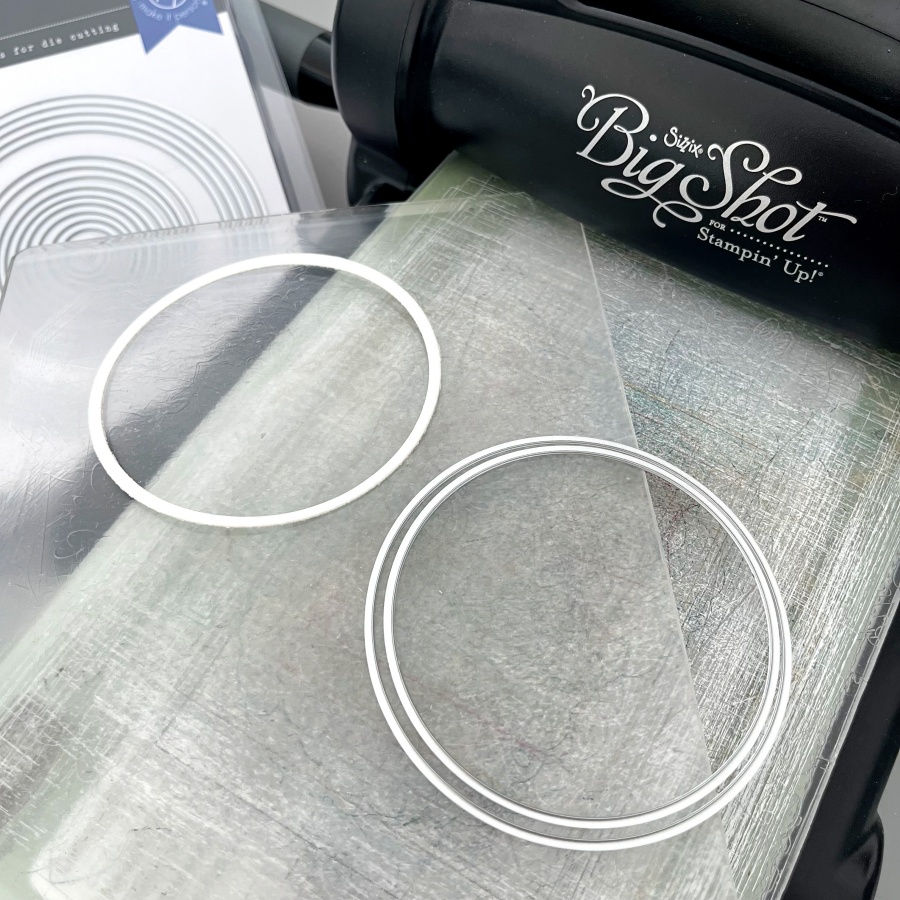
The idea for this card is to create a winter wedding church scene inside a wedding ring. I started off by die cutting a narrow circle that will be the base of the wedding band. A trick here is to use layering dies to customize any die cut size you may need.
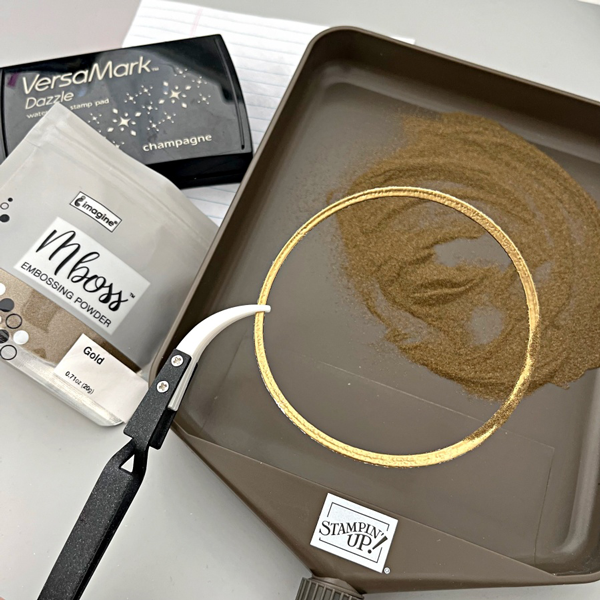
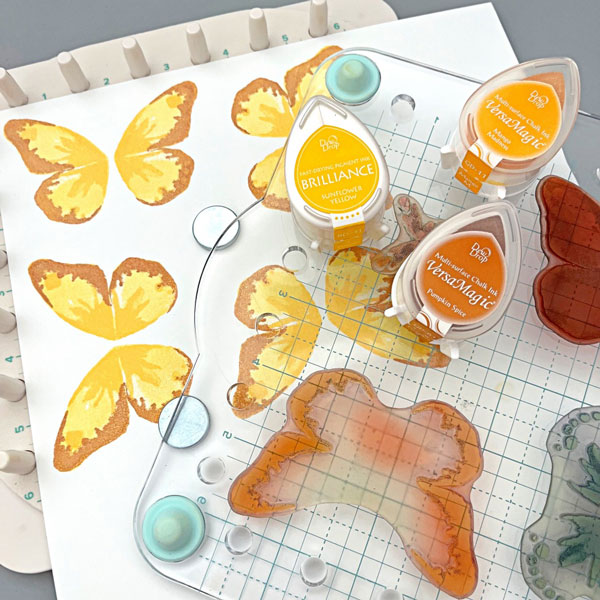
Step 2:
Then I took my VersaMark ink pad and “stamped” it directly onto the circle die cut piece. After that, I applied a generous coat of gold embossing powder and heat set it with a heat tool. For a smoother finish, I repeated these steps again. After two coats of embossing, the gold embossed surface is shiny and smooth, which really mimics a gold wedding ring.

Step 3:
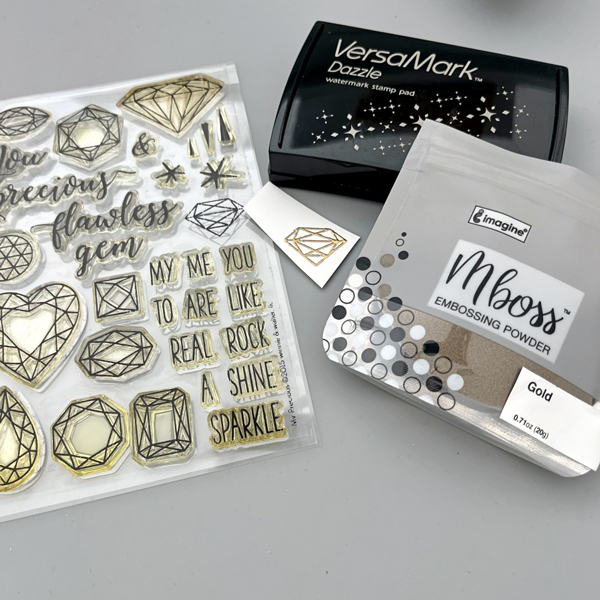
The Winnie & Walter My Precious stamp set is my favorite for any diamond and gems images. I heat embossed the smaller diamond with gold Mboss powder.

Step 4:
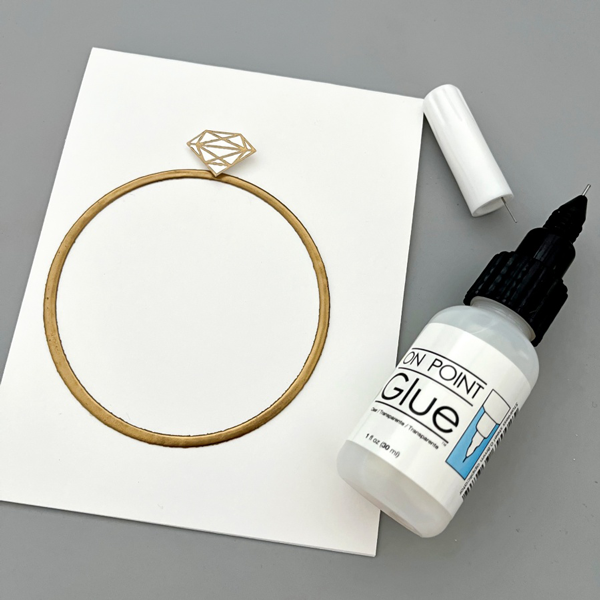
After fussy cutting the embossed diamond image, I adhered both of the wedding ring elements with On Point Glue.

Step 5:
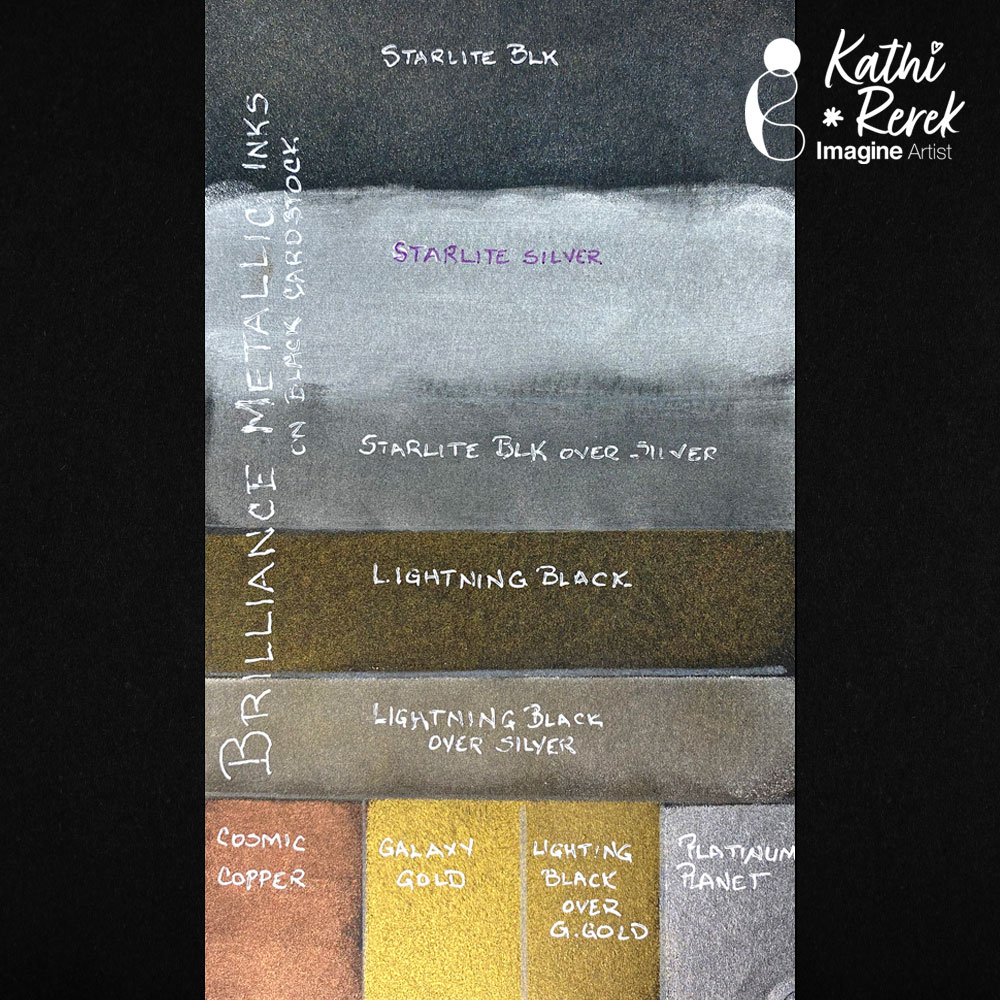
For the wedding church scene, I used the dies from Stampin’ Up!’s Snowglobe Scenes set. I die cut two pieces of the forest backgrounds and layered the church buildings with foam tape. I even added a tiny piece of vellum behind the first church die cut to create the illusion of glass windows. For the sentiment, I stamped this really adorable greeting using Brilliance Galaxy Gold ink pad.

Craft Supplies:

Imagine Supplies:

Other Supplies:

  • Winnie & Walter – Stamps – My Precious
  • Hero Arts – Dies – Infinity Circle
  • Stampin’ Up! – Dies – Snowglobe Scenes
  • Mama Elephant – Stamps – Oh Happy Day (for the greeting)
  • We R – Tool – Precision Press
  • Heat Tool
  • Rhinestones
  • White cardstock

Zombie Graveyard Halloween Card with VersaMagic Inks

By Kathi Rerek

I might be an introvert, but I do love to make scenes — in card form. Here’s a Halloween card created with VersaMagic and VersaFine Clair inks, stamping, and some die-cuts.

Skill Level: Intermediate
Time: 1.5 hours

Instructions:

Step 1:
Cut a piece of Bristol paper to 4.75” x 6.75”. Use the Boneyard Edgers die to cut removable sticker paper and place along the bottom of the image panel. Place low tack tape below it.

Use the 1” circle punch to punch the sticker paper and adhere it to the upper left hand side as shown.

Step 2:
Use a Sponge Dauber to apply Night Sky VersaMagic Ink over the masked images onto the background. Heat set.

Step 3:
Spray a little water into a small container. Squeeze a few drops of Moonlight White VersaMagic Re-inker into the pot. Use a paint brush to mix the water and the ink. Tap the inky paintbrush over the night sky background to add splatter to look like stars.

Step 4:
Remove the sticker masks from the moon and from the cemetery.Smoosh the Jumbo Java VersaMagic Dewdrop Inkpad onto a piece of acetate. Lightly mist with water. Use a paintbrush to paint the tree in the graveyard. Heat set. Clean and dry the acetate.

Steps 5A and 5B:
Smoosh the Hint of Pesto VersaMagic Dewdrop Inkpad onto the cleaned piece of acetate. Lightly mist with water. Use a clean paintbrush to apply green ink at the top of the hill below the tombstones, crosses, gate, and tree (5A). Use a Fantastix to apply Spanish Olive VersaMagic Ink to blend this lighter ink below the ink applied in Step 5A. Continue apply the Spanish Olive Versa Magic Ink horizontally to fill in the base of the card and create the cemetery lawn. Heat set the image panel.

Step 6:
Place the image panel onto the base of a stamping platform secured with magnets and low-tack tape.

Position the clear Zombie stamps from the Zombie Party Clear Stamp Set facedown as desired on the cemetery lawn. Position the Bat Colony Clear Stamp facedown over the moon and sky.

Press the platform’s base onto the back of the stamps. Lift. Ink the stamps with Nocturne VersaFine Clair Ink and stamp. Re-ink and stamp if necessary to attain solid black images. Heat set the panel.

Step 7:
Trim the image panel to 4.625” x 6.625”. Use Nocturne VersaFine Clair Ink to edge the image panel. Cut a piece of orange cardstock to 4.75” x 6.75”. Sorry that there’s no photo.

Step 8:
Apply Tear It! Tape to cover the reverse of a piece of orange cardstock. Use the “Happy Halloween” sentiment dies to cut orange cardstock. Remove the tape’s backing and adhere the sentiment as shown.

Step 9:
Use Tear It! Tape to adhere the layers of the card.

Imagine Crafts Supplies:

Other Supplies:

  • Bristol Paper by Strathmore
  • Carrot Textured Cardstock by Bazzill Basics
  • Raven Textured Cardstock by Bazzill Basics
  • Boneyard Edgers Dies by Frantic Stamper
  • Happy Halloween Dies by Top Dog Dies (defunct)
  • Zombie Party Clear Stamp Set by Whimsy Stamps
  • Bat Colony Clear Polymer Stamp by Lavinia Stamps
  • Low-Tack Tape
  • Misti  Stamping Platform by My Sweet Petunia

VersaMagic Inks are Great for Stamp Layering

By Jessica Lin

Hi everyone! It’s Jessica here and I’m excited to share a patterned paper trick with you today. If you like to save scraps of pretty paper, but are unsure how to use them, I highly recommend trying out today’s technique!

Skill: Intermediate
Time: 30 minutes

Step 1:
The focal image of today’s card is this butterfly stamp from Watercolor Wings. It’s one of my favorite layering stamp sets of all time. I used Brilliance Sunflower Yellow for the base layer. Then I stamped the second and third layers with VersaMagic Mango Madness and Pumpkin Spice. I did add a fourth layer using Brilliance Galaxy Gold as well (not pictured). 

Step 2:
Die cut the butterfly images with Bold Butterfly dies. Then adhere the tips of the butterfly die cuts with On Point Glue. This would create a string of butterflies for a surprise pop up mechanism inside the card (next photo).

Step 3:
To make the patterned paper background for the card front, trim your patterned paper scraps to 1 x 6’’. Then cut each piece diagonally to create long, triangular shapes. I used Stick It adhesive to cover the entire background panel and adhered the patterned paper pieces on top. However, you could use whichever adhesive you prefer. Once the entire panel is covered, trim off the hanging pieces on the edges.

Step 4:
Lastly, adhere the last butterfly along with any additional foliage die cuts. And the card is complete!

Imagine Supplies:

Other Supplies:

  • Stampin’ Up! – Stamps – Watercolor Wings
  • Stampin’ Up! – Dies – Bold Butterfly, Flourish
  • We R – Tool – Precision Press
  • Foam Tape
  • Stampin’ Up! – Cardstock – Mint Macaron
  • DCWV – Pattern Paper – Floral Flair
  • White cardstock

Make a Fourth of July Card with Colorful Heat Embossing 

By Jessica Lin

Hi everyone! Are you ready to celebrate the Fourth of July? I made a sparkly, light-up card to celebrate the occasion. It’s been a while since I heat embossed with colorful embossing powders and I truly miss this simple and fun technique. Be sure to check out the supply list at the end to see the colors I used!

Skill Level: Advanced
Time: 1 hour

Step 1:
Stamp one image from MFT’s Festive Fireworks set with VersaMark ink pad. Then pour on embossing powder with the color of your choice. Repeat the steps if you would like to use different colors of embossing powders, making sure to heat set the powder before moving on to the next color. The colors I used today are Mboss – Valentine, Lucky Stars, Princess Party, and Shimmering Night Sky (not pictured here).

Step 2:
Use Brilliance – Galaxy Gold ink pad to stamp the layering images. I used a stamp positioning tool so that I could restamp a couple of times and get good ink coverage. The gold stamped images look so well against the black background, don’t you think?

Step 3:
I decided to add interactive elements to make this card even more festive! I used Chibitronics LED light stickers to create the light up circuit. If you are interested in making a light up card, feel free to check out the step-by-step video tutorial on my YouTube channel “Craft with Jessica V. Lin” and search for “How to Make a Fireworks Light Up Card with BLACK Cardstock”.

Step 4:
For some finishing touches, I splattered some Sheer Shimmer Craft Spray to the background. I used the brush-over-acrylic-block flicking method, but you could use the spray nozzle to add a fine mist of shimmer as well. Then I adhered some sequins with On-Point Glue, and that completes the card!

Imagine Supplies:

Other Supplies:

  • MFT – Stamps – Festive Fireworks
  • We R – Tool – Precision Press
  • Antistatic Powder Tool
  • Heat Tool
  • Hero Arts – Dies – Infinity Circle (to die cut the small center circles for light to shine through the fireworks images)
  • Chibitronics – Tool – LED sticker and Circuit Tape
  • Foam Tape
  • Black cardstock

Brilliance Metallic Inks On Black Cardstock

By Kathi Rerek

I recently shared a project using rich Brilliance Pigment Inks and a friend asked how they looked on black cardstock. I decided that it was a great idea to swatch them so that I’d have a reference.

Skill Level: Beginner
Time: 30 minutes

Instructions:

I had a scrap of black mixed media cardstock leftover from a project. I used a Sponge Dauber or foam applicator to apply the inks singly or in combination onto black cardstock, then labeled them with a white gel pen and/or a purple Sharpie pen when the white didn’t show on the silver. I heat set after each application to avoid contaminating my ink pads.

Notes and Observations about Brilliance Ink:

  • Re-applying another layer of ink after heat setting intensified the opacity and metallic properties of the ink on black cardstock. I’d imagine building up several layers would continue to enhance the inks.
  • The bottom right hand corner of the cardstock was smashed. Applying metallic ink over the crush mark emphasized that textural component! Cool!
  • I applied Starlite Silver and Starlite Black Inks to a Gel Press with a brayer, then pulled a print with black cardstock, which resulted in a lovely silvery mottled metallic finish. Again, a second layer of ink deepened the silver and improved the coverage.
  • FYI: You can apply Brilliance Metallic inks over white chalk finish acrylic paint and over white gesso, which means you can use it on a variety of surfaces. I have not tried Metallic Brilliance Inks over transparent and/or black gesso or Matte Medium. Those will be experiments for another day.
  • Lastly, VersaMagic Inks can be applied over the Brilliance Metallic Inks and yield a nice matte finish.

Imagine Supplies:

Other Supplies:

  • 140 lb. Black Mixed Media Paper by Strathmore
  • Premier Ink Blending Tools by Hunkydory Crafts
  • Premier Ink Blending Sponges by Hunkydory Crafts
  • White Gelly Roll Gel Pen by Sakura of America

How to Make a Sunset with Fireworks! Shimmery Craft Sprays

By Alison Heikkila

Hello! It’s Alison Heikkila. In my latest YouTube video for Imagine, we’re going to create a sunset with Fireworks! Sprays. These pigmented sprays also have mica in them, which help you to achieve beautiful shiny effects. Creating backgrounds with these are really fun, and we’ll use a couple of techniques to do it.

*Some affiliate links are used in this post. That means that if you shop through these links, I may receive a small compensation, at no cost to you. 

 Skill Level: Intermediate
Time to Complete: 40 minutes

Supplies:
Imagine:
Fireworks! Sprays in Dandelion, Tangelo, Rose Bud, Grape Jelly, and Paris Dusk
VersaFine Clair Ink in Nocturne
Black Embossing Powder
Brilliance Reinker in Moonlight

Other:
Hero Arts: Color Layering Palm Tree
Stampendous: Ocean Sayings Stamps (Discontinued)
MISTI Stamping Tool or other stamping platform
Strathmore Smooth Bristol Cardstock
Bearly Arts Glue
Accent Opaque 110lb. White Cardstock
Cosmetic Sponge
Paintbrush
Acrylic Block

It would be fun to try this with other colors of Fireworks! Sprays. Which colors would you use? Thanks so much for stopping by. Have an inspiring day!