How to Make Little Paper Bags for Wedding and Party Favors

2021-apr-kyriakos-party-favors-bags-main-wm 2

By Kyriakos Pachadiroglou

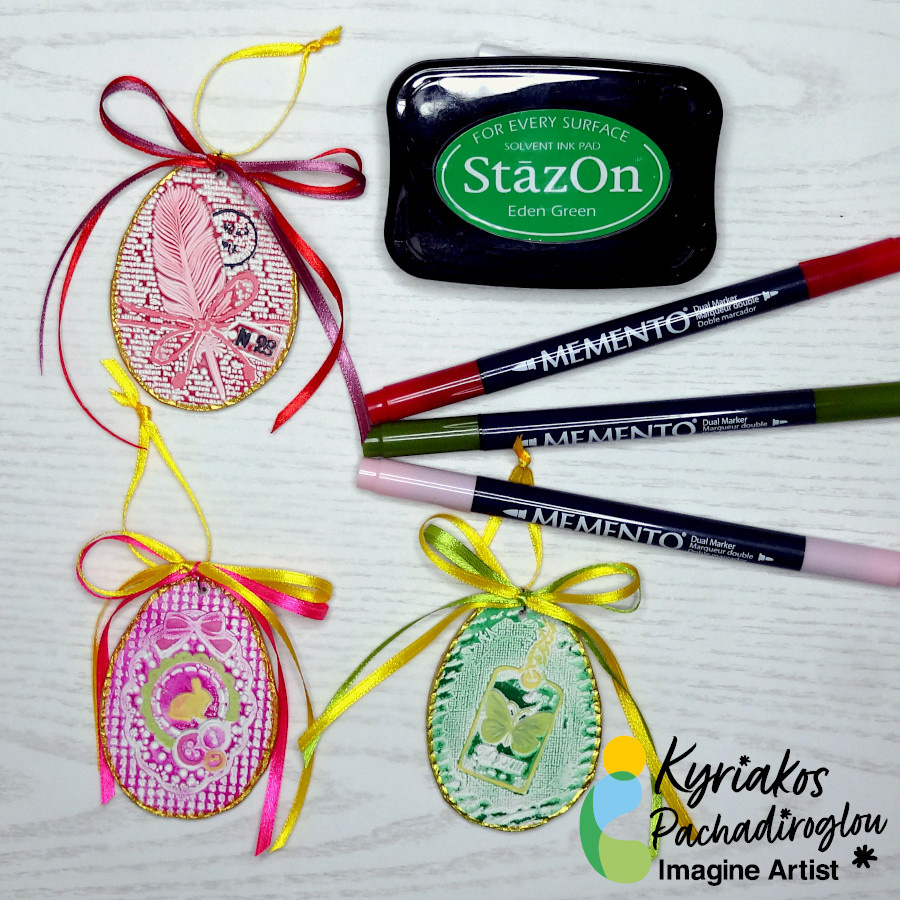
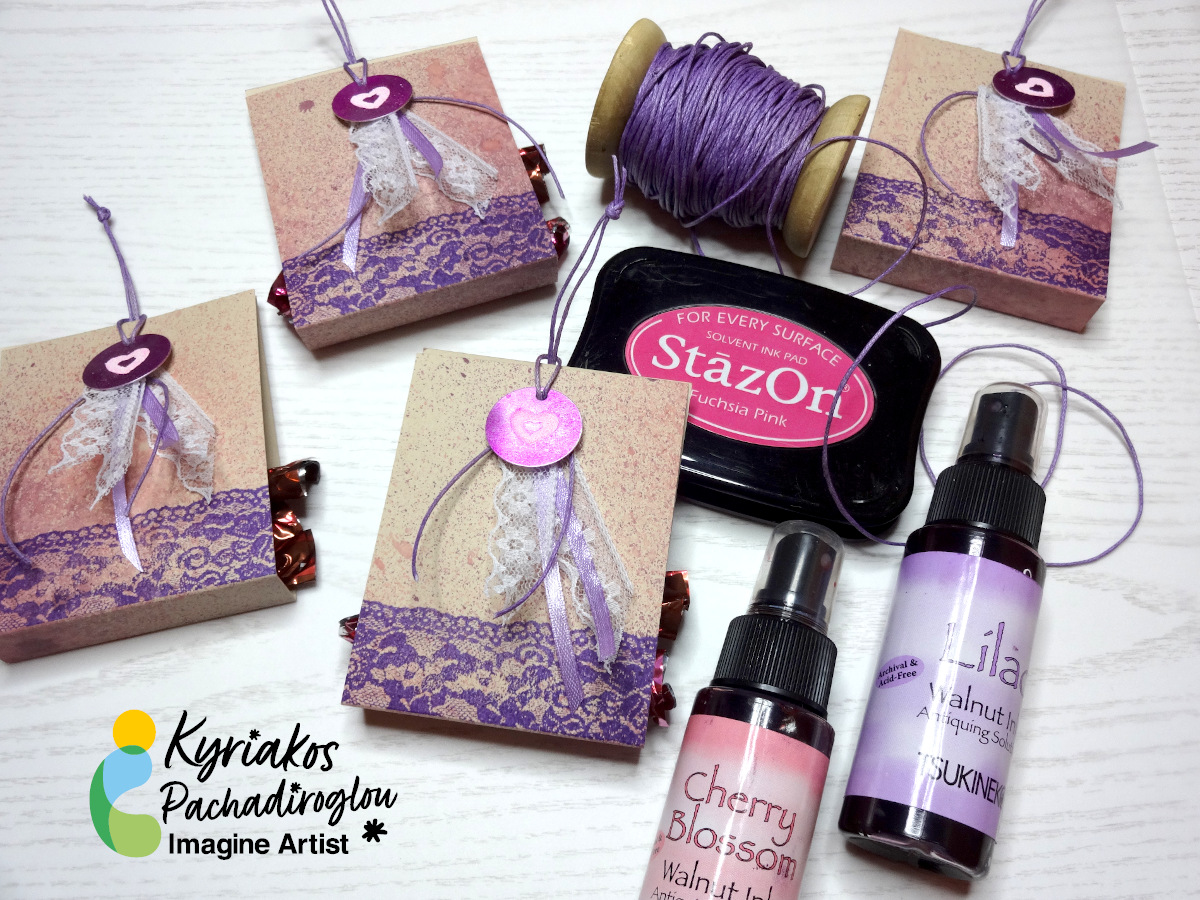
Decorate folded into bag paper cuttings that are distressed with Walnut Inks and stamped with a lace design using MEMENTO ink. Add a round SHEET metal charm with an embossed heart on it. Add sweets in the bags and place them in baskets, on side tables or hang them on branches in a large vase.

Skill: Beginner

Time: 30 min

Directions:

2021-apr-kyriakos-party-favors-bags-step1

Step 1

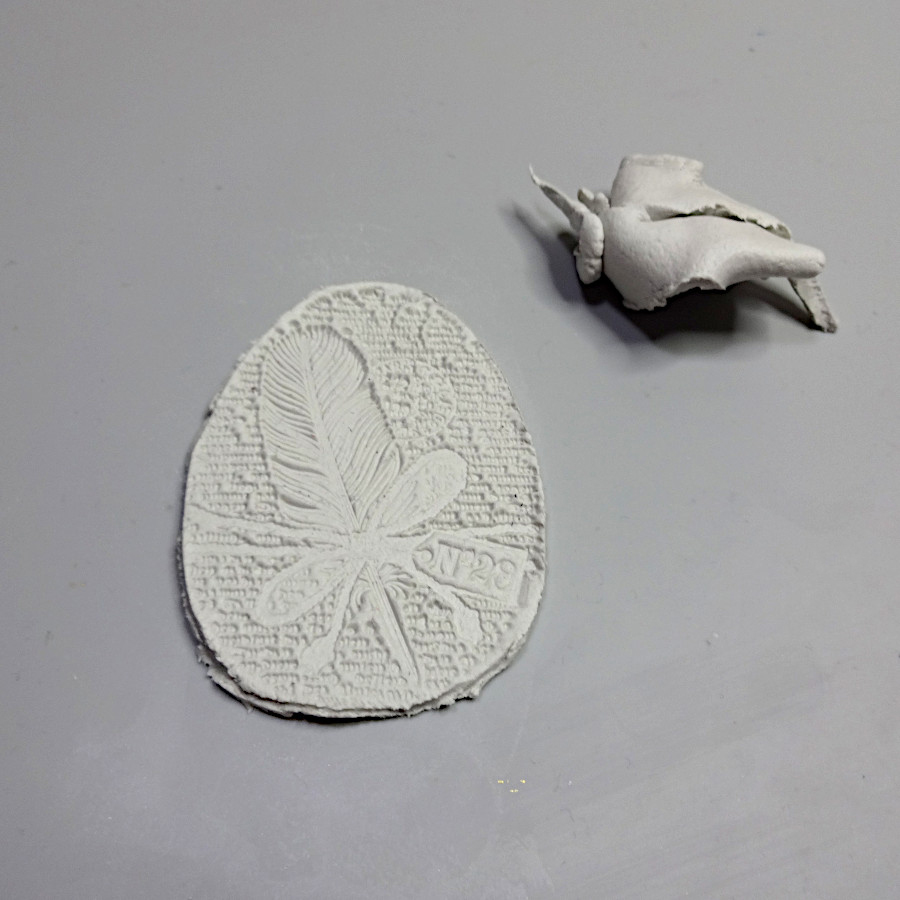
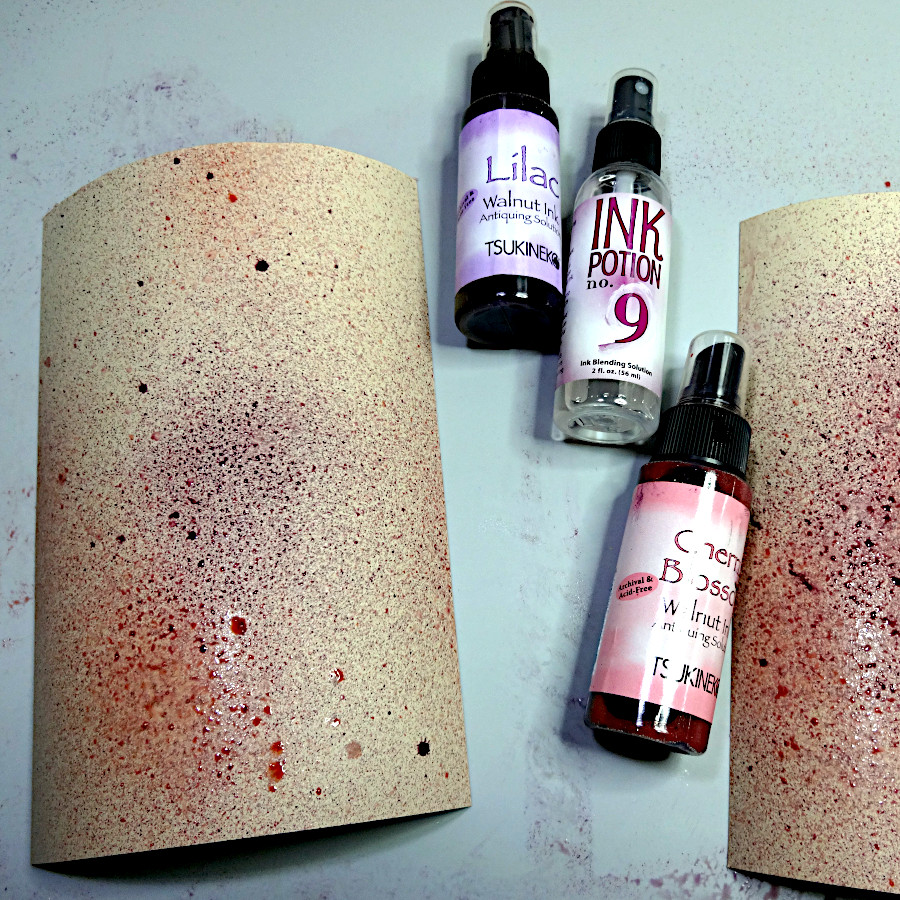
Cut 8×3″ pieces (~half of an A5)of the cardstock and spray them with Ink Potion No 9. While still wet, spray with the Walnut Inks Cherry Blossom and Lilac in some distance from the papers.


2021-apr-kyriakos-party-favors-bags-step2
Step 2

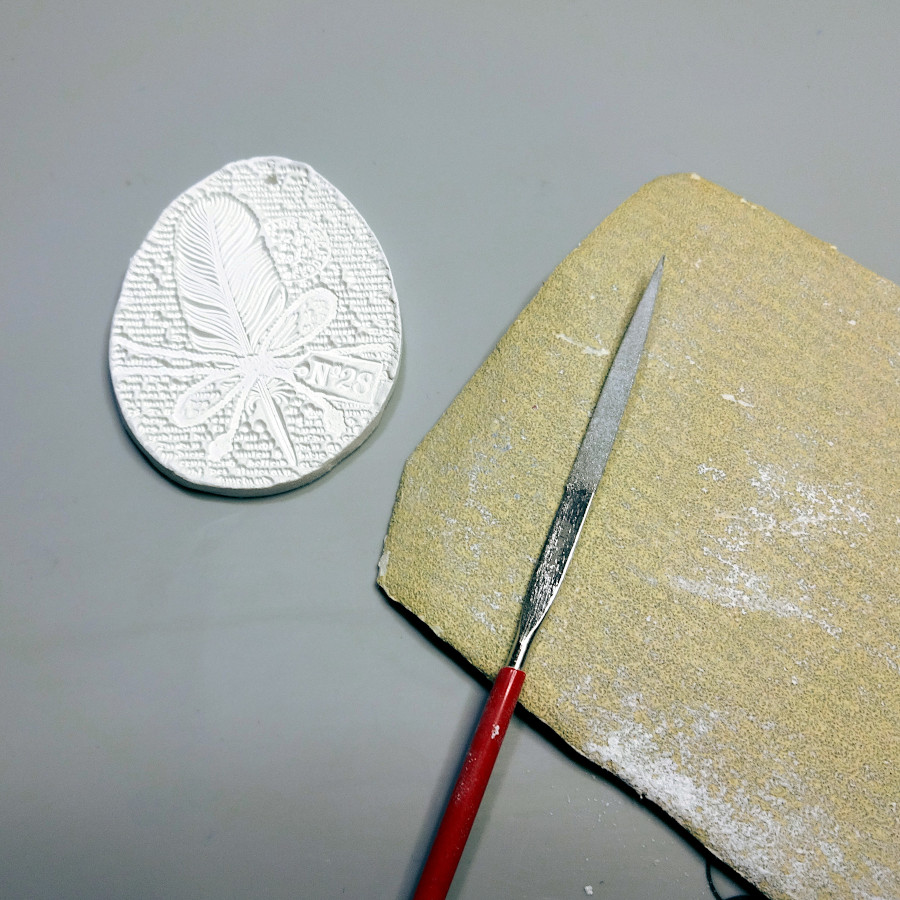
Let them dry (or speed up the process with a heat tool), mark the center (long side) and score ¾in from the center left and right.


2021-apr-kyriakos-party-favors-bags-step3

Step 3

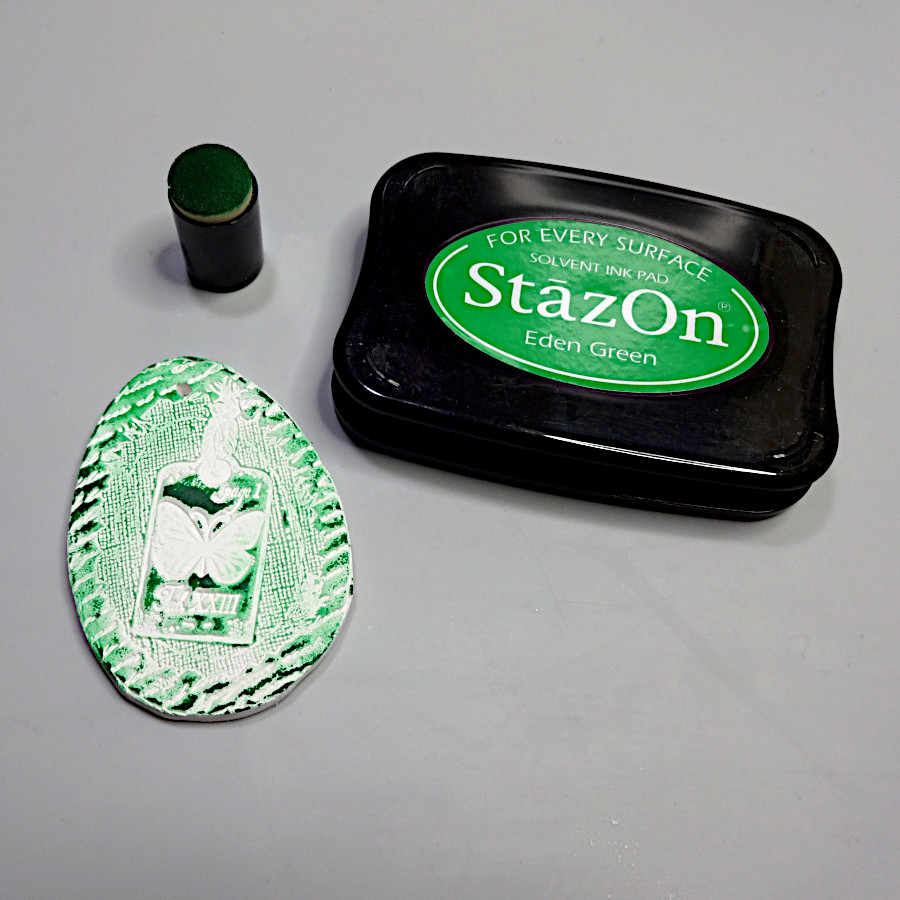
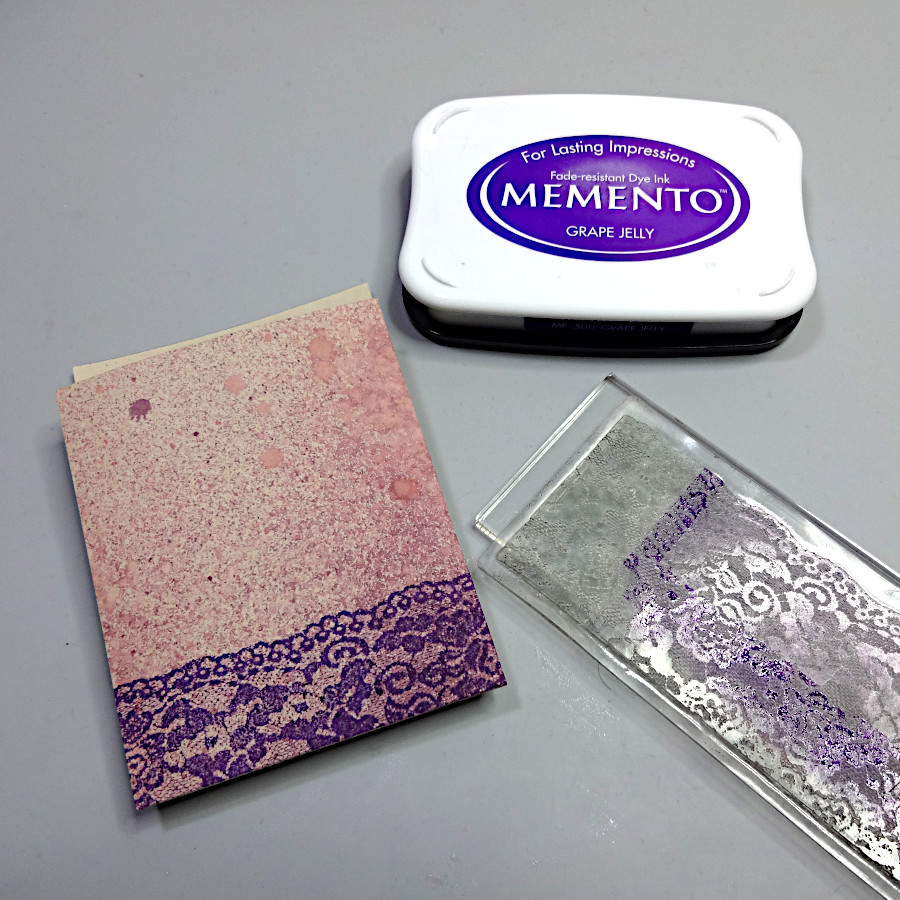
Stamp the lace stamp with MEMENTO Grape Jelly ink pad.


2021-apr-kyriakos-party-favors-bags-step4

Step 4

Color the round SHEET Metal pieces with the StazOn Royal Purple.


2021-apr-kyriakos-party-favors-bags-step5

Step 5

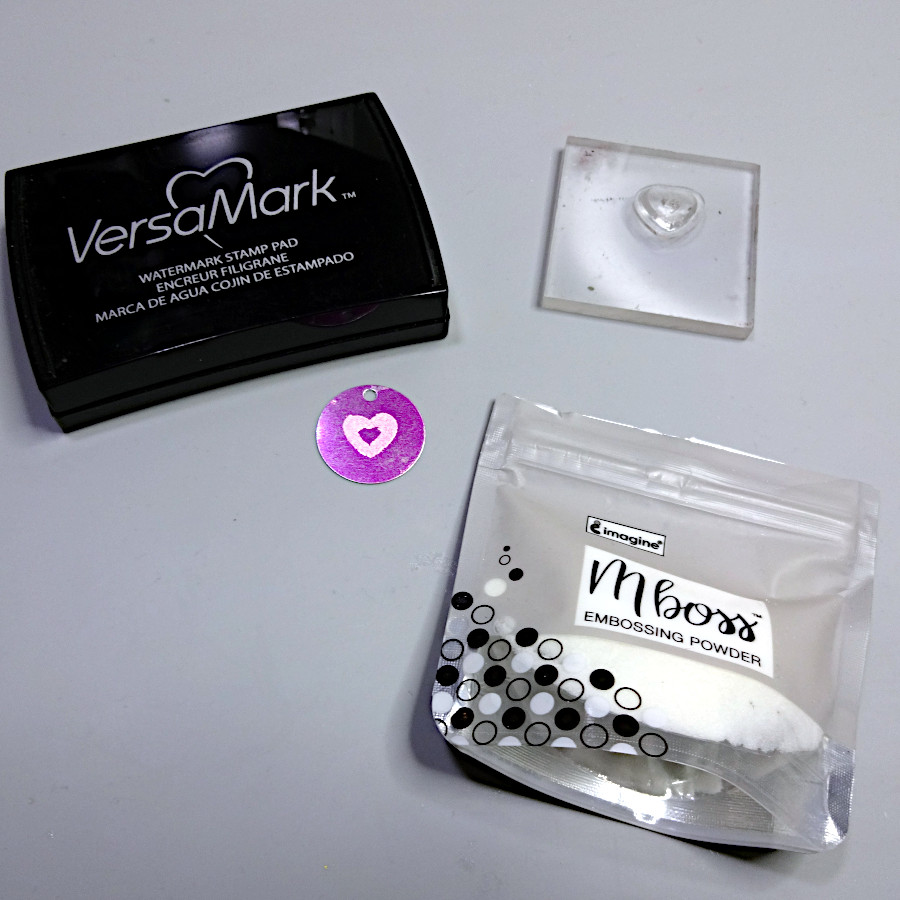
When the ink dries, stamp a heart with the VersaMark ink pad, cover with Mboss White Embossing Powder and heat set.


2021-apr-kyriakos-party-favors-bags-step6

Step 6

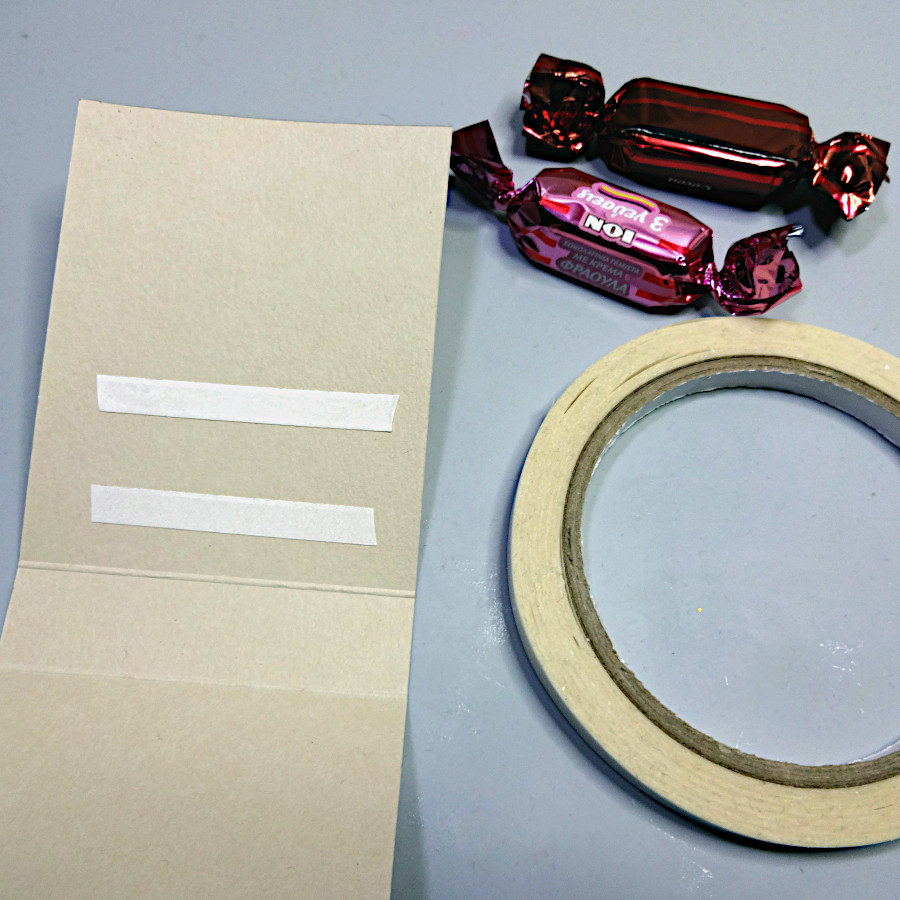
Add Tear It! Tape to the inner if the card cuttings and place the sweets (flat ones will fit better and they can be any shape (like hearts, squares).
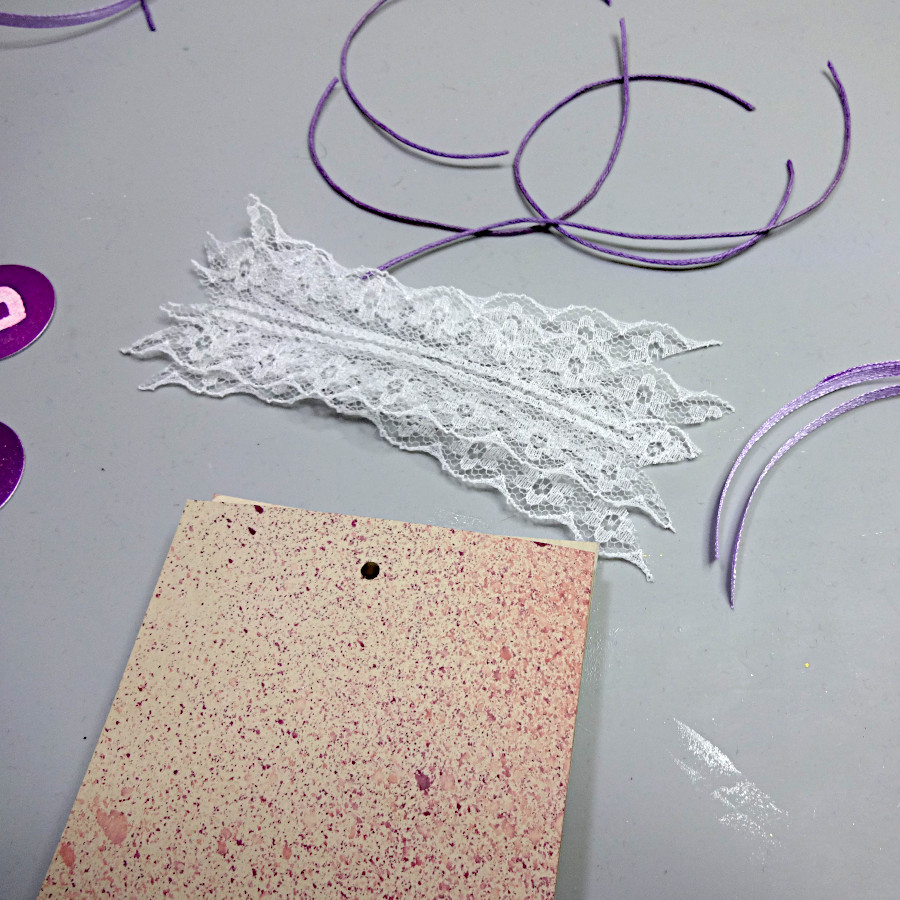
 

2021-apr-kyriakos-party-favors-bags-step7

Step 7

Punch a hole to the folded sides and cut 4″ long pieces of the lace, the ribbon and and the cord.
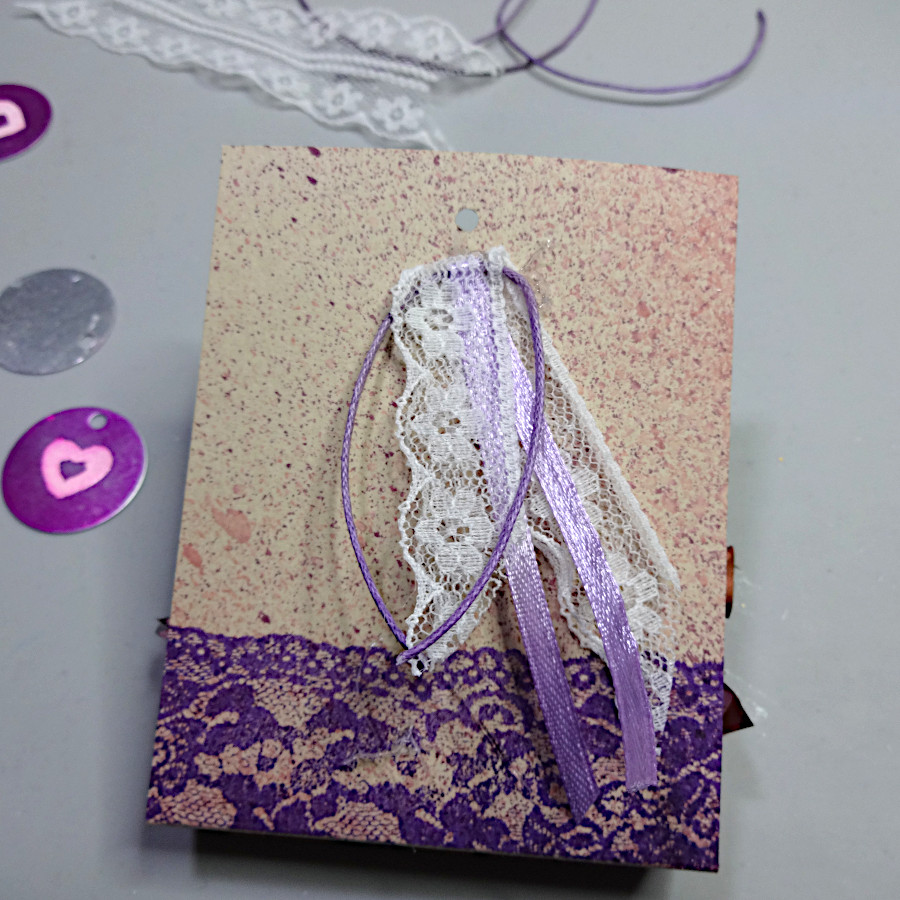
 

2021-apr-kyriakos-party-favors-bags-step8

Step 8

Fold in half the above cuttings and glue them just below the punched hole.
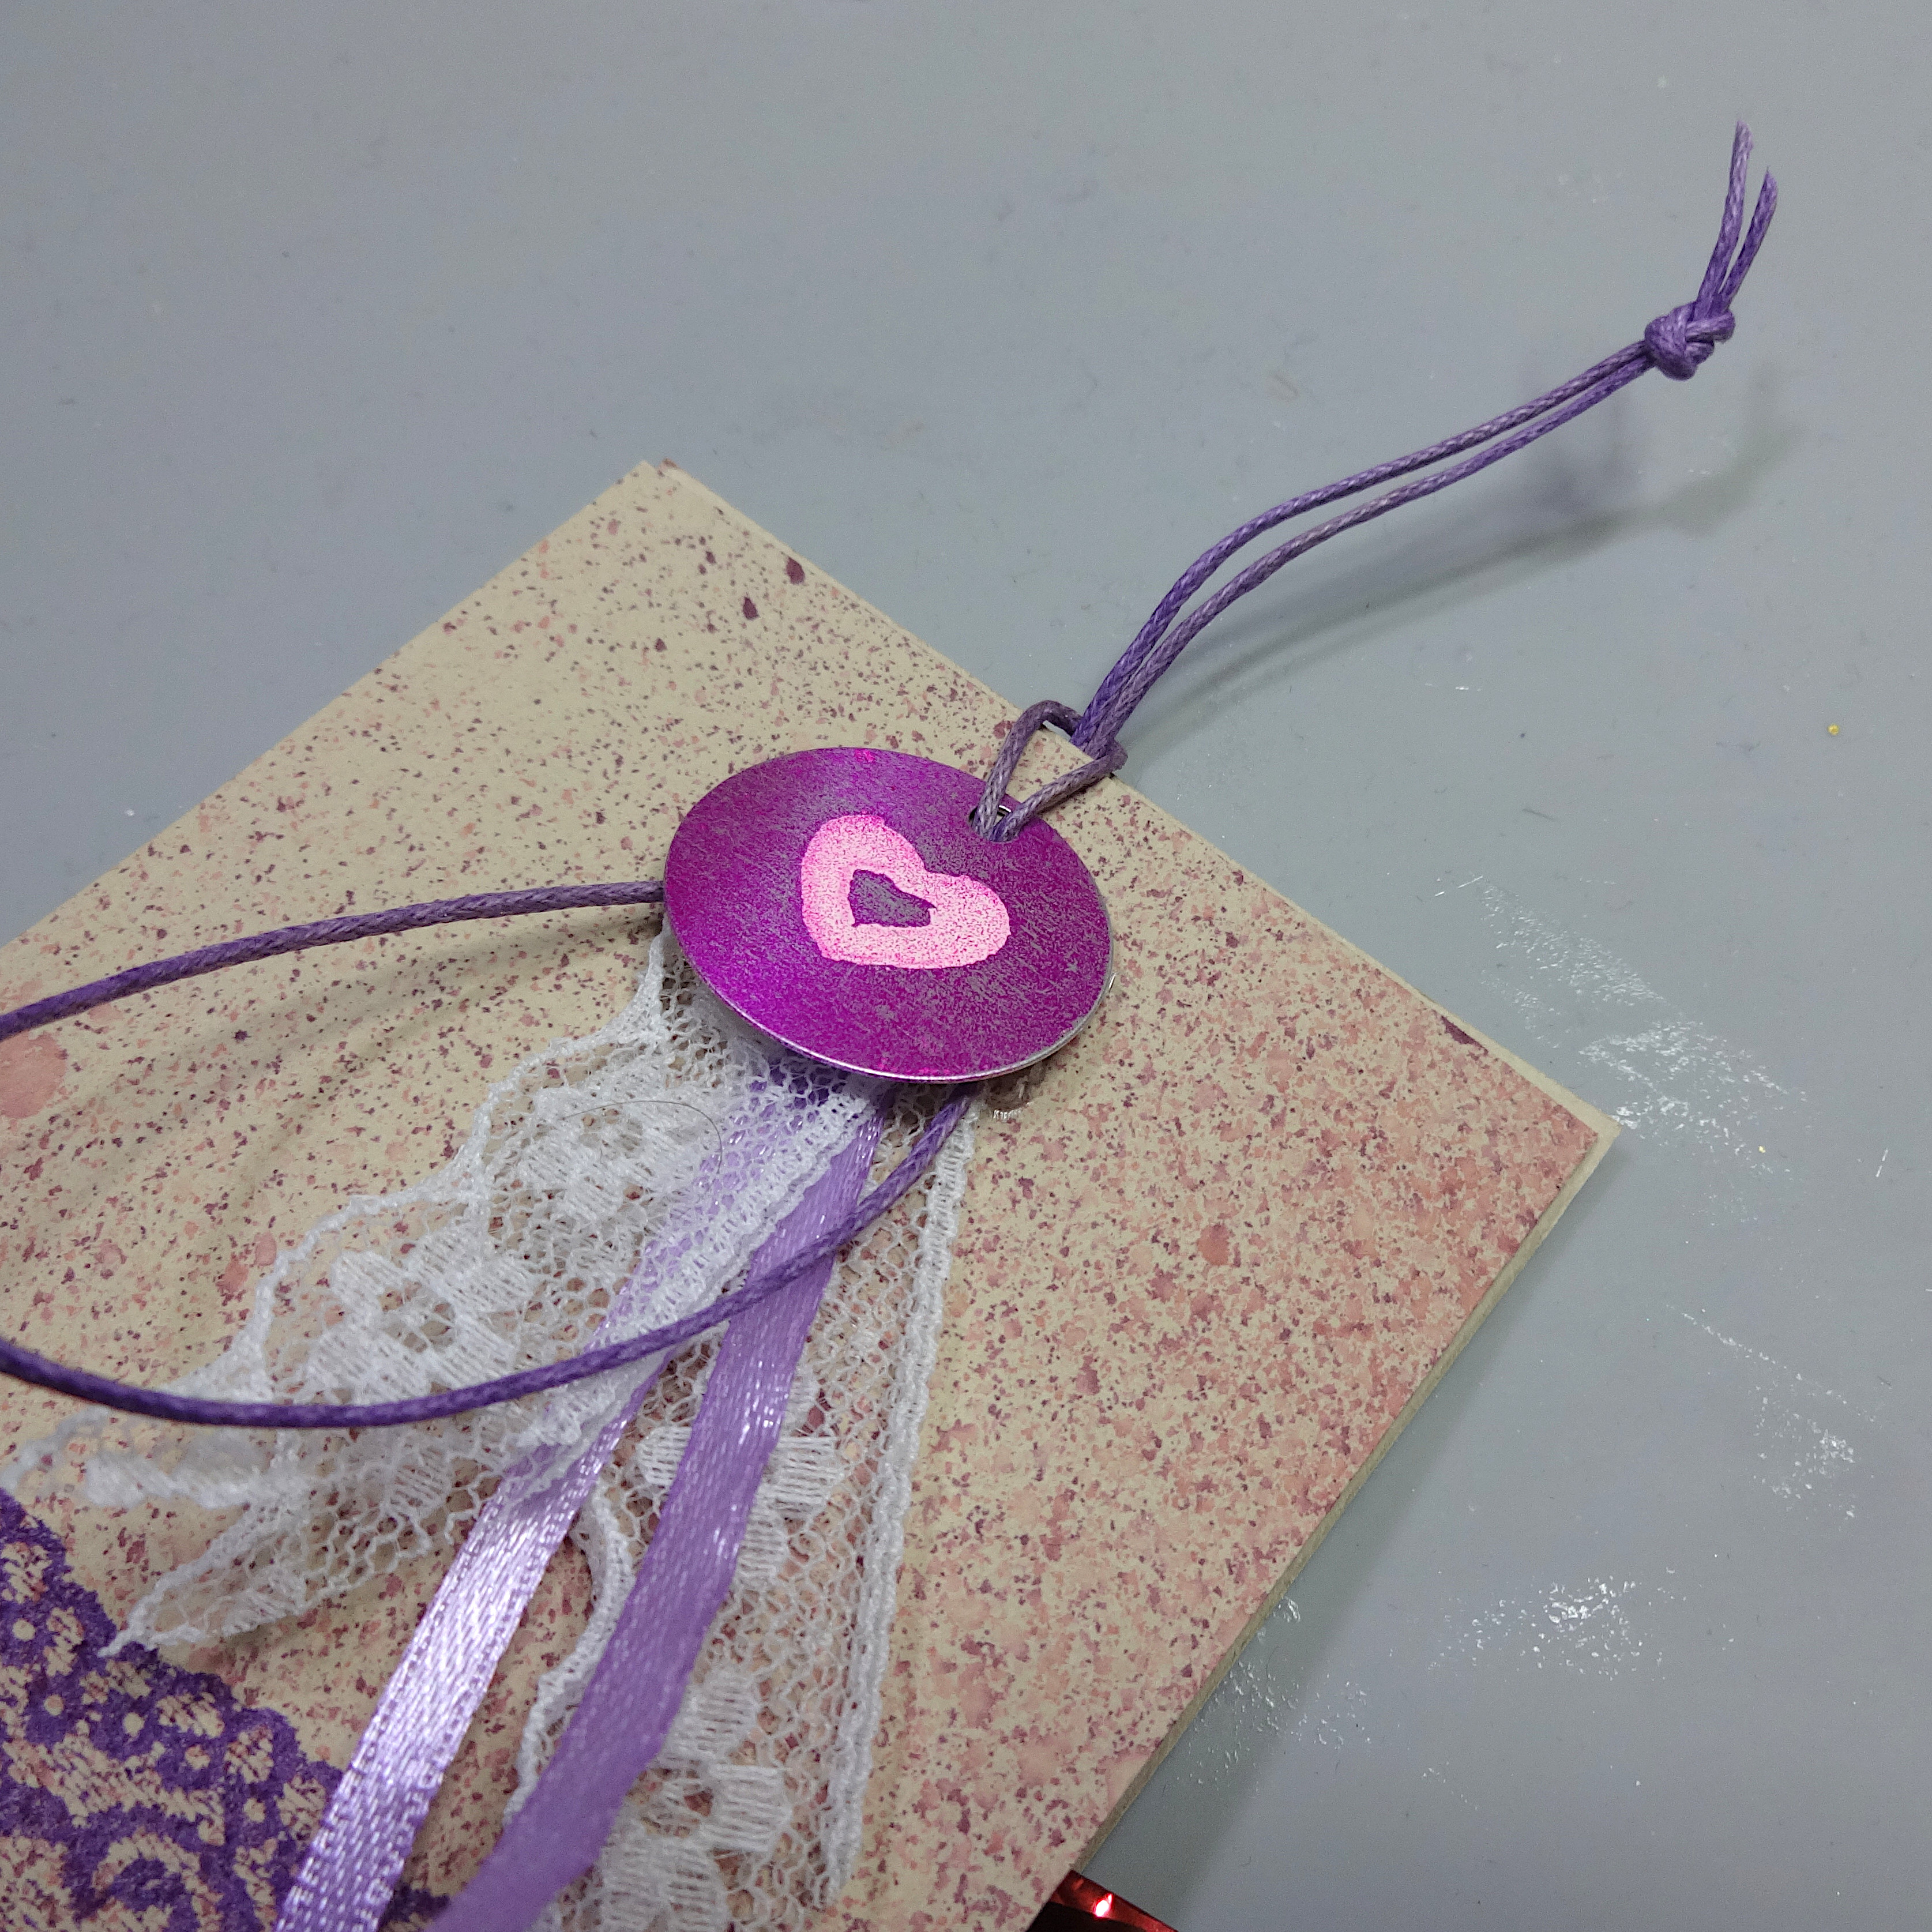
 

2021-apr-kyriakos-party-favors-bags-step9

Step 9

Add the round SHEET Metal charm with some cord (which can be also used to hang the paper bag).


Art Supplies

Imagine

MEMENTO – Grape Jelly

Walnut Ink – Cherry blossom, Lilac

Ink Potion No.9

SHEET Metal – Round 1″

Tear It! Tape

Sponge Daubers

Mboss Embossing Powder – White

VersaMark – Original

 
Other materials

250g/m2 – 115 lb Cardstock Natural

Kaiserkraft Stamp – Lace

Heart Stamp

Hole Punch

Heat Tool

Hot Glue

Lace, Ribbon, Cord

Sweets


Learn How to Make a Multi-Colored Easter Card


By Neva Cole 

In today’s crafting tutorial, I will show you how to use a single stamp image and stamp each line with a different ink color. I will also share how to blend VersaMagic inks for a background and take it up a notch by dry embossing.  


Skill: Intermediate

Time: 1 hour


Directions:

Step 1

Place image on stamp positioner and use a post-it to cover the bottom three lines of the image.  I used a sentiment stamp from Unity Stamp Co. titled “Everything Easter” with four lines of text.  Use a paper piercer to tuck the post-it securely in place. Ink the top line with VersaMagic in Aloe Vera.  Remove post-it and stamp image on cardstock. Clean ink off of the post-it so you can use it for subsequent steps.  Clean image after stamping and moving to Step 2. Repeat this after each step through Step 4.


Step 2

Use two post-its to cover lines 1,3 and 4 and ink image with VersaMagic in Spring Pansy. 


Step 3

Use two post-its to cover lines 1,2, and 4 and ink image in VersaMagic Sea Breeze.


Step 4

Use a post-it to cover lines 1,2, and 3 and ink image in VersaMagic in Spring Pansy.


Step 5

Clean the entire image and ink in VersaMark and stamp image over the colored lines.  Heat emboss with Iridescent Embossing Powder.


Step 6

Using ink blushers ink a section of 4″ x 5.25″ cardstock in VersaMagic Aloe Vera, Spring Pansy, and Sea Breeze and blend into each color.  Use an ink blusher to ink over the heat embossed sentiment image with VersaMagic Pixie Dust.


Step 7

Pressure emboss 4″ x 5.25″ blended color cardstock with Lifestyle Crafts Tide embossing folder.


Step 8

Use a sanding block or sandpaper to gently remove the color from the raised areas of the embossed cardstock.  The white color of the cardstock will show through.


Step 9

Die-cut sentiment image and use and ink blusher to in the edges in VersaMagic Spring Pansy.


Step 10 

Ink the edges of an A-2 (4.25″ x 5.5″) card base in VersaMagic Spring Pansy.


Step 11

Adhere layers together with foam adhesive.  Adhere pearl embellishments in curly- ques of the embossed background.  Adhere pearl embellishments to the center of small flower sequins and adhere with On Point Glue.  Tie a triple looped bow from sheer ribbon and adhere with On Point Glue.


Art Supplies

Imagine
Other
  • Unity Stamp Co.  Everything Easter
  • Post-it notes
  • Paper piercer
  • Lifestyle Crafts Tide embossing folder
  • Sanding block
  • SpiegelmomScraps 50’s Sock Hop sequins
  • Foam adhesive

How to Make Clay Easter Egg-Shaped Ornaments

By Kyriakos Pachadiroglou

Stamp Easter egg designs on clay and color them with StazOn inks and Memento Dual Tip Markers to make Easter ornaments. Decorate tree branches in a vase for a Spring and Easter theme or add them to gift packages and bags.

Skill: Beginner

Time: 30 min + drying time

Directions:

Step 1

On a flat piece of clay, press the egg design stamp.


Step 2

Remove the stamp and cut around the design with a pointed tool (a pallet knife, a piercing tool, etc). Don’t forget to open a hole on the top of the shape. Let the clay cure.


Step 3

When the clay shapes are ready use a filling tool or some sanding paper to smooth the edge of the clay eggs.


Step 4

Use a Sponge Dauber and the StazOn Eden Green to color the embossed designs. You can press the ink pad directly on the clay egg to add more color strength to the embossed design.


Step 5

Color parts of the stamped design with the MEMENTO Dual Tip Markers in greenish shades.


Step 6

For the next design use the StazOn Black Cherry and the MEMENTO Dual Tip Marker Tuxedo black, Angel Pink and Lady Bug to color it following the same procedure as above.


Step 7

Finally, use StazOn Fuschia Pink and MEMENTO Dual Tip Markers Pear Tart, Rose Bud and Bamboo Leaves to color the clay egg.
You can color around the edges of the clay eggs with the All-Purpose Ink Vegas Gold and add ribbons.


Art Supplies

Imagine

StazOn – Eden Green, Black Cherry, Fuchsia Pink 

MEMENTO Dual Tip Markers – Angel Pink, Dandelion, Rose Bud, Bamboo Leaves, Pear Tart, Tuxedo Black, Lady Bug 

Sponge Daubers 

All-Purpose Ink – Vegas Gold

Other materials

Air-Dry Clay – White

Viva Decor Stamps – Easter Eggs

Satin Ribbons Various Colors

Sanding Paper


Learn How To Make Easter Gift Tags

By Jowilna Nolte 

Today I am sharing a quick Easter Tag using some fun splats stamps and the gorgeous range of StazOn ink colors. Plain stamped images in bright and fun colors are a classic look and so versatile – making Easter decorations extra special with a touch of handmade.


Skill Level: Beginner

Time: 20 minutes


Directions:


Step 1

Use a splat stamp and stamp a sheet of white cardstock using different colors of StazOn ink. Stamp one color at a time and then clean your stamp using StazOn Stamp cleaner before inking your stamp with the second color. Repeat and stamp your third color.


Step 2

Once you have stamped all your StazOn colors, use a yellow VersaFine Clair ink and fill in any gaps on your cardstock.


Step 3

Cut your cardstock sheet into tag sizes measuring 3×6”. Then stamp your bunny and wording in VersaFine Clair Nocturne ink.


Step 4

Use Rose Gold Sheer Shimmer Spritz to add some ink splats across the tag and leave to dry. Tie onto a gift bag using baker’s twine.


Art Supplies

Imagine

StazOn full-size inkpad Cherry Blossom

StazOn full-size inkpad Caribbean Green

StazOn full-size inkpad Plum

Sheer Shimmer 7ml Spritzer Rose Gold

VersaFine Clair Full-size Inkpad Nocturne (black)

Other

White cardstock

Stamps: Joy Clair, Stampers Anonymous

Enamel dots


Watercolor and Ink Blending Spring Cards with VersaMagic

By Jessica Lin

Hi everyone, it’s Jessica here and today I have two spring cards to share with you. They feature some cute critters watercolored by VersaMagic ink pads. Those ink pads are my favorite when it comes to creating pastel-themed cards. I hope you like these Easter projects!

Skill level: Medium


Art Supplies:

Imagine

• VersaFine Clair – Nocturne

• VersaMagic:

Squirrel: Sahara Sand, Jumbo Java, Thatched Straw, Ocean Depth, Pink Grapefruit, Tea Leaves

Rabbit: Sea Breeze, Ocean Depth, Wheat, Pumpkin Spice, Pink Grapefruit (Pixie Dust, Spring Pansy)

• VersaMark Dazzle – Champagne

• Mboss – Clear

• Brilliance Dew Drop Ink Pad – Galaxy Gold

• Tear-It Tape

• Craft Mat

Other

Stampin’ Up Fable Friends stamp set

Stamping tool (Stamparatus)

Ranger watercolor cardstock

Waterbrush

EK Success anti-static powder tool

Stampin’ Up A Wish for Everything bundle