Quick & Easy: How to Make Earrings

by Kyriakos Pachadiroglou

Having a quick look at your craft supplies, you can always find something more to make than papercrafts. Jewelry is one of the best things and you can make them any day and according to your fashion requirements each time.

These Wind Charm earrings are very easy to make and you can follow the same steps to make a necklace just by replacing the earring hooks with a jump ring and passing a cord to it. You only need basic supplies and no special techniques.

StazOn Pigment
in Peacock Feathers

Inkblushers

Sheet Metal
in Diamond 1.25 in

GlazOn


Jewelry Kit 

Rinea Foil Paper

Tear It Tape

Jewelry Punch

Glue Gun

Jewelry Pliers

Directions

Cut 2 x 1 ½ inch pieces of the Rinea Turquoise starstruck paper, 5 for each earring or more if you are planning to make a necklace too. An alternative can be to use two matching color papers and have a result that goes with more outfits. When you have the papers cut, place Tear It Tape at one of the long edges and use a bamboo skewer starting from the opposite edge tightly roll the paper. Secure with the pre-set Tear It! Tape to create the pipes. Using the double-sided tape is easy and does not create a mess.

Place a drop of hot glue on one of the pipes ends and set a small jump ring inside. Continue with all of the small pipes and only at one side. If you do not have a glue gun then a strong liquid adhesive glue such as On Point Glue should work as well.

Punch small holes on two sides of the SHEET Metal in a diamond shape. You can use a hole punch or a piercing tool, but make sure that the openings allow the jump rings to pass. Then, remove the protective film and just press them on the StazOn Pigment in Peacock Feathers ink pad. Allow a few minutes the ink to dry. You can seal the result with GlazOn. This liquid sealant is formulated to work with StazOn inks.

Add a bit larger jump rings to set the pipes on the SHEET Metal diamond shapes and finish by adding an earring hook.

See How to Create Stunning Card Design on Black Paper

by Arjita Sepaha Singh

See How to Create Stunning Card Design on Black Paper

For today’s card, I used the new StazOn Pigment inks to create this stenciled floral background. I love the way StazOn Pigment Ink looks on dark/black card stock. This is a very easy and simple card to make because the ink is so vibrant. I used my old daubers to add the pigment on my black card stock if you do not have old dauber then consider using an InkBlusher. To make an impact on this design, I first added white ink and then the colored ink on top. This gives me a brighter vibrant impression and I like it a lot. I used a sentiment “sending hugs” stamped in black and added few details to the inside of the flowers with my white gel pen to finish the card.

Skill: Beginner
Time: 20 minutes

Directions

Supplies

Imagine
Other
  • Cardstock – Black, White
  • Altenew – Floral Garden Stencil
  • Misti Stamping Tool

Brilliant Peacock Themed Jewelry

By Kyriakos Pachadiroglou

Kyriakos Pachadiroglou makes a peacock theme jewlery set using StazOn, VeraMark and embossing powders. green, yellow, teal, metal, circles, earrings, necklace.

Spring is just around the corner and what better color to represent spring than Greenery! Combining green shades and a peacock feather stamp in a one-of-a-kind necklace with matching earrings will catch the eye this spring. The round metal shapes make a perfect base to work with the StazOn colors and create a stylish piece of jewelry.

Kyriakos Pachadiroglou makes a peacock theme jewlery set using StazOn, VeraMark and embossing powders. green, yellow, teal, metal, circles, earrings, necklace.

Step 1

Position the SHEET Metal circles to the desired design and punch holes where necessary to hold the metal pieces together.

Kyriakos Pachadiroglou makes a peacock theme jewlery set using StazOn, VeraMark and embossing powders. green, yellow, teal, metal, circles, earrings, necklace.
Step 2

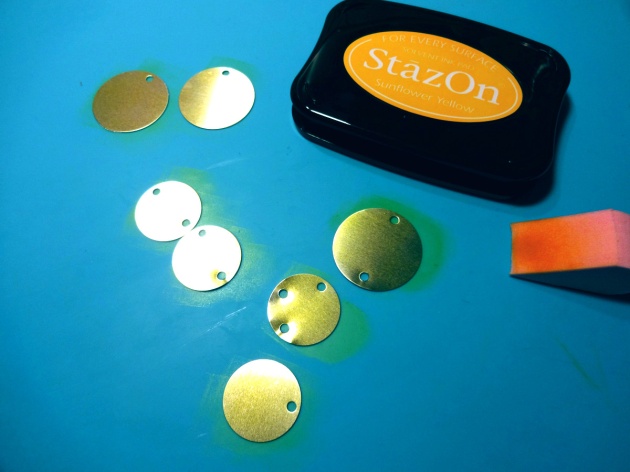
Remove the protection foil and lightly color with the Sunflower Yellow StazOn. Let it dry.

Kyriakos Pachadiroglou makes a peacock theme jewlery set using StazOn, VeraMark and embossing powders. green, yellow, teal, metal, circles, earrings, necklace.

Step 3

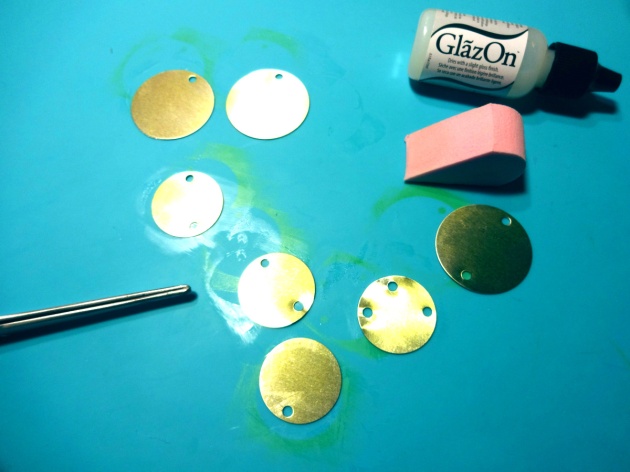
Cover with the GlazOn using an InkBlusher.

Kyriakos Pachadiroglou makes a peacock theme jewlery set using StazOn, VeraMark and embossing powders. green, yellow, teal, metal, circles, earrings, necklace.

Step 4

Continue with the Eden Green StazOn and again cover with GlazOn.

Kyriakos Pachadiroglou makes a peacock theme jewlery set using StazOn, VeraMark and embossing powders. green, yellow, teal, metal, circles, earrings, necklace.

Step 5

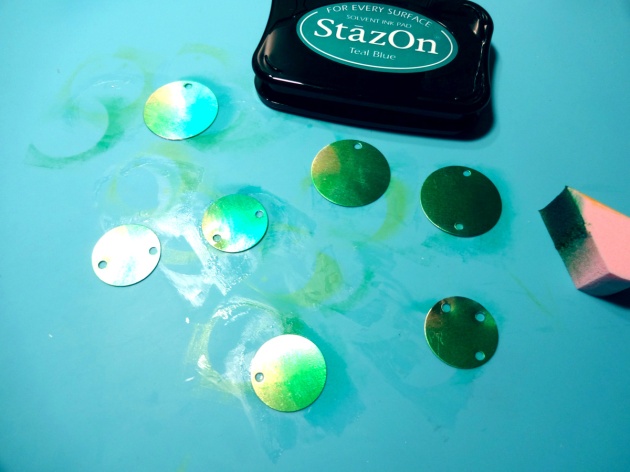
Lastly use Teal Blue StazOn and again secure with the GlazOn.

Kyriakos Pachadiroglou makes a peacock theme jewlery set using StazOn, VeraMark and embossing powders. green, yellow, teal, metal, circles, earrings, necklace.

Step 6

When it dries, pass a layer of the Green Iridescent Creative Medium on top of your StazOn layers.

Kyriakos Pachadiroglou makes a peacock theme jewlery set using StazOn, VeraMark and embossing powders. green, yellow, teal, metal, circles, earrings, necklace.

Step 7

Partially stamp the peacock stamp with VersaMark, cover with the Imagine’s Black Embossing Powder and heat with a heat gun. Finish by connecting the metal circles with jump rings and connecting them on a cord.

Kyriakos Pachadiroglou makes a peacock theme jewlery set using StazOn, VeraMark and embossing powders. green, yellow, teal, metal, circles, earrings, necklace.

StazOn on metal creates a brilliant glow and it will shine through on jewelry projects like this one!

Supplies

Imagine
Other
  • Viva – peacock feathers stamp
  • Black cord
  • Gold color jump rings
  • Cold color beads
  • Earring hooks
  • Jewelers pliers
  • Metal hole punch


Save

Save

Make Decor with a Fantastic Golden Touch

Perhaps Valentine’s Day also needs a touch of home decor to set the right mood for your loved one! Jessica Litman created this shimmery heart banner to add a little pizzazz to the room. We imagine this banner would look great in combination with flowers and a card. Kyriakos Pachadiroglou took a more earthy route and created a wood block piece that expresses sentiments associated with our Heart of Gold theme.

jessica litman creates this beautiful banner for Valentine's Day using Delicata White Shimmer and Imagine Embossing Clear.

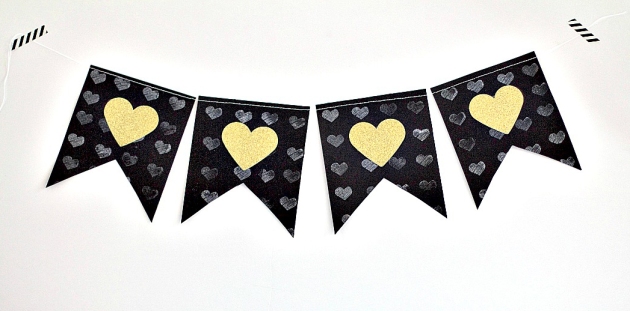
With Valentine’s Day coming up, Jessica Litman felt that creating a banner to decorate would be the perfect fit for the holiday! This project allows a ton of flexibility because the banner can be as long or small as space allows! Jessica started by embossing heart stamps using Delicata White Shimmer and Clear Embossing Powder creating the background on black paper. Delicata is a metallic pigment ink and works great with embossing powders. She then cut the banner shapes and attached the gold heart to the center and finished the banner with a sewing machine. If you do not have a sewing machine then attaching a string to the back with adhesives should also work.

jessica litman creates this beautiful banner for Valentine's Day using Delicata White Shimmer and Imagine Embossing Clear.

Supplies

Imagine
Other
  • Heat tool
  • Adhesive
  • Black cardstock 12 x 12”
  • Gold cardstock
  • Heart punch
  • Heart stamp
  • Sewing machine
  • Scissors
  • Paper cutter

Kyriakos Pachadiroglou uses Goosebumps and walnut ink on wood for this lovely piece of home decor.

Describe a person with a heart of gold and you will get words likes “believe”, “respect”, “patience”, “care”, “love” and much more. Kyriakos choose these words to convey a person with such qualities. He marked these sentiments on a slice of wood and enhanced it by a golden heart and embossing powder. Words are hand lettered with a paintbrush with the magic of GooseBumps and then covered with Walnut Ink to create a resist effect which almost looks hand carved.

Supplies

Imagine
Other
  • Slice of wood
  • Buddly Crafts – 40mm wooden heart
  • Gold metallic embellishments
  • Crafty Individuals – CI258 stamp
  • Binder twine
  • Rhinestones
  • Paint brush
  • Hot glue gun

Save

Save

Make a Lavish Trifold and Deckled Greeting Cards

This month the theme at Imagine is Heart of Gold and the color of the month is Rose … a beautiful duo! Imagine artists Mischelle Smith and Neva Cole present two lovely renditions of this theme with a surprising tri-fold card and a soft deckled-edge card. These two cards contrast each other visually with a sharp verses soft look but compliment each other in every other way sticking to the core of our theme.

mischelle smith tri fold rose valentine's card


2017_february_ms_tripanelcard_main_topview

Mischelle decided to take this duo and create a heartwarming card made to be put on display. This tri-panel card comes together with a little detailing and is sure to spark curiosity with its easy-on-the-eyes design. Using a corner punch, bone folder, scoring board, Mischelle crafted the tri-fold shape. Then with embossing, watercoloring and diecutting, she created a diverse composition focusing the eye on the center panel. Beautiful!

Supplies

Imagine
Other
  • Close To My Heart – Hello Lovely
  • All About the Gold Fundamentals overlays
  • Hello Lovely – Cardmaking Thin Cuts Bundle
  • Watercolor paper
  • Waterbrush
  • Adhesive-backed gems
  • Corner rounder
  • Acrylic block
  • White doily
  • Gold metallic thread
  • Foam tape
  • Adhesive
  • Die cut machine
  • Scissors
  • Score board
  • Bone folder
  • Heat tool

Falling for You greeting card Valentine Card.

Neva choose to use one of her favorite combinations for the “Heart of Gold” challenge—Delicata Golden Glitz embossed with Clear Embossing powder. Deckled edges add to the soft touch along with the whimsical hearts and sweet sentiment. A bit of Memento in Angel Pink adds just the blush of color to finish the card.

Supplies

Imagine
Other
  • Unity – Moon Beams and Heart Strings stamp
  • Deckle edged ruler
  • Dimensional foam adhesive
  • Heat tool

Ink Blending a Background

Wee Ghosties Halloween Card

by Mary Prasad

Handmade halloween card featuring stamped and colored ghosts, haunted house and tree as well as a blended ink background with resist Stars and a full moon created by blending Memento inks over GooseBumps spray by Mary Prasad.

Learn how to create this blended background using Memento Inks and InkBlushers. The stars are created easily by splattering a little GooseBumps before inking up the background.

Skill: Advanced
Time: 1 hour + drying time

Supplies

Imagine
  • Memento Inkpads – Cantaloupe, Dandelion, Elderberry, Paris Dusk, Tangelo, Tuxedo Black
  • Memento Dual Tip Marker – Tuxedo Black
  • StazOn Inkpad – Jet Black
  • GooseBumps Texture Spray – Original
  • InkBlushers
  • BrushStix
  • Tear It! Tape
Other
  • Lawn Fawn – Happy Haunting stemp set
  • Hillside Die – Outdoor Edges die set
  • Cardstock – white, dark green, purple
  • Colored pencils
  • Dimensional adhesive
  • Paint brush
  • Stamp positioner or acrylic block
  • Detail cutting knife
  • Detail scissors
  • Cutting Mat
  • Paper towel
  • Water

Save

Save

Save